2N EasyRoute Scheda tecnica

2N®EasyRoute
1
Quick setup manual
For connection 2N®EasyRoute to the Internet and to you computer you are going to need:
•1x 2N®EasyRoute device
•1x Power adapter (12V/2A D )
•1x SMA antenna
•1x UTP wire (Ethernet networ wire)
•1x CD with manual
•1x Telephone cable (if analogue phone is connected)
ALL THIS ACESSORIES INCLUDES THE 2N®EASYROUTE BOX
•SIM card (with DATA, possibly Voice tariff).
• APN title for connection to the Internet. Often used APN is: Internet and Dial: *99#
Installation
1. onnect SMA antenna firs
2. Insert your SIM card (DATA tariff needed)
3. onnect 2N® EasyRoute to your P or Laptop with network UTP wire (Ethernet wire).
4. Plug in the Power adapter
Setup: Internet connection, Wi-Fi enable
1. In your P must be installed T P/IP protocol, set to get IP address automatically from DH P
server. Most operating systems use this setting as a default.
2. Open any Web browser: Internet Explorer, Mozilla Firefox, Google hrome etc.
3. In the text window write the IP address: 192.168.1.1 you will be reconnected to the basic
window of 2N®EasyRoute configuration interface.
User name and Pass ord details:
There are two options, how to Log in to the 2N®EasyRoute device.
a. As an ADMIN. Fill in details: User: admin; Password: admin – you will be connected as an
administrator (you will have all rights to set up the device and change the configuration)
b. As a User. Fill in details: User: user; Password: user - (rights only for sending SMS and status
window of the device. For example: signal strength, status of nternet connection etc.)
4. After successful login in to the configuration interface of 2N®EasyRoute you can change all
setting and make additional set up.

2N®EasyRoute
2
5.If you have active on your SIM card PIN, continue on menu SETUP→ELULAR. Fill in the PIN
number of the SIM card. Do not forget SAVE all change, which you have done by clicking on
symbol floppy picture on the right bottom corner.
6. In menu SETUP→Internet (Point-to-Point Protocol), check the details of APN and Dial
number. You should get those details with the SIM card from operator. If the APN is known in
the database of APN. 2N®EasyRoute will use this APN automatically.
7. Go to the menu STATUS. You can check here the router (GW) has been successfully logged in
to the network and the connection to the Internet is established. In menu STATUS you should
see status Internet: Connected. You can start browse on the Internet.
8. If you get status: Disconnected. onnect the EasyRoute by click on the symbol of the ircle
with arrow on the right bottom corner. Wait for a while, when the router (GW) will be
connected to the Internet. Status will change for Connected.
Tip: You can connect / disconnect the device from the Internet like that anytime you would
like.
9. Successfully login SIM card to the network is indicate by blinking of Yellow led diode.
Enable Wi-Fi
•Go to the menu SETUP → Wireless
•Tick box Enable and save it on right bottom corner (symbol of Floppy).
•Wi-Fi is indicate by blinking green LED diode
1. When Wi-Fi enable, we do recommend for your wireless network safety set up in menu
Wireless → Security password for Wi-Fi connection.
You can choose from encryption codes as a (WEP, WPA, WPA2, WPA+WPA2). It is good to
know, which encryption does support your P or Laptop. Most common encryption key are:
WEP and WPA. hoose encryption alphabet for the key: ASCII, HEX.
HEX= symbols which you can use are: (A-F, 0-9) - length for WEP key is 13 or 26 characters.
ASCII= all symbols from ASII table. Length for WEP key is 5 or 10 characters.
On all other keys (WAP, WAP2) is length of the password minimum of 8 characters.
2. Write the security KEY in the window.
3. You will be asked for this KEY (password), when you would like to be connected to the
2N®EasyRoute through Wi-Fi from your laptop/computer.
4. For leaving the configuration interface use the LOG OUT button on the left bottom corner.
2N®EasyRoute
3
RESET BUTTON
Reset button pressed for short period of time restarts the 2N®EasyRoute. Pressed for more than
10sec reset all set to default values.
UMTS / GSM net ork
The speed and quality of connection depends on UMTS / GSM operator, accessible services, signal
coverage and status of network. Technical parameters are maximal, for detailed information about
accessible service contact your mobile operator.
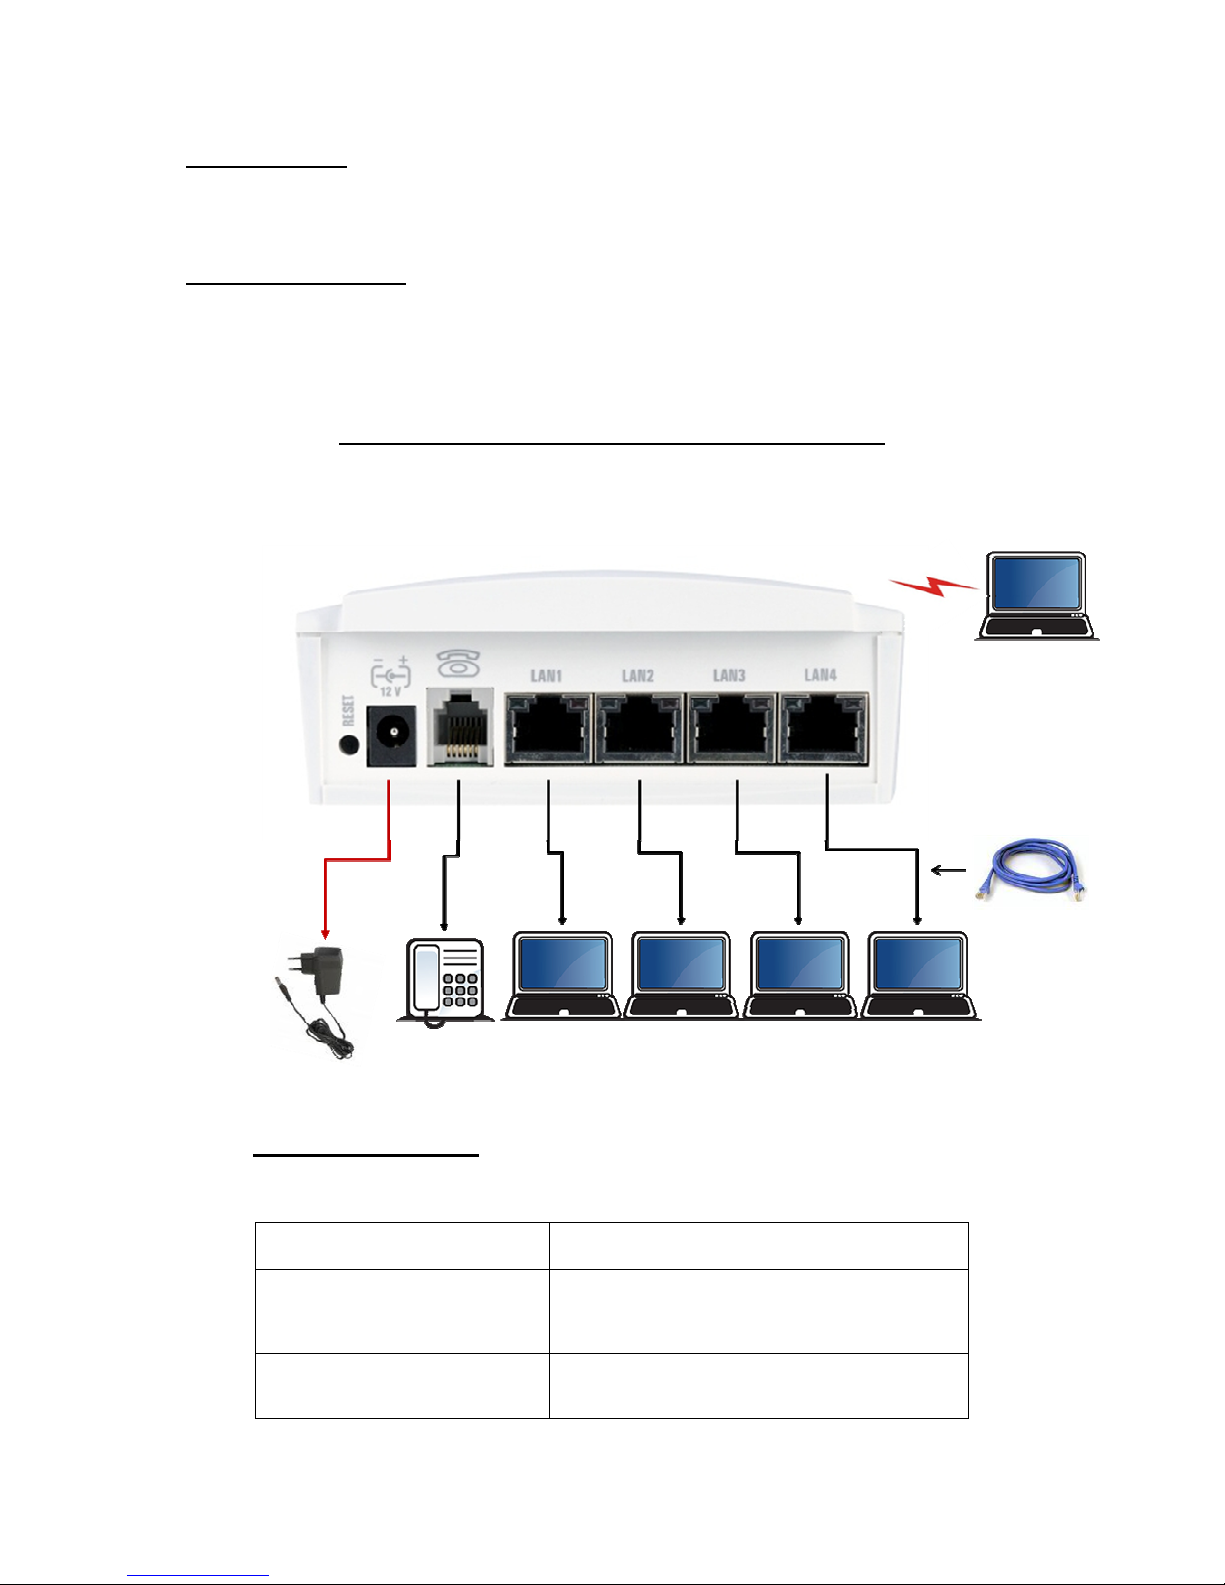
Connection diagram of 2N®EasyRoute
Indication LED table:
Po er supply •Blued led diode: po er on
Net ork
•Yello led diode – UMTS/GSM status
•Green led– Wi-Fi status
•Flashes – net ork active
•Length of flash – traffic indication
Phone line
•no light = standby
•flashes quickly = line off-hook or ringing
•light = call
Power adapter
INPUT: 110V/240V AC
OUTPUT: 12V/2A DC
Analogue
phone
-
Option to connect
up to
4 PC
/
Laptops
through
Ethernet / UTP
wire
Ethernet /
UTP wire
Wireless connection
for PC or Laptops
through inbuilt WiFi
Altri manuali per EasyRoute
4
Altri manuali 2N Router wireless


