
a2b Obree Manuale utente

1
Owner’s manual Obree

1.0 Introduction 4
2.0 Important information 5
3.0 Your A2B 6
4.0 Please familiarise with the functions of your A2B
before your first tour 12
5.0 Operating instructions display and motor 16
5.1.1 Important instructions – please observe in any case! 16
5.1.2 Intended use of the neodrives components 16
5.1.3 Admissible operating conditions / places of use 17
5.1.4 Standard scope of supply 17
5.1.5 Technical data 18
5.2. Controller 20
5.3. smart Man-Machine Interface (sMMI) 20
5.3.1 Fitting and removing the sMMI 22
5.3.2 Functions of the sMMI 23
5.3.2.1 Switching on and off 23
5.3.2.2 Start menu 24
5.3.2.3
Dynamo function and switch-on routine "light“ (optional)
25
5.3.2.3 Selection of the assistance level 25
5.3.2.5 Activation of recuperation 26
5.3.2.6 Braking assistant 27
5.3.2.7 Walk assist / Walk assist button 28
5.3.2.8 Date and time 30
Contents
5.3.2.9 Assist mode 30
5.3.2.10 Display of travelling information 31
5.3.2.11 Display of information and warnings 32
5.3.2.12 Easy Display mode 33
5.3.2.13 Other settings 33
5.3.2.14 USB port 34
5.3.2.15 Programming options by the specialist dealer 34
5.3.2.16 Firmware updates and their transmission 35
5.3.2.17 Information on the sMMI plugs 36
5.4. Thermal management 36
5.5. Motor 38
5.5.1 Removal of the drive wheel 38
5.5.2 Attachment of the drive wheel 40
5.6. Cleaning of the motor and sMMI 41
5.6.1 Motor 41
5.6.2 sMMI 42
5.7. Transport 42
5.8. Warnings 42
5.9. Error indications and possible remedies 42

3
6.0 Operating instructions battery 44
6.1.1 Important instructions - please observe in any case. 44
5.1.2 Intended use of the neodrives components 44
6.1.3 Admissible operating conditions 45
6.1.4 Standard scope of supply 45
6.1.5 Technical data 45
6.1.6 Main elements at a glance 46
6.2. Safety instructions and warnings 47
6.2.1 on the use of the battery 47
6.2.2 on the storage of the battery 48
6.2.3 on the charging process 48
6.2.4 on the transport and dispatch 49
6.2.5 on the charger 49
6.3. Startup 51
6.3.1 Information on the operating modes 51
6.3.2 Insertion of the battery 51
6.3.3 Switch-on of the battery 52
6.3.4 Display of the state of charge 52
6.4. Removal of the battery 53
6.4.1 Switching off the battery 53
6.4.2 Removing the battery 53
6.5. Charging the battery 54
6.5.1 Connecting the charger 54
6.5.2 Charging process 54
6.5.3 LED indications during charging process 55
6.6. Keys 56
6.7. Cleaning the battery 56
6.8. Disposal 56
6.9. Liability 56
7.0 Important safety instructions before your first tour 57
8.0 Maintenance 60
9.0 Vehicle cleaning 66
10.0 Technical data 67
11.0 Warranty and safety information 68
12.0 Disposal 70
13.0 Maintenance schedule 70
14.0 Product registration 78

4
Owner’s manual
1.0 Introduction
Welcome and congratulations on buying your new A2B Obree, the
electric bike that’s taking transport in a whole new direction. It’s the
revolutionary way to get to work, visit the shops or just get some
fresh air. Compared to jumping in the car, an ebike is a lot more fun,
easier to park and will reduce your fuel costs as well as your impact
on the environment… as you’ll soon find out! Feeling energetic?
You can ride your new A2B Obree powered off and then switch
the assistance on for hills and headwinds. We dedicated our new
bikes to pioneers that redefined the way we do things in the modern
World. As a tribute, the A2B Obree bike was named after Graeme
Obree who took the limits of the hour record in track cycling to an
unprecedented level through his radical bicycle construction designs.
WARNING
• Wear light fluorescent clothing at night.
• Your existing insurance policies may not provide accident cover
for your A2B Obree. Contact your insurance company or agent
for information.
• This owner’s manual makes no representation about the safe
use of the A2B Obree under all conditions. See your A2B dealer
for all service, repairs or maintenance and for referral to suitable
classes, clinics and books on cycling.
1.1. Intended use of your A2B
Your A2B equipped with the neodrives drive system is a Pedelec
(Pedal Electric Cycle) for usual transport of one person in public road
traffic. Any adjustments and repairs of the A2B and its components
will only be regarded as intended use as far as they are described
and permitted in these operating instructions, the instructions from
the component manufacturers or any further documents provided
upon purchase of the Pedelec. The manufacturer does not assume
any liability for damage caused negligently due to misuse, improper
use, improper or omitted maintenance or repairs. The driver is
responsible for checking the Pedelec as prescribed, having any
necessary works carried out and using it appropriately.
These operating instructions describe the use of your A2B and
its components and correspond to the state of the art at the time
of printing. The manufacturer reserves the right to make changes
resulting from the further development of mechanics, the software or
from any statutory requirements.
UK office
Hero Eco Ltd
80 Coleman St
London
EC2R 5BJ
www.wearea2b.com
*’ The A2B Obree electric bicycle is here in after in short referred to as ”A2B”.
US office
Hero Eco, Inc.
207 97th St.
San Francisco,
CA 94103
USA
German office
Hero Eco Ltd
Reichenberger Strasse 124
10999 Berlin
Germany

5
2.0 Important information
This owner’s manual contains important safety, performance and service information. Please ensure that users of your A2B
Obree read and understand the following important warnings and cautions before their first trip. If you have any questions or
are not sure about any instructions in this owner’s manual ask your A2B dealer. Read and understand the following warnings
and cautions. If your A2B Obree is used by others, please show this section to them so that they are aware of these important
warnings to reduce the risk of an accident. Important terms. Throughout the manual, the following symbols and terms call your
attention to important warnings, cautions and notes. Read, understand and follow them whilst using your A2B Obree.
Please ensure that all users of your A2B read and understand the following important information.
Important symbols
Indicates a potentially dangerous situation which may lead to a severe injury, material or equipment damage or unwanted system
failure if this situation is not prevented.
Indicates useful or other important, relevant information.
If you have any questions or do not understand particular instructions of this user manual, please ask your A2B specialist dealer or contact
• According to the Straßenverkehrszulassungsordnung (StVZO)
[Road traffic approval regulations], a bicycle must be equipped
with two operative brakes which are independent of each other,
a clearly audible bell, headlamp, rear lamp, pedal reflectors, side
reflectors for wheels or integrated reflective strips on the tyre and
front and rear reflectors.
• Your A2B is suitable for riding on pavements and cycle highways
and paths. Therefore, do not ride beyond paved ways or off-road. Do
not use the A2B across water, for off-road jumps and sports events.
• We recommend to always wear an approved bicycle helmet when
using the A2B and to additionally wear light or reflective clothes
at night.
• Make sure that you know and observe the rules of behaviour
for safe and responsible cycling. When riding the A2B, there is
always a risk of severe / fatal injuries or material damage resulting
from an accident. By deciding to ride the A2B you assume the full
responsibility for this risk.
• Your current insurance policies might not include accident
insurance coverage for using the A2B. Please ask your insurance
or insurance agent concerning this matter.
• This user manual does not express any guarantee as to the safe
use of the A2B under all conditions.

6
Owner’s manual
3.0 Your A2B
3.1 Components
1
2
323
5
6
8
18
10
9
13
12
14
11
16
15
17
20
24
21
7
4
22
19
1. Saddle (seat)
2. Saddle post
3. Quick release
4. Front splash guard
5. Front tyre
6. Front wheel rim
7. Front disk brake and rotor
8. Pedals, pedal crank and chainring
9. Chain
10. Motor
11. Stand
12. Rear wheel rim
13. Rear tyre
14. Derailleur and freewheel
15. Reflector
16. Rear splash guard
17. Battery
18. LED rear light
19. Z reflector on battery
20. Battery plug
21. Frame
22. sMMI
23. Headlamp
24. Quick release front wheel
7
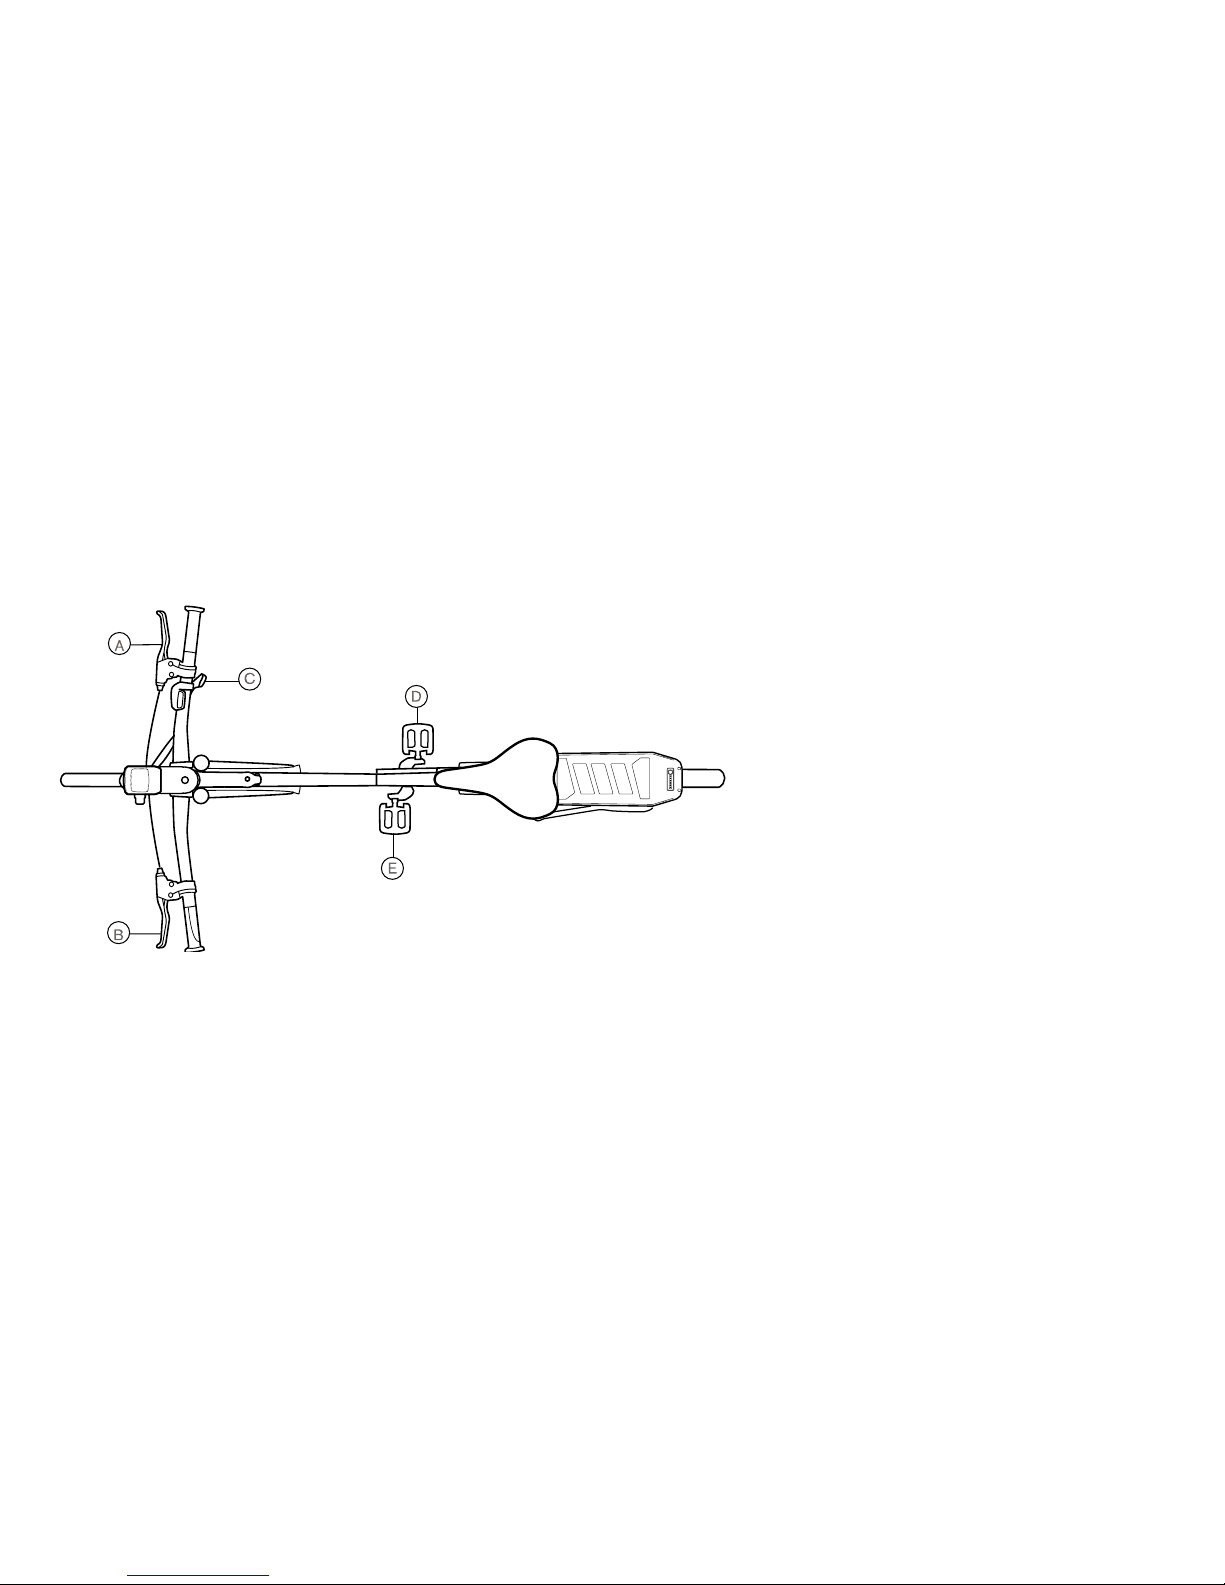
3.1 Components A. Right-hand brake lever
(for rear wheel brake)
B. Left-hand brake lever
(for front wheel brake)
C. Shift lever
D. Right pedal
E. Left pedal

8
Owner’s manual
3.2 Replacement of components, fitting of accessories
Before mounting any components or accessories (including
different tyres), you should ask your certified A2B specialist dealer
if they are appropriate for your A2B.
Please read and observe the instructions for the respective
components or accessories you have bought for your A2B. Please
observe the manufacturer's instructions for the components or
accessories if they are different from these instructions.
As all mechanical components your A2B is subject to wear and
tear as well. Especially in case of high strain, the user must watch
out for wear and tear. If a component's life cycle is exceeded, this
component may suddenly become inoperative leading to severe
or even fatal injuries. Therefore, please watch out for signs of wear
and tear, such as cracks, scratches and changes of colour in spots
which are subject to high strain, e.g. on the frame, fork, wheels and
handlebars, indicating that the life cycle has been completed or
even exceeded. Have worn components replaced immediately by
your specialist dealer.
If you do not check components or accessories for fitness and
mount, use and maintain them properly, this may lead to severe or
even fatal injuries.
The use of non-original components or spare parts may
endanger your A2B's safety and void the warranty.
The replacement of components or fitting of accessories will be
made at your own risk, since the fitness, reliability or safety of these
parts for use with your A2B may not have been checked by Hero
Eco.
3.3 Adjustment of brake levers
Are you able to easily operate the brake levers? If not, take your
A2B to an A2B specialist dealer to have the brake levers' angle
adjusted.
Alternatively, you may adjust the brake levers' angle on your own as
indicated below:
1. Loosen the screw below the brake lever using an appropriate
Allen key.
2. Adjust the angle as required.
3. Tighten the screw and make sure the brake lever is retained
securely in place.
For adjustment of the brakes, you should take your A2B to an
A2B specialist dealer.

9
3.4 Adjustment of the seat height
The seat height may have to be adjusted. Please ask your A2B
specialist dealer to adjust the seat height before your first tour. You
may also adjust the seat height on your own as indicated below:
Determination of the correct driver's seat height
There are several ways of determining the correct seat height; the
method which can be carried out without any further auxiliary means
is described in the following: Sit on the saddle and stretch one leg.
Put your foot's heel on the pedal which is on the lowest point of the
crank turn. Your knee should now be almost straightened.
If you are sitting straight on the saddle while having this position,
the saddle's height is correct.
Of course, you then do not drive with legs stretched. If you put your
foot on the pedal while having the correct driving position (ball of
foot and metatarsophalangeal joint above the pedal axle), the knee
will remain slightly angled also on the lowest point of crank turn if
the saddle height has been adjusted correctly.
A short test ride is recommended to find out if the saddle is too high.
If the pelvis tilts to the right and the left in the rhythm of pedalling, the
saddle is too high. If the saddle is too low, you will usually find it out
only after many kilometres through pain in the knees.

10
Owner’s manual
Height adjustment
1. The seat height can be adjusted by loosening the quick release
for the saddle post.
2. Position the saddle at the desired height. Do NOT position the
saddle higher than the minimum insertion mark located on the
saddle post BY NO MEANS.
3. Push the lever of the quick release towards the frame, until it will
be closed again. The lever must not stick out to avoid danger
of injuries. The lever is safely attached if you must use efforts
to push it into the closed position. The efforts are appropriate if
the lever leaves a mark on the palm of your hand when pressing.
A properly closed quick-release cannot be moved anymore
unless it is reopened as specified above. If you can move the
mechanism slightly, open the lever of the quick release, turn the
adjusting nut by another 180° and try again.
Frame Height
Frame Height
Inside Leg Height
Frame Height
1 inch / 2,5 cm
Clearance
Inside Leg Height
4. After height adjustment, check if the saddle cannot be moved in
any direction.
An improperly attached saddle may lead to severe or even
fatal injuries. Ensure that the saddle clamp screw (saddle post -
saddle) has been tightened using 27 Nm.
• This user manual does not express any guarantee as to the safe
use of the A2B under all conditions.
Altri manuali per Obree
1
Indice
Altri manuali a2b Bicicletta


