Acer Liquid E600 Manuale utente


2 -
© 2014 All Rights Reserved
Acer Liquid E600 User’s Manual
Model: E600
This revision: October 2014
Acer Liquid E600 Smartphone
Model number: _______________________________________________
Serial number: _______________________________________________
Date of purchase: ____________________________________________
Place of purchase: ___________________________________________
Important
This manual contains proprietary information that is protected by
copyright laws. The information contained in this manual is subject to
change without notice. Images provided herein are for reference only
and may contain information or features that do not apply to your
computer. Acer Group shall not be liable for technical or editorial errors
or omissions contained in this manual.
Sign up for an Acer ID and enjoy great benefits
Open the Acer Portal app from the Start screen to sign up for an Acer ID or
sign in if you already have an Acer ID.
There are three great reasons for you to get an Acer ID:
• Build Your Own Cloud with Acer BYOC.
• Get the latest offers and product information.
• Register your device for warranty service.
For more information, please visit the AcerCloud website:
www.acer.com/byoc-start

Table of contents - 3
TABLE OF CONTENTS
Setting up 5
Unpacking your smartphone.................... 5
Getting to know your smartphone............ 5
Views .......................................................... 5
Charging the battery ................................... 7
Installing a SIM or microSD card ............. 7
SIM card lock .............................................. 8
Using your smartphone 9
Turning on for the first time...................... 9
Sign in to or create a Google account ..... 9
Entering your PIN........................................ 9
Activating a new SIM card .......................... 9
Locking your smartphone ........................ 9
Waking your smartphone ......................... 10
Navigating through menus and options . 10
Using the touchscreen........................... 11
Onscreen keyboards ............................. 12
Google keyboard....................................... 12
Swype ....................................................... 13
Predictive text ........................................... 14
The Home screen .................................. 14
Search....................................................... 15
The extended Home screen...................... 15
Personalizing the Home screen ................ 15
The Application (Apps) menu.................... 18
Notification and status area ...................... 18
Multitasking ............................................... 19
Managing contacts 20
Managing your contacts ........................ 20
Adding a contact ....................................... 20
Making calls 22
Before making a call .............................. 22
Making a call.......................................... 23
Dialing a number from Call History ........... 23
Viewing missed calls................................. 24
Making a call to one of your contacts........ 24
Dialing an international number ................ 24
Direct dial widget....................................... 25
The voice call screen............................. 25
Answering or declining a call .................... 26
Conference calls ....................................... 27
Internet calling 28
Adding an internet calling account......... 28
Editing or removing an internet calling
account .................................................. 28
Using internet calling ............................. 28
Receiving internet calls.......................... 28
Calling a contact’s internet calling
address.................................................. 29
Calling a phone number using internet
calling..................................................... 29
Messaging 30
Creating a new message ....................... 30
Replying to a message .......................... 31
Multimedia messages ............................ 32
Receiving multimedia messages .............. 32
Going online 34
Browsing the internet ............................. 34
Using the browser .................................... 34
Setting up Email..................................... 35
Google services ..................................... 35
Setting up your Google email ................... 36
Voice search ............................................. 36
Play Store ................................................. 37
Google Hangouts...................................... 38
Maps, Navigation, Places and Latitude .... 39
Using the Camera 40
Camera/camcorder icons and indicators 40
Settings menus ......................................... 42
Taking a photo ....................................... 43
Taking a panoramic photo ........................ 43
Shooting a video .................................... 44
Supported formats .................................... 44
Viewing photos and videos .................... 44
Geotagging ............................................ 44
Advanced settings 45
Putting your smartphone in Airplane
mode...................................................... 45
Turning Airplane mode on or off ............... 45
Restarting your phone ........................... 46
Adjusting settings................................... 46
Activating or deactivating connections...... 46
Phone network settings ............................ 48
Phone settings .......................................... 49
Sound ....................................................... 50
Audio profiles ............................................ 50
Display ...................................................... 51
Setting the date and time.......................... 51
Setting alarms........................................... 51
Changing language and text options ........ 52
Connecting to a PC................................ 52
Synchronization ........................................ 53
Applications (apps) ................................ 54
Closing an app.......................................... 54
Uninstalling an app ................................... 54
Restoring to factory settings .................. 55
Accessories and tips 56
Using the headset.................................. 56
Using a Bluetooth headset..................... 56
Creating a new access point..................... 56

4 - Table of contents
Inserting a microSD card ....................... 57
Appendix 58
FAQ and troubleshooting ....................... 58
Other sources of help............................. 60
Warnings and precautions 61
Medical devices ....................................... 62
Vehicles ................................................... 63
Potentially explosive environments.......... 63
Emergency calls..................................... 64
Taking care of your smartphone ............ 64
Specifications ......................................... 66
Performance ............................................. 66
Display ...................................................... 66
Multimedia ................................................ 66
USB connector.......................................... 66
Connectivity .............................................. 67
Camera ..................................................... 67
Expansion ................................................. 67
Battery ...................................................... 67
Dimensions ............................................... 68
End User License Agreement 69

Setting up - 5
SETTING UP
Unpacking your smartphone
Your new smartphone comes packed in a protective box. Carefully
unpack the box and remove the contents. If any of the following items
is missing or damaged, contact your dealer immediately:
• Your Acer E600 smartphone
•QuickGuide
• USB cable
• AC adapter
• Headset
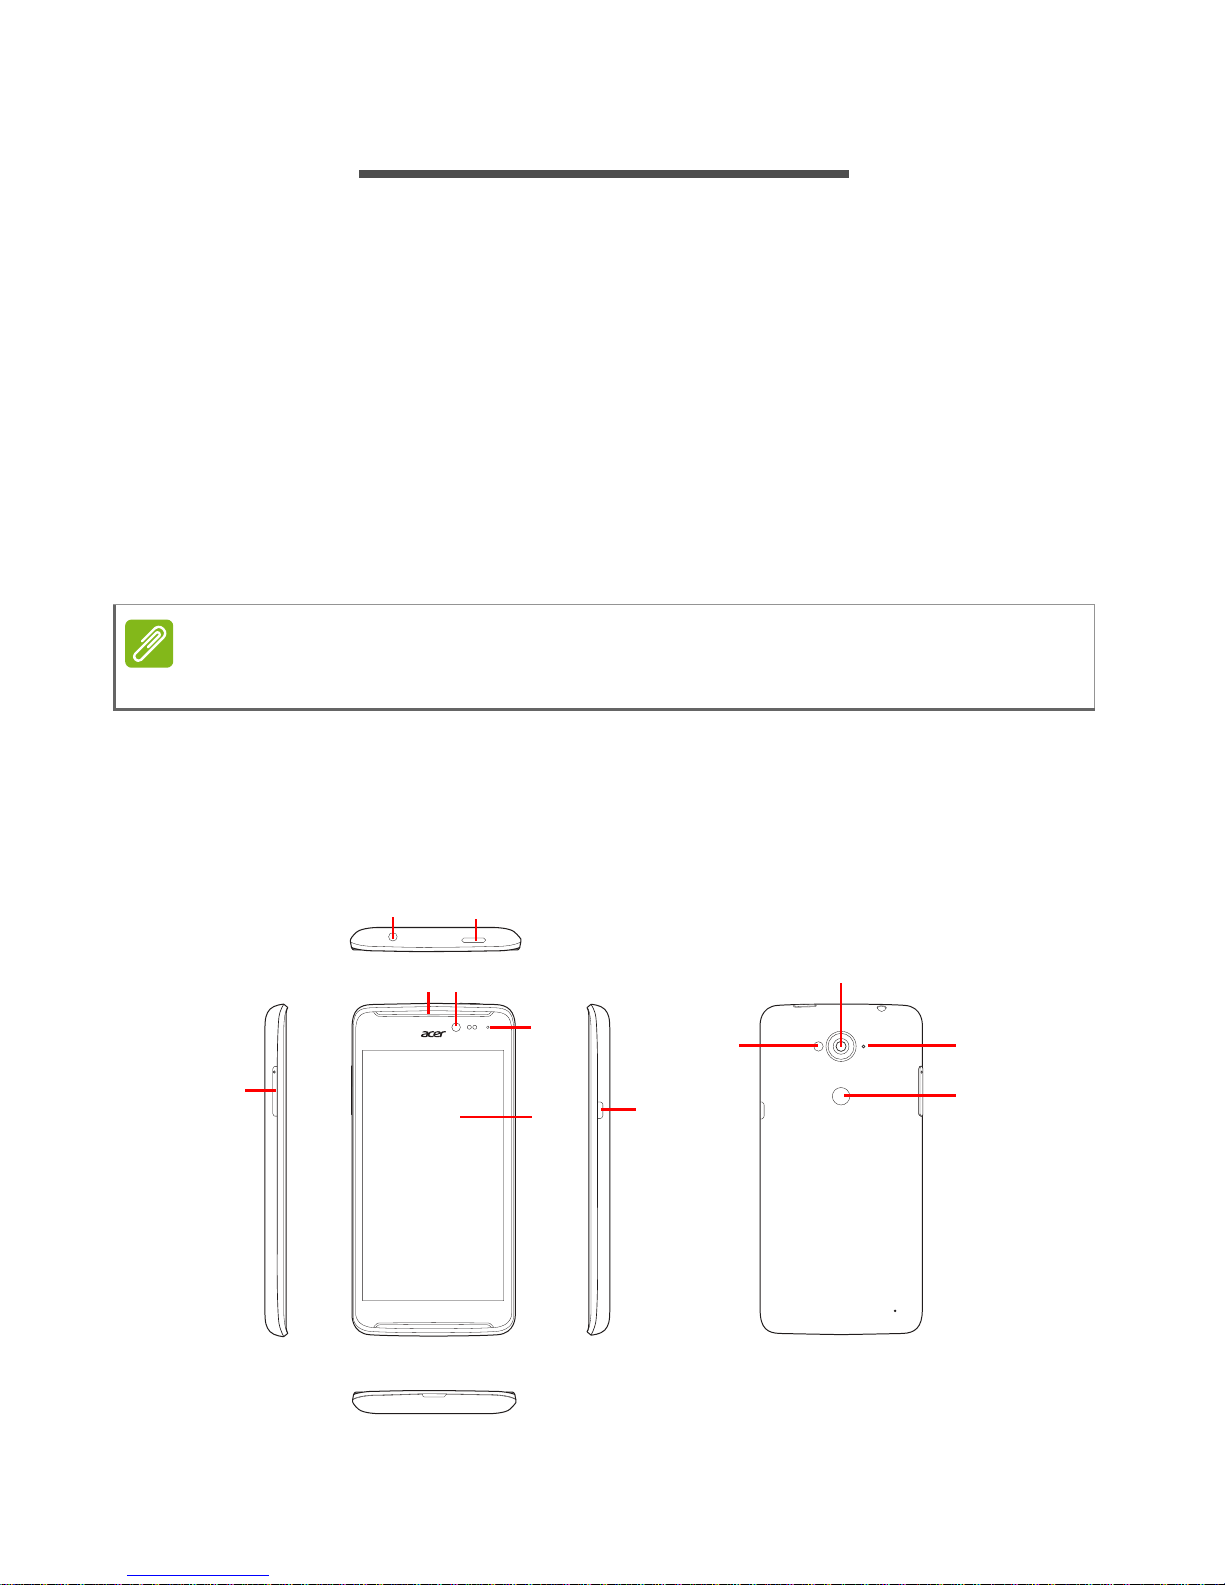
Getting to know your smartphone
Views
1
23
45
6
78
9
10
11
12
Note
In-box content varies depending on country and region.

6 - Setting up
No. Item Description
1 Volume up/down button Increases or decreases the phone volume.
2 3.5 mm headphone jack Connects to stereo headphones.
3 Power button Press to turn the screen on/off or enter sleep
mode; press and hold to turn the smartphone on
or off.
4 Phone speaker Emits audio from your smartphone; suitable for
holding to your ear.
5 Front-facing camera Fixed-focus 0.3 MP camera for video chats and
self-portrait images.
6 LED indicator Indicates when the phone is connected as a
media device.
7 Touchscreen 5-inch, 854 x 480 pixel capacitive touchscreen to
display data, phone content and enter information.
8 Micro USB connector Connects to a USB cable/charger.
9 Flash LED flash for camera.
10 Camera Auto-focus 8 MP camera for taking high-resolution
images.
11 Microphone Internal microphone.
12 AcerRAPID button Shortcut button to answer incoming calls. Long
press to launch the camera app; short press to
launch a designated app (default app is Google
Play Music).

Setting up - 7
Charging the battery
For initial use, you need to charge your smartphone for eight hours. After
that you can recharge the battery as needed.
Connect the AC adapter cord to the micro USB connector on your
smartphone.
Installing a SIM or microSD card
To take full advantage of your smartphone’s telephony capabilities,
you must install a SIM card.
Additionally, you may wish to increase your smartphone’s storage by
inserting a microSD card into the labeled slot.
1. Turn off the phone by pressing and holding the power button.
Note
The information in this UM may vary according to the number of SIMs you are
using.

8 - Setting up
2. Insert your fingernail into the notch located at the bottom of the
phone and remove the cover as illustrated.
3. Ensure the microSD card and SIM are inserted all the way as
illustrated and gently snap the cover back in place.
SIM card lock
Your smartphone may come with a SIM card lock, i.e., you will only be
able to use the SIM card provided by your network operator.
To cancel the SIM lock, contact your network provider.
Note
Your smartphone may be equipped with one or two SIM slots depending on
model.

Using your smartphone - 9
USING YOUR SMARTPHONE
Turning on for the first time
To turn on your smartphone for the first time, press and hold the
power button until the screen turns on. You will then be asked to
configure some settings before you can use your smartphone.
Follow the onscreen instructions to complete setup.
Sign in to or create a Google account
If you have Internet access, your smartphone allows you to
synchronize information with a Google account.
You may create or sign in to an existing Google account, which will be
used to synchronize your contact list, email, calendar and other
information.Open the Application menu and then tap Settings > Add
account. Tap the type of account you want to add (e.g. Google). You
will need internet access to complete the synchronization process.
You can create and easily access multiple Google accounts.
Entering your PIN
When you install a SIM card for the first time, you may need to enter a
PIN using the onscreen number pad.
Activating a new SIM card
If you are using your SIM card for the first time, it may require
activation. Contact your network operator for details on how to do this.
Locking your smartphone
If you will not use your smartphone for a while, briefly press the power
button to lock access. This saves power and ensures your
Important
Depending on your settings, you may be required to enter your PIN
each time you switch on the phone function.

10 - Using your smartphone
smartphone does not unintentionally use any services. Your
smartphone will lock automatically if it is not used for one minute.
Waking your smartphone
If the screen is off and the smartphone does not react to any taps on
the screen or front panel button, then it has been locked and is in
sleep mode.
Press the power button to wake your smartphone. Unlock your
smartphone by sliding your finger from one side of the screen to the
other (it works both ways).
For additional security, you may set an unlock pattern, a set of dots
that must be touched in the correct order to access the phone. Open
the Application menu and then tap Settings > Security > Screen
lock. If you forget your unlock pattern, please refer to Unlock pattern
on page 60.
You may also directly enter the lock screen apps. Tap and hold the
lock screen icon, move your finer slightly in any direction, and release.
The phone unlocks and opens that app.
Navigating through menus and options
To navigate through menus and options,
there are three buttons beneath the
screen.
Back Home Menu
Indice
Altri manuali Acer Telefono cellulare

Acer
Acer DMP300EU Manuale utente

Acer
Acer Liquid Z5 Manuale utente
Acer
Acer Iconia Talk S Manuale utente

Acer
Acer LIQUID S56 Manuale utente

Acer
Acer F900 Manuale utente

Acer
Acer E100 Manuale utente

Acer
Acer Liquid Z5 Manuale utente

Acer
Acer Liquid Z4 Manuale utente

Acer
Acer Liquid Gallant E350 Manuale utente

Acer
Acer Altos G520 series Manuale utente

Acer
Acer F900 Manuale utente

Acer
Acer V360 Manuale utente

Acer
Acer DME110 Manuale utente

Acer
Acer P400 Manuale utente

Acer
Acer G75 Manuale utente

Acer
Acer Liquid Z200 Manuale utente

Acer
Acer beTouch E210 Manuale utente

Acer
Acer Aspire E600 Manuale utente

Acer
Acer Liquid Z5 Manuale utente

Acer
Acer liquid es 100 Manuale utente