AEG DUK531160M Manuale utente

USER
MANUAL
EN User Manual
Built-In Double Oven
DUK531160M

FOR PERFECT RESULTS
Thank you for choosing this AEG product. We have created it to give you impeccable
performance for many years, with innovative technologies that help make life simpler – features
you might not find on ordinary appliances. Please spend a few minutes reading to get the very
best from it.
Visit our website to:
Get usage advice, brochures, trouble shooter, service and repair information:
www.aeg.com/support
Register your product for better service:
www.registeraeg.com
Buy Accessories, Consumables and Original spare parts for your appliance:
www.aeg.com/shop
For more recipes, hints, troubleshooting download My AEG Kitchen app.
CUSTOMER CARE AND SERVICE
Always use original spare parts.
When contacting our Authorised Service Centre, ensure that you have the following data
available: Model, PNC, Serial Number.
The information can be found on the rating plate.
Warning / Caution-Safety information
General information and tips
Environmental information
CONTENTS
1. SAFETY INFORMATION............................. 3
1.1 Children and vulnerable people
safety..................................................... 3
1.2 General Safety.................................4
2. SAFETY INSTRUCTIONS........................... 5
2.1 Installation........................................5
2.2 Electrical connection........................6
2.3 Use.................................................. 6
2.4 Care and cleaning............................7
2.5 Internal lighting................................ 7
2.6 Service.............................................8
2.7 Disposal........................................... 8
3. PRODUCT DESCRIPTION.......................... 9
3.1 General overview.............................9
3.2 Accessories..................................... 9
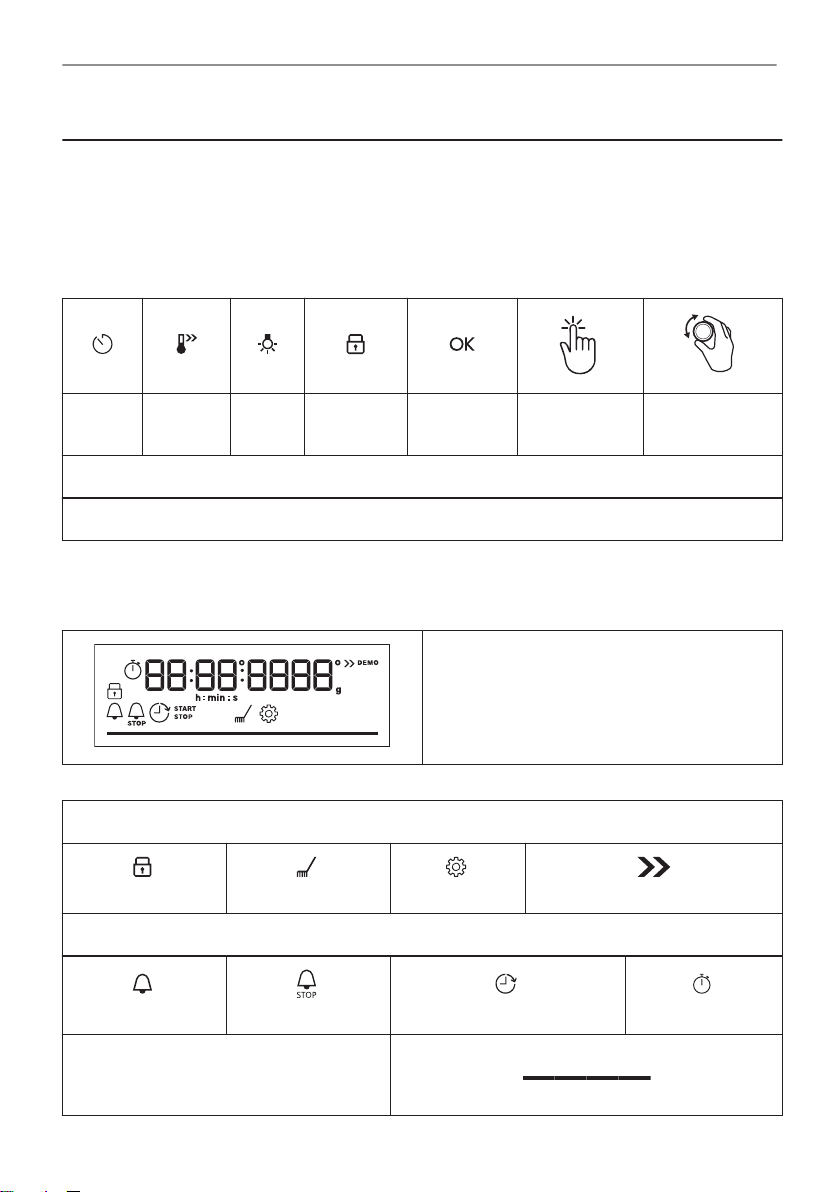
4. CONTROL PANEL.....................................10
4.1 Retractable knobs..........................10
4.2 Control panel overview.................. 10
4.3 Display........................................... 10
5. BEFORE FIRST USE.................................11
5.1 Initial cleaning................................ 11
5.2 Initial preheating............................ 11
6. DAILY USE................................................ 11
6.1 How to set: Heating functions........ 11
6.2 Main oven functions.......................12
6.3 Top oven functions........................ 13
6.4 Notes on: Moist Fan Baking...........13
7. CLOCK FUNCTIONS.................................14
7.1 Clock functions.............................. 14
7.2 How to set: Clock functions........... 14
2/32

8. USING THE ACCESSORIES.....................15
8.1 Inserting accessories..................... 15
8.2 Using Trivet and Grill- /
Roasting pan........................................16
9. ADDITIONAL FUNCTIONS....................... 17
9.1 Lock............................................... 17
9.2 Automatic switch-off.......................17
9.3 Cooling fan.....................................18
10. HINTS AND TIPS..................................... 18
10.1 Cooking recommendations.......... 18
10.2 Moist Fan Baking......................... 18
10.3 Moist Fan Baking -
recommended accessories..................20
10.4 Cooking tables for test institutes..20
11. CARE AND CLEANING...........................21
11.1 Notes on cleaning........................ 21
11.2 How to remove: Shelf supports ...22
11.3 How to use: Catalytic cleaning ....22
11.4 How to remove and install: Door..23
11.5 How to replace: Lamp..................24
12. TROUBLESHOOTING............................. 25
12.1 What to do if.................................25
12.2 Service data.................................26
13. ENERGY EFFICIENCY............................ 26
13.1 Product Information and Product
Information Sheet................................ 26
13.2 Energy saving.............................. 27
14. MENU STRUCTURE................................28
14.1 Menu............................................28
15. ENVIRONMENTAL CONCERNS.............29
Subject to change without notice.
1. SAFETY INFORMATION
Before the installation and use of the appliance, carefully read
the supplied instructions. The manufacturer is not responsible
for any injuries or damage that are the result of incorrect
installation or usage. Always keep the instructions in a safe
and accessible location for future reference.
1.1 Children and vulnerable people safety
•This appliance can be used by children aged from 8 years
and above and persons with reduced physical, sensory or
mental capabilities or lack of experience and knowledge if
they have been given supervision or instruction concerning
the use of the appliance in a safe way and understand the
hazards involved. Children of less than 8 years of age and
persons with very extensive and complex disabilities shall
be kept away from the appliance unless continuously
supervised.
•Children should be supervised to ensure that they do not
play with the appliance.
3/32
SAFETY INFORMATION

•Keep all packaging away from children and dispose of it
appropriately.
•WARNING: The appliance and its accessible parts become
hot during use. Keep children and pets away from the
appliance when in use and when cooling down.
•If the appliance has a child safety device, it should be
activated.
•Children shall not carry out cleaning and user maintenance
of the appliance without supervision.
1.2 General Safety
•This appliance is for cooking purposes only.
•This appliance is designed for single household domestic
use in an indoor environment.
•This appliance may be used in, offices, hotel guest rooms,
bed & breakfast guest rooms, farm guest houses and other
similar accommodation where such use does not exceed
(average) domestic usage levels.
•Only a qualified person must install this appliance and
replace the cable.
•Do not use the appliance before installing it in the built-in
structure.
•Disconnect the appliance from the power supply before
carrying out any maintenance.
•If the supply cord is damaged, it must be replaced by the
manufacturer, its Authorised Service Centre or similarly
qualified persons to avoid an electrical hazard.
•The means for disconnection must be incorporated in the
fixed wiring in accordance with the wiring rules.
•WARNING: Ensure that the appliance is switched off before
replacing the lamp to avoid the possibility of electric shock.
•WARNING: The appliance and its accessible parts become
hot during use. Care should be taken to avoid touching
heating elements or the surface of the appliance cavity.
4/32
SAFETY INFORMATION

•Always use oven gloves to remove or insert accessories or
ovenware.
•To remove the shelf supports first pull the front of the shelf
support and then the rear end away from the side walls.
Install the shelf supports in the opposite sequence.
•Do not use a steam cleaner to clean the appliance.
•Do not use harsh abrasive cleaners or sharp metal scrapers
to clean the glass door since they can scratch the surface,
which may result in shattering of the glass.
2. SAFETY INSTRUCTIONS
2.1 Installation
WARNING!
Only a qualified person must install this appliance.
• Remove all the packaging.
• Do not install or use a damaged appliance.
• Follow the installation instructions supplied with the appliance.
• Always take care when moving the appliance as it is heavy. Always use safety gloves and
enclosed footwear.
• Do not pull the appliance by the handle.
• Install the appliance in a safe and suitable place that meets installation requirements.
• Keep the minimum distance from other appliances and units.
• Before mounting the appliance, check if the appliance door opens without restraint.
• The appliance is equipped with an electric cooling system. It must be operated with the
electric power supply.
• The built-in unit must meet the stability requirements of DIN 68930.
Cabinet minimum height (Cabinet under the work‐
top minimum height)
(720) mm
Cabinet width 600-605 mm
Cabinet depth 550 mm
Height of the front of the appliance 715 mm
Height of the back of the appliance 708 mm
Width of the front of the appliance 594 mm
Width of the back of the appliance 538 mm
5/32
SAFETY INSTRUCTIONS

Depth of the appliance 568 mm
Built in depth of the appliance 547 mm
Depth with open door 998 mm
Ventilation opening minimum size. Opening placed
on the bottom rear side
600x20 mm
Mounting screws 3.5x25 mm
2.2 Electrical connection
WARNING!
Risk of fire and electric shock.
• All electrical connections should be made by a qualified electrician.
• The appliance must be earthed.
• Make sure that the parameters on the rating plate are compatible with the electrical ratings
of the mains power supply.
• Always use a correctly installed shockproof socket.
• Do not use multi-plug adapters and extension cables.
• Make sure not to cause damage to the mains plug and to the mains cable. Should the mains
cable need to be replaced, this must be carried out by our Authorised Service Centre.
• Do not let mains cables touch or come near the appliance door or the niche below the
appliance, especially when it operates or the door is hot.
• The shock protection of live and insulated parts must be fastened in such a way that it
cannot be removed without tools.
• Connect the mains plug to the mains socket only at the end of the installation. Make sure
that there is access to the mains plug after the installation.
• If the mains socket is loose, do not connect the mains plug.
• Do not pull the mains cable to disconnect the appliance. Always pull the mains plug.
• Use only correct isolation devices: line protecting cut-outs, fuses (screw type fuses removed
from the holder), earth leakage trips and contactors.
• The electrical installation must have an isolation device which lets you disconnect the
appliance from the mains at all poles. The isolation device must have a contact opening
width of minimum 3 mm.
• This appliance is supplied without a main plug and a main cable.
2.3 Use
WARNING!
Risk of injury, burns and electric shock or explosion.
• Do not change the specification of this appliance.
• Make sure that the ventilation openings are not blocked.
• Do not let the appliance stay unattended during operation.
• Deactivate the appliance after each use.
6/32
SAFETY INSTRUCTIONS

• Be careful when you open the appliance door while the appliance is in operation. Hot air can
release.
• Do not operate the appliance with wet hands or when it has contact with water.
• Do not apply pressure on the open door.
• Do not use the appliance as a work surface or as a storage surface.
• Open the appliance door carefully. The use of ingredients with alcohol can cause a mixture
of alcohol and air.
• Do not let sparks or open flames to come in contact with the appliance when you open the
door.
• Do not put flammable products or items that are wet with flammable products in, near or on
the appliance.
WARNING!
Risk of damage to the appliance.
• To prevent damage or discoloration to the enamel:
– do not put ovenware or other objects in the appliance directly on the bottom.
– do not put aluminium foil directly on the bottom of cavity of the appliance.
– do not put water directly into the hot appliance.
– do not keep moist dishes and food in the appliance after you finish the cooking.
– be careful when you remove or install the accessories.
• Discoloration of the enamel or stainless steel has no effect on the performance of the
appliance.
• Use a deep pan for moist cakes. Fruit juices cause stains that can be permanent.
• Always cook with the appliance door closed.
• If the appliance is installed behind a furniture panel (e.g. a door) make sure the door is never
closed when the appliance operates. Heat and moisture can build up behind a closed
furniture panel and cause subsequent damage to the appliance, the housing unit or the floor.
Do not close the furniture panel until the appliance has cooled down completely after use.
2.4 Care and cleaning
WARNING!
Risk of injury, fire, or damage to the appliance.
• Before maintenance, deactivate the appliance and disconnect the mains plug from the mains
socket.
• Make sure the appliance is cold. There is the risk that the glass panels can break.
• Replace immediately the door glass panels when they are damaged. Contact the Authorised
Service Centre.
• Be careful when you remove the door from the appliance. The door is heavy!
• Clean regularly the appliance to prevent the deterioration of the surface material.
• Clean the appliance with a moist soft cloth. Use only neutral detergents. Do not use abrasive
products, abrasive cleaning pads, solvents or metal objects.
• If you use an oven spray, follow the safety instructions on its packaging.
• Do not clean the catalytic enamel with detergents.
2.5 Internal lighting
WARNING!
Risk of electric shock.
7/32
SAFETY INSTRUCTIONS

• Concerning the lamp(s) inside this product and spare part lamps sold separately: These
lamps are intended to withstand extreme physical conditions in household appliances, such
as temperature, vibration, humidity, or are intended to signal information about the
operational status of the appliance. They are not intended to be used in other applications
and are not suitable for household room illumination.
• This product contains a light source of energy efficiency class G.
• Use only lamps with the same specifications.
2.6 Service
• To repair the appliance contact the Authorised Service Centre.
• Use original spare parts only.
2.7 Disposal
WARNING!
Risk of injury or suffocation.
• Contact your municipal authority for information on how to dispose of the appliance.
• Disconnect the appliance from the mains supply.
• Cut off the mains electrical cable close to the appliance and dispose of it.
• Remove the door catch to prevent children or pets from becoming trapped in the appliance.
8/32
SAFETY INSTRUCTIONS

3. PRODUCT DESCRIPTION
3.1 General overview
1 2 4 763
10
11
12
1
2
3
4
5
5
8
8
9
9
1
2
3
4
12
11
1Knob for the top oven functions
2Knob for the top oven temperature
3Temperature indicator / symbol for the top oven
4Display
5Knob for the main oven functions
6Temperature indicator / symbol for the main oven
7Knob for the main oven temperature
8Heating element
9Lamp
10 Fan
11 Shelf support, removable
12 Shelf positions
3.2 Accessories
•Wire shelf
For cookware, cake tins, roasts.
•Grill- / Roasting pan
To bake and roast or as pan to collect fat.
•Trivet
For roasting and grilling.
Use the trivet only with the Grill- / roasting pan.
9/32
PRODUCT DESCRIPTION

4. CONTROL PANEL
4.1 Retractable knobs
To use the appliance press the knob. The knob comes out.
4.2 Control panel overview
Timer Fast
Heat Up Light Lock Confirm
setting Press Turn the knob
Select a heating function to turn on the appliance.
Turn the knob for the heating functions to the off position to turn the appliance off.
4.3 Display
Display with key functions.
Display indicators
Basic indicators
Lock Cleaning Settings Fast Heat Up
Timer indicators
Minute minder End time Time Delay Uptimer
Progress bar - for temperature or time.
The bar is fully red when the appliance
reaches the set temperature.
10/32
CONTROL PANEL
Indice
Altri manuali AEG Forno

AEG
AEG Competence 3215V Manuale utente

AEG
AEG COMPETENCE D4150-1 Manuale utente

AEG
AEG COMPETENCE D4100-1 Manuale utente

AEG
AEG BPE948730M Manuale utente

AEG
AEG BSK798380M Manuale utente

AEG
AEG BP9314001 Manuale utente

AEG
AEG BEB331010M Manuale utente

AEG
AEG BY931460IM Manuale utente

AEG
AEG BSK999330B Manuale utente

AEG
AEG BEB230010M Manuale utente

AEG
AEG KEK442910M Manuale utente

AEG
AEG KS8100001M Manuale utente

AEG
AEG Competence 3058 B Manuale utente

AEG
AEG B 2.60L Manuale utente

AEG
AEG BEE455010M Manuale utente

AEG
AEG BS9314001 Manuale utente

AEG
AEG BPK537221M Manuale utente

AEG
AEG Tauber B881 D Manuale utente

AEG
AEG BEK435120W Manuale utente

AEG
AEG BP3003001 Manuale utente


