AEG L7FEC842BI Manuale utente

USER
MANUAL
EN User Manual
Washing Machine
L7FEC842BI
CONTENTS
1. SAFETY INFORMATION.............................................................................................3
2. SAFETY INSTRUCTIONS.............................................................................................4
3. INSTALLATION............................................................................................................6
4. PRODUCT DESCRIPTION.........................................................................................15
5. CONTROL PANEL..................................................................................................... 16
6. DIAL AND BUTTONS................................................................................................18
7. PROGRAMMES..........................................................................................................21
8. SETTINGS...................................................................................................................26
9. BEFORE FIRST USE................................................................................................... 26
10. DAILY USE................................................................................................................26
11. HINTS AND TIPS..................................................................................................... 31
12. CARE AND CLEANING.......................................................................................... 32
13. TROUBLESHOOTING.............................................................................................37
14. CONSUMPTION VALUES.......................................................................................41
15. TECHNICAL DATA..................................................................................................42
16. PRODUCT INFORMATION SHEET IN REFERENCE TO E.U. REGULATION
1369/2017........................................................................................................................43
FOR PERFECT RESULTS
Thank you for choosing this AEG product. We have created it to give you
impeccable performance for many years, with innovative technologies that help
make life simpler features you might not find on ordinary appliances. Please
spend a few minutes reading to get the very best from it.
Visit our website for:
Get usage advice, brochures, trouble shooter, service information:
www.aeg.com/webselfservice
Register your product for better service:
www.registeraeg.com
Buy Accessories, Consumables and Original spare parts for your appliance:
www.aeg.com/shop
CUSTOMER CARE AND SERVICE
Always use original spare parts.
When contacting our Authorised Service Centre, ensure that you have the
following data available: Model, PNC, Serial Number.
The information can be found on the rating plate.
Warning / Caution-Safety information
General information and tips
Environmental information
Subject to change without notice.
www.aeg.com2

1. SAFETY INFORMATION
Before the installation and use of the appliance,
carefully read the supplied instructions. The
manufacturer is not responsible for any injuries or
damages that are the result of incorrect installation or
usage. Always keep the instructions in a safe and
accessible location for future reference.
1.1 Children and vulnerable people safety
•This appliance can be used by children aged from 8
years and above and persons with reduced physical,
sensory or mental capabilities or lack of experience
and knowledge if they have been given supervision or
instruction concerning the use of the appliance in a
safe way and understand the hazards involved.
•Children between 3 and 8 years of age and persons
with very extensive and complex disabilities shall be
kept away unless continuously supervised.
•Children of less than 3 years of age should be kept
away unless continuously supervised.
•Do not let children play with the appliance.
•Keep all packaging away from children and dispose of
it appropriately.
•Keep detergents away from children.
•Keep children and pets away from the appliance when
the door is open.
•If the appliance has a child safety device, it should be
activated.
•Children shall not carry out cleaning and user
maintenance of the appliance without supervision.
1.2 General Safety
•Do not change the specification of this appliance.
•This appliance is intended to be used in household
and similar applications such as:
–staff kitchen areas in shops, offices and other
working environments;
ENGLISH 3

–by clients in hotels, motels, bed & breakfast and
other residential type environments;
–areas for communal use in blocks of flats or in
launderettes.
•Do not exceed the maximum load of 8 kg (refer to the
"Programme chart" chapter).
•The operating water pressure at the water entry point
from the outlet connection must be between 0.5 bar
(0.05 MPa) and 8 bar (0.8 MPa).
•The ventilation opening in the base must not be
covered by a carpet, mat, or any floor covering.
•The appliance must be connected to the water mains
using the new supplied hose sets, or other new hose
sets supplied by the Authorised Service Centre.
•Old hose sets must not be reused.
•If the mains power supply cable is damaged, it must
be replaced by the manufacturer, its Authorised
Service Centre or similarly qualified persons to avoid
an electrical hazard.
•Before any maintenance operation, deactivate the
appliance and disconnect the mains plug from the
socket.
•Do not use high pressure water sprays and/or steam
to clean the appliance.
•Clean the appliance with a moist cloth. Use only
neutral detergents. Do not use abrasive products,
abrasive cleaning pads, solvents or metal objects.
2. SAFETY INSTRUCTIONS
2.1 Installation
The installation must comply
with relevant national
regulations.
• Remove all the packaging and the
transit bolts including rubber bush
with plastic spacer.
•Keep the transit bolts in a safe place.
If the appliance is to be moved in the
future they must be reattached to lock
the drum to prevent an internal
damage.
• Always take care when moving the
appliance as it is heavy. Always use
safety gloves and enclosed footwear.
•Do not install or use a damaged
appliance.
• Follow the installation instructions
supplied with the appliance.
• Do not install or use the appliance
where the temperature can be less
than 0°C or where it is exposed to the
weather.
www.aeg.com4
• The floor area on which the appliance
is to be installed must be flat, stable,
heat resistant and clean.
•Make sure that there is air circulation
between the appliance and the floor.
•When the appliance is in its
permanent position, check if it is
levelled correctly with the aid of a
spirit level. If it is not, adjust the feet
accordingly.
• Do not install the appliance directly
above a floor drain.
• Do not spray water on the appliance
and do not expose it to excessive
humidity.
• Do not install the appliance where the
appliance door cannot be fully
opened.
• Do not put a closed container to
collect possible water leakage under
the appliance. Contact the Authorised
Service Centre to ensure which
accessories can be used.
2.2 Electrical connection
WARNING!
Risk of fire and electric
shock.
• The appliance must be earthed.
•Always use a correctly installed
shockproof socket.
•Make sure that the parameters on the
rating plate are compatible with the
electrical ratings of the mains power
supply.
• Do not use multi-plug adapters and
extension cables.
• Make sure not to cause damage to
the mains plug and to the mains
cable. Should the mains cable need
to be replaced, this must be carried
out by our Authorised Service Centre.
• Connect the mains plug to the mains
socket only at the end of the
installation. Make sure that there is
access to the mains plug after the
installation.
• Do not touch the mains cable or the
mains plug with wet hands.
• Do not pull the mains cable to
disconnect the appliance. Always pull
the mains plug.
• This appliance complies with the
E.E.C. Directives.
2.3 Water connection
• Do not cause damage to the water
hoses.
•Before connection to new pipes,
pipes not used for a long time, where
repair work has been carried out or
new devices fitted (water meters,
etc.), let the water flow until it is clean
and clear.
• Ensure that there are no visible water
leaks during and after the first use of
the appliance.
• Do not use an extension hose if the
inlet hose is too short. Contact the
Authorised Service Centre for the
replacement of the inlet hose.
• It is possible to see water flowing
from the drain hose. This is due to the
testing of the appliance with the use
of water in the factory.
• You can extend the drain hose to
maximum 400 cm. Contact the
Authorised Service Centre for the
other drain hose and the extension.
2.4 Use
WARNING!
Risk of injury, electric shock,
fire, burns or damage to the
appliance.
• Follow the safety instructions on the
detergent packaging.
•Do not put flammable products or
items that are wet with flammable
products in, near or on the appliance.
•Make sure that all metal objects are
removed from the laundry.
• Do not wash fabrics which are heavily
soiled with oil, grease or other greasy
substances. It can damage rubber
parts of the washing machine.
Prewash such fabrics by hand before
loading them into the washing
machine.
• Do not touch the glass door while a
programme is in operation. The glass
can get hot.
2.5 Service
• To repair the appliance contact an
Authorised Service Centre.
• Use original spare parts only.
ENGLISH 5
2.6 Disposal
WARNING!
Risk of injury or suffocation.
• Disconnect the appliance from the
mains electrical and water supplies.
•Cut off the mains electrical cable
close to the appliance and dispose of
it.
•Remove the door catch to prevent
children or pets from becoming
trapped in the drum.
• Dispose of the appliance in
accordance with local requirements
for the disposal of Waste Electrical
and Electronic Equipment (WEEE).
3. INSTALLATION
WARNING!
Refer to Safety chapters.
3.1 Be prepared for
installation
It is recommended that
installation is carried out by
two persons.
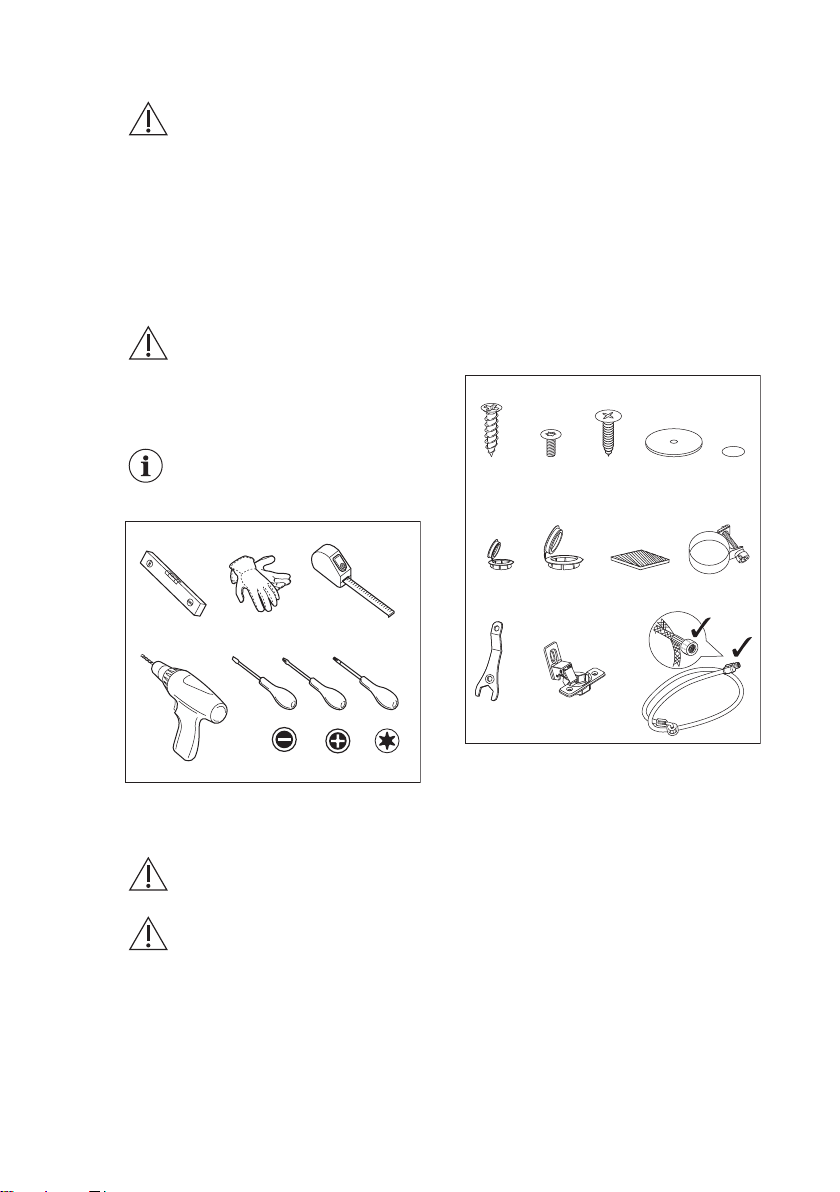
3.2 The appliance is equipped
with ...
x1 x2
x1
E
x2
x1 x1
x2
x4 x1 x1
BA C D
F G H L
3.3 Unpacking
WARNING!
Use the gloves.
WARNING!
Remove all the packaging and the transit bolts before installing the
appliance.
www.aeg.com6
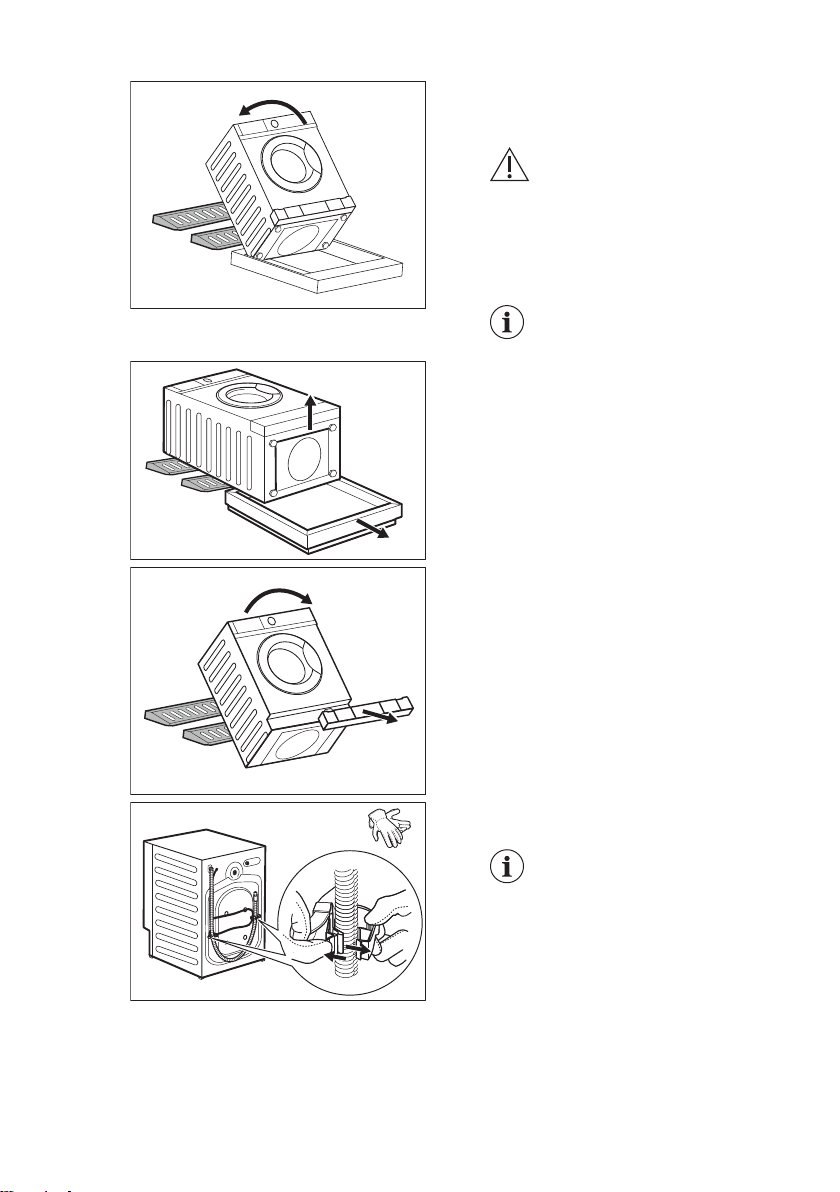
1. Put two polystyrene packaging
elements on the floor under the
appliance.
WARNING!
It is strongly
recommended that this
action is carries out by two
persons.
2. Carefully put the appliance down on its
rear side.
Make sure not to damage
the hoses.
1
2
3. Remove the polystyrene protection
from the bottom.
1
2
4. Return the appliance in vertical
position and remove the socket
polystyrene protection.
5. Remove the power supply cable and
the drain hose from the hose holders.
It is possible to see water
flowing from the drain
hose. This is due to the
testing with water of the
appliance in factory.
ENGLISH 7

6. Remove the three bolts, the hose
holders and plastic spacers by using the
spanner supplied with the appliance.
F
G
7. Close the holes with the plastic caps
you find in the user manual bag. Put the
smallest cap Fin upper hole and the two
bigger caps Gin lower holes.
We recommend that you keep the packaging and the transit bolts for any
movement of the appliance.
3.4 Positioning and levelling
x4
1. Install the appliance on a flat hard floor.
WARNING!
Make sure that carpets do not
stop the air circulation below
the appliance.
Bring the appliance near the
furniture recess before
levelling it. For more details,
refer to paragraph "Building
in".
2. Loosen or tighten the feet to adjust the
level.
A correct adjustment of the
appliance level prevents the
vibration, noise and the
movement of the appliance
when in operation.
www.aeg.com8

The appliance must be level and stable.
CAUTION!
Do not put cardboard, wood
or equivalent materials below
the appliance feet to adjust
the level.
3.5 Hose and cable connection
1100 mm 1450 mm
960 mm1230 mm
900 mm 1360 mm
max 1000 mm
min. 600 mm
max 1000 mm
min. 600 mm
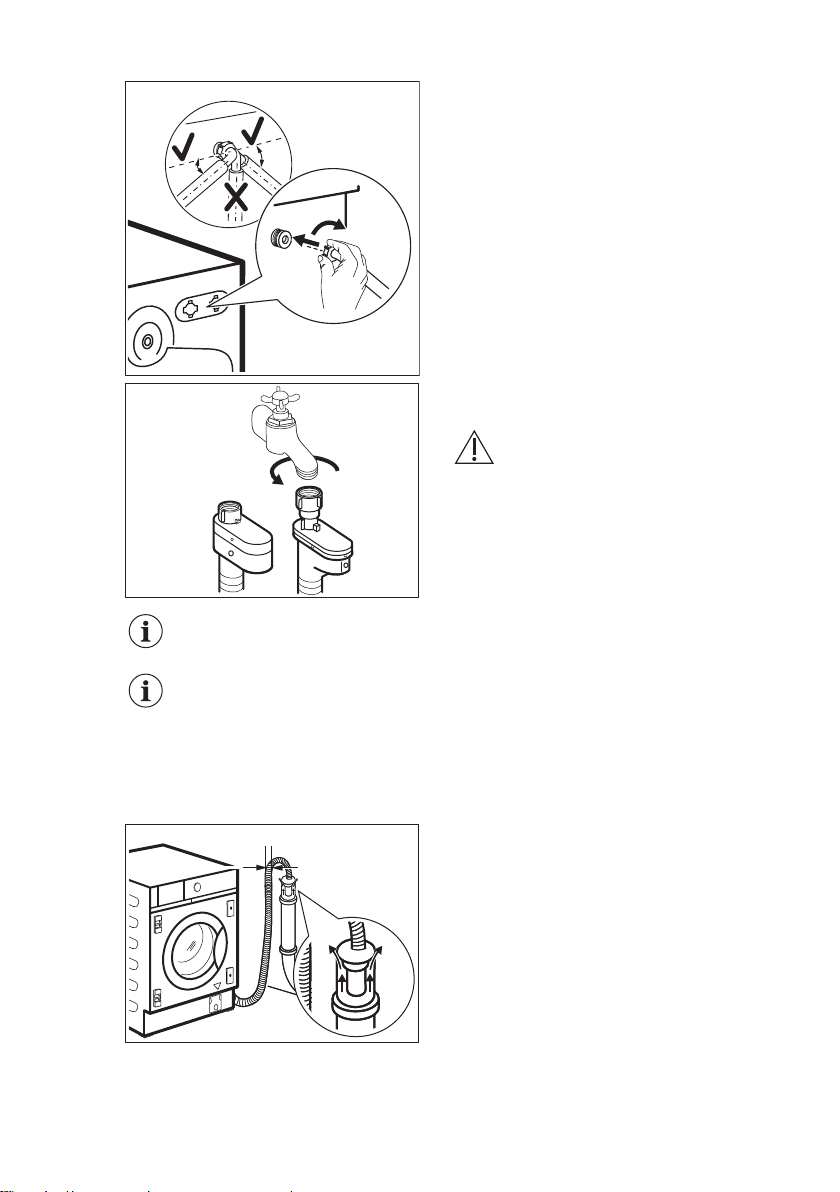
The inlet hose
1. Remove the inlet hose from inside the
drum.
2. To connect the water inlet hose towards
the proper direction and with the proper
inclination, check the position of the water
tap before connecting it to the back of the
appliance.
Make sure the hose is nor
kinked, squashed but neither
tensed.
ENGLISH 9
20O
20O
45O
45O
3. Connect the hose to the back of the
appliance. Do not turn the inlet hose
downwards, but turn it left or right depending
on the position of your water tap.
4. Loosen the ring nut to fix it in the correct
position.
5. Connect the water inlet hose to the cold
water tap with 3/4 thread.
WARNING!
Make sure that there are no
leaks from the couplings.
Use the hose supplied with appliance.
Do not use an extension hose if the inlet hose is too short. Contact the
Authorised Service Centre for an inlet hose replacement.
Water drainage
The drain hose can be connected:
Ø 40 mm
To a stand pipe with vent-hole
Directly into a drain pipe at a height of not
less than 60 cm (23.6”) and not more than 100
cm (39.3”).
The end of the drain hose must always be
ventilated , i.e. the inner diameter of the drain
pipe (min. 40 mm - min. 1.6”) must be larger
than the external diameter of the drain hose.
www.aeg.com10
Indice
Altri manuali AEG Rondella

AEG
AEG L8FBK966E2 Manuale utente

AEG
AEG LR833W96W Manuale utente

AEG
AEG L8FEA70690 Manuale utente

AEG
AEG LAVATHERM 76375AH1 Manuale utente

AEG
AEG L6FBG861R Manuale utente

AEG
AEG LP 2252 F Manuale utente

AEG
AEG L7FBE84W Manuale utente

AEG
AEG LAVAMAT W 1220 Manuale utente

AEG
AEG OKO-LAVAMAT 70330 Manuale operativo

AEG
AEG L 87495 XFL Manuale utente

AEG
AEG L 87490 FL Manuale utente

AEG
AEG AWF9024P5SB Manuale utente

AEG
AEG L8FB86ES Manuale utente

AEG
AEG LFR73944B Manuale utente

AEG
AEG L 87695 WD Manuale utente

AEG
AEG LAVAMAT 14500 VI Manuale utente

AEG
AEG OKO-LAVAMAT 72600 update Manuale utente

AEG
AEG L88689FL Manuale utente

AEG
AEG LAVAMAT 693 sensortronic Manuale utente

AEG
AEG LAVAMAT BELLA 3450 Manuale operativo


