
AGA ARAFX30W5SS Manuale utente
Ed. 2008
INSTRUCTIONS BOOKLET
LIVRET D’INSTRUCTIONS
MANUAL DE INSTRUCCIONES
36”Vent Hood

Dear Sir/Madam, congratulations!
You have purchased a prestigious range hood of guaranteed quality. For best results, we
suggest that you carefully follow the operating and maintenance instructions provided
in this booklet; in addition, to order spare charcoal filters, use the special coupon on the
cover.
Chère Madame/Cher Monsieur, félicitations!
Vous venez d’acheter une hotte haut de gamme. Pour en tirer les performances les
meilleures veuillez lire avec attention le mode d’emploi et la maintenance que vous
trouvez dans ce manuel ; pour commander les filtres de rechange au carbone actif
veuillez vous servir du coupon annexé à la couverture.
Enhorabuena Señora/Señor!
Ha comprado una campana extractora de prestigio y calidad segura. Para que pueda
obtener las mejores prestaciones, le sugerimos seguir con atención las instrucciones
contenidas en este manual para el uso y el mantenimiento. Para pedir los filtros de
recambio de carbón activo, utilice el cupón adjunto a la cubierta.

1
Product code
ARAFX30W5*SS
ARAFX36W5*SS
ARART24W4*SG
ARARX30W5*SG
ARARX36W5*SG
FDCON48W5*SS
FDCON36W5*SS
FDCON30W5*SS
FDFUT48W5*SS
FDFUT36W5*SS
FDINT48W5*SS
FDINT36W5*SS
FFKRS48W5*FG
FFKRS36W5*FG
FDKRS36W5*SG
FDKRS48W5*SG
FDLGO36W5*SS
FDLNE48W5*SS
FDLNE36W5*SS
FDMIZ30W5*SS
FDMIZ36W5*SS
ARMEX48W5*SS
ARMEX30W5*SS
ARMEX36W5*SS
FDOND36W5*SS
FDOND36W5*SG
FFPLN48W5*FS
FFPLN36W5*FS
ARSAX30W5*SG
ARSAX36W5SG
FFSYM48W5*FS
FFSYM36W5*FS
FFALT24W5*FS
ARVUX24W5*SS
ARVUX30W5*SS
ARVUX36W5*SS
FDDIA36W5*SS
FDLGO30W5*SS
FDADR36W5*SG
FDLUM36W5*SS
FDLUM48W5*SS
FDASL36W5*SG
FDIRD36W5*SS
ARART24W4*SG
ARTRA30W4*SS
ARTRA36W4*SS
FFPLN36W5*FS
FFPLN48W5*FS
FDLGO36W5*SS
FDCON30W5*SS
FDASL36W5*SG
* 4 or 5
APRO36HD-XXX
2
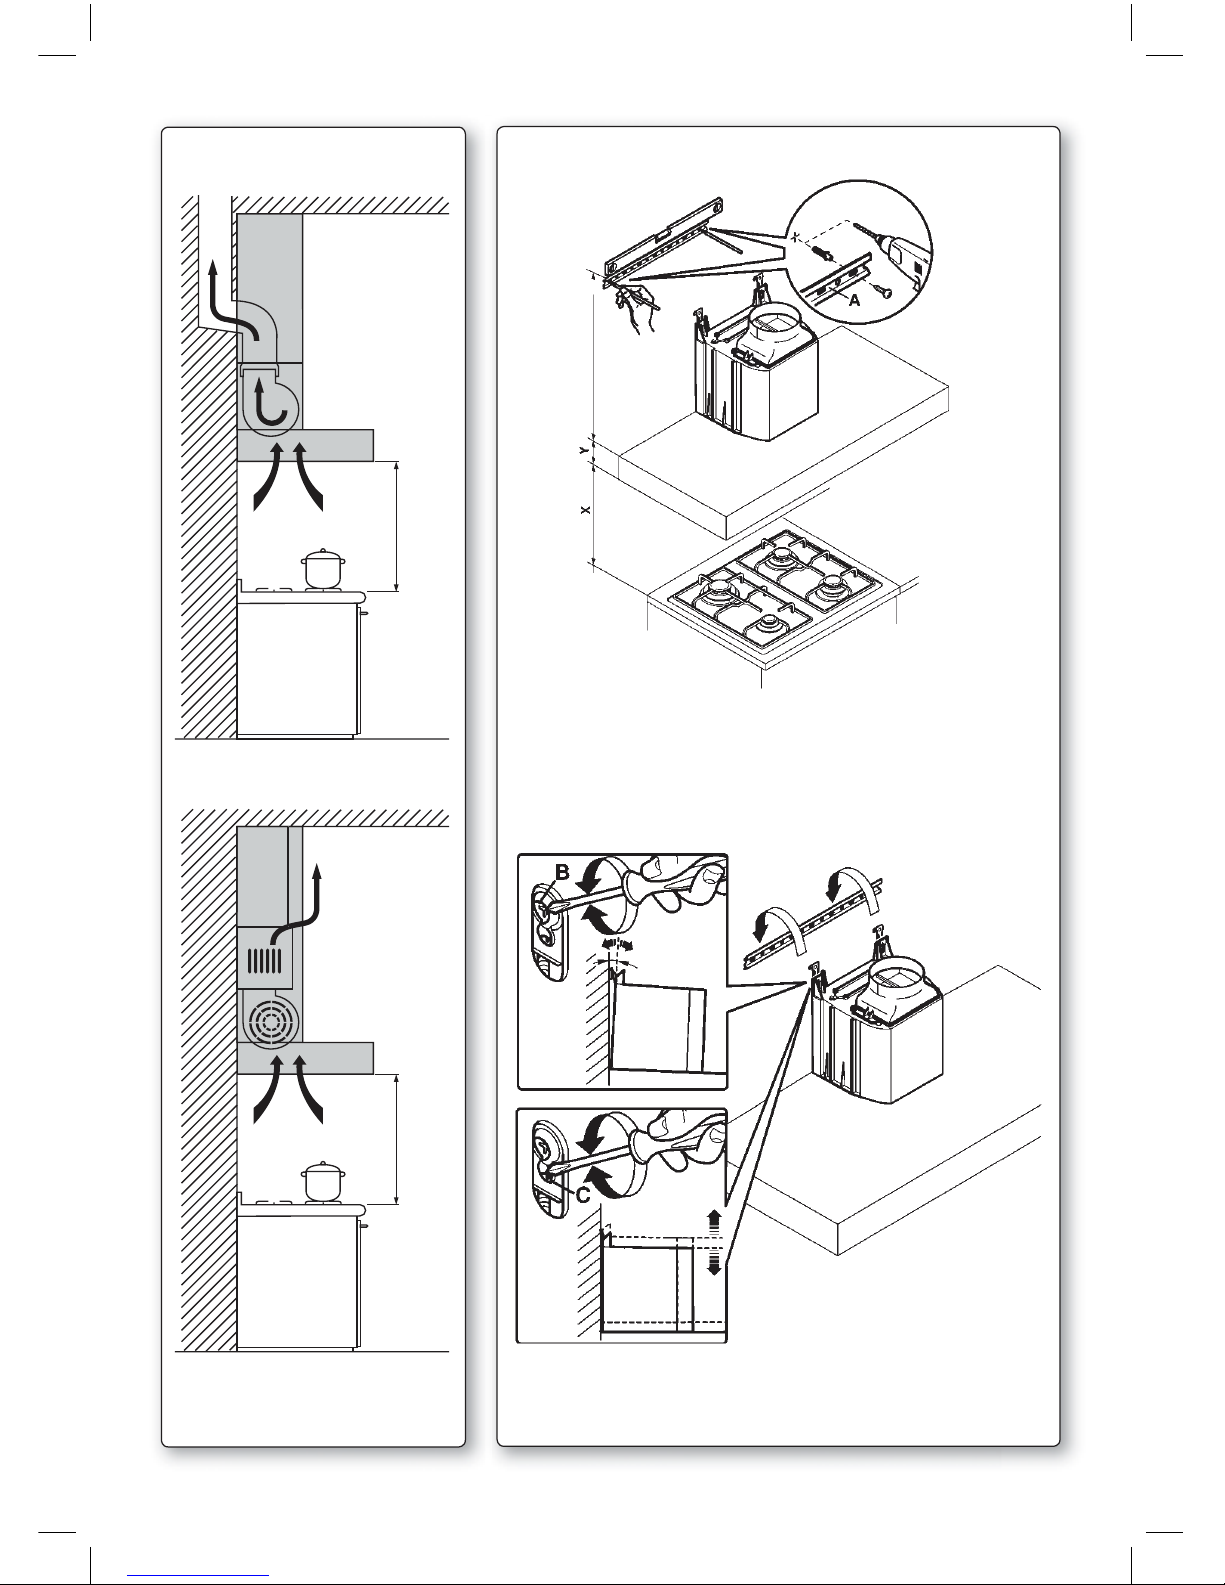
650 mm
(25,6”)
650 mm
(25,6”)
Fig. C
Fig. O1
Fig. O2

3
Fig. O3
Fig. O4
- not included in
Aga models
- six inch exhaust
opening - unit
includes 6”-5”
adapter
4
5
PUSH
PUSH
B
C
2
1
4
A1
B
C
A2
3
A1
A2
3
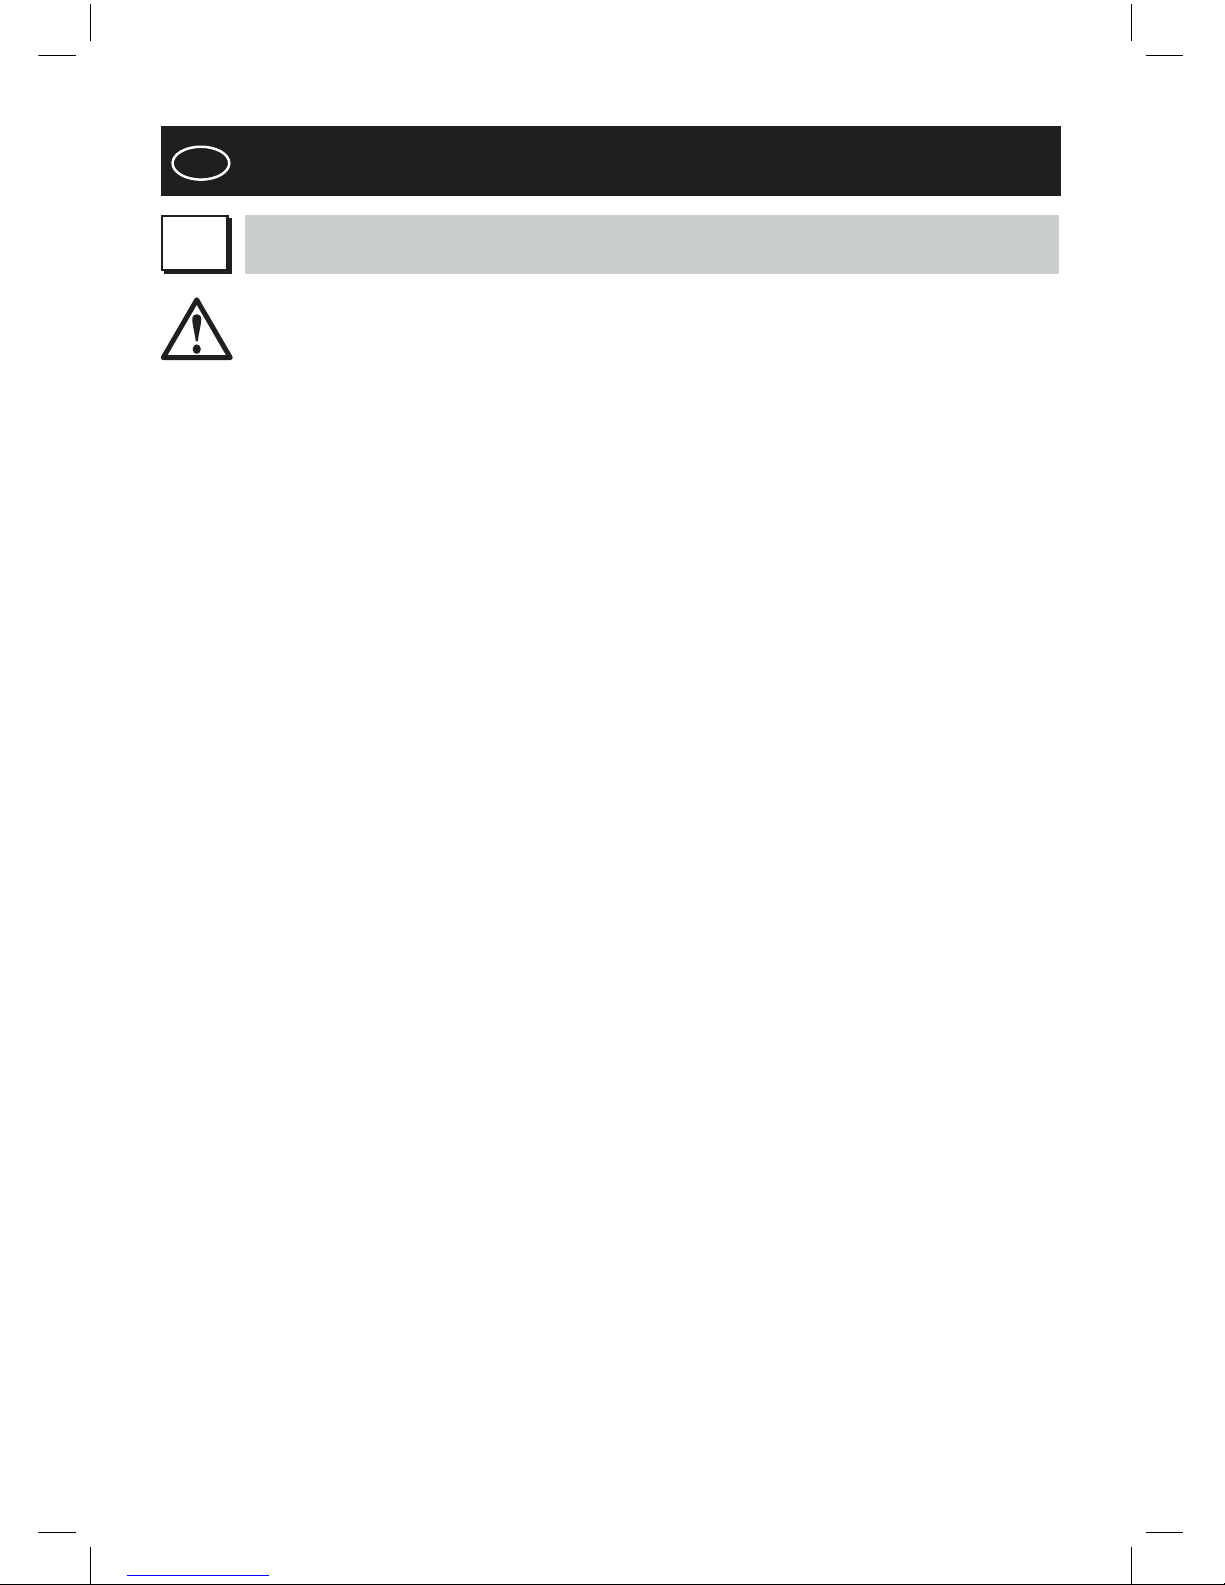
ISTRUZIONI PER PANNELLO REMOVIBILE
INSTRUCTION FOR REMOVABLE PANEL
Fig. H3
5
GB
INSTRUCTIONS BOOKLET
WARNINGS
A
This instruction booklet must be kept together with the appliance for future
reference. If the appliance is sold or consigned to other parties, check that
the booklet is supplied with it, to ensure that the new user has the correct
information on the operation of the range hood and is aware of the warnings.
These warnings have been provided for the your safety and the safety of oth-
ers. As a result, please read them carefully before installing and operating the
appliance.
This appliance is not intended for use by young children or infirm persons un-
less they have been adequately supervised by a responsible person to ensure
that they can use the appliance safely.Young children should be supervised to
ensure they do not play with the appliance.
The appliance must be installed by qualified personnel, in accordance with
national and local safety regulations the standards in force. If the supply cord
is damaged, it must be re-placed by the manufacturer, its service agent or
similarly qualified persons in order to avoid a hazard. Any modifications that
may be required to the electrical system for the installation of the range hood
must only be made by qualified electricians.
It is dangerous to modify or attempt to modify the characteristics of this sys-
tem. In the event of malfunctions or if repairs are required to the appliance,
do not attempt to solve the problems directly.
Repairs performed by unqualified persons may cause damage. For all repair
and other work on the appliance, contact an authorised service/spare parts
centre.
Always check that all the electrical parts (lights, exhaust device), are off when
the appliance is not being used. Read the entire instruction booklet before
performing any operations on the range hood.
The manufacturer can not be held responsible for unauthorized work. Ensure
that power to the appliance is OFF while installation or repair work is per-
formed.
Verify that the voltage, load and circuit rating information found on the data
plate (located behind the grease filter), match the household electrical supply
before installing the hood.
The range hood must only be used for the exhaust of cooking fumes in home
kitchens. The manufacturer disclaims all liability for any other use of the ap-
pliance.
The maximum weight of any object placed above the hood, or hung to it (if
possible) must not exceed 1,5 kilos. After installing the stainless steel hood,
clean it in order to remove any residue of the protective glue, and stains of
grease or oil. The manufacturer recommends its cleaning cloth available for
purchase. The manufacturer accepts no liability in case of damage caused by
the use of different detergent types.
TECHNICAL SPECIFICATIONS
B
The technical data pertaining to the electric applianceThe technical specifica-
tions of the appliance are shown on the rating plates located inside the range
hood.
INSTALLATION
C
(Section reserved for qualified installers of the range hood)
Minimum distance: distance between the main top of the cooking appliance
and the bottom-most section of the hood. When the hood is positioned above
a gas appliance this minimum distance must be at least 65 cm (25,6“) (see
fig. C) or more importantly, check the distances specified for the gas cooking
appliance.
In the outside exhaust version, the diameter of the entire duct run must be no
smaller than the range hood connection.
In the horizontal duct run, the duct must slope slightly (around 10%) upwards,
so as to better ventilate the air outside of the room.
Avoid using angled pipes/elbows where possible. To optimize performance,
keep the duct run as straight and short as possible. Galvanized metal ducting
is recommended.
Comply with the current regulations on air discharge into the atmosphere.
If a boiler, stove, fireplace, etc. that uses gas or other fuels is being used at
the same time, make sure the room where the fumes are extracted is well
ventilated, in compliance with the current regulations.
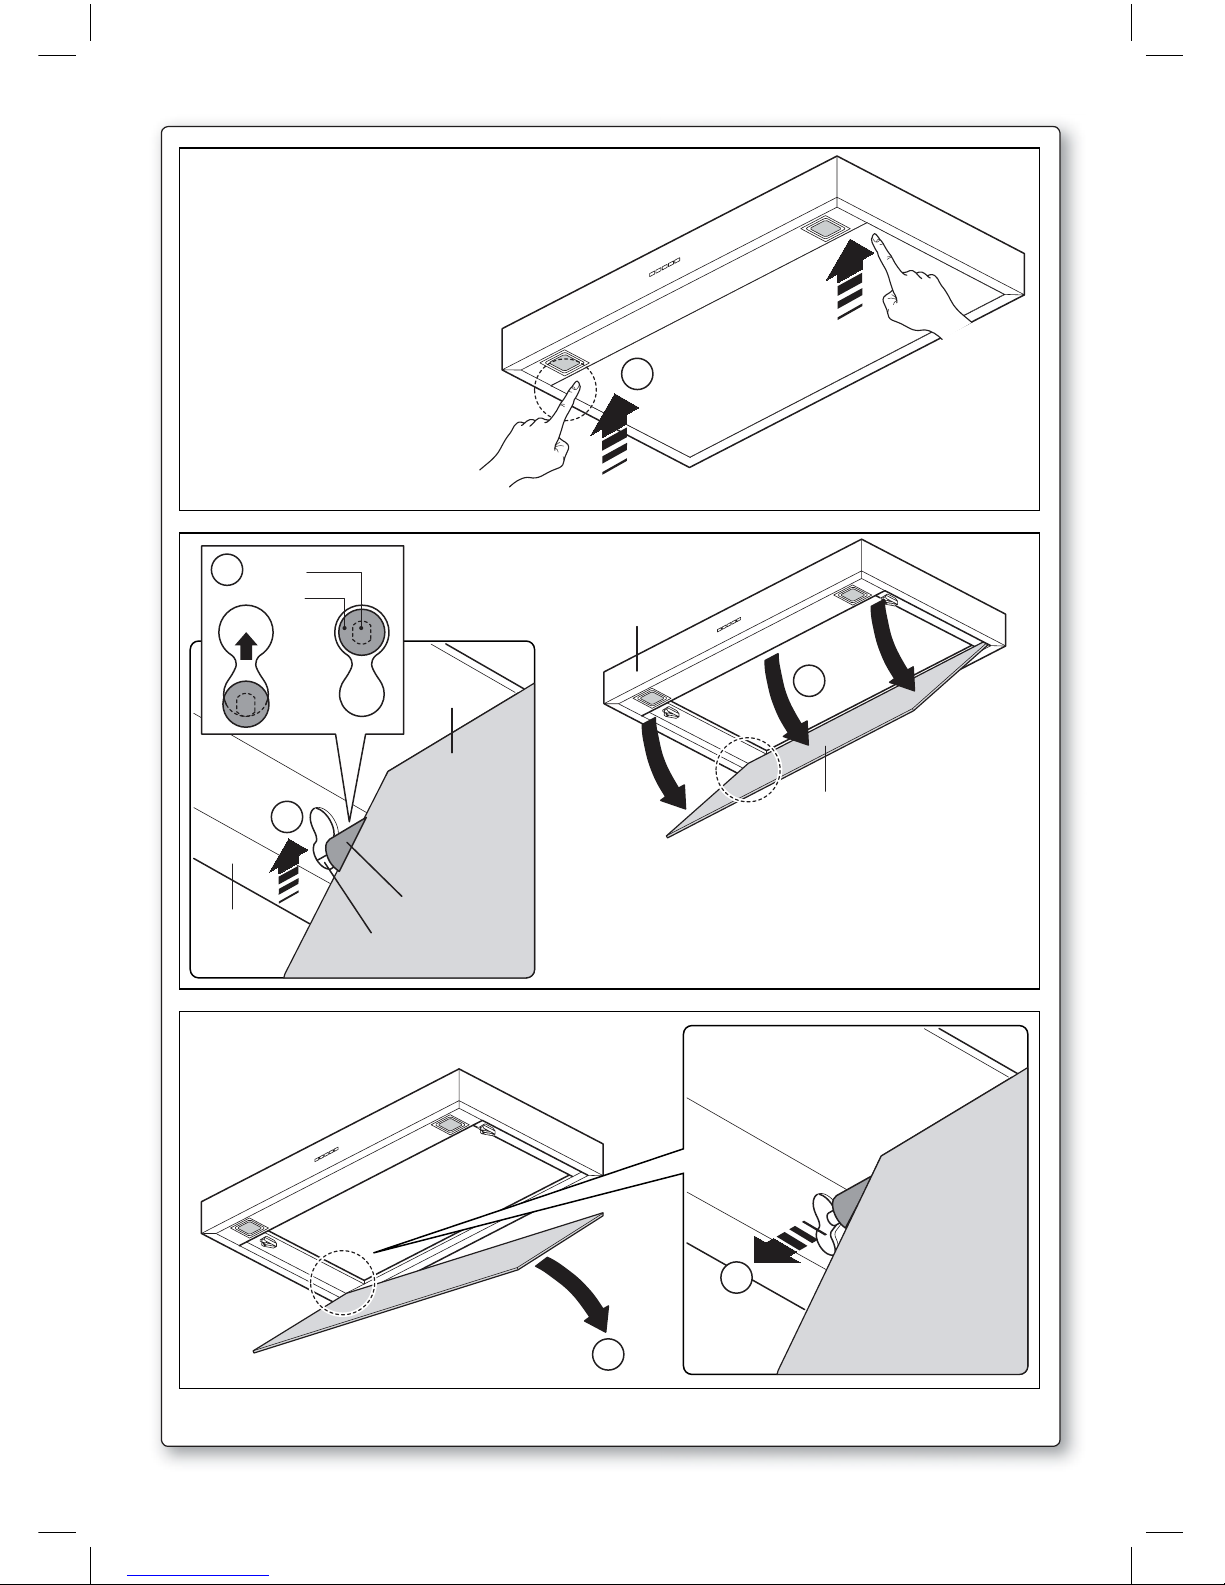
Mounting instruction: see section “O” of the booklet.
ELECTRICAL CONNECTIONS
D
(Section reserved for qualified installers)
WARNING!
Before doing any work inside the range hood, disconnect the appliance from
the mains power supply.
Check that the wires inside the range hood are not disconnected or cut; if this
is the case, contact your nearest service centre. The electrical connections
must be performed by qualified personnel.
The connections must be performed in compliance with the legal standards
in force. Check that the receptacle and wiring are able to support the load of
the appliance (see the technical specifications in point B).
THIS APPLIANCE MUST BE GROUNDED.
Important:
The hood comes equipped with a 5 ft(1.5 m) power cord with a NEMA 5-15
molded plug for connection to a 120VAC, 60 Hz, 15 A power outlet. This outlet
must be located in the duct cover area above the hood.
Some types of appliance are supplied with a cable without plug; in this case,
“standardised” or a junction box must be used, keeping in mind that:
- the yellow/green wire must be used for the earth,
6
- the blue/white wire must be used for the neutral,
- the brown/black wire must be used for the phase; the cable must not come
into contact with hot parts (over 75°C).
- fit a plug that is suitable for the load to the power cable, and connect it to a
suitable power outlet.
If local codes permit, the power cord may be removed and the hood may
be connected to a hard wired electrical connection. If there is any question
concerning the electrical connection of this appliance to your power supply,
please consult a licensed electrician.
For appliances that come supplied with cable and plug please ensure they are
plugged into a circuit suitable for this appliance.
Please refer to a qualifed person. (See technical specifications in point B).
The manufacturer declines all liability if the safety standards are not ob-
served.
ERANGE HOOD WITH OUTSIDE
DISCHARGE (exhaust)
In this application, the fumes and steam from the kitchen are vented outside
through an exhaust duct.
The exhaust conveyor that protrudes from the upper part of the range hood
must be connected to a duct that carries the fumes and steam outside. In this
application, the charcoal filters, if fitted, should be removed; to do this, see the
instructions in point F. There must be adequate ventilation of the room when
the range hood is used at the same time as appliances burning gas or other
fuels, according to the standard.
Deviation for Germany:
When the range hood and appliances supplied with energy other than elec-
tricity are simultaneously in operation, the negative pressure in the room
must not exceed 4 Pa (4x10 E-5 bar).
FRECIRCULATING RANGE
HOOD (with filter)
In this application, the air passes through charcoal filters for purification, and
is then recirculated back into the kitchen.
Check that the charcoal filters are fitted to the motor, and if not, install them
as described in the instructions in point H.
If the hood is of filtering type, remove the non-return valve fitted at the mo-
tor’s outlet.
For maximum efficiency, the third speed should be used when there are
strong odours or a lot of steam, the second speed in normal conditions, and
the first speed for keeping the air clean with minimum energy consumption.
The range hood should be switched on when starting to cook, and left on
until the odours disappear.
7
8
GOPERATION
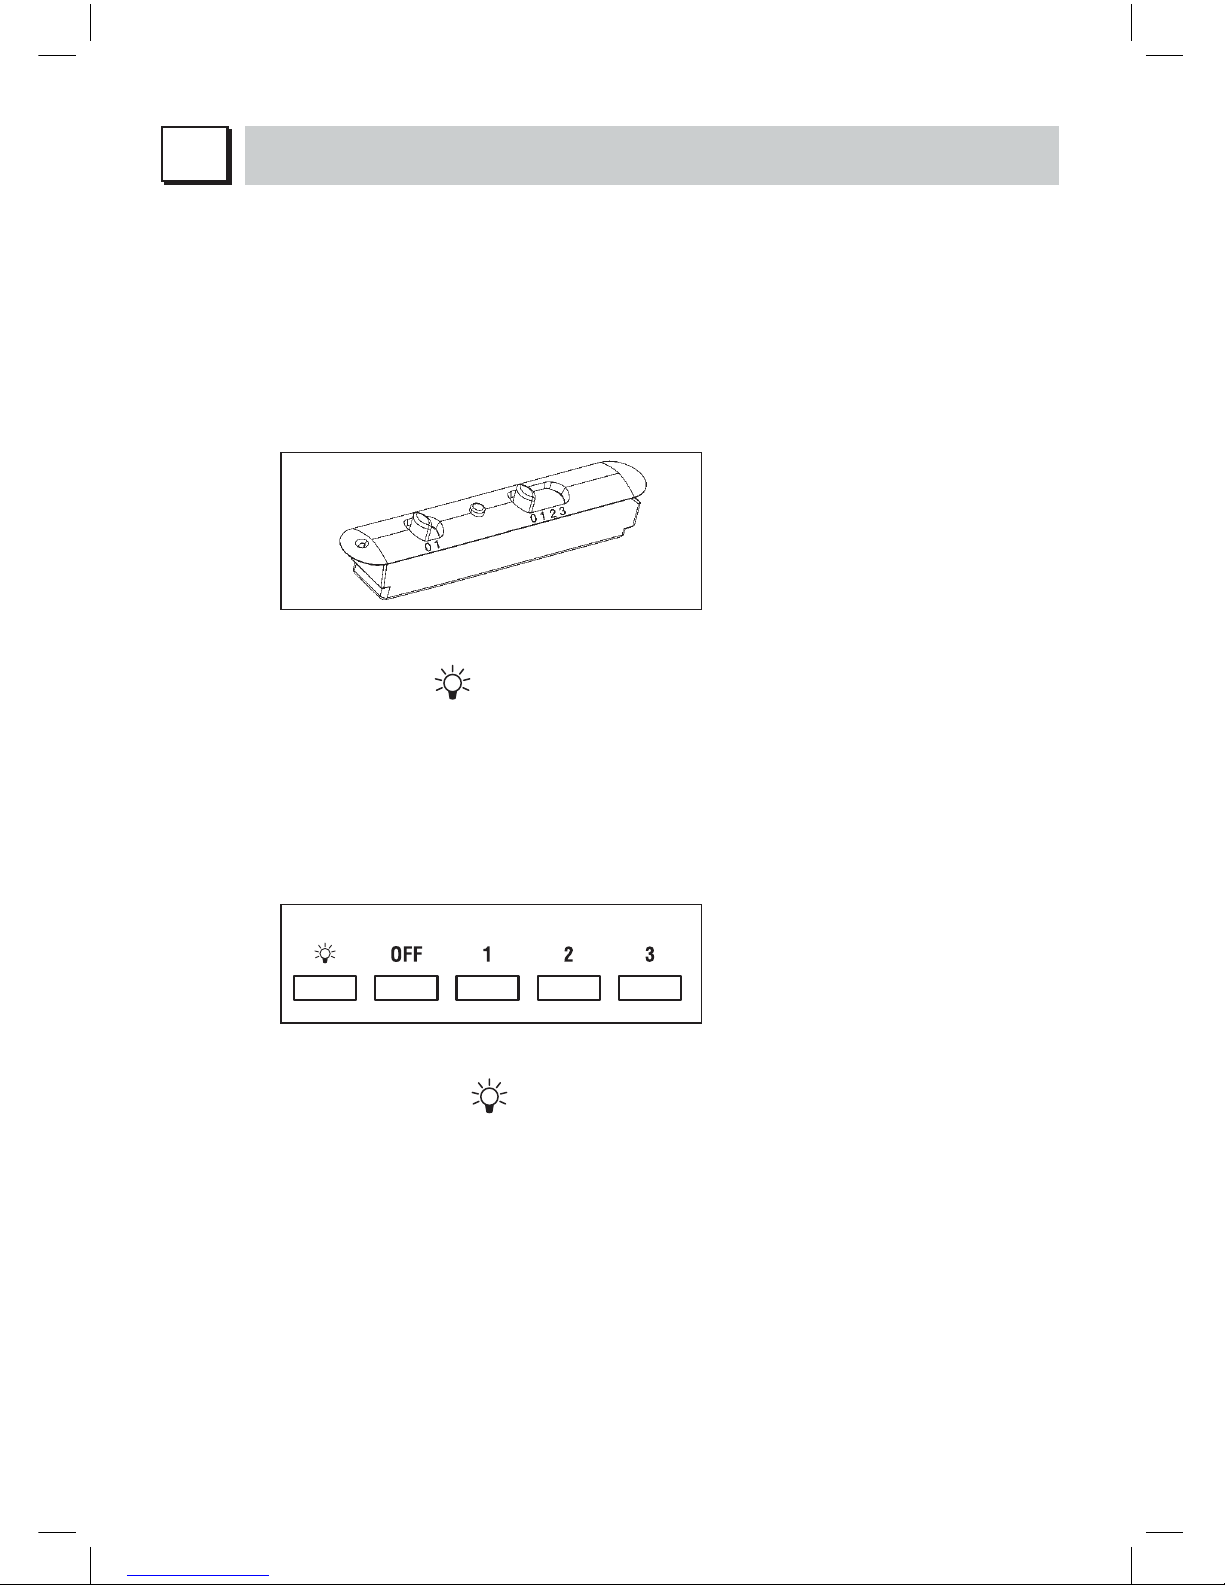
1. TWO BUTTON CONTROL PANEL
LIGHT - Switch A
Position 0: the light is off.
Position 1: the light is on.
SPEED - Switch B
This is used to start and set the speed of the motor, from 1 to 3, or with
continuous speed variator, depending on the version.
LIGHT - C
Motor operation indicator light.
2. FIVE BUTTON CONTROL PANEL
LIGHT- button
Pressed: the light is on
Released: the light is off
MOTOR button - 1, 2, 3, OFF
1: starts the motor at minimum speed
2: starts the motor at medium speed
3: starts the motor at maximum speed
OFF: stops the motor
3. ELECTRONIC CONTROL PANEL
Light pushbutton
• ON: light on (the pushbutton is lit);
• OFF: light off;
Pushbutton -
Press to reduce motor speed
Speed 1, 2 and 3 are indicated by the number of LEDs that light up (exclud-
ing the light and the timer LEDs).
Pushbutton +
Press to increase motor speed. Speed 1, 2 and 3 are indicated by the
number of LEDs that light up (excluding the light and the timer LEDs).
(In the 4-speed version the pushbutton + blinks.The fourth speed remains
on for a set duration of time. After 15 minutes the motor returns to the
third speed).
Questo manuale è adatto per i seguenti modelli
134
Indice
Altri manuali AGA Cappa di ventilazione

AGA
AGA AEXT 720 (72) Manuale utente

AGA
AGA 1000 SE Manuale di istruzioni

AGA
AGA SH890 Guida

AGA
AGA Rangemaster FM900 Manuale

AGA
AGA Falcon FALHDS90BL/-AUS Manuale utente

AGA
AGA AMCHD36 Manuale utente

AGA
AGA AMCHD36SS Manuale utente

AGA
AGA VENTILATION HOOD Manuale elenco delle parti

AGA
AGA Cooker hood Manuale utente

AGA
AGA PH890 Guida


