Aigo P882 Manuale utente

1
Note
Model :P882 Serial V1.0
For your safe use and enjoyment of the aigo P882 player,
please read the following carefully before use.
Warning:
Do not expose the player to extremely high or low
temperatures.
Do not expose the player to rain or other moist environments.
Do not put the player close to magnetic objects.
Do not drop or throw the player.
Do not place under direct sun light or in very hot places (e.g.
the trunk of a car on a hot day.It may damage the player or
cause it to malfunction.
Please use the enclosed power adaptor rather than another
model.
Do not clean the player with water or detergent, but use the
enclosed cleaning cloth.
Note
Please keep the player clean and do not scratch the display.
Do not use the player in dusty environments.
Please do not put heavy items on top of the player.
Please do not operate or use the player while driving.
Please do not listen to loud music contiusoudly with
earphones as your hearing may be damaged.
While using earphones, be careful to not pull the cord as it
may damage the earphones.
Please do not disassemble the player yourself. Maintenance
is limited to personnel authorized by the original manufacturer.

Freedom in Technology; Freedom in life
2
Copyright statement
To respect intellecutual property laws, please do not copy,
exchange or share recorded content without authorization.
Furthermore, please abide related copyright laws when recording
music.

3
Table of Contents
TABLE OF CONTENTS....................................................3
Chapter I: Getting to know the P882................................5
1. Overview of the Player..................................................5
2. Charging the Battery.....................................................8
3. Connecting to your PC................................................10
4. System requirements..................................................11
CHAPTER II OPERATION ..............................................12
2-1. Precautions...............................................................12
2-2.Film.............................................................................13
2-3.Music..........................................................................17
2-4.Photo..........................................................................21
2-5. Voice Recorder.........................................................23
2-6.TV Encoder ................................................................25
2-7.E-book........................................................................28
2-8.Setting........................................................................32
2-8-1. Data Management .................................................33
2-8-2.System Status ........................................................35
2-8-3.Volume Adjustment ...............................................35
2-8-4.LCD Contrast..........................................................35
2-8-5.Power Management ...............................................36
2-8-6.Key Tone.................................................................37
2-8-7.NTSC/PAL...............................................................37
2-8-8.Menu Setting ..........................................................37
2-8-9.Service Center........................................................38
2-8-10.Time Setting..........................................................38
2-8-11.HDD Recovery......................................................39

Freedom in Technology; Freedom in life
4
2-8-12.System Renewal...................................................40
2-8-13.Video Display........................................................41
2-8-14.Desktop Setting....................................................41
2-8-15.MTV Backdrop......................................................42
2-8-16.MTP Storage.........................................................42
CHAPTER III TROUBLESHOTING ...................................47
CHAPTER IV APPENDIX ...............................................53
Technical Specifications.................................................53
Supported Files ...............................................................55
Packing list ......................................................................56

5
Chapter I: Getting to know the P882
1. Overview of the Player
Obverse side
1. Stop/Back Button: When you’re playing files, press it once to stop
playing. When you’re viewing the File List, press it once to go back
to the previous File List Page or return to the [Main menu].When
you entered the [Sub menu] or [Effect Menu], press it to close the
menu. Allows you to exit the [Sub menu] or [Effect Menu].

Freedom in Technology; Freedom in life
6
2. Menu Button: Press it once to stop playing or return to the [Main
Menu].
3. Power Of/Off Button: Press and hold it for 2-3seconds to turn on
the MP5 player, click it to power off.
4. Display Mode Swith Button: If you’ve connected the AV/OUT
Cable to the AV/OUT jack, press the button to switch the display to
the MP5 player screen content, and the video device will display
aigo MP5 P882 pictures including user’s interfaces, a nd multimedia
content.
5. Power light: Power on in green light and outer adapter in red light.
6. HD light:Orange light to show HD in use.
7. Select Button (Up): UP button to hightlight item. To selectfile or
filoder or to select an item or adjust setting value.
8. OK Button: Press to play. During playback, press to
pause/reverse/forward.
9. Select Button (Down): Down button to hightlight item. To
selectfile or filoder or to select an item or adjust setting value.
10. LCD screen: Offers a user-friendly interface for multimedia and
video.
11. HOLD Button: To inactivate the buttons during playing or
carrying. When “HOLD” is in the locked out state, all function
buttons are invalkid. To activate them, you only need to put “HOLD”
up to unlocked state, slide the switch to the HOLD position. (The
“LOCK” icon will appear in the display to remind you that you’ve
locked the player.
12. RESET Jack: In some circumstances, when RESETING is

7
needed, please use a pin or pen point to insert to the resetting jack.
Press RESET (the memory will be cleared and settings will restart
and resume to the defaults).
13. DC 5V: When you plug in the Power Adaptor, the battery inside
of the MP5 Player will automatically start to charge.
Note: please do use the exclusive power adapter in the
package to recharge!
14. USB 2.0 Port& OTG: Attach the small end (Type Mini-B) of the
Mini-USB Cable here. Attach the large end (Type A) to your
computer. If it is properly connected, and “USB” icon will be
displayed on the screen, then you can move, copy, delete and
manage files.
15. AV/IN Jack: Attach the AV out componement by AV cable, or
attach the audio componement by Line in cable.
16. AV/OUT Jack: Attach the AV/OUT cable here when you’re
connecting the MP5 player to an Audio/Video component, such as a
stereo receiver, portable speaker, TV projector, etc.
17. Earphne Jack: For earphone.
Note
:
The pixel of this device is 480
×
272 and the same is on
TV. aigo P882 play videos in full screen automatically.

Freedom in Technology; Freedom in life
8
Reverse side
1. Battery compartment: Included recharged lithium battery.
2. Bracket: A small shelf or shelves to support the MP5 player.
2. Charging the Battery
The player uses emovable and rechargeable high capacity lithium
battery. The battery can be recharged directly through the power
adaptor.

9
1. When the player is out of power, recharge the battery with the
power adaptor for about 3 hours. The LED indicator is red while
recharging, after the battery is fully recharged the indiator turns out.
2. Please note the specifications of the power supply: output
voltage: 5V, output current: 2A.
Note:
1. Damage incurred by using other power adaptor that does
not come with this device is not covered by our warranty.
2. For the initial use, please fully charge the battery.
3. If the screen of “Low Battery” appears repeatedly, this
means the power is insufficient, please recharge the battery; if
“The battery is critical low! Please plug in AC adapter.”
appears on the screen, the device turns off automatically.
4. When power is insufficient, please turn off the device first
and then plug in AC adaptor to recharge the battery.
5. Personal data will be retained even the device is out of
power, but please remember to turn off the power before taking
out the battery.
Freedom in Technology; Freedom in life
10
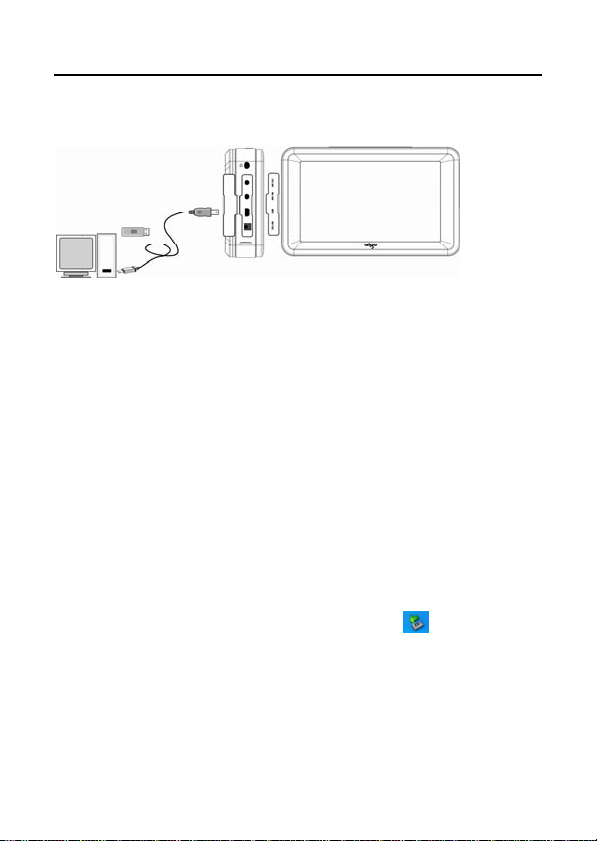
3. Connecting to your PC
The player can act as a standard USB removable storage disk in
Windows. Files can be transferred between the PC and the player.
3.1 Use of the player as Removable Storage Space
1. Start your computer.
2. Turn on the aigo P882 player, insert the smaller end of the USB
line into the USB port of the aigo P882 player and insert the other
end into the USB port of PC. An icon should appear indicating that
aigo P882 is connected.
3. Double click “My Computer”, and you will see a new “Removable
disk” icon, representing the built-in hard drive of the aigo P882
player.
Note: When using the player for the first time, the system will
spend some time on searching for an aigo P882 driver, please
wait patiently. In Windows 2000/XP, an icon will appear in
the bottom right in the taskbar, which represents the aigo P882
removable storage.
4. Aigo P882 can be used as removable storage to copy, modify
and delete files.
Indice
Altri manuali Aigo Lettore multimediale


