AL Tech DSD 4121RV Manuale utente


2 | P a g e
© Copyright 2013 Altech UEC (Pty) Ltd
TABLE OF CONTENTS
1INTRODUCTION.............................................................................4
1.1 EXTERNAL HARD DRIVE (HDD) SPECIFICATIONS ...............................................4
1.2 PVR EXTENSION.............................................................................................4
2REMOTE CONTROL.......................................................................5
2.1 PVR REMOTE CONTROL BUTTON FUNCTIONS.....................................................6
3HDD CONNECTION........................................................................7
3.1 HARD DRIVE DETECTION .................................................................................7
3.2 HARD DRIVE FORMAT......................................................................................7
3.3 HARD DRIVE PROBLEMS ..................................................................................7
4RECORDING...................................................................................8
4.1 INSTANT RECORD ............................................................................................8
4.2 TV GUIDE (EPG) RECORD ...............................................................................8
4.3 TIMEBASED RECORD........................................................................................9
5CONFLICTS ..................................................................................11
5.1 LIMITATIONS .................................................................................................11
6PAUSE LIVE TV............................................................................11
6.1 PAUSING ......................................................................................................11
6.2 PAUSE BUFFER.............................................................................................11
6.3 VIEWING PAUSE BUFFER RESET.....................................................................12
6.4 VIEWING PAUSE BUFFER AND RECORDING......................................................12
7PLAYLIST......................................................................................13
7.1 PLAYBACK ....................................................................................................13
7.2 DELETE EVENT .............................................................................................14
7.3 SORTING ......................................................................................................14

3 | P a g e
© Copyright 2013 Altech UEC (Pty) Ltd
8SCHEDULED LIST........................................................................14
8.1 VIEWING.......................................................................................................14
8.2 DELETE EVENT .............................................................................................15
8.3 SORTING ......................................................................................................15
8.4 TIMEBASED RECORDING ................................................................................15
9PVR SETUP..................................................................................16
9.1 PVR SETUP MENU........................................................................................16
9.2 RECORDING OFFSETS ...................................................................................16
9.3 JUMP SETTINGS ............................................................................................17
9.4 SAFELY DISCONNECT HARD DRIVE.................................................................17
9.5 FORMAT HARD DRIVE....................................................................................17
10 PVR INFO......................................................................................18
10.1 HARD DRIVE INFORMATION ............................................................................18
11 TROUBLESHOOTING ..................................................................19
11.1 HARD DRIVE NOT CONNECTED.......................................................................19
11.2 HARD DRIVE HAS INCORRECT FORMAT ...........................................................19
11.3 HARD DRIVE IS FULL......................................................................................19
11.4 HARD DRIVE SPACE ONLY SAYS 1TB WHEN IHAVE CONNECTED
A 2TB DRIVE ...............................................................................................................20
11.5 TIMEBASED RECORDING WON’T SCHEDULE BECAUSE OF
INVALID VALUES ..........................................................................................................20
12 FREQUENTLY ASKED QUESTIONS...........................................21
12.1 HOW MANY HOURS CAN IRECORD?...............................................................21
12.2 HOW DO IERASE ALL THE PROGRAMS IN THE PLAYLIST?................................21
12.3 CAN IPLAYBACK MY RECORDED PROGRAMS ON A COMPUTER? .......................21
12.4 CAN IVIEW SUBTITLES ON APLAYBACK?.......................................................21

4 | P a g e
© Copyright 2013 Altech UEC (Pty) Ltd
1INTRODUCTION
Congratulations on your purchase of the VAST PVR Ready Extension Pack.
1.1 EXTERNAL HARD DRIVE (HDD) SPECIFICATIONS
1.1.1 Either a 2.5” or 3.5’’external hard drive is required for recording.
1.1.2 The maximum supported capacity is 1TB. If a hard drive larger than 1TB is
used, it will be formatted to use only 1TB.
1.1.3 Altech UEC strongly advises against the use of USB memory sticks in this PVR,
due to their low access speed and limited read-write cycles. The constant
transfer of AV data can damage or considerably shorten the useable lifespan of
USB memory sticks.
1.1.4 A list of recommended hard drives can be found on our website at
www.uec.com.au
1.2 PVR EXTENSION
1.2.1 This PVR Extension Pack adds features to the existing software.
1.2.2 All existing functions will behave as per the DSD4121RV Basic Viewers Guide,
except:
1.2.2.1 Reminders will not display while a recording is in progress.
1.2.2.2 A limited TV Guide will be available while a recording is in progress.

5 | P a g e
© Copyright 2013 Altech UEC (Pty) Ltd
2REMOTE CONTROL
One Touch
Record
Jump
Backward
Schedule
Recordings
Playlist &
Pause/Play
Forward
Fast
Playback
Stop
Settings
Closed
Captioning
/Subtitles

6 | P a g e
© Copyright 2013 Altech UEC (Pty) Ltd
2.1 PVR REMOTE CONTROL BUTTON FUNCTIONS
2.1.1 NOTE : Not all remote buttons will be enabled on this remote until the PVR
activation has been successful.
BUTTON
FUNCTION
PVR
Launches the PVR Menu. From here you can access the Playlist,
Scheduled List, PVR Setup menu and PVR Info screens.
R
Pressing “R” (Record) when watching live TV will record the
current program. The recording will automatically complete when
the program finishes.
JUMP BACKWARD
Use this button to jump backwards when watching a recorded
program or viewing behind live.
The jump settings are configurable in the PVR Setup menu.
Pressing this button will jump back by the “SMALL” jump amount.
Holding this button will jump back by the “BIG” jump amount.
FAST FORWARD
Use this button to fast forward a recorded program or when
viewing behind live.
Pressing the button repeatedly will increase the speed of the fast
forward up to a maximum of 9x speed.
Pressing Play will stop the fast forward and play the program back
at normal viewing speed.
Holding this button will jump forward by the “BIG” jump amount
which is configurable in the PVR Setup menu (min. 10mins).
STOP
STOP will end the viewing of a recorded program and return you
to the playlist.
STOP can also be used to jump back to live if you are viewing
behind live.
PLAY / PAUSE
Pressing this button will pause live TV. Press the button again to
resume playing back behind live. This button is also used to pause
the program while watching a recorded program.
TV GUIDE
The TV GUIDE button launches the TV GUIDE which will allow you
to browse through future programs. Pressing “R” on the selected
event in the TV Guide will schedule a recording for that event.
TV/RADIO
Press this button once to switch between TV and radio services.
Hold the button down to launch the bouquet popup (if available)

7 | P a g e
© Copyright 2013 Altech UEC (Pty) Ltd
3HDD CONNECTION
3.1 HARD DRIVE DETECTION
3.1.1 Insert the hard drive’s USB cable into the USB port at the rear of the set top
box.
3.1.2 Turn on the hard drive’s power switch (if applicable).
3.1.3 Press ‘PVR’ on the remote and scroll left to the “PVR Setup” icon and press OK
to enter the “PVR Setup” menu screen.
3.1.4 In this menu, you can see the current status of the hard drive.
3.2 HARD DRIVE FORMAT
3.2.1 When a hard drive is used with the PVR for the first time, it will need to be
formatted before any PVR functions can be used.
3.2.2 In the “PVR Setup” menu, scroll down to the “Hard Drive Format” option and
press OK.
3.2.3 The hard drive format will take a few minutes. Once completed, the HDD Status
should say “Connected and working”
3.3 HARD DRIVE PROBLEMS
3.3.1 Please see trouble shooting guide at the end of this manual.

8 | P a g e
© Copyright 2013 Altech UEC (Pty) Ltd
4RECORDING
There are a number of ways to schedule a recording:
4.1 INSTANT RECORD
4.1.1 If you want to record the program you are currently watching, press the record
button on the remote control.
4.1.2 A record start icon will appear and a red dot will appear in the iplate indicating
that the event is recording.
4.2 TV GUIDE (EPG) RECORD
4.2.1 Scroll in the TV Guide to highlight the program you would like to record, then
press the record button.
4.2.2 A red dot will appear indicating that recording is scheduled.

9 | P a g e
© Copyright 2013 Altech UEC (Pty) Ltd
4.3 TIMEBASED RECORD
4.3.1 A Timebased recording can be scheduled, where you manually set the channel,
start time, duration and parental guidance setting.
4.3.2 A Timebased recording will appear as a single recording in the playlist, even if
the duration spans multiple programs, and the individual program information
within the recording cannot be accessed.
4.3.3 Because individual program information cannot be accessed, an overall
parental block setting for the recording can be set. Choosing Parental Setting
“ON” means the Parental guidance pin will need to be entered before the
playback can start.
4.3.4 The maximum duration of a time based recording is 24 hours.
4.3.5 To schedule a timebased recording:
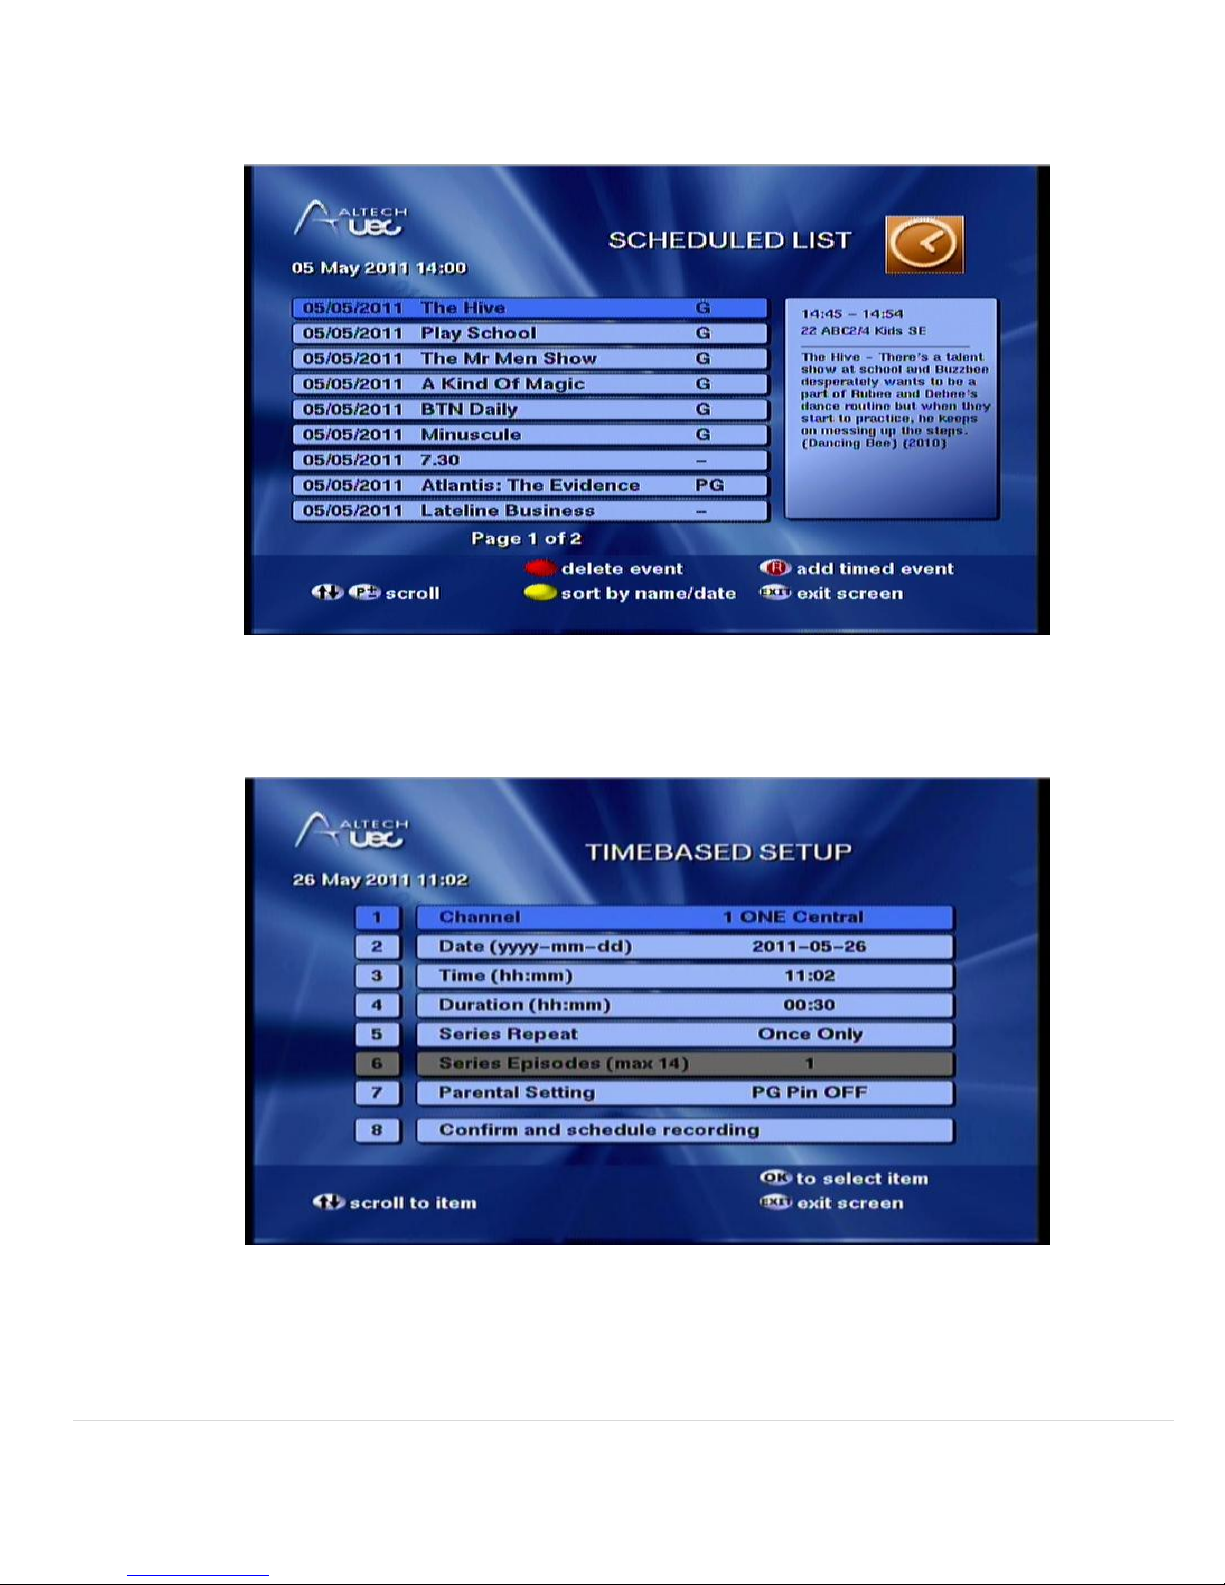
4.3.5.1 Press the PVR button.
4.3.5.2 Scroll to the Scheduled List icon and press OK to launch the Scheduled List
screen.
10 | P a g e
© Copyright 2013 Altech UEC (Pty) Ltd
4.3.5.3 Press the “R” (Record) button on the remote control to add a
Timebased recording (timed event).
4.3.5.4 The following screen will appear:
4.3.5.5 Press OK on a field to edit it.
4.3.5.6 Use left and right arrow buttons to change the selected channel and
the parental setting, and use the number keys to enter in the
date/time/duration.
Altri manuali per DSD 4121RV
1
Indice
Altri manuali AL Tech Registratore digitale


