Amano Amano TCX 21 Manuale utente

TCX-21
Electronic Time Clock
Operation Manual

Safety
1. Installation, maintenance, etc, of this apparatus should only be
performed by a qualified electrician.
2. The power cord may be used as a 2-pole main disconnect device.
Therefore, always place the electrical outlet for the power cord close
to the equipment.
Proprietary Notice
This document contains proprietary information and such information
may not be reproduced in whole or in part without the written
permission from Amano Cincinnati, Inc., 140 Harrison Avenue,
Roseland, New Jersey, 07068.
Amano Cincinnati, Inc. reserves the right to make equipment changes
and improvements which may not be reflected in this document.
Portions of this document may have been updated to include the latest
hardware or firmware version, if applicable.
We recommend that this document be read in its entirety before any
attempt is made to operate the equipment.

Specifications
Power Requirements: AC100V ± 10%, 50/60Hz
AC120V ± 10%, 60Hz
AC230V ± 10%, 50/60Hz
Ambient Temperature: -10°C to 45°C (14°F to 113°F)
Ambient Humidity: 10% to 90% (non-condensing)
Dimensions: 6 7/8” (175 mm) wide x 8 1/4” (210 mm) high x
6 1/4”(159 mm) deep
Weight: 3.196 Kg (7 lbs.)
Environment: Indoor use only; dust-free environment. Keep
out of direct sunlight
External View
Page 1

Removing the Cover & Packing Materials
1. Turn the key clockwise to
unlock the cover.
2. Lift the cover up, then pull it
towards you to remove it.
3. Lift the printer block and
remove the spacer.
4. Remove the spacer between
the Ribbon Cartridge and the
Printer Carriage.
5. Re-install the cover. Your
TCX-21 is ready for use!
Internal View
Page 2

Page 3
Power Connection
Before connecting power, verify that the AC outlet voltage falls in the
range of 100-240 Volts AC and that the power cord and plug are
appropriate for your AC source. Plug the power cord into a properly
grounded 120 or 240 Volt wall outlet.
Wall Mounting
Note: Mounting screw locations should be marked on the wall. Do
not insert a drill bit through the mounting holes of the back plate
when drilling holes.
1. Disconnect the power cord from the power source.
2. Unlock and remove the cover.
3. Locate the teardrop mounting hole and the two 1/4” mounting holes
in the back plate.
4. Approximate the final location of the clock. Insert one #10 wood
screw or equivalent into the wall 1-1/2” (38 mm) from the top center
location of the clock.
5. Hang the clock on the screw using the teardop mounting hole.
6. Secure the clock to the wall by inserting screws through the bottom
two mounting holes.
7. Reconnect the power cord to the power source.
8. Re-install the cover and secure.

Make a Test Print
1. Make sure that there is power to the TCX-21 (Refer to Page 3).
2. Insert a piece of paper or time card into the TCX-21. The clock will
automatically print YEAR, MONTH, DATE and TIME with AM or PM.
3. If the imprint is satisfactory, the TCX-21 is ready for use.
4. If you wish to change the time and/or print style on the TCX-21, you
must enter the Program Mode to make changes to the print style.
Continue to the next page for instructions on programming the TCX-
21 to fit your needs.
Adjusting the Margin
1. Unlock and remove the cover.
2. Locate the Card Stopper
Adjustment Screw on the
right side of the clock,
below the printer platen.
3. Position a piece of paper or time
card as desired.
4. Loosen the screw to move the
Card Stopper forward or back.
Tighten the screw as needed.
(See top illustration.) The print
margin can be adjusted to a
maximum of 7/8” (22 mm).
Page 4

Program Mode Guide
Unlock and remove the cover. Locate the PROGRAM, CHANGE and
ENTER buttons on top of the clock.
The PROGRAM button is used to enter and exit the Program Mode.
Press the PROGRAM button at any time to exit the Program Mode.
If a program step is in the process of being changed when this button
is pushed, the new information will not be saved.
The CHANGE button is used to change the information on the
display. When you are reviewing the main programming menu, use
the CHANGE button to advance to the next programming step. When
you are revising a programming step, use the CHANGE button to
change the blinking information.
The ENTER button is used to accept the information shown on the
display and save it in memory.
The RESET button is located on the right side of the clock. Pressing
this button will clear any jams or errors.
Page 5

Entering the Program Mode
1. Unlock and remove the cover.
2. Press and hold the PROGRAM button to access the
Main Programming Menu. The Main Programming
Menu consists of the following:
3. When Pl
ddAAEE
flashes in the display, release the
PROGRAM button. To move to the next menu item,
press the CHANGE button.
Note: If no other button is pressed after five minutes, the clock will
return to the Normal Mode and the clock hands will reset.
Setting the Year, Month and Date
1. When the display flashes Pl
ddAAEE, press the ENTER
button.
2. Press the CHANGE button until the correct year
appears, then press the ENTER button.
3. Press the CHANGE button until the correct month
appears, then press the ENTER button.
4. Press the CHANGE button until the correct date
appears, then press the ENTER button.
5. When the display flashes the correct year, month and
date, press the ENTER button.
6. When the display flashes Pl
ddAAEE, press the CHANGE
button to move to Setting the Clock Time.
Page 6
P l
ddAA
EE
9 5
00ll
00ll
9 8
00ll
00ll
9 8
004400ll
9 8
0044ll88
P l
ddAA
EE
P l
ddAAEE

Setting the Clock Time
Note: Use a 24 hour and 60 minute format when setting the time.
For example, 2:00 PM = 14:00.
1. When the display flashes P2 CCLLoocc, press the ENTER
button.
2. Press the CHANGE button until the correct hour
appears, then press the ENTER button.
3. Press the CHANGE button until the correct minute
appears, then press the ENTER button.
4. When the display flashes the correct time, press the
ENTER button.
5. When the display flashes P2 CCLLoocc, press the CHANGE
button to move to the Daylight Saving Time On/Off
Setting.
Disabling/Enabling Daylight Saving Time (DST)
Note: When this setting is set to ON, the clock’s time will
automatically change for DST. When this setting is set to OFF, the
clock’s time will not change for DST. The dates to begin and end
DST are set in the Other Options Menu (See Page 14).
1. When the display flashes P3 ddLLSS, press the ENTER
button.
2. Press the CHANGE button to alternate between On
and Off.
3. When the display flashes the correct setting, press the
ENTER button.
4. When the display flashes P3 ddLLSS, press the CHANGE
button to move to the Quick Set-Up Code setting.
Page 7
P 3
ddLLSS
P 3
ddLLSS
oonn
ooFFFF
P 2
CCLLoocc
ll22::0000
ll44::0000
ll44::0077
P 2
CCLLoocc
Page 8
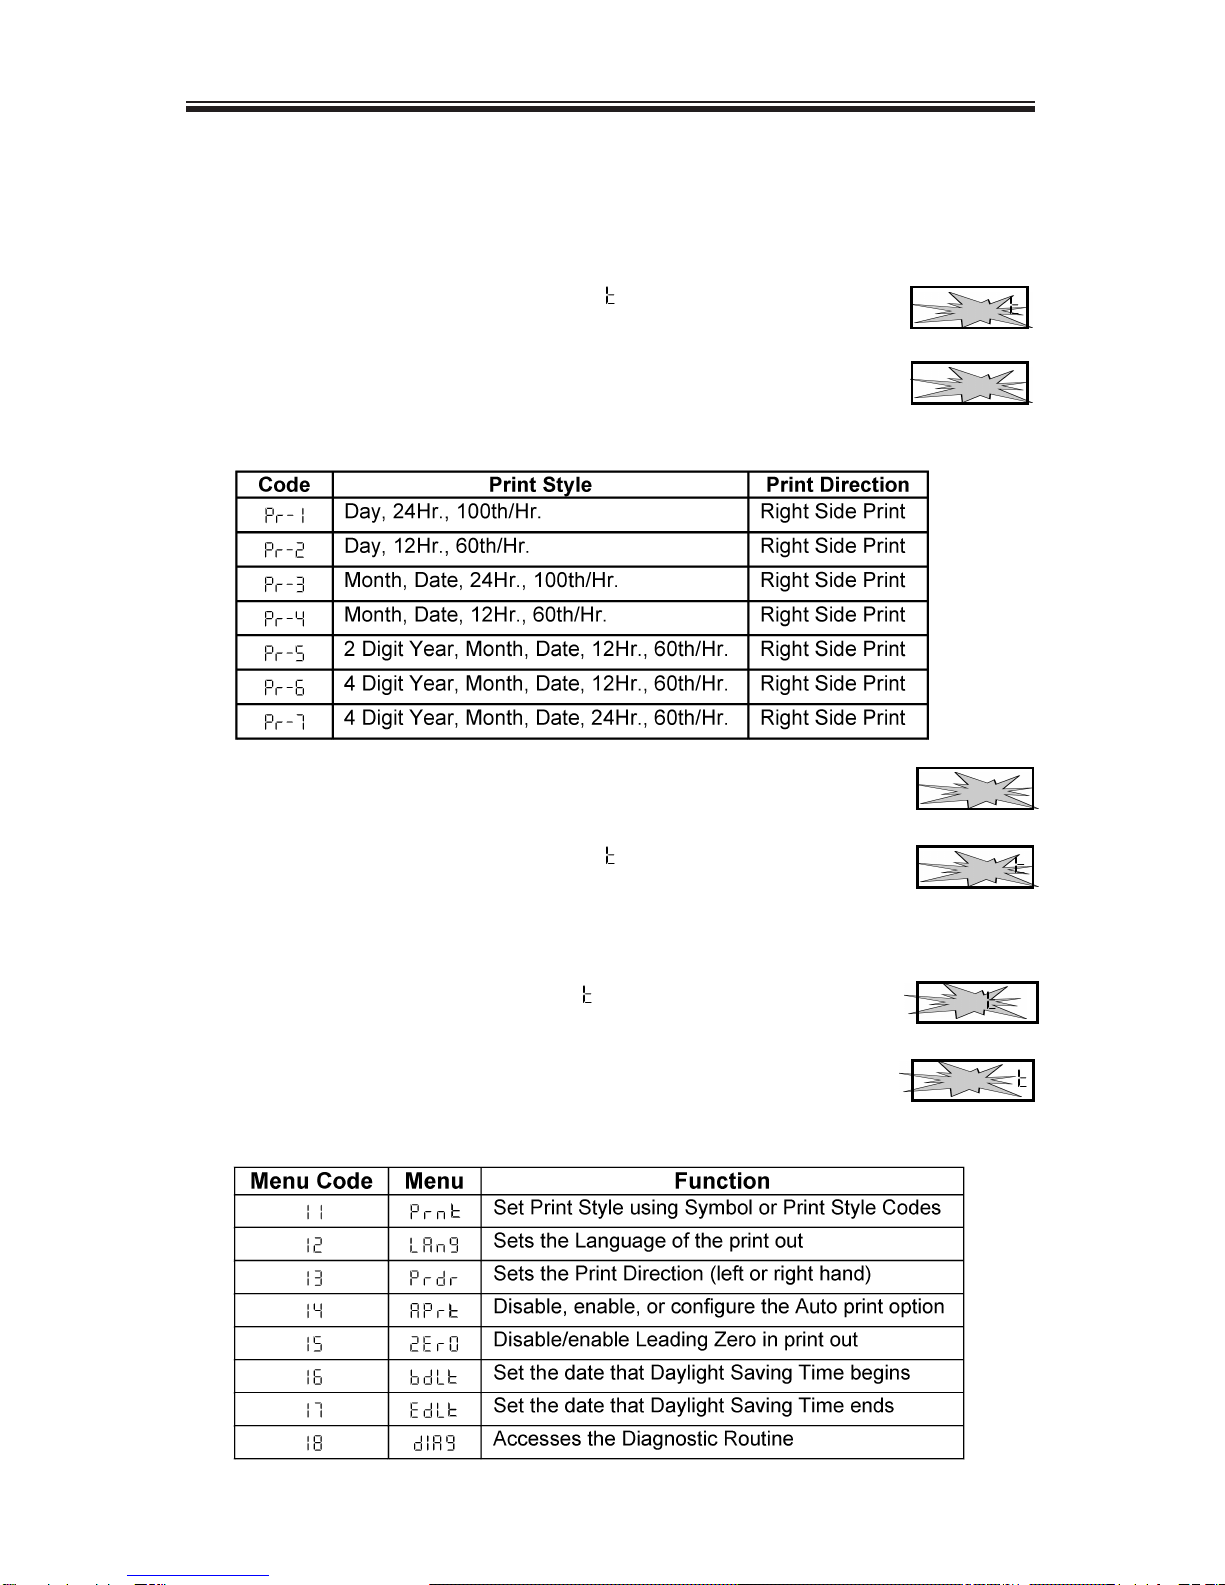
The Quick Set-Up Code Setting
Note: If you do not wish to use one of the Quick Set-Up Code
settings, you may set an alternate style on the following page.
1. When the display flashes P4 PPrrnn, press the ENTER
button.
2. The display will flash the current setting. Press the
CHANGE button to scroll through each of the Quick
Set-Up Code Settings.
3. When the display flashes the correct setting, press the
ENTER button.
4. When the display flashes P4 PPrrnn, press the CHANGE
button to move to the Other Options menu.
Accessing the Other Options Menu
1. When the display flashes P5 OOhhrr, press the ENTER
button.
2. The display will flash the first programming step in the
Other Options sub-menu. Press the CHANGE button to
advance through the menu selections.
P 5
OOhhrr
I I
PPrrnn
P 4
PPrrnn
PPrr-22
P 4
PPrrnn
PPrr-22
Altri manuali per Amano TCX 21
1
Indice
Altri manuali Amano Orologio marcatempo


Manuali Orologio marcatempo popolari di altre marche


Easy Clocking
Easy Clocking XENIO 500 Manuale

LA CROSSE CLOCK
LA CROSSE CLOCK Harper 404-3450A Manuale utente

Europa components
Europa components ET167DYD Manuale utente

TONIN CASA
TONIN CASA Opaca circle Manuale utente

CS TIMECLOCK
CS TIMECLOCK 2110 Manuale di istruzioni

timetac
timetac Evo Smart Manuale utente