Amica AWSM12D Manuale utente
Operating manual
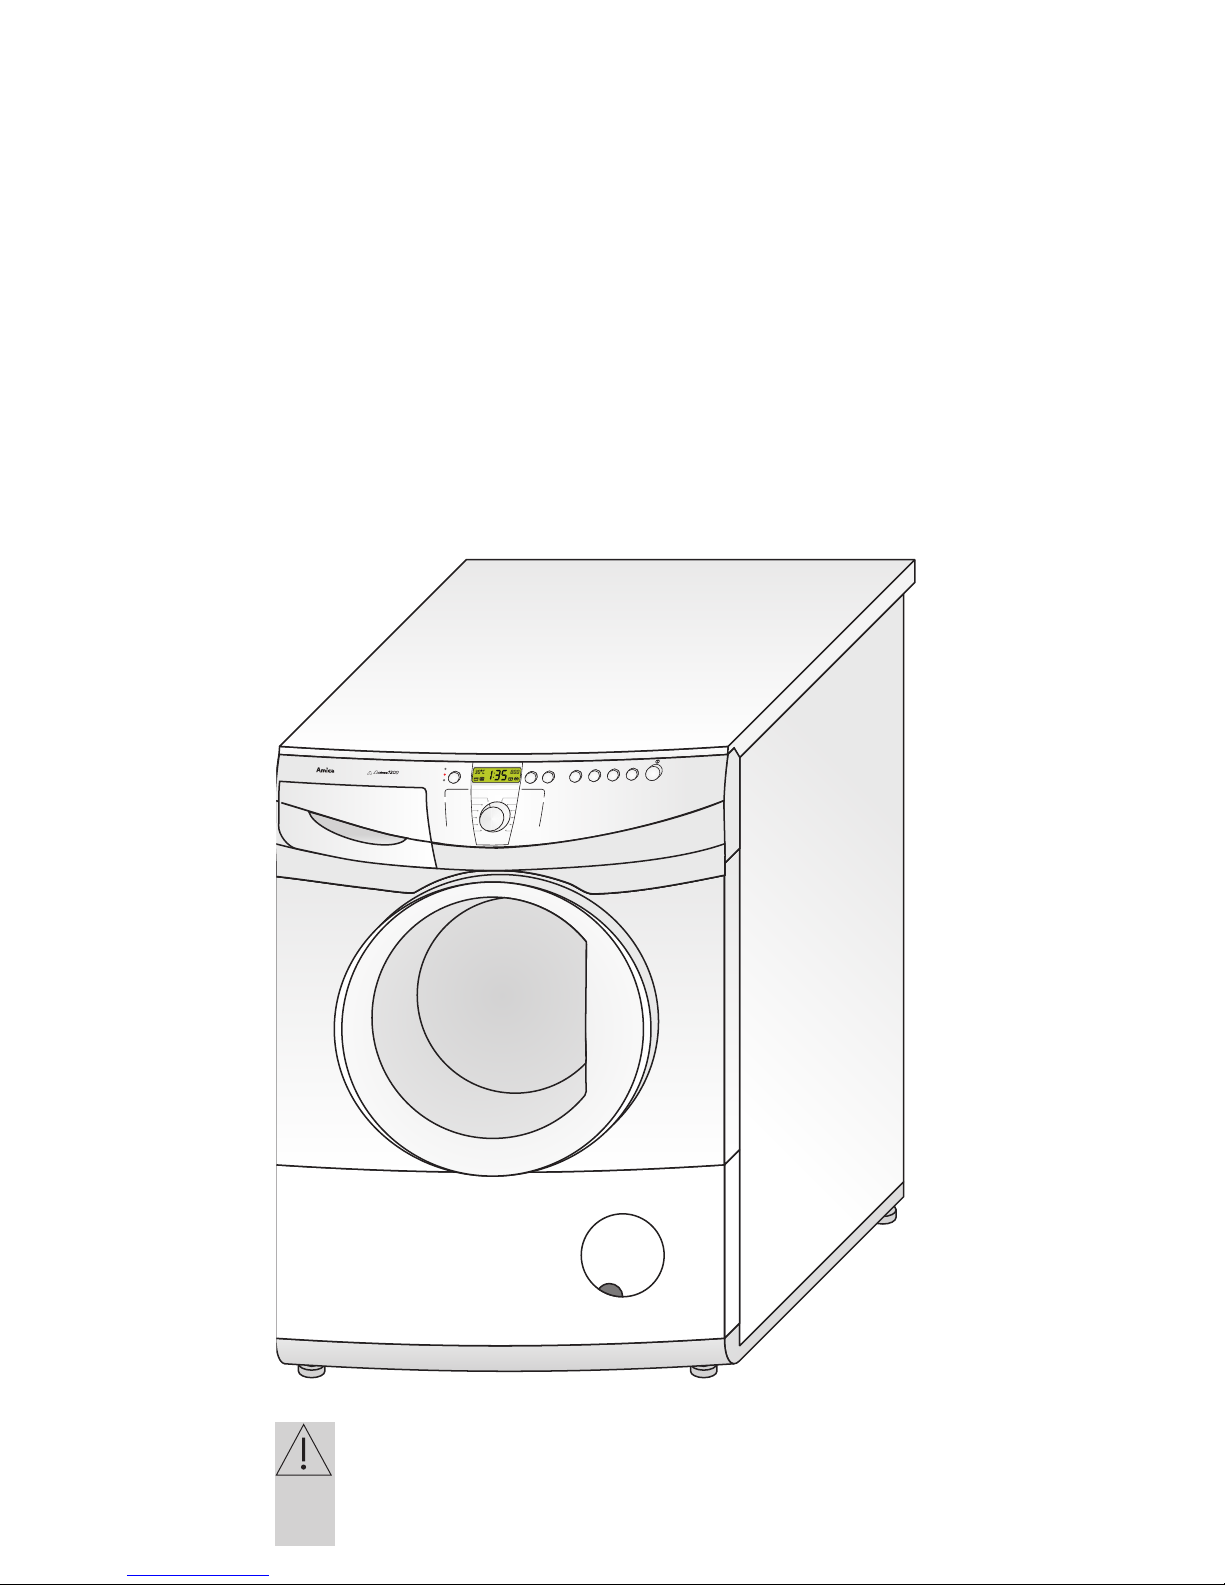
Washing machine
AWSM12D
Start up your washing machine only once you’ve read the
Manual and the abridged Instructions for Use!
+
WASH
WASH IRON
RINSE
INTENSIVE
SHORT EASY
EXTRA
READY
END
RUN
WOOL
HAND WASH
SYNTHETICS
REFRESH
RINSING
AUTO DRAIN
WHITES
SPINNING
RINSING
EFFECT PLUS
EVERYDAY
COLOURS
DELICATE COTTON

2
TABLE OF CONTENTS
General information........................................................................................................3
Safety instructions .........................................................................................................4
Installation.......................................................................................................................5
Troubleshooting guide....................................................................................................7
Care labels symbols......................................................................................................10
Maintenance and cleaning............................................................................................11
Practical washing hints.................................................................................................11
Technical data................................................................................................................16
Guarantee and service..................................................................................................16

3
DEAR CUSTOMER
By reading this Manual you will become a conscious user of new washing machine, a
modern and technologically advanced product.
The new automatic washing machine has been designed by technicians and engineers
working in constructional and research forces, using the latest technical knowledge and
modern designing tools.
It is a perfect response to the key needs of the market such as demand of reliability, func-
tionality, simplicity of operation and modern design.
Every washing machine that leaves our plant is thoroughly inspected and tested before
packing. The tests, carried out on independent inspection stands, check the safety features
and functionality of every nal product. There might still be some moisture or residual water
inside the tested appliances.
Please read the Manual carefully before you start up the appliance.
Compliance with the provided instructions and recommendations will prevent you from
misusing the appliance.
Keep the manual handy at all times.
Carefully observe the Manual to avoid accidents.
Warning!
The washing machine is designed only for household applications and may be used
only for washing machine-washable fabrics and textiles.
Before connecting to the mains, remove all the protective materials and level the
appliance.
The Manufacturer reserves himself a right to introduce changes not affecting the
performance of the appliance.
Usage
- Operate the appliance only after reading and understanding the Manual
- Never use the appliance outdoors or in rooms exposed to freezing temperatures.
Warning! Temperatures below O°C may damage the washing machine!
- Children and persons not familiarised with the Manual must not operate the ap-
pliance.
Certicate of compliance
Compliance with the following Directives:73/23/EEC, 89/336/EEC, 92/75/EEC
The Manufacturer declares that its product complies with the general safety, hygienic and
environmental protection requirements pursuant to the European Community Directives
and that the specic documents applicable to the said product, especially the European
Community Dec la ration of Conformity issued by the manufacturer may be viewed in ofces
of the competent authorities and may be obtained through the Manufacturer.

4
Stability control
When the washing machine is installed and levelled, make sure that all four feet are rest-
ing rmly on the oor by pressing down each corner and checking if the appliance stands
still.
Proper positioning and levelling guarantee safe, reliable and long-term operation.
Warning! Improper levelling and lack of stability may cause the appliance to
move during operation.
lNever allow children to remain unattended near the cooktop nor to play with the
control panel.
lUnless properly supervised by caretakers or upon thorough studies of the operat-
ing manual, the appliance must not be operated by persons (including children)
of limited physical or psychical abilities, these of limited technical expertise, or
unfamiliar with the equipment.
Withdrawal from operation
From safety reasons, a worn out washing machine must be made inoperable. In order to
do so, unplug it and cut off the power lead.
Dispose of the appliance in conformity with local regulations.
Do not use any solvent-containing washing agents as they may dam-
age some parts of the appliance or may release poisonous gases and
create ignition and explosion danger.
The window and door of your washing machine are hot during op-
eration. Do not allow children in the vicinity of the appliance. Use only
those washing agents and bleaches that are appropriate for washing
in automatic washing machines.
Before you begin any transport activities pull out the mains plug. The
washing machine must be locked during transportation. Place both
the upper and bottom interlocks. See Installation.
Data plate specifying all the main technical data is located in the up-
per part of the aback cover.
SAFETY INSTRUCTIONS
Burns
Washing agents
Transportation
Data plate
Loading the wash Do not admit unwanted objects into the appliance. Empty all the pock-
ets, do up all the buttons and fasten zippers. Put small and loose
objects in a cloth bag or pillow case as they may break and damage
the drum and the inside tank. Do not overload the machine.
5
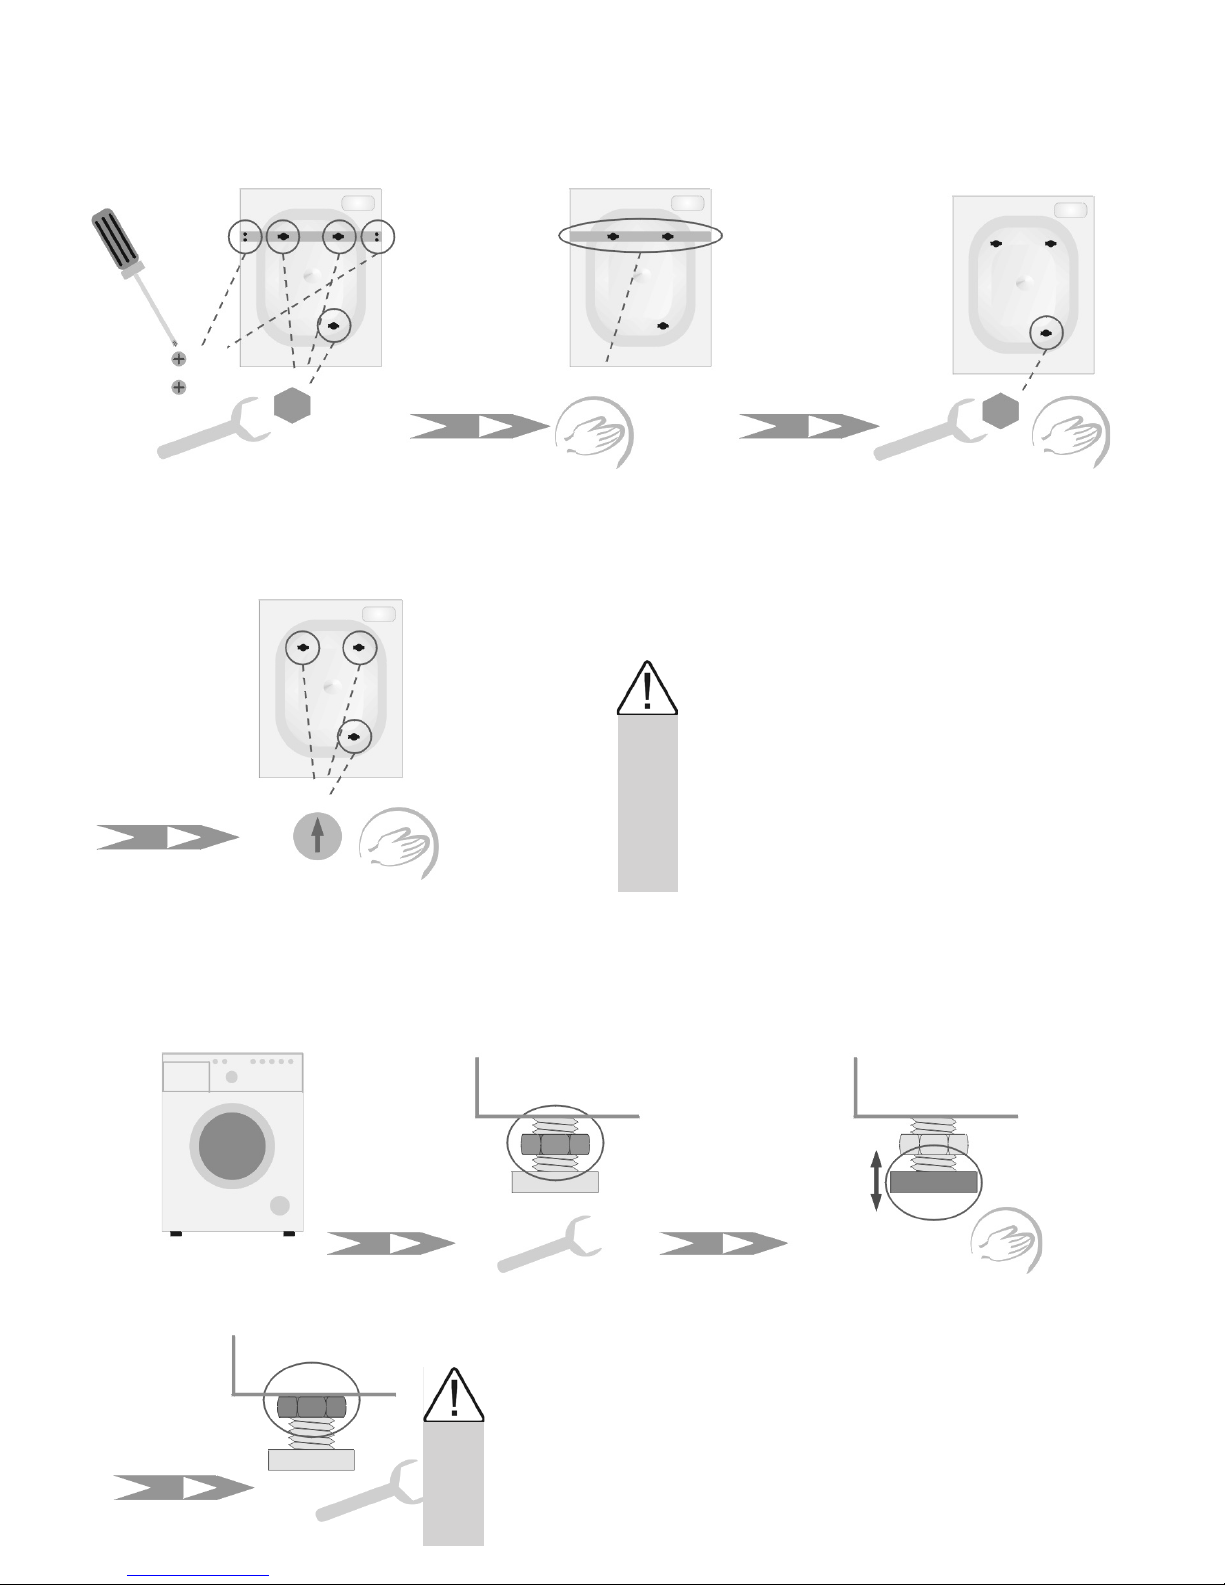
INSTALLATION
I. Remove all the packing materials (keep them for future use!)
lUnscrew the screws using a scre-
wdriver.
lUnscrew the bolts that x the
guard.
lRemove the transport guard toge-
ther with sleeves and bolts.
lUnscrew the bolt
lRemove the sleeve and bolt.
Before you start up the appliance
check that all the locking devices
are removed !
Do not place washing machine on
a carpet!
lPlug holes with stoppers.
II.Positioning and levelling
lPlace the washing machine on a solid
and level oor surface.
lAdjust the feet to level the ma-
chine.
When the washing machine is installed and levelled, make
sure that all four feet are resting rmly on the oor by
pressing down each corner and checking if the appliance
stands still!
Warning! Before you start up the appliance, remove the
protecting foil from the control panel.
lTighten the locknuts!
lSlacken the
locknuts.
6
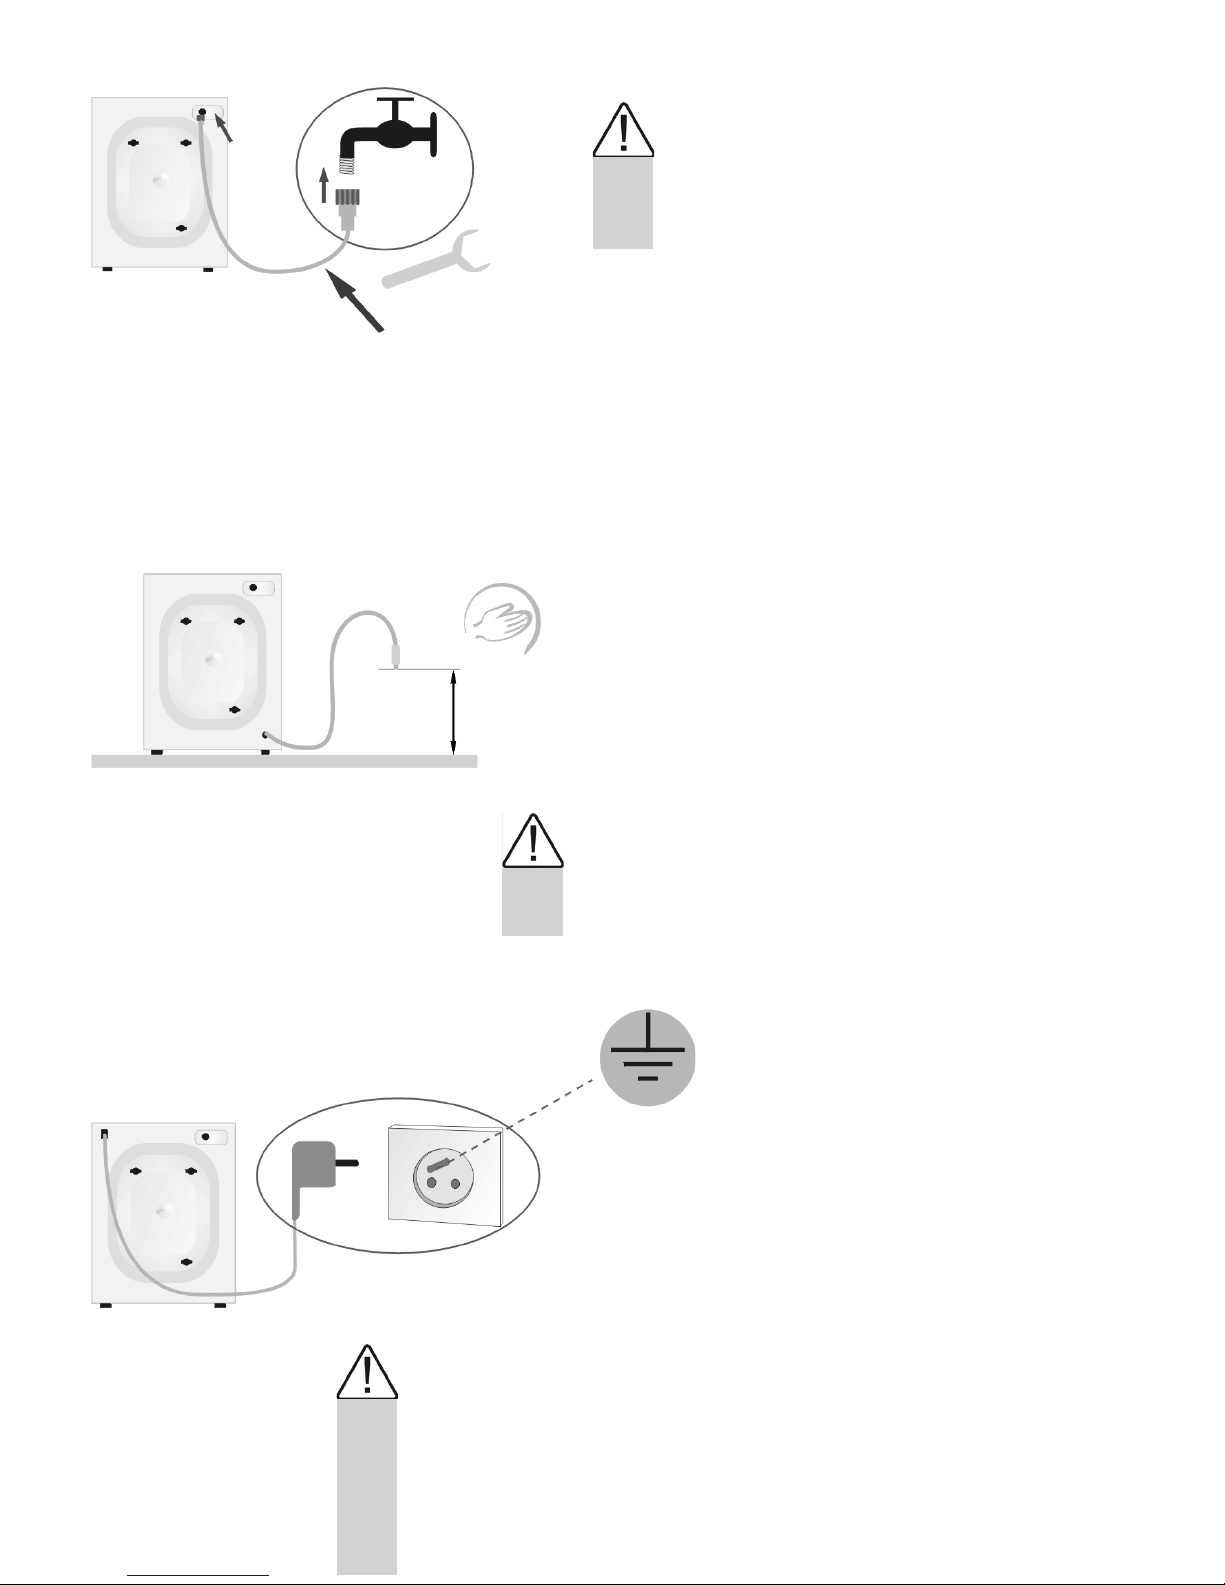
III.Water supply
Inlet hose with seals.
Water pressure min.1bar, max. 8 bar.
Feed the appliance only with cold
water!
IV.Water outlet
max 100 cm
min. 50 cm
V.Power supply
Secure the drain hose so it does not move dur-
ing operation!
Do not insert the drain hose too dip into the
water pipe!
lThe connection must be made with a correctly installed, earthed
and insulated socket!
Do not use extension cords!
lBroken power leads may be replaced only by authorised serv-
icemen.
lPower lead type - H 0 5 V V - F 3G 1,0.
Power lead catalogue number: 8010551
7
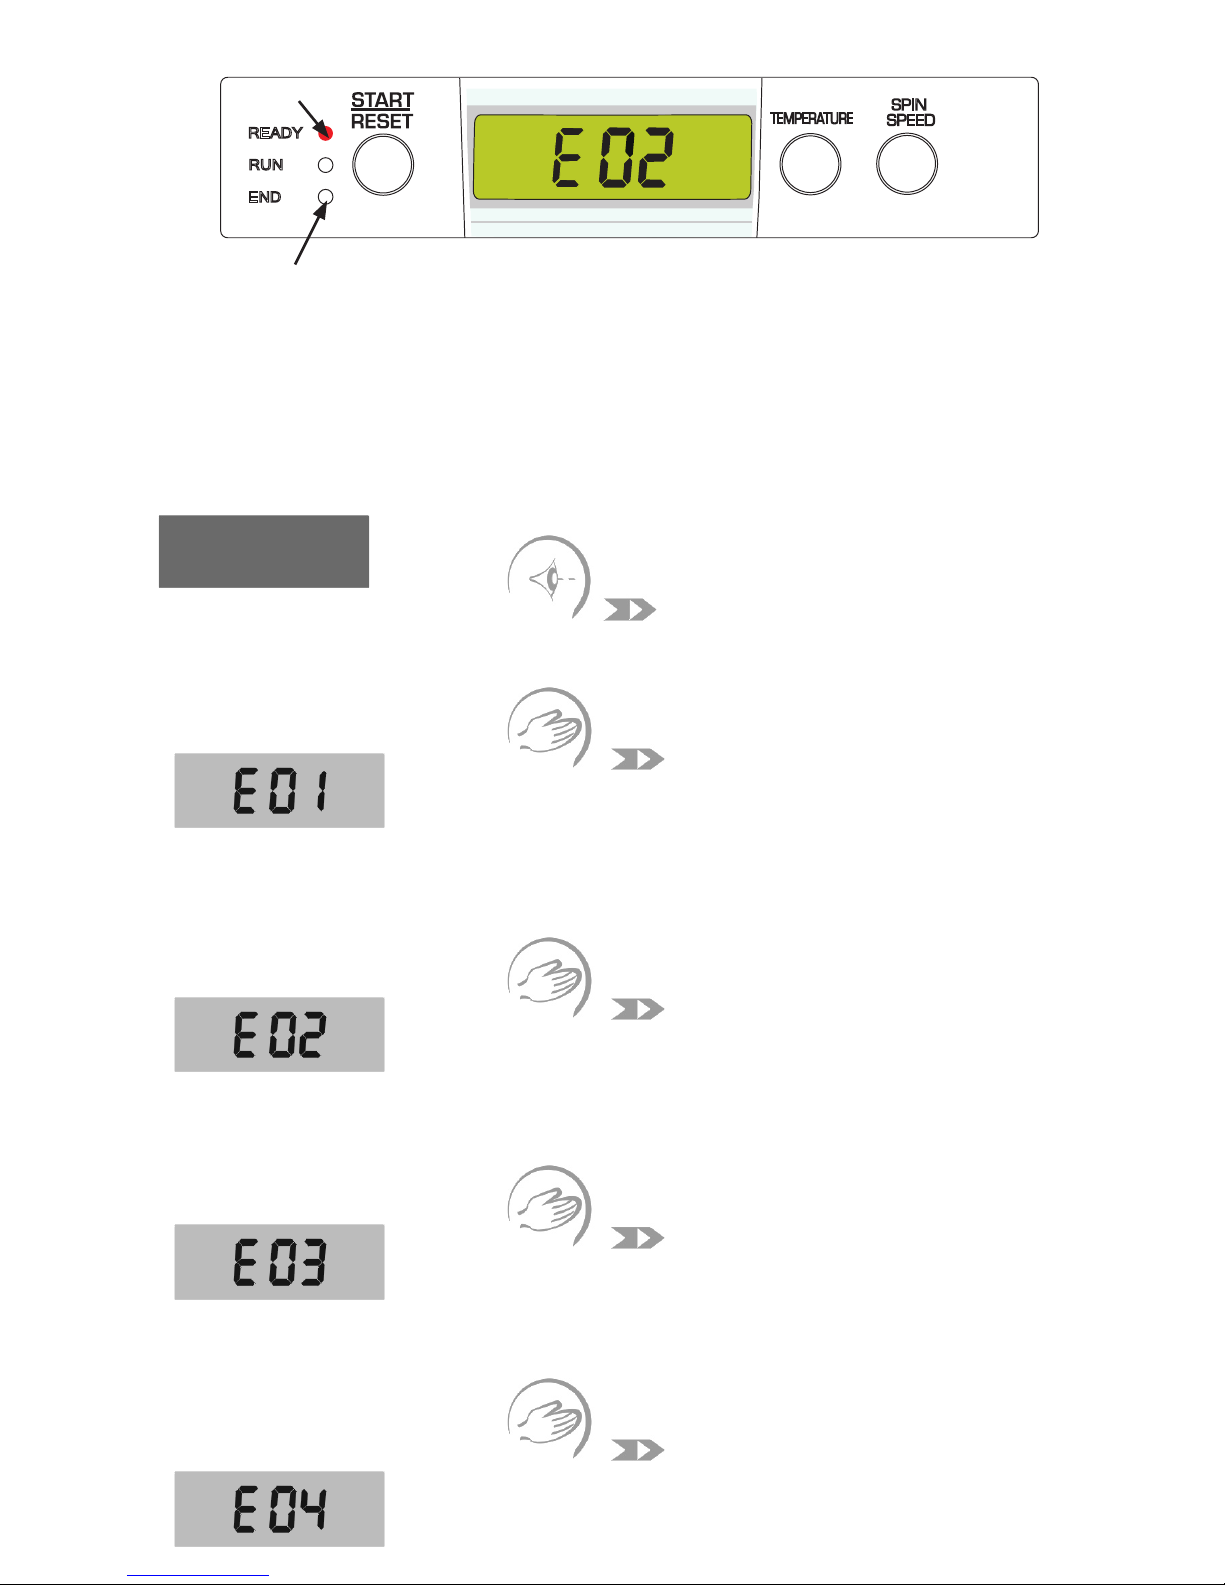
TROUBLESHOOTING GUIDE
Some faults and defects are signalised by E 01 – E 99 error code, ashing READY light
and lighted FINISH light.
Faults that may be remedied by the user.
I.The appliance will not operate
Now display !
lPower failure
lProperly insert the power plug in the
mains socket.
lCheck the mains fuse.
II.The appliance will not operate
lThe door are not closed!
lClose the door.
III.Low pressure lCheck pressure in the water supply
system.
lClean the mesh lter on the water supply-
ing hose.
lTurn the tap on completely.
IV.Pump lter clogged
lClean the lter.
V.Washing machine is overloaded
lClean the pump lter.
lReduce the load.
READY
END
RUN
TEMPERATURE
SPIN
SPEED
Flashing signal light
Shining signal light
8
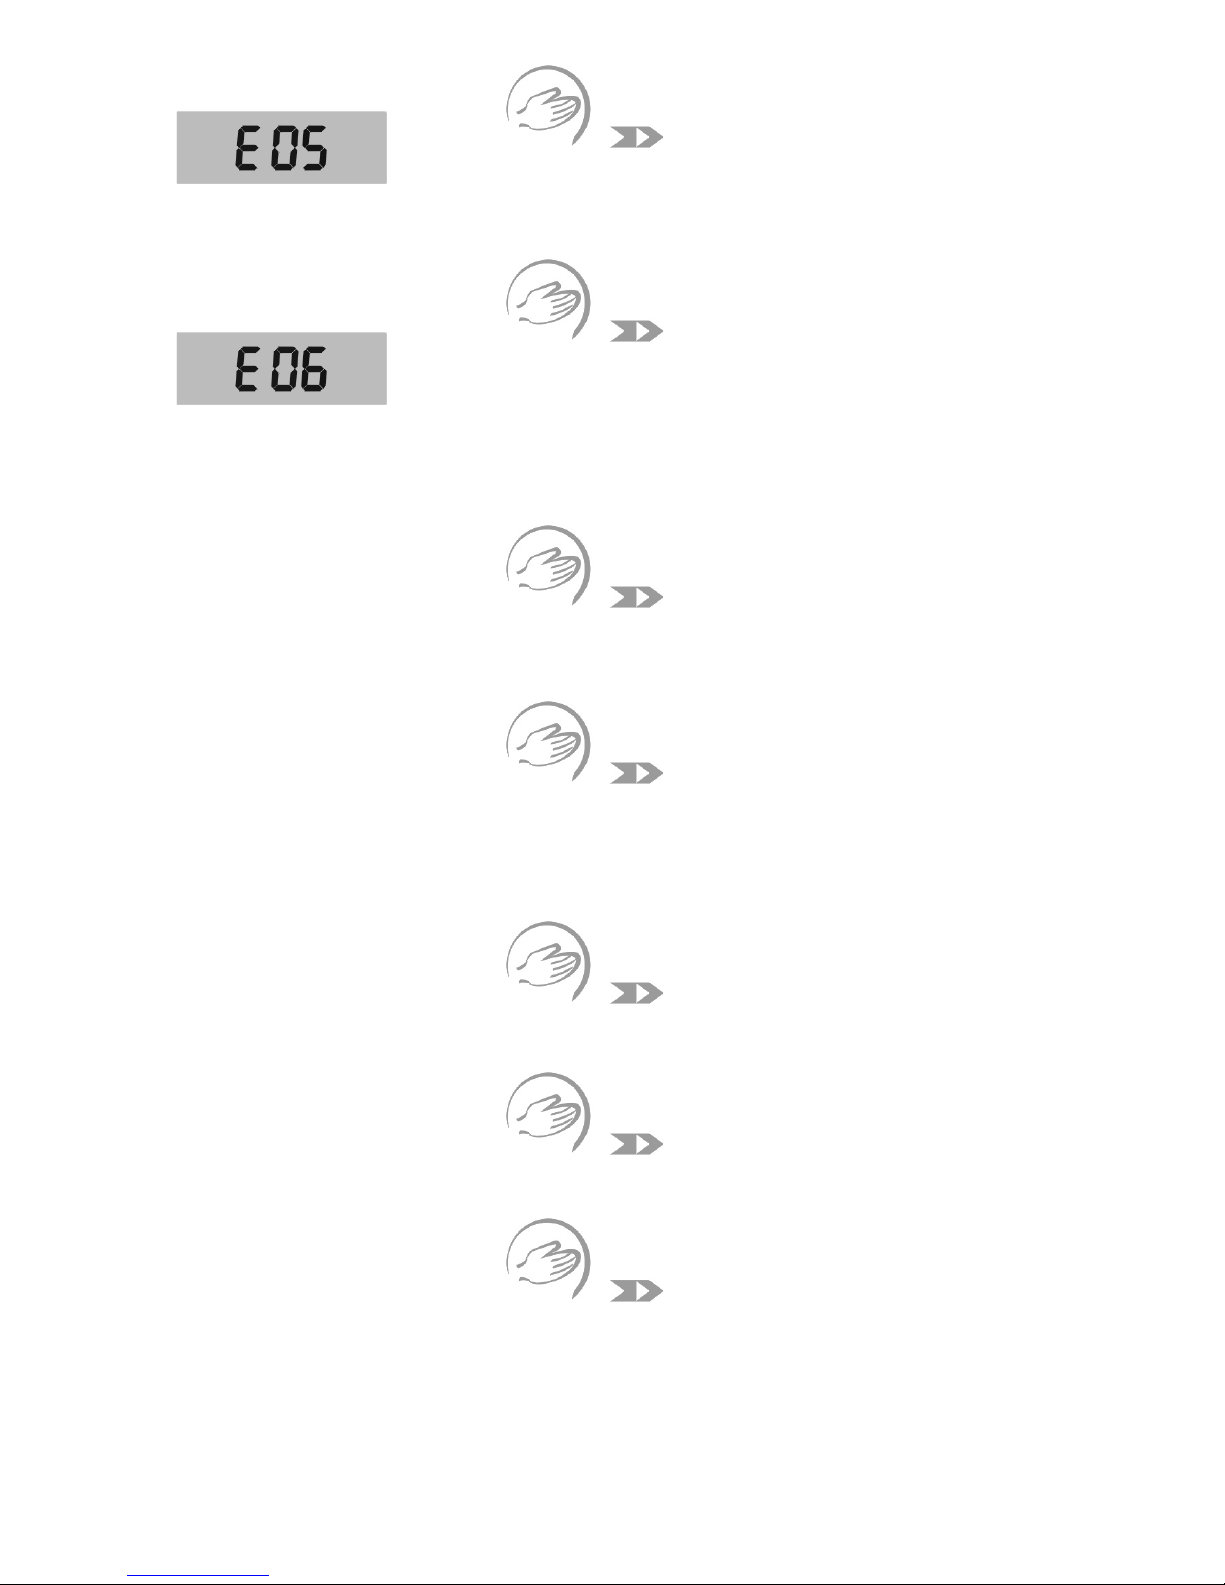
VI.No water in the washing machine
lTurn the tap on completely.
lClean the mesh lter on the water
supplying hose.
VII.Washing interrupted
lClean the pump lter.
lClean the drain hose.
VIII.Water under washing machine
lTighten the pump lter.
lCheck the drain hose and fasten it if
necessary
IX.Washing machine moves
lRemove the transport locking devices.
lPlace the machine in a perfectly horizon-
tal position.
lLock the feet (tighten the locknuts).
X.Poor nal spin results
lClean the pump lter (see ma in te nan ce).
XI.Foam formation lCheck water hardness and adjust
the dose of the washing agent.
lCheck water hardness.
XII.Poor washing results
lAdjust the dose of the washing agent to
the degree of soiling and water hardness
(see recommendations on the washing
agent packaging).
lSelect appropriate programme.
lWater was not pumped out.
9
XIII.Poor rinsing results
The appliance remembers the last error. To cancel the error sign press START button for approx.
3 sec. (see Cancelling a programme).
If error occurs, the appliance will lock the door. To open the door follow the below indications:
- cancel the error sign and wait until the symbol stops ashing or
- switch off the appliance using the button and wait approx. 2 minutes.
Warning! Cancellation only removes the error signal but does not remedy its cause.
If the display shows an error signal larger than E 06 or the activities mentioned above proved un-
satisfactory:
-write down the displayed error code
-switch off the appliance
-pull out the mains plug
-call the service
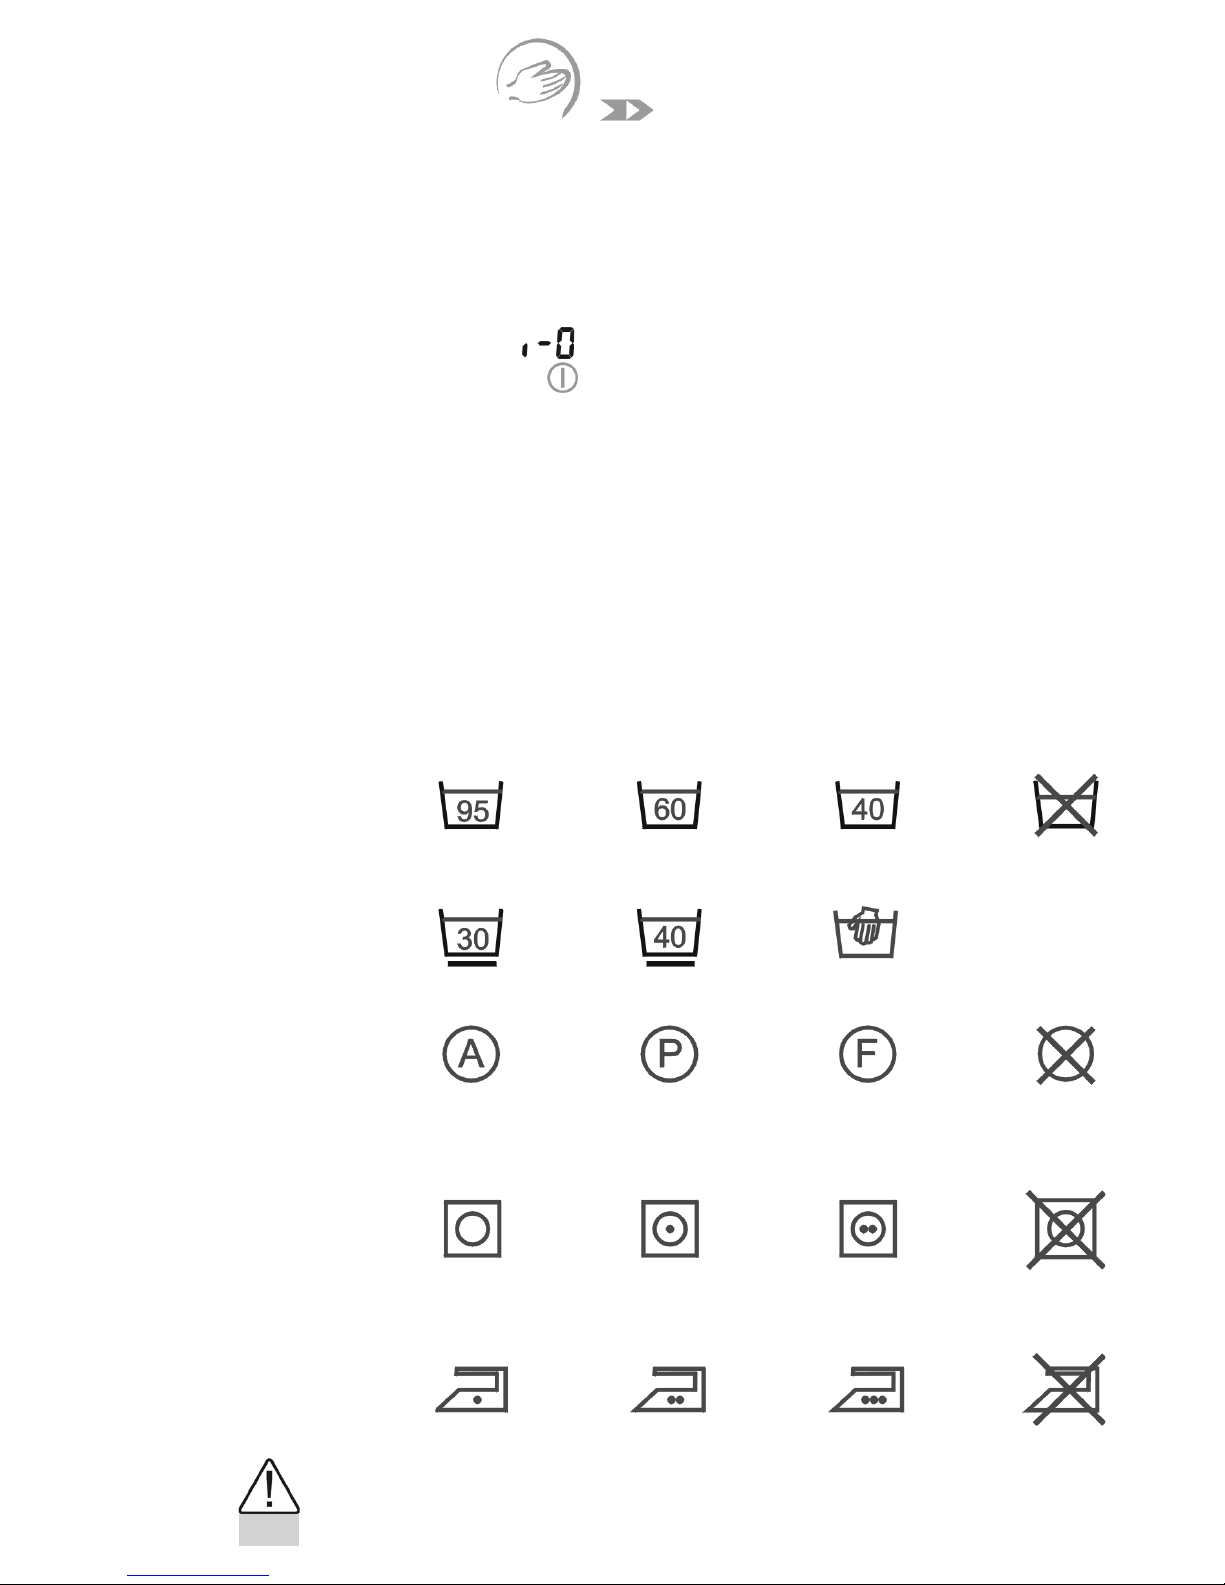
Care label symbols
I. Washing
II. Dry cleaning
III. Spin dryer
IV. Ironing
boiling
temp. 950C
normal
temp. 600C
Do not
wasch!
delicate manual
all solvents
Do not
clean!
normal
Do not
dry!
1100C 1500C 2000C
Select a programme taking into account the care labels indications.
normal
temp. 400C
all but TRI Benzine only
low high
Do not
iron!
lAdjust the dose of the washing agent to
the degree of soiling and water hardness
(see recommendations on the washing
agent packaging).
lSelect appropriate programme.
10
MAINTENANCE AND CLEANING
Never use solvents or sharp, abrasive cleaning agents (for example cleaning powders)
to clean the cover and plastic parts! Clean the appliance using delicate, liquid cleaning
agents.
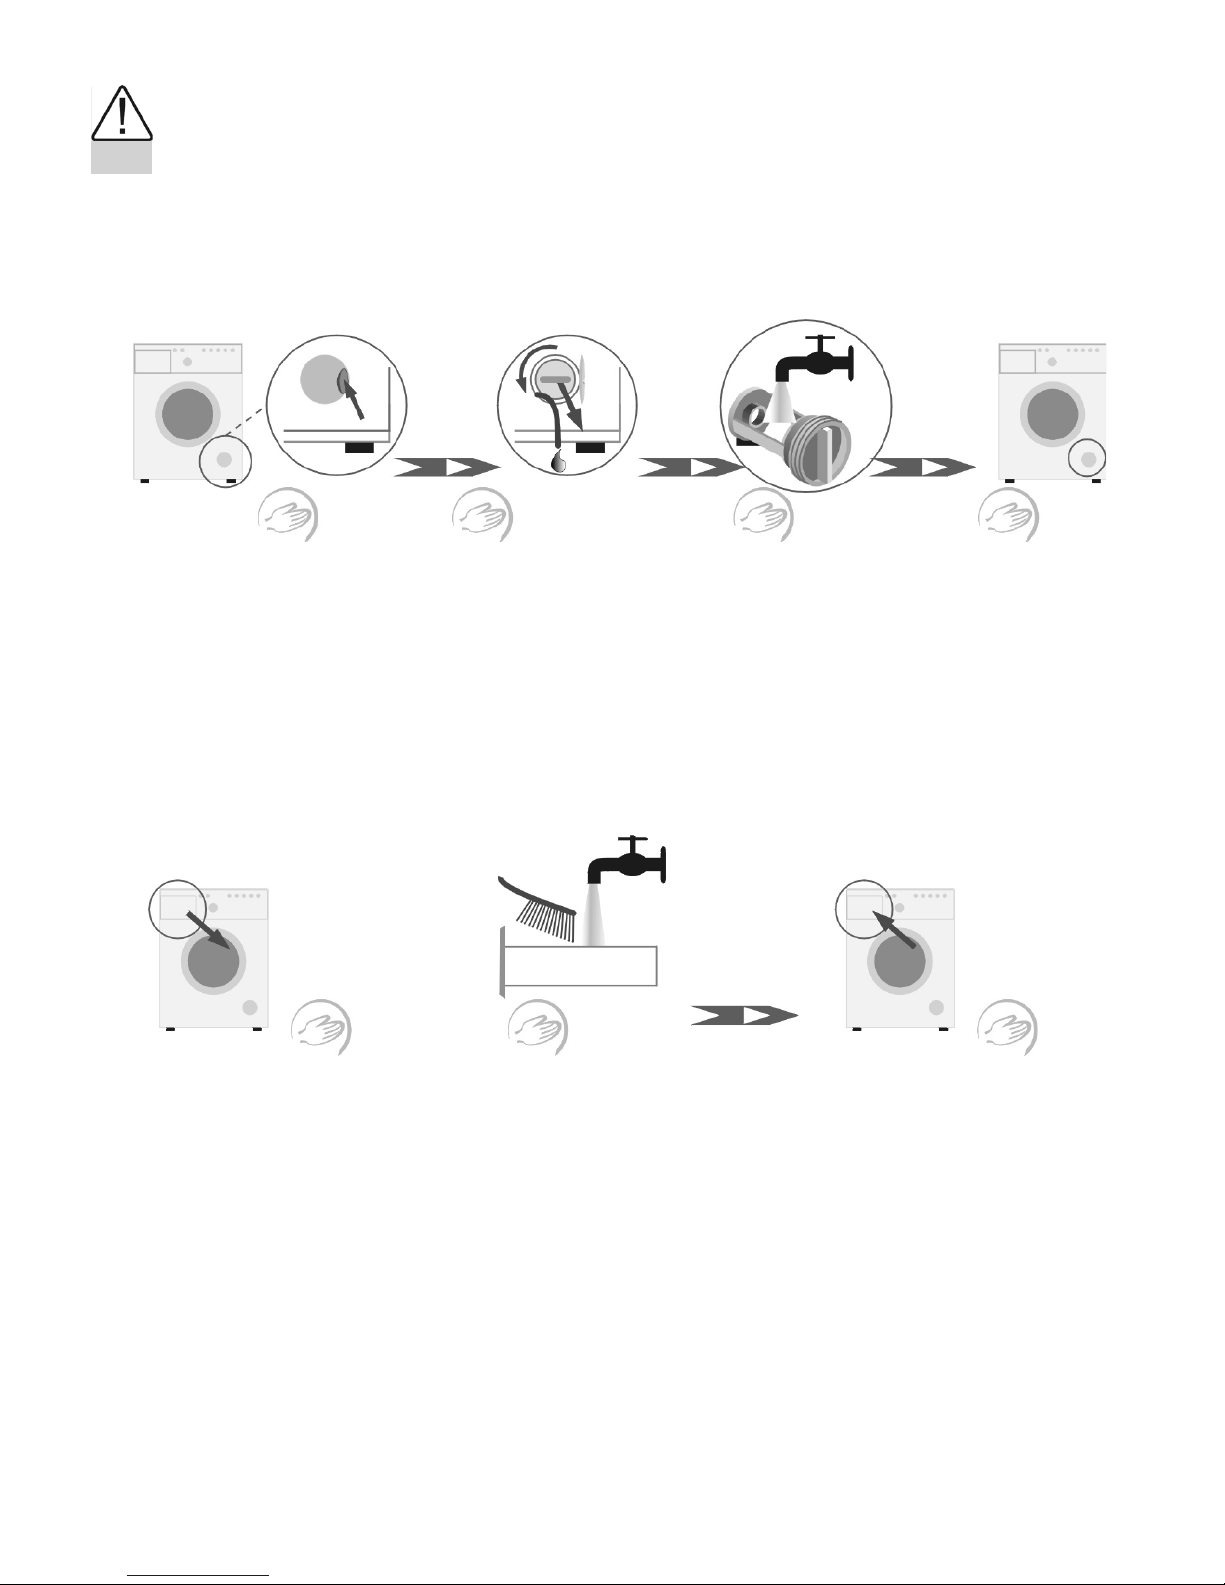
I. . Pump lter
Clean the lter periodically, after approx. 20
washing cycles.
Forgetting to clean the lter may cause dif-
culties in draining water from the appliance!
lOpen the door lTake out the release
lRemove the plug from the
release
lDrain the residual water on
a tray
lUnscrew the lter
lRemove the lter
lRemove the lter pad.
lWash the lter and the
lter pad under running
water.
lReassemble the
lter in a reverse
order.
III. Detergent drawer
lExtract the drawer (pull hard
on it to overcome the limited
protrude).
lWash under running water (use
brush if necessary).
lInsert the drawer
Indice
Altri manuali Amica Rondella

Amica
Amica AWI712S Manuale utente

Amica
Amica WA 484 081 Manuale utente

Amica
Amica IO-WMS-0825 Manuale utente

Amica
Amica AWT714S Manuale utente

Amica
Amica WMA712 Manuale utente

Amica
Amica WA 484 020 Manuale utente

Amica
Amica AWI612L Manuale utente

Amica
Amica AWN912DJ Manuale utente

Amica
Amica AWI814L Manuale utente

Amica
Amica WA 14681 W Manuale utente

Amica
Amica AWN712D Manuale utente

Amica
Amica AWP510L Manuale utente

Amica
Amica AWB814L Manuale utente

Amica
Amica EWA 34657 W Manuale utente

Amica
Amica WT 473 710 Manuale utente

Amica
Amica AWI714S Manuale utente

Amica
Amica WMS814 Manuale utente

Amica
Amica AWCM 10L Manuale utente

Amica
Amica WA 461 030 Manuale utente

Amica
Amica WME610/1 Manuale utente


