
andover Model-One Manuale utente

Page 1
www.andoveraudio.com
Product Manual

Page 2

Page 3
Table of Contents
Warnings / FCC Statement.........................................................4-5
Introduction / About........................................................... 6
In the Box / Room Placement............................................................7
Subwoofer Setup........................................................8, 9
Making the Initial Connections..........................................................10
Adjusting Level and Frequency..........................................................11
Isogroove Technology..........................................................12
Guarantee / Product Cleaning..........................................................13

Page 4
WARNING
This symbol alerts the user to the presence
of uninsulated “dangerous voltage” within the
magnitude to constitute a risk of electric shock
to persons.
This symbol is intended to alert the user to
the presence of important operating and
maintenance (servicing) instructions in the
literature accompanying the appliance.
Important Safety Instructions
1. Read these instructions.
2. Keep these instructions.
3. Heed all warnings.
4. Do not use this apparatus near water.
5. Clean only with dry cloth.
6. Do not block any ventilation openings. Install in
accordance with the manufacturer’s instructions.
7. Do not install near any heat sources such as
radiators, heat registers, stoves, or other apparatus
8. Do not defeat the safety purpose of the polarized
or grounding-type plug. A polarized plug has two
blades with one wider than the other. A grounding
type plug has two blades and a third grounding
prong. The wide blade or the third prong are provid-
into your outlet, consult an electrician for replace-
ment of the obsolete outlet.
9.
manufacturer.
10. Use only with the cart, stand, tripod, bracket or
apparatus. When a cart is used, use caution when
moving the cart/apparatus combination to avoid
injury from tip-over.
11. Unplug this apparatus during lighting storms or
when not used for long periods of time.
12.
Servicing is required when the apparatus has been
damaged in any way, such as power supply cord or
plug is damaged, liquid has been spilled or objects
have fallen into the apparatus, the apparatus has
been exposed to rain or moisture, does not operate
normally, or has been dropped.
13. The apparatus shall not be exposed to dripping or
such as vases, shall be placed on the apparatus.
14. Do not install this apparatus in a bookcase or
similar unit.
15. The apparatus draws nominal non-operating power
from the AC outlet with its STANDBY/ON switch in
the standby position.
16. The apparatus should be located close enough to
the AC outlet so that you can easily grasp the power
cord plug at any time.
17. To completely disconnect the power input, the rear
panel power switch may be switched off.
18. Excessive sound pressure from earphones and
headphones can cause hearing loss.
19. The battery shall not be exposed to excessive heat
Additional Safety Advice
1. Keep surrounding objects at least four inches away
from the apparatus for adequate ventilation.
2. Ventilation openings on the apparatus should not
be impeded by such items as newspaper, cloths,
curtains, and the like.
3. -
tus, such as lighted candles.
4. Dispose of internal electronics in accordance with
local safety and environmental regulations.
5. Do not operate the apparatus at a temperature less
Caution
• DO NOT REMOVE THE EXTERNAL ENCLOSURE
PARTS TO EXPOSE THE ELECTRONICS. NO USER
SERVICEABLE PARTS ARE INSIDE.
• IF YOU ARE EXPERIENCING PROBLEMS WITH THIS
PRODUCT, CONTACT ANDOVER AUDIO CUSTOMER
SUPPORT. DO NOT USE THE PRODUCT UNTIL IT
HAS BEEN REPAIRED.
DO NOT OPEN
TO PREVENT THE RISK OF ELECTRIC
SHOCK, DO NO REMOVE COVER. NO
USER-SERVICEABLE PARTS INSIDE.
REFER SERVICING TO QUALIFIED
SERVICE PERSONNEL.

Page 5
FCC STATEMENT FOR THE U.S.A.
This equipment has been tested and found to comply
with the limits of part 15 of the FCC rules. These
limits are designed to provide reasonable protection
against harmful interference in a residential instal-
lation. This equipment generates, uses, and can
radiate radio frequency energy and, if not installed
and used in accordance with the instructions, may
cause harmful interference to radio communications,
However there is no guarantee that interference will
not occur in a particular installation. If this equipment
does cause harmful interference to radio or televi-
sion reception, which can be determined by turning
the equipment off and on, the user is encouraged to
try to correct the interference by one or more of the
following measures:
• Reorient or relocate the equipment.
• Increase the separation between the equipment
and receiver.
• Connect the equipment to an AC outlet of a dif-
ferent mains circuit from the main circuit/outlet
providing power to the receiver.
• Consult the dealer or an experience radio/TV
technician for help.
•
expressly approved by Andover for compliance
will void the user’s warranty.
Caution
-
pressly approved by Andover for compliance will void
the user’s warranty.
This product can be recycled. Products bearing this
symbol must NOT be thrown away with normal house-
hold waste. At the end of the product’s life, take it to a
collection point designated for recycling of electrical
and electronic devices. Find out more about return
and collection points through your local authority.
The European Waste Electrical and Electronic Equip-
ment (WEEE) Directive was implemented to dramat-
thereby reducing the environmental impact on the
planet and on human health. Please act responsibly
by recycling used products. If this product is still
usable, consider giving it away or selling it.

Page 6
Introduction
Thanks for choosing the Model-One Subwoofer. Your Subwoofer is perfectly
matched both sonically and aesthetically to the Model-One Turntable Music
System. It may be used standalone with its beautiful tempered-glass top, or
integrated with the Model-One stand system to create a full range music system
with the smallest possible footprint.
While optimized for use with the Model-One system, it is also a great choice to
use as a companion to a high-quality audio system of any brand to extend its low
frequency performance.
Unlike common home-theater subwoofers, the Model-One Subwoofer design
prioritizes smooth frequency response and accurate impulse response over
sheer loudness. Its twin 10” Woofers in a sealed Acoustic Suspension design
provide smooth, extended bass response that perfectly matches the Model-One
Music System.
To get the most from your system, be sure to thoroughly review this manual and
heed the important safety instructions. If you have any questions not covered
here please contact Andover Audio support via email (support@andoveraudio.
com) or phone (+1 978.775.3670).
With the proper care and operation, your Andover product will provide many years
of trouble-free enjoyment.
Please save the carton and original packaging in case you ever need to move or
ship your unit.
About Andover
behind the scenes to some of the most recognized brands in automotive,
professional, and high-performance consumer audio. We now focus our award-
winning skills to our own product line that artfully blends exceptional sound with
distinctive design.

Page 7
In the Box
Room Placment
The long wavelengths of low frequency sounds exceed the dimensions of most
will reinforce bass in some places, and cancel bass in others. This is the result
bass from a given listening position. Understanding how these standing waves
work within your particular room is important to get the most satisfying overall
performance. Moving the subwoofer a few feet either way can have a dramatic
effect on perceived bass response. Each room is different, so experimentation in
The symmetry resulting from placing the subwoofer directly in the center of a
is usually best to place the woofer a few feet to either side of center.
Corner placement will yield the strongest reinforcement of bass within the room,
but may also further exacerbate standing waves. You will need to try various
locations to determine what location works best on your particular room.
Your Model-One Subwoofer uses a digital crossover with a very sharp cutoff
above the selected frequency. This makes it possible to separate the subwoofer
location from the Model-One Turntable Music System by up to 12 feet and still
maintain a smooth blend with the main speakers. Once you have determined
frequency for the best sonic blend from your preferred listening position.
When you install the Model-One Subwoofer as an integral part of the stand,
locate the Model-One system where for the best full range sound, as outlined
in the Model-One Turntable Music System manual. Placing the system near the
center of a wall, but not perfectly centered, will likely yield the best overall sound.
• Model One Subwoofer
• Glass Top (Removable)
• AC Power Cord
• 1M signal cable with RCA plugs
• 2M signal cable with RCA plugs
• Leveling Feet (QTY - 4)
• Product Manual

Page 8
Subwoofer Setup
Install the four adjustable feet in the four bottom corners of the subwoofer by
screwing them into the threaded inserts. These may be adjusted slightly to level
To use the Subwoofer separately:
1. Carefully remove the tempered glass top from the foam packaging and
gently place it in the recess in the center of the top frame.
2. the volume control
away from its center position to match the output from the Model-One Music
System from your listening position.
1. Remove the 4 screws holding the
top panel to the subwoofer for
shipping and put aside the top.
To integrate the Subwoofer with the stand:
2. Remove the
subwoofer grille
by pressing on the
grille from the back
on both sides. Slide
the grille straight
forward.

Page 9
3. Prepare the top stand by
installing the 4 cam-lock pins
into the innermost threaded
holes. Screw them in fully, but do
not overtighten. Also press the
wooden alignment dowels fully
into the larger adjacent holes.
4. Place the top stand on the
subwoofer, being careful to align
the pins into the proper holes.
5. Insert locking cams into each
ofthe four holes and lock them by
turning the cams clockwise until
they stop.
6. Reinstall the grille by sliding it
carefully from the front until it is
fully seated.
7. Adjust the leveling feet if needed
to level the assembly.
Page 10
Making the Initial Connections
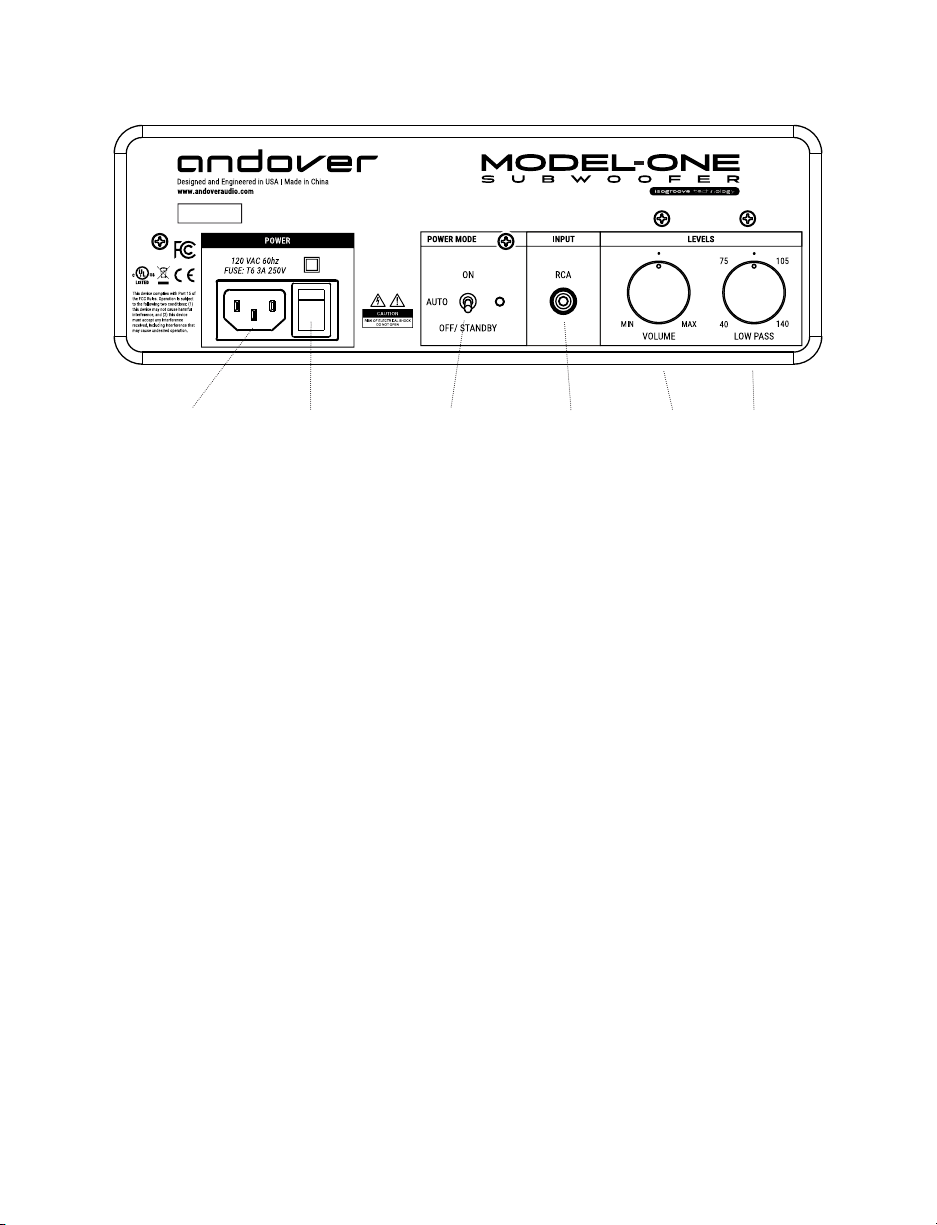
1. Connect the power cord into the AC power input connector and plug the
other end into a grounded wall outlet.
2. Connect an RCA cable from the Subwoofer output of the source component
into the RCA jack input.
3. Switch the power switch adjacent to the AC input ON.
4. Switch the Power mode switch to the AUTO (middle) position.
If using the Model-One Turntable music system, set the Volume and Frequency
knobs to their center detent position. This is our factory-recommended setting.
Once the system is installed and operating, you may freely adjust these controls
to your taste.
The LED adjacent to the Power Mode switch indicates operating status. A Red
LED indicates the subwoofer is on and in Standby. When a signal is present,
the LED will turn green and the subwoofer will be active. After a few minutes of
silence, the woofer will return to Standby.
Back Panel
Power Inlet Power Input (RCA) Volume Low Pass
Power Mode
Altri manuali per Model-One
2
Indice
Altri manuali andover Subwoofer


