AORUS X7 Manuale utente

1
EN
TC
SC
KR
GR
FR
Congratulations on your purchase of the AORUS Notebook!
This Manual will help you to get started with setting up your notebook. For more detailed information,
please visit our website at http://www.aorus.com. All specications are subject to the manufacturer's
conguration at the time of shipping and may change without prior notice,written or otherwise.
1
2
3
4
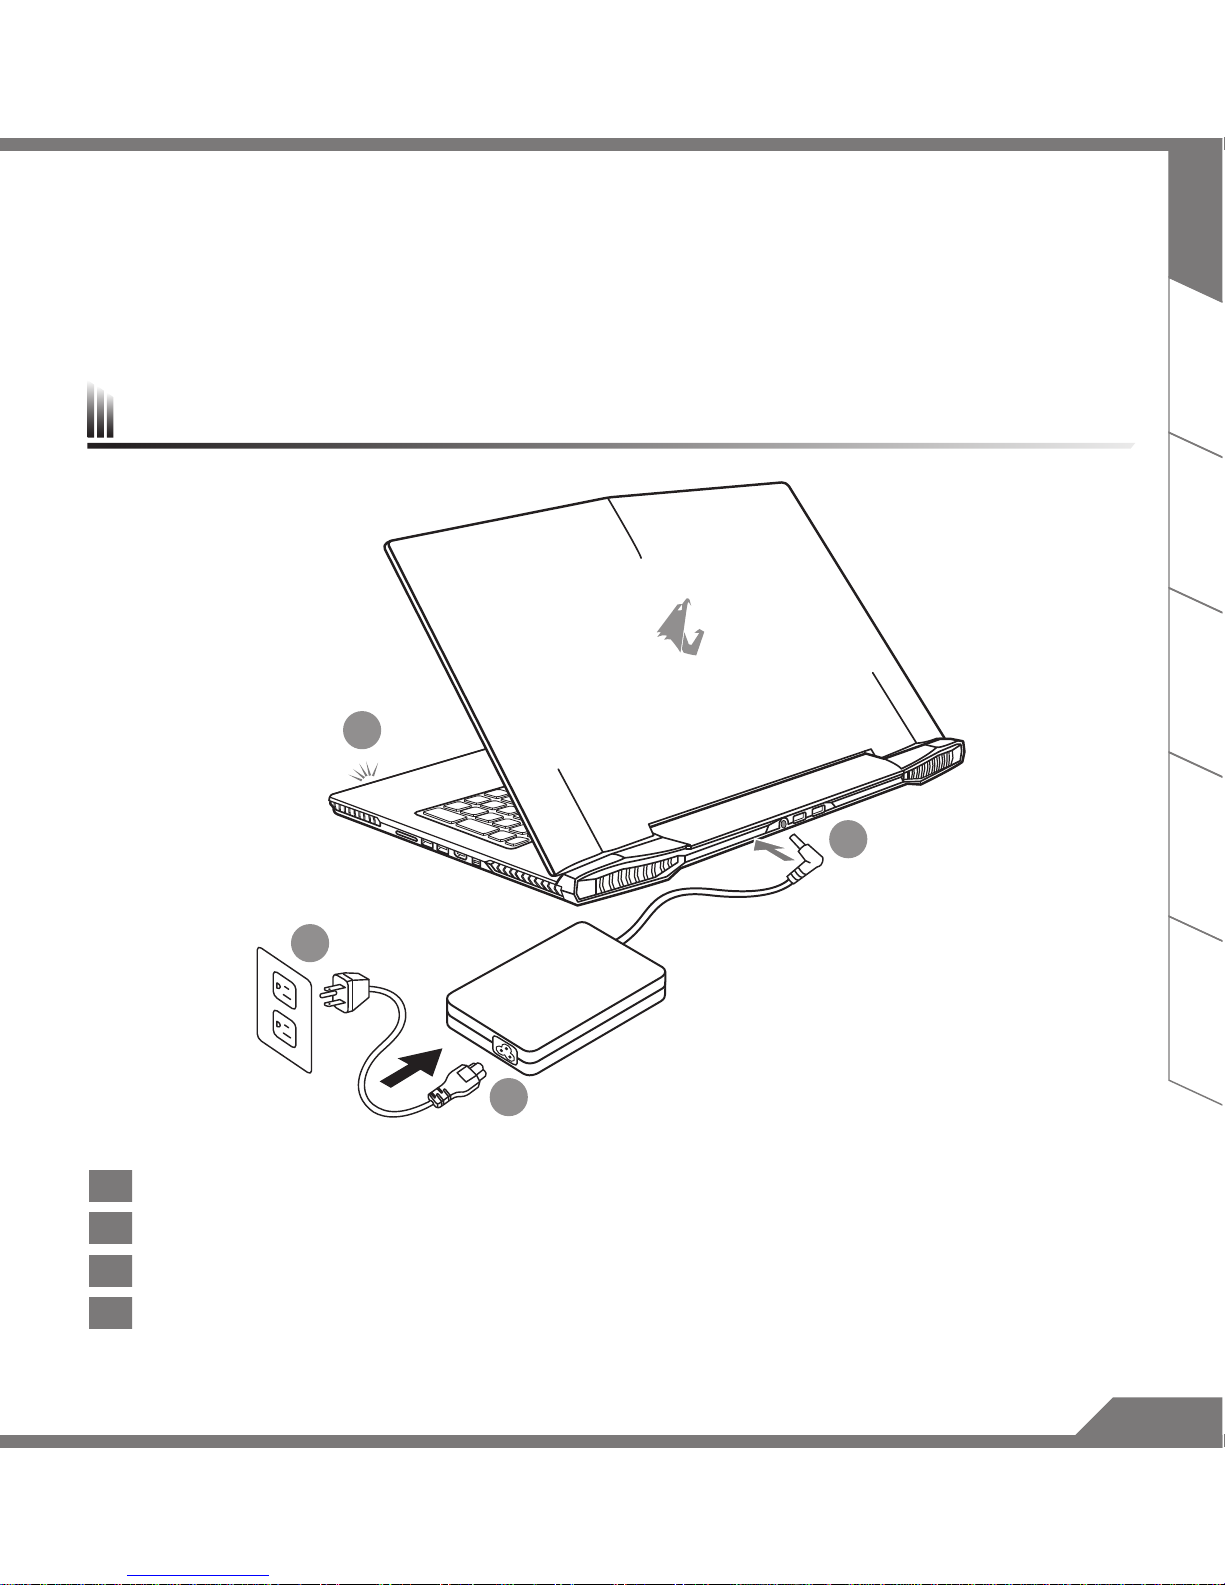
1Connect the the power cord to the AC adapter.
2Connect the AC adapter to the DC-in jack on the back side of the notebook.
3Connect the power cord to the power outlet.
4While the Battery Indicator lights on, press the Power Button to turn on the notebook.
Using AORUS Notebook for the First Time

2
EN
TC
SC
KR
GR
FR
Switching on the Power
After you turn on the notebook for the very rst time, do not turn it off until the operating system has been
congured. Please note that the volume for the audio will not function until Windows®Setup has completed.
Booting Up the notebook for the First Time
Depending on your configuration, the Microsoft®Windows®Boot Screen may be the first screen that you
will see as the notebook starts up. Follow the on screen prompts and instructions and enter your personal
information to complete the setup of the Windows®Operating System.
3
EN
TC
SC
KR
GR
FR
Your AORUS Notebook Tour
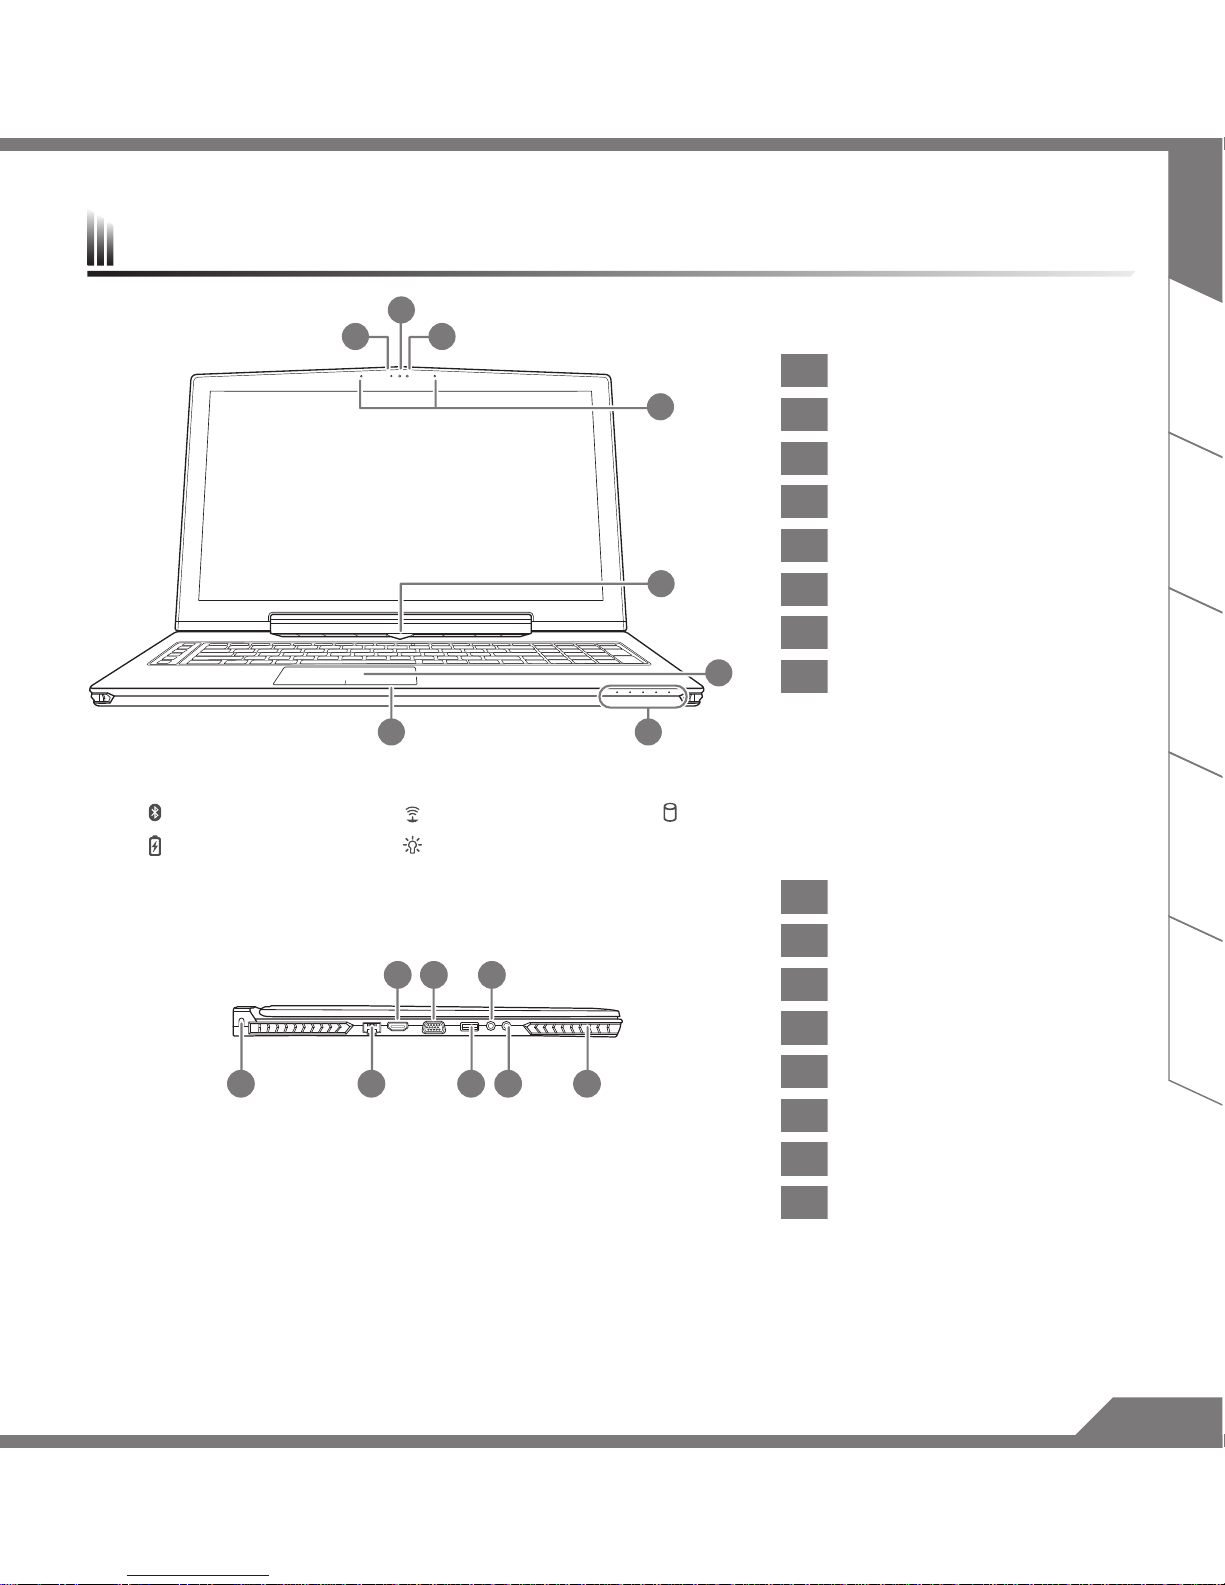
1Webcam Status LED Indicator
2Webcam
3Light sensor
4Microphone
5Power Button
6TouchPad
7Battery Indicator Button
8LED Indicators
Press the right button of touchpad while power off, hibernate mode to check the remaining battery power.
Bluetooth Status LED Wireless Lan Status LED HDD Status LED
Battery Status LED Power Status LED
1Kensington Lock Slot
2Ethernet Port
3Surround Port
4D-sub (VGA) Port
5USB 3.0 Port
6Microphone Jack
7Headphone Jack
8Speaker
Enjoy triple display visual pleasure by connecting HDMI, mini-DP and Surround port with 3 monitors (same model number).
*Caution:
(1) Surround port is compatible with regular HDMI cable connecting television and PC.
(2) Connect HDMI or mini-DP port to external monitor for dual screen display. Surround port does not support dual display.
(3) Supported game title list please refer to NVIDIA ofcial website.
(4) NVIDIA Surround Technology is only available when connected to AC adapter.
6
87
5
2
31
4
21 5 7 8
43 6
4
EN
TC
SC
KR
GR
FR
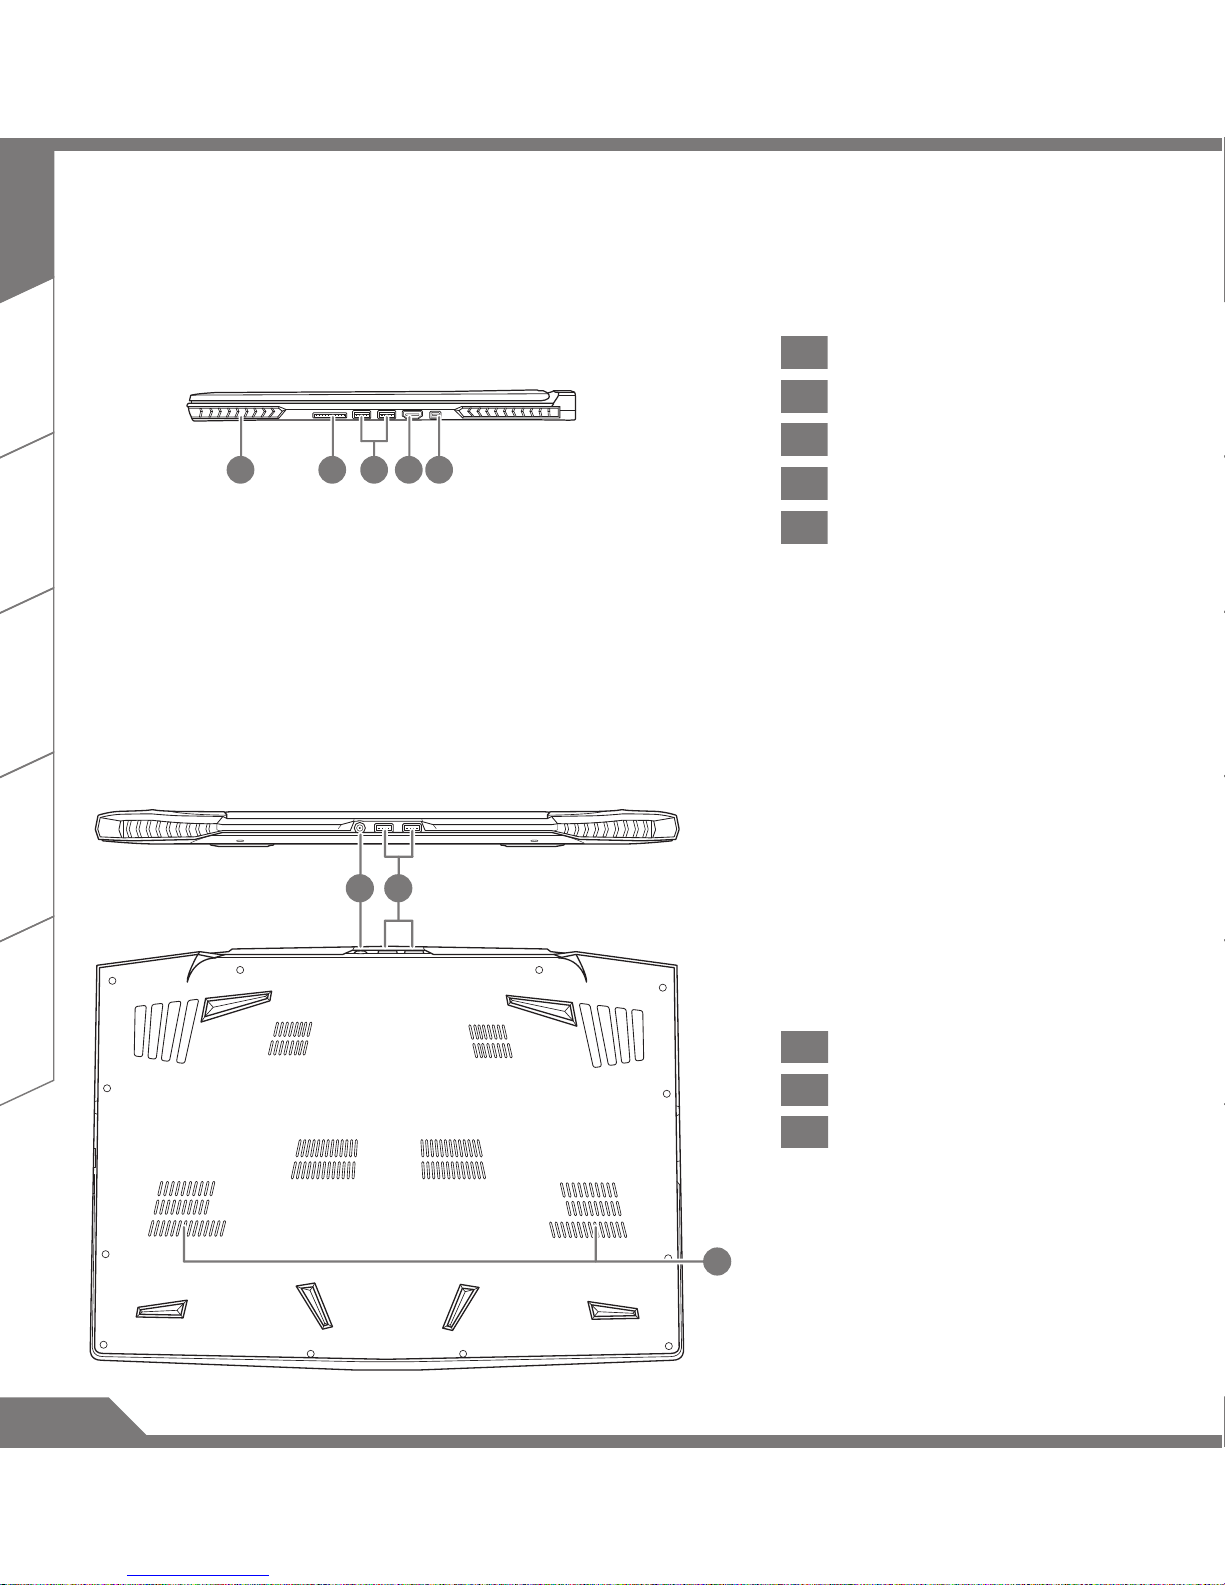
1Speaker
2SD Card Reader
3USB 3.0 Port
4HDMI Port
5Mini Display Port
1DC-in Jack
2USB Port
3Subwoofer
21 4 53
1 2
3
5
EN
TC
SC
KR
GR
FR
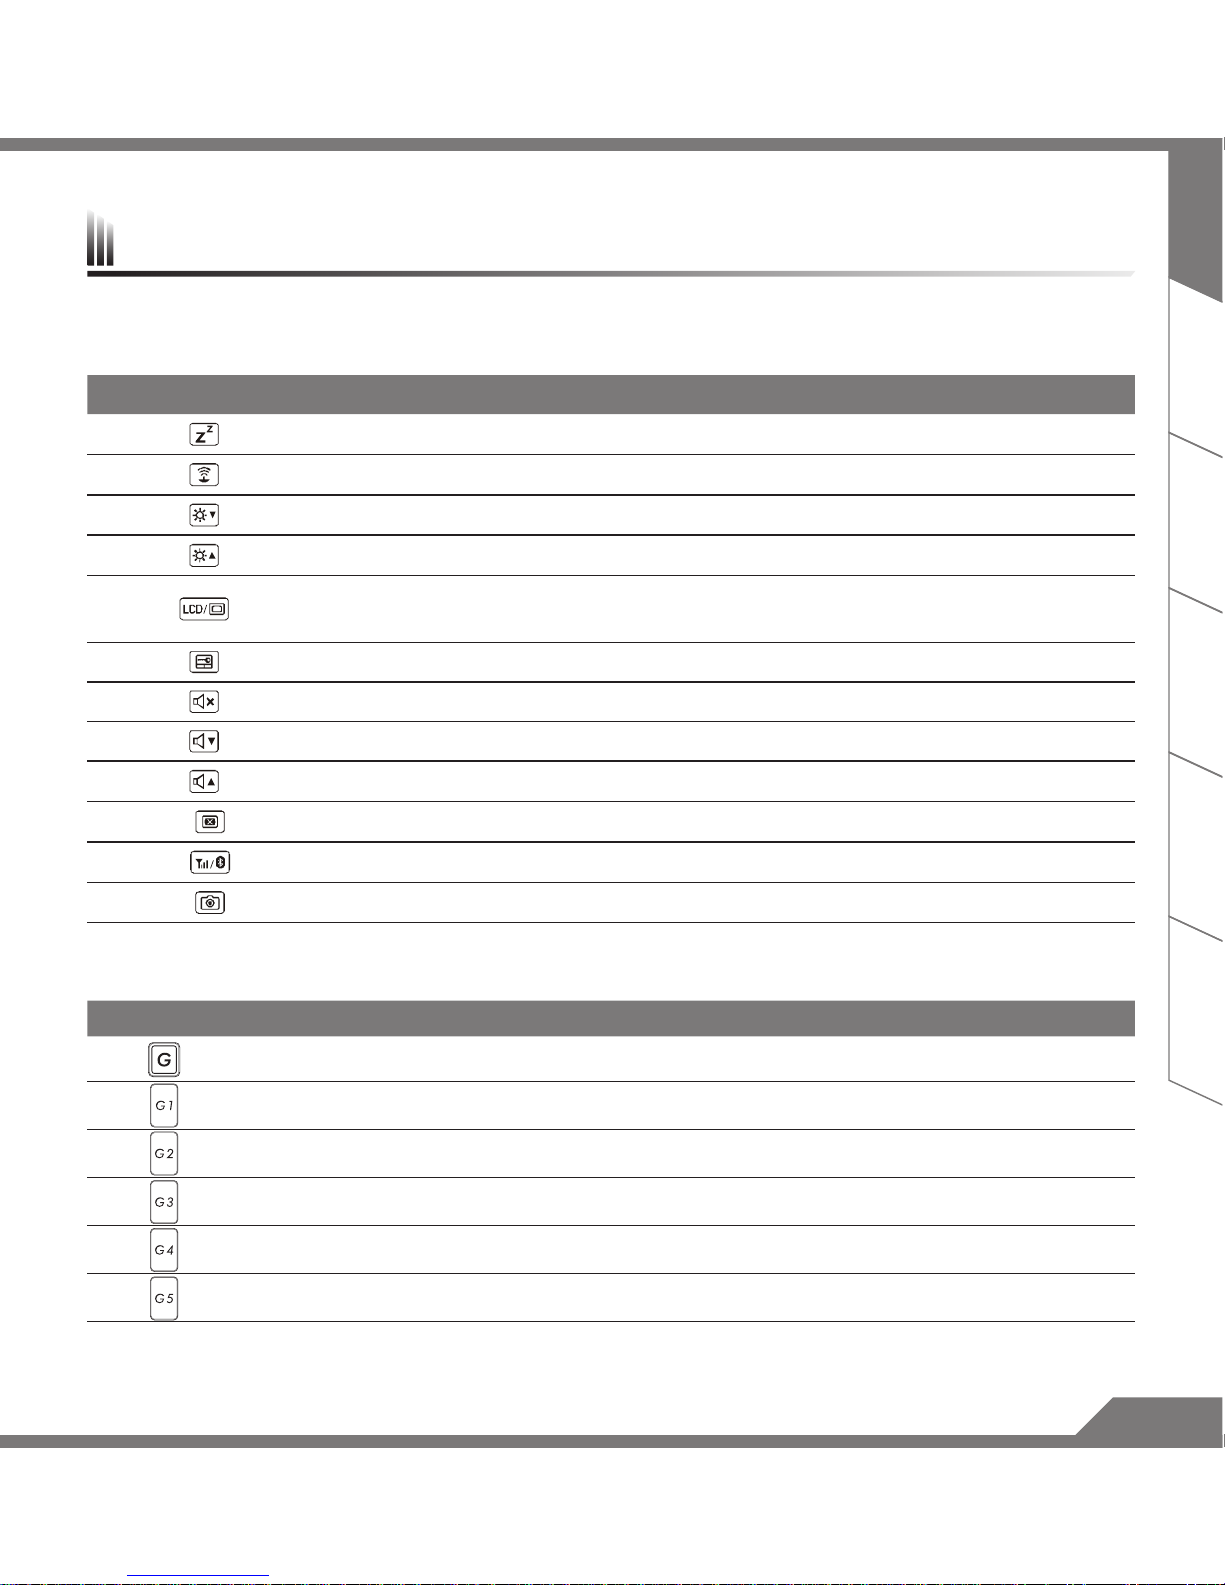
The computer employs hotkeys or key combinations to access most of the computer’s controls like screen
brightness and volume output. To activate hotkeys, press and hold the <Fn> key before pressing the other key
in the hotkey combination.
Hotkey Function Description
Fn + F1 Sleep Put the computer in Sleep mode.
Fn + F2 Wireless LAN Turn the Wireless LAN function ON and OFF.
Fn + F3 Brightness Down Decrease the screen brightness.
Fn + F4 Brightness Up Increase the screen brightness.
Fn + F5 Display Toggle Switche display output between the display screen, external
monitor (if connected) and both.
Fn + F6 Touchpad Toggle Turn the internal touchpad ON and OFF.
Fn + F7 Speaker Toggle Turn the speaker ON and OFF.
Fn + F8 Volume Down Decrease the sound volume.
Fn + F9 Volume Up Increase the sound volume.
Fn + F10 Screen Display Toggle Turn the screen display ON and OFF.
Fn + F11 WiFi / Bluetooth Toggle Turn the WiFi / Bluetooth function ON and OFF.
Fn + F12 Webcam Turn the internal webcam ON and OFF.
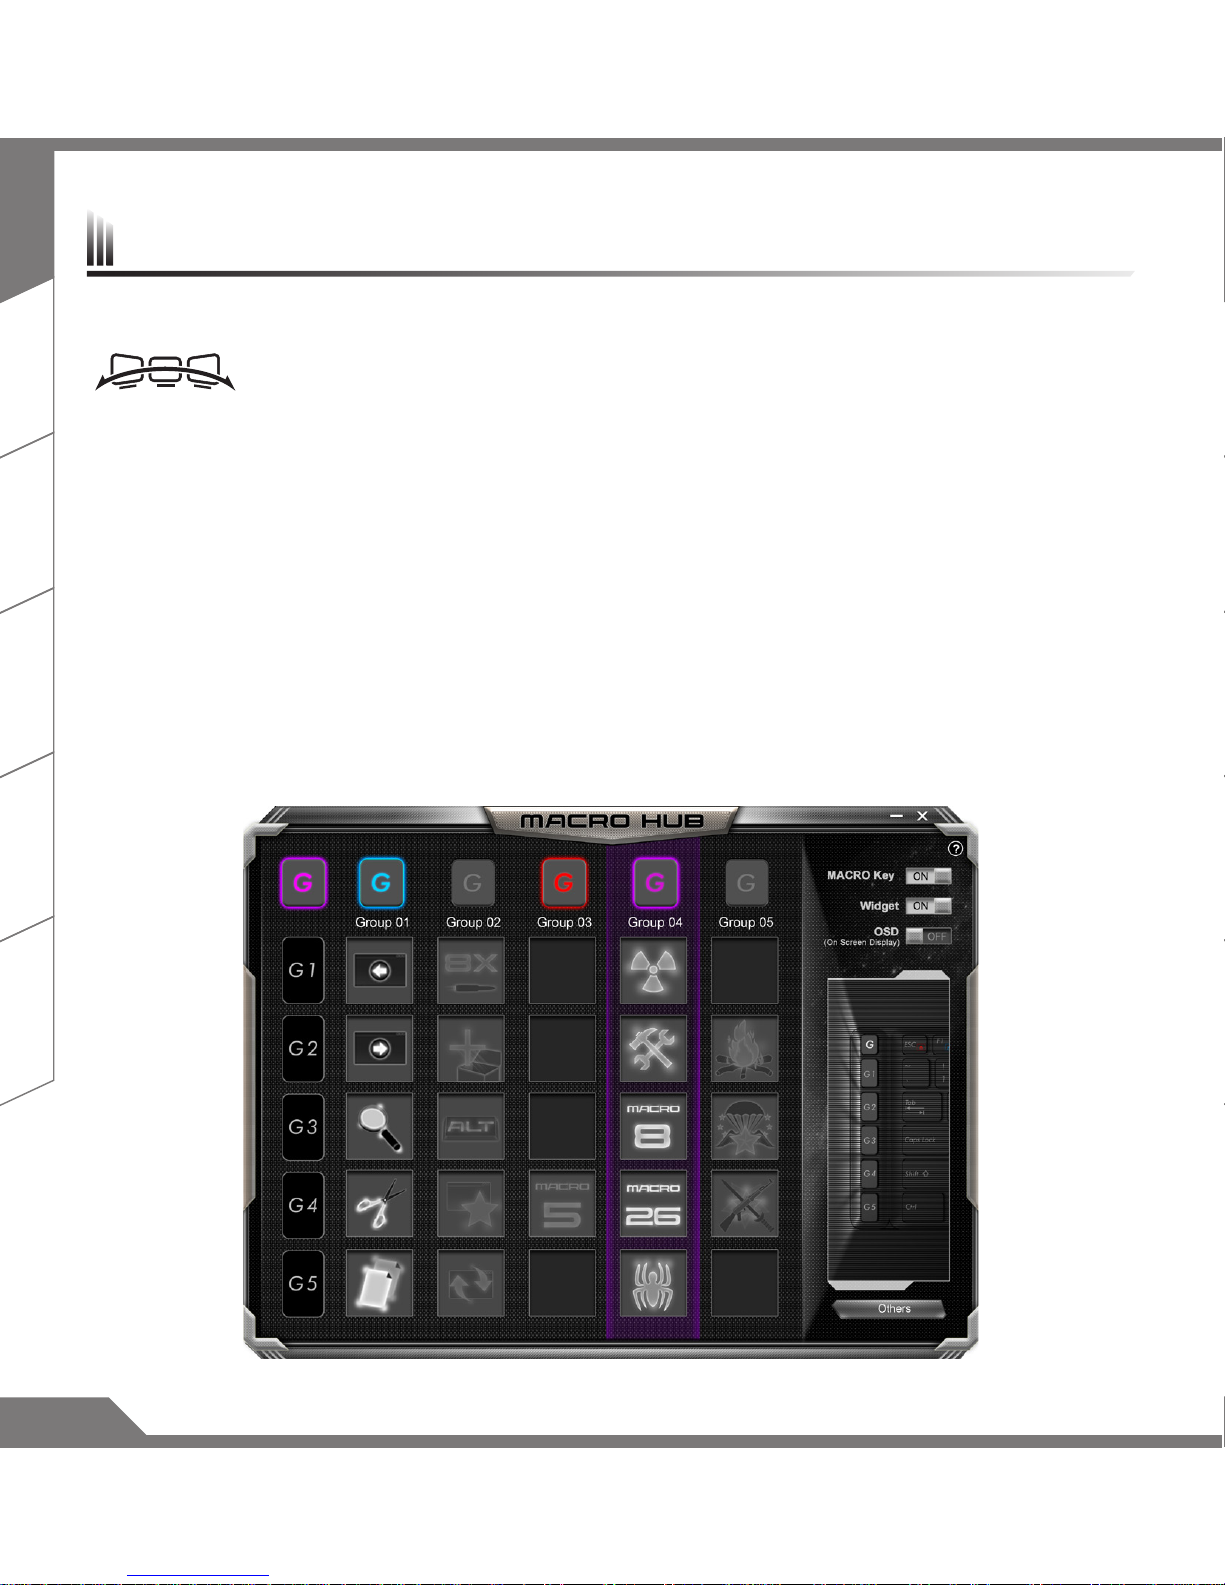
Macro key
Macro keys can be set via Macro Hub, setting combination keys for complicated and/or general operation.
Macro key Macro key Description
G Macro group switch, press around 3 secconds as hardware switch on/off.
G1 User self-denition Macro key
G2 User self-denition Macro key
G3 User self-denition Macro key
G4 User self-denition Macro key
G5 User self-denition Macro key
Hotkeys
6
EN
TC
SC
KR
GR
FR
X7 equipped with many unique features, providing user an exceptional gaming experiences.
Surround Port
Surround port is located on the left side of X7. User may connect X7 up to three external monitors with
HDMI, mini Display and Surround port, presenting true visual surround effect and enjoy outstanding gaming
experience. Surround port is compatible with television , PC’s standard HDMI cable; however, only HDMI
port and mini-DP support dual screen display. Please refer to NVIDIA ofcial website for Surround's games
supporting.
Macro key
X7 features five macro keys and macro group switch, providing users to set their own preference of
combinations, capable for switching in between maximum up to 25 sets of macros simultaneously. By using
Marco Hub, users can easily access to their own dened recorded macro, and also adjust the macro sets, so
the players are always steps ahead in games. For further detail instructions please refer Macro key setting
manual.
X7 Operation manual
7
EN
TC
SC
KR
GR
FR
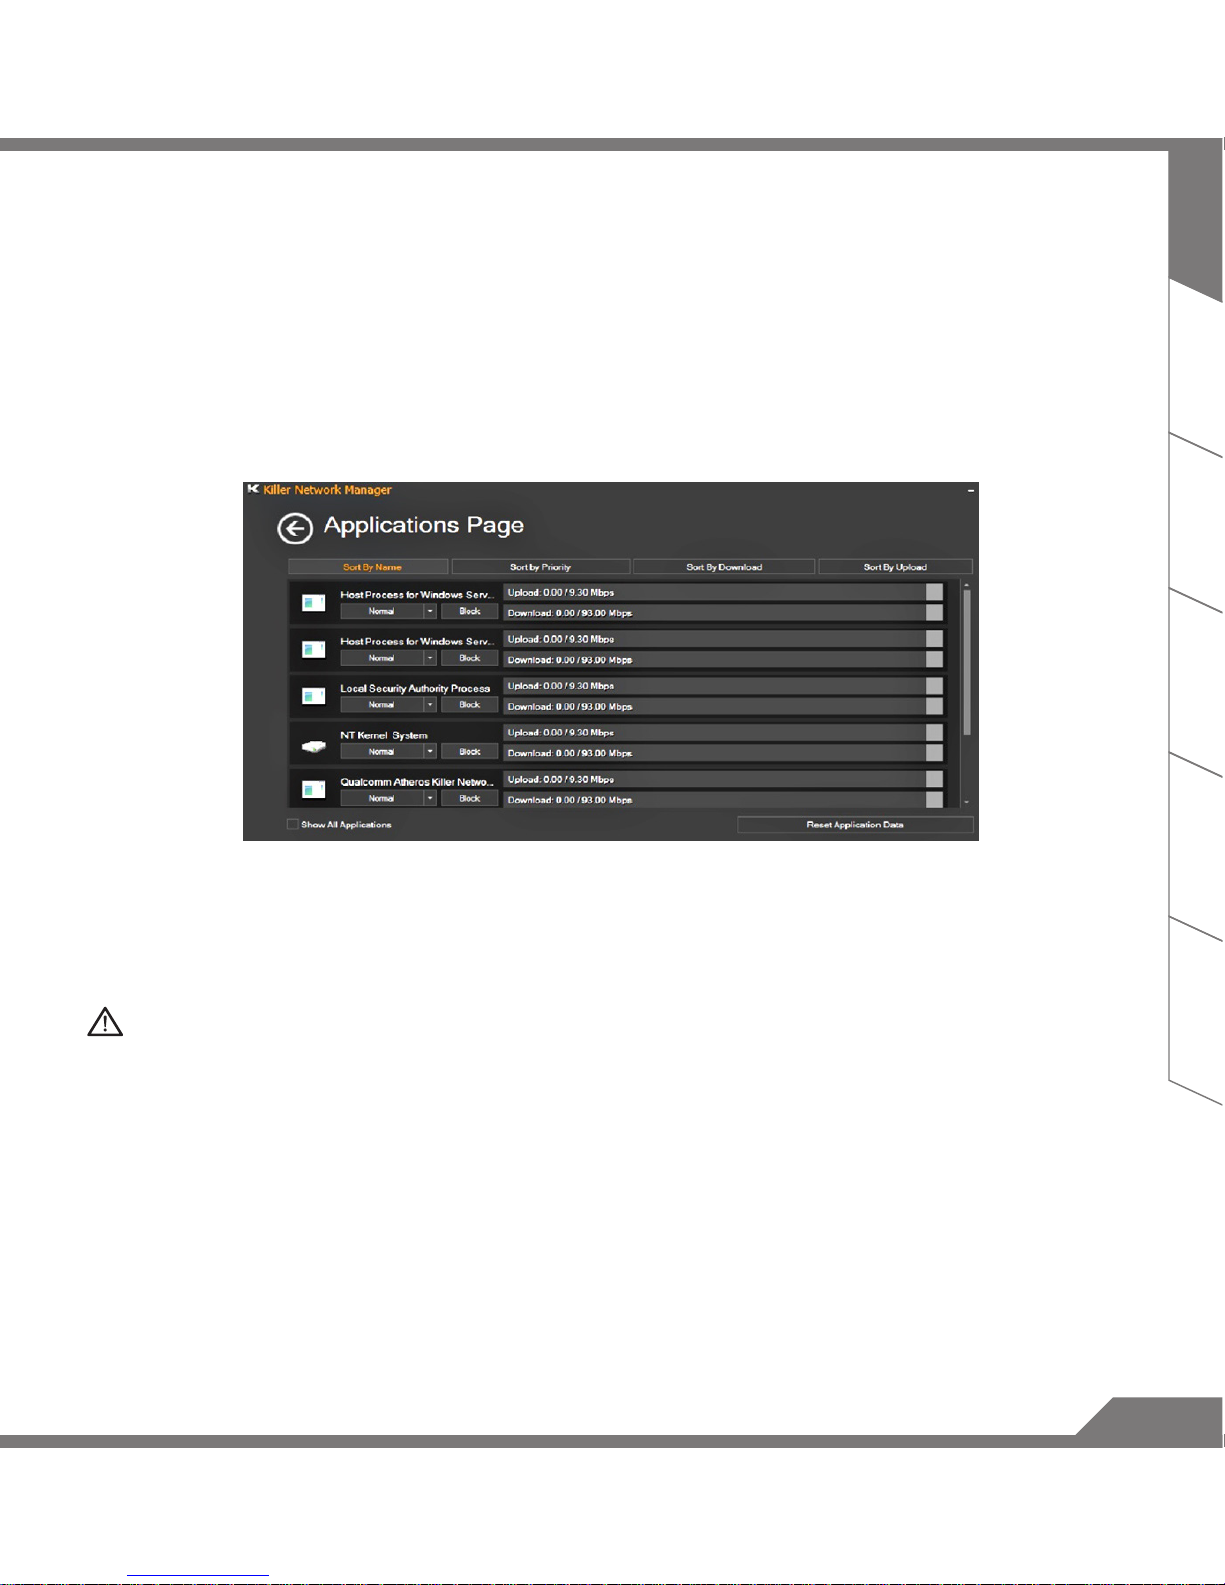
Killer LAN
Killer LAN can automatically adjust the priority of network transmission, allowing the user to have the best
gaming network speed, by effectively reducing ping values and gain sequence control over different softwares
that require network packet. User may set the software manually by Killer LAN's specic program with the
highest priority network packets; Moreover, user may also congure the network for the download priority for
online videos and games packets to achieve the best network optimization.
Hardware Upgrade
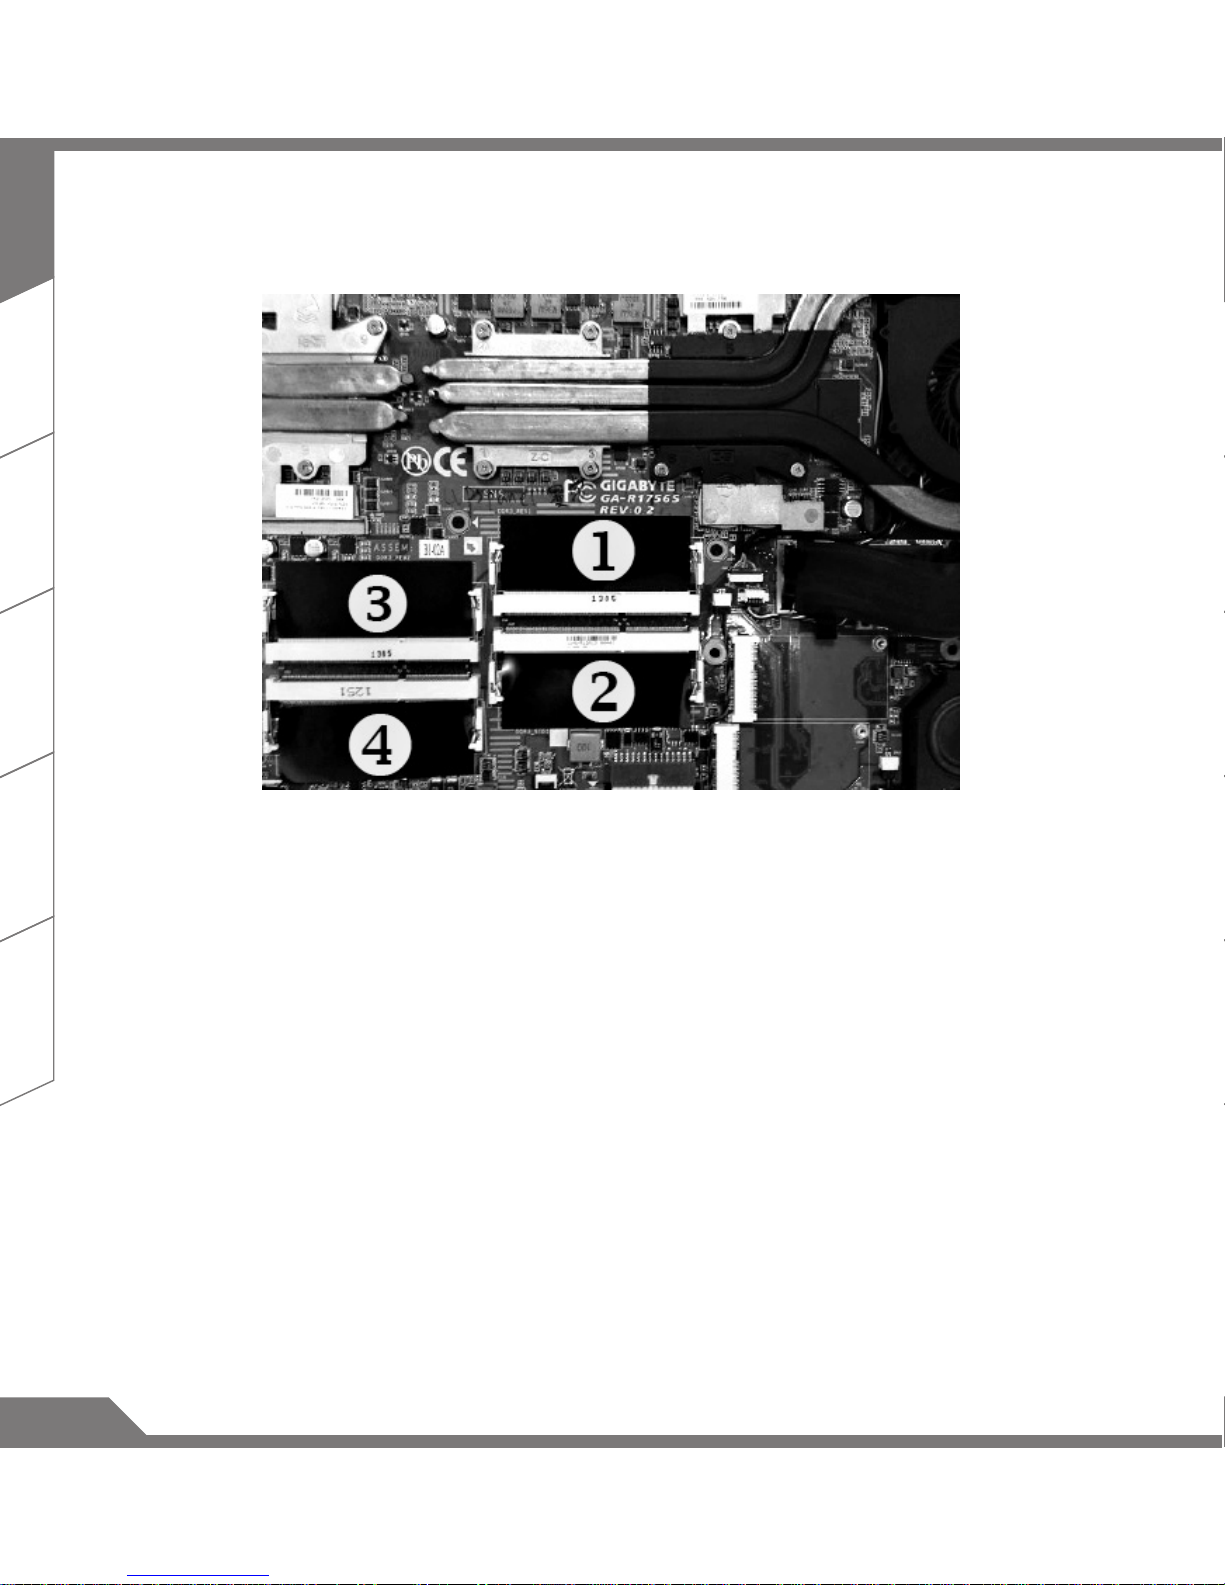
X7 supports up to two mSATA SSD and one 2.5 inch hard drive, and four SO-DIMM memory slot. User may
upgrade memory or carry X7 to nearest repair center to upgrade; Please visit AORUS ofcial website for
compatible memory brands.
Caution
Please ensure X7 is not powered on and unplugged to power source before the upgrade. Any damage during
user’s upgrade will not be covered by warranty, and user shall be responsible for related repair cost; hence
recommend to carry your laptop to nearest service center for the upgrade.
Memory
In order to maintain optimum compatibility and performance, please choose the slot that ts the condition
below when upgrading memory to be installed to avoid compatibility problems or poor performance; For the
supported memory module manufacturers, please visit AORUS ofcial website FAQ for the reference.
8
EN
TC
SC
KR
GR
FR
8GB single: installed on the 1st memory slot.
4GB/8GB two: Install on the 1st and the 3rd memory slot.
4GB/8GB three: installed on the 1st, the 2nd and the 3rd memory slot.
4GB/8GB four: mounted on four memory slots.
Battery Protection
When battery is in use for a period of time (not connected to power source and in high performance mode),
Mass power discharging on battery in a short period of time may cause battery to run at high temperature
and may shorten its lifespan. in order to protect the battery's lifespan, the battery will not be chargeable when
its temperature is higher than 45 ° C. The mechanism for this is to protect the battery life. However, after
user connects to power adapter, battery stops discharging and temperatures below is 45 ° C, the battery will
start charging back to the source and to maintain normal operation.Command & Control is a software that
integrates a list of basic settings to a single interface, providing user a faster and better experience when
customization is needed.
9
EN
TC
SC
KR
GR
FR
Command & Control is a software that integrates a list of basic settings to a single interface, providing user a
faster and better experience when customization is needed.
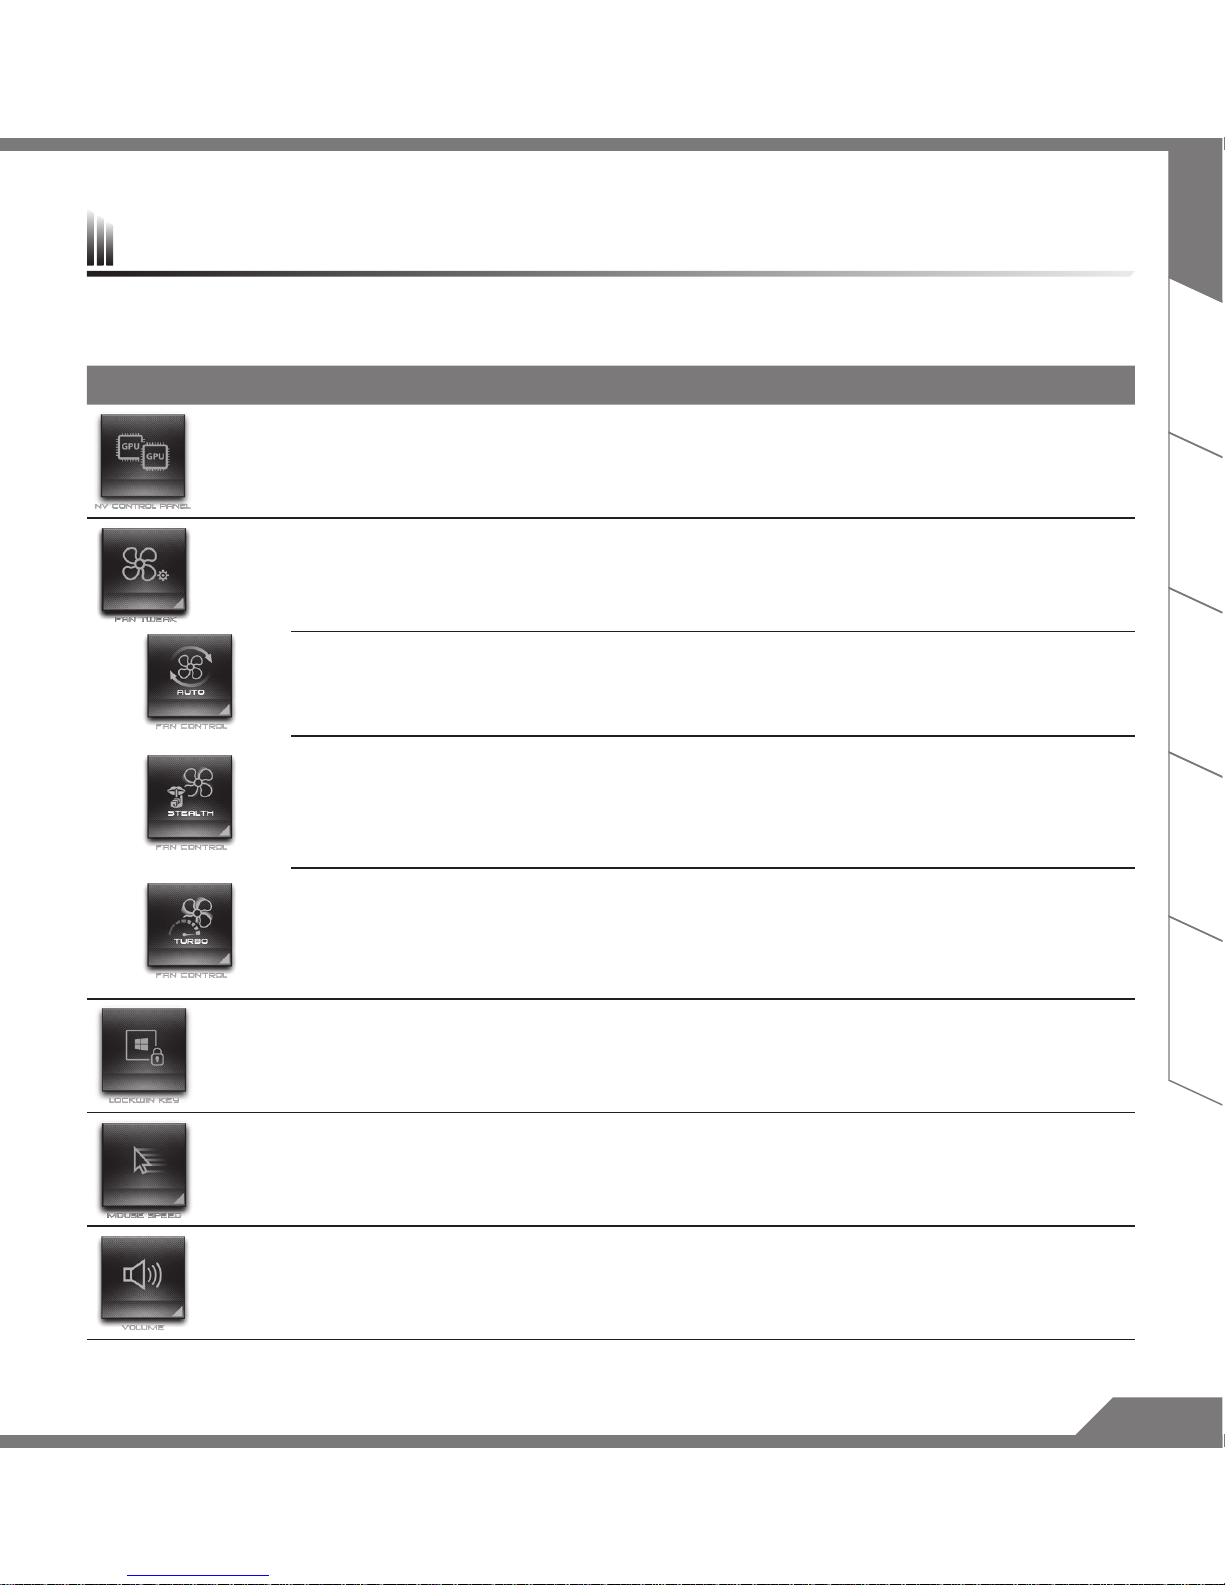
Hotkey Function Description
GPU SLI Switch Enable or disable GPU SLI, when slave GPU turns off, it may
increase battery life.
Fan Controller Adjusts fan speed according to user's preference.
Auto
The system will detect level of work load and adjust the fan
speed accordingly Auto mode provides a perfect balance
between performance, heat dissipation and noise level. (System
performance is not at its maximum during Auto mode)
Stealth
When high performance is not needed, Stealth setting will limit
fan speed to avoid uncomfortable fan noise.
* Note: This feature may cause limitation to system performance.
Recommend to use such mode during web browsing and
scenarios where high performance is not needed.
Turbo
(Performance Mode)
The fan operates at full speed for maximum heat dissipation,
enhancing system performance to maximum.
Windows Key Lock Lock or unlock Windows key
Mouse Speed Setting Adjust the mouse pointer speed according to user.
Volume Setting Adjust volume.
X7 Command & Control
Altri manuali per X7
1
Indice
Altri manuali AORUS Computer portatile


