Applica Presenter Manuale utente

User ManualUser Manual
User ManualUser Manual
User Manual
Presenter / Presenter Pro
One PC can display and manage 4 additional remote monitors.

MNAPPR11072005V1.0
Page 2
Notice
The information contained in this document is subject to change without
notice. Applica, Inc. makes no warranty of any kind with regard to this
material, including but not limited to, implied warranties of merchantability
and fitness for any particular purpose.
Applica, Inc. will not be liable for errors contained herein or for incidental
or consequential damages in connection with the furnishing, performance
or use of this material.
No part of this document may be photocopied, reproduced or translated
into another language without prior written consent from Applica, Inc.

MNAPPR11072005V1.0 Page 3
Table Of ContentsTable Of Contents
Table Of ContentsTable Of Contents
Table Of Contents
IntroductionIntroduction
IntroductionIntroduction
Introduction ................................................................................................................................................................................................................................
................................................................................................................................................................................................................................
................................................................................................................ 44
44
4
What‘s in the box..................................................................................................4
Introducing the Presenter..................................................................................5
Peripheral Compatibility .....................................................................................5
Installation and OperationInstallation and Operation
Installation and OperationInstallation and Operation
Installation and Operation ..........................................................................................................................................................................
..........................................................................................................................................................................
..................................................................................... 66
66
6
Before you install Presenter ........................................................................................................................................................
........................................................................................................................................................
............................................................................ 6
Quick Start ......................................................................................................................................................................................................................
......................................................................................................................................................................................................................
........................................................................................................... 7
Connecting the Presenter PCI Card ................................................................8
Connecting the Remote Monitors (Presenter) ............................................9
Connecting the Remote Monitors (Presenter Pro) ....................................9
System Power Up............................................................................................... 10
Installing the ApplicaXP Software ................................................................ 11
Installing the Presenter2 Software ............................................................... 12
Preparing System CAT5 cable ....................................................................... 12
AppendixAppendix
AppendixAppendix
Appendix ......................................................................................................................................................................................................................................
......................................................................................................................................................................................................................................
................................................................................................................... 1313
1313
13
Specifications ...................................................................................................... 13
Technical Support .............................................................................................. 14
Troubleshooting ................................................................................................ 14
Limited Warranty Statement .......................................................................... 15
MNAPPR11072005V1.0
Page 4
IntroductionIntroduction
IntroductionIntroduction
Introduction
What‘s in the boxWhat‘s in the box
What‘s in the boxWhat‘s in the box
What‘s in the box
stnetnoCegakcaPretneserP
ytQnoitpircseDrebmuNtraP
1draCICPretneserP101-G-4UPA
4elbaCAGVot5TAC100-VC-BCPA
1)DC(er
awtfoSretneserP&PXacilppARP-PX-SPA
stnetnoCegakcaPORPretneserP
ytQnoitpircseDrebmuNtraP
1draCICPretneserP101-G-4UPA
1rettimsnarToiduA/AGXUtroP400
4XT-XLS
4revieceRoiduA/AGXU001XR-XLS
1)DC(erawtfoSretneserP/PXacilppARP-PX-SPA
1retpadArewoPV21SU-A2D21-SP

MNAPPR11072005V1.0 Page 5
IntroductionIntroduction
IntroductionIntroduction
Introduction
Introducing the PresenterIntroducing the Presenter
Introducing the PresenterIntroducing the Presenter
Introducing the Presenter
When you need to create that special presentation, The Presenter from Applica
can help make it a succes. When you need to have multiple screens and need to
control them from a central location, The Presenter can help. You can manage
and control four additional screens. You can even manage and control up to 16
remote screens by using multiple Presenter Cards.
The Presente Pro adds the functionality of having those remote screens at extremely
remote locations. This is done by combining Applica with SmartAVI. Using the
combination of transmitter and receiver units, SLX-TX400 & SLX-RX100, you can
have those remote screens up to 1000 ft. away.
There are many applications for the Presenter. Some of these include:
•Dynamic Digital Advertising such as malls, airports, hotels, convention centers,
and Sports arenas.
•Education and Entertainment such as information walls, booths, program
information and updates.
•Special Events and Demonstrations such as Vendor booths, product
presentations, and special speaker events.
Peripheral CompatibilityPeripheral Compatibility
Peripheral CompatibilityPeripheral Compatibility
Peripheral Compatibility
Start installation process by ensuring that all video displays and audio devices are
compatible with the computers. This is accomplished by connecting the devices
directly to the computer (bypassing the presenter card and/or SLX-100 receivers)
and checking that the devices operate as desired.
If they operate as desired, they should function properly when connected to the
Presenter unit.
If the device does not operate as desired when connected directly to the computer,
something is wrong with the device, NOT the Presenter unit since it is not yet
connected.

MNAPPR11072005V1.0
Page 6
Before you install PresenterBefore you install Presenter
Before you install PresenterBefore you install Presenter
Before you install Presenter
There are several steps you should take in preparation for the installation of
your Presenter unit. These steps are to ensure proper installation so that your
product may run smoothly and trouble free.
We have attempted to make the installation procedure as simple as possible.
Variations in computer systems might make your installation procedure unique
but please try to follow these steps as closely as possible.
Please check the following:
•Make sure to logon with a username and password that has Administrator
privileges.
•Install and register Windows XP and all normal applications that you will
run on this PC.
•Make sure that you have installed current drivers for your normal video
adapter.
•If your PC supports Hyperthreading (HT), make sure that it is disabled in the
BIOS/CMOS.
•Make sure that any Remote Control Host software is uninstalled.
•Verify that Windows XP Service Pack 1 (SP1 or SP1a) is installed. (Start >
Control Panel > System > General. Or Windows Key+Pause/BreakKey).
•Make sure that you have at least 256MB of Ram.
•It might later be useful to determine wether your computer uses an AGP or
PCI Graphics Card. You may write it down or remember it.
•Disable any screen savers. Go to Control Panel > Display > Screen Saver Tab
and select (None) for the screen saver. Here you will also want to adjust
the Power settings by clicking the Power button at the bottom of the
Screen Saver tab. You will want to select the Always On power scheme and
“Turn Off Monitor” should be set to “Never”.
•Make sure that any AntiVirus software is disabled as this may interrupt or
interfere with installation. Note: You may reenable this software after
Presenter is installed.
After any settings might have been made it might be neccessary to restart your
computer. If you have not done so already please do so no to ensure that all
changes have been finalized.
Installation and OperationInstallation and Operation
Installation and OperationInstallation and Operation
Installation and Operation
MNAPPR11072005V1.0 Page 7
Installation and OperationInstallation and Operation
Installation and OperationInstallation and Operation
Installation and Operation
Quick StartQuick Start
Quick StartQuick Start
Quick Start
Before beginning installation ensure that your PC is turned off. Follow the Steps
indicated for the Presenter Package you have.
1. Install the Presenter PCI card into an available PCI slot in your computer.
2. (Presenter) Connect the CAT5 to VGA adapters to the 4 CAT5 connectors
on the Presenter Card.
(Presenter Pro) Use 4 CAT5 cables to Connect the Presenter Card to the
inputs on the SLX-TX400.
3. (Presenter Pro) Run a CAT5 cable from the transmitter to the remote
location of your screen. Connect a remote station (SLX-RX100) into each
end of those CAT5 cables that you will be using.
4. (Presenter)Connect remote monitors to the ends of the CAT5/VGA cables.
(Presenter Pro) Connect monitors and/or speakers to SLX-RX100 units.
Then connect the external power supply to the AC IN connection of the
SLX-X400 unit. (Optional) Connect power adapters to the SLX-RX100 units.
5. Power on your PC.
6. Windows will now recognize that new hardware has been installed. Allow
it to detect all of the hardware. This could take a few minutes.
7. Install the provided ApplicaXP software (includes drivers) and the Presenter
Software.
8. Reboot your computer.
Presenter
Presenter Pro

MNAPPR11072005V1.0
Page 8
Connecting the Presenter PCI card (Detailed)Connecting the Presenter PCI card (Detailed)
Connecting the Presenter PCI card (Detailed)Connecting the Presenter PCI card (Detailed)
Connecting the Presenter PCI card (Detailed)
1. Open up the computer so the inside is exposed. Usually this is a side panel.
2. Find an available PCI slot. Remove the filler bracket from the slot you have
selected.
3. Ground yourself by briefly touching something metal, such as the
computer chassis, with your fingers, and then remove the PCI board from
its shielded plastic envelope.
4. Carefully insert the Presenter card making sure that it is properly and
completely inserted. This is done by firmly applying pressure across the top.
You will feel the card slide into place. If you do not know how to do this
find someone who is qualified to do so. Verify that no other PCI cards have
been accidentally lifted from their slots.
5. Insert a screw to secure the chrome bracket of the pci card to the PC case.
Note: If you are connecting more than one Presenter card, completely
install the first card and make sure it is fully operational. This will simply the
installation process and simplify possible troubleshooting later on.
6. Put the cover back on the computer. (If you are connecting multiple cards
you can postpone this step until all of the cards are installed.
Before beginning installation ensure that the PC is turned off.
Installation and OperationInstallation and Operation
Installation and OperationInstallation and Operation
Installation and Operation
The Applica Presenter card requires an available full length PCI
slot . The PC case must also be large enough to accommodate
and cool a card of this size.

MNAPPR11072005V1.0 Page 9
Installation and OperationInstallation and Operation
Installation and OperationInstallation and Operation
Installation and Operation
Connecting the Trasnmitter, Receivers and RemoteConnecting the Trasnmitter, Receivers and Remote
Connecting the Trasnmitter, Receivers and RemoteConnecting the Trasnmitter, Receivers and Remote
Connecting the Trasnmitter, Receivers and Remote
Monitors (Presenter Pro)Monitors (Presenter Pro)
Monitors (Presenter Pro)Monitors (Presenter Pro)
Monitors (Presenter Pro)
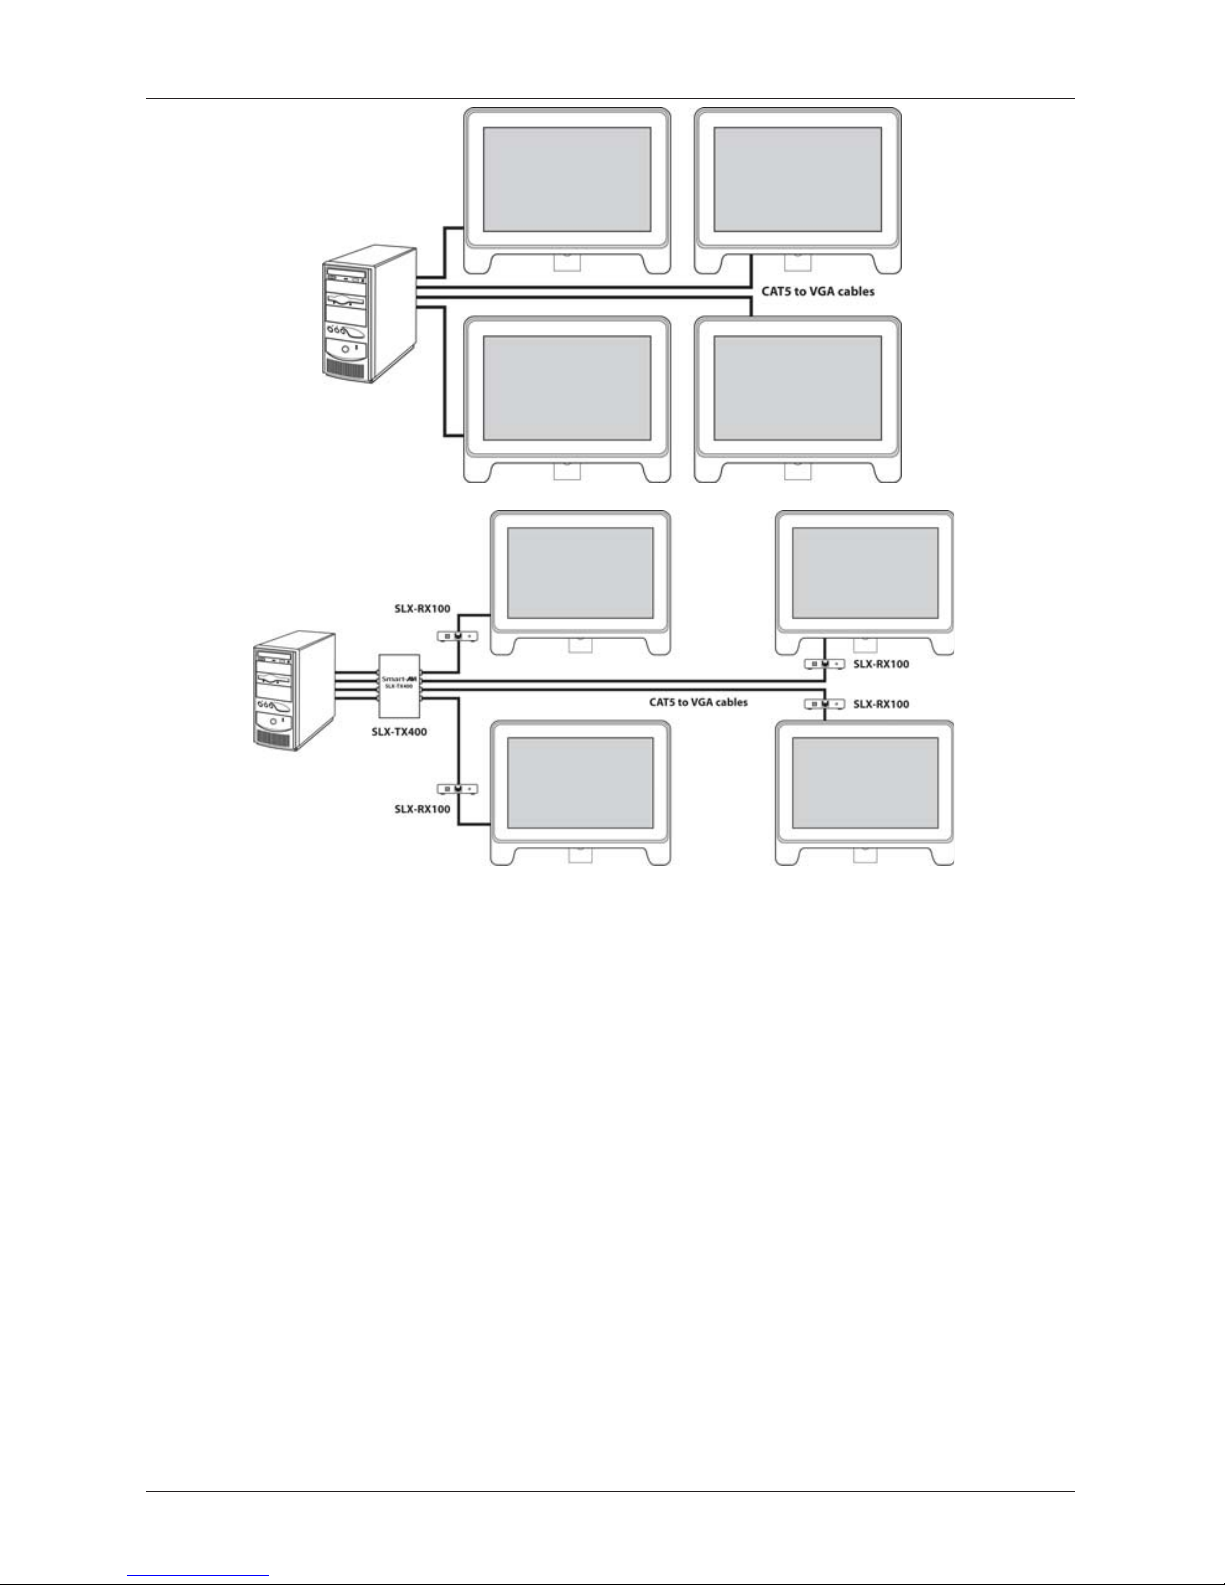
1. Use four CAT5 cables to connect the outputs on the Presenter card
to the inputs on the SLX-TX400 unit.
2. Optional - Connect audio inputs to the front of the SLX-TX400 or connect a
standard USB 2.0 cable to the SLX-TX400 to use built in audio.
2. Connect additional CAT5 cables to the output connectors on the SLX-
TX400 units and run those cables to the location of your remote monitors.
3. Connect an SLX-RX100 unit to each end of those CAT5 cables.
4. Connect your output monitor and speakers to the SLX-RX100 units.
* Up to four can be connected although only
two are shown.
* Up to four can be connectedalthough only one is
shown
Connecting the Remote Monitors (Presenter)Connecting the Remote Monitors (Presenter)
Connecting the Remote Monitors (Presenter)Connecting the Remote Monitors (Presenter)
Connecting the Remote Monitors (Presenter)
1. Use the supplied CAT5 to VGA cables to connect the remote monitors to the
the CAT5 connectors on the Presenter Card.
MNAPPR11072005V1.0
Page 10
System Power UpSystem Power Up
System Power UpSystem Power Up
System Power Up
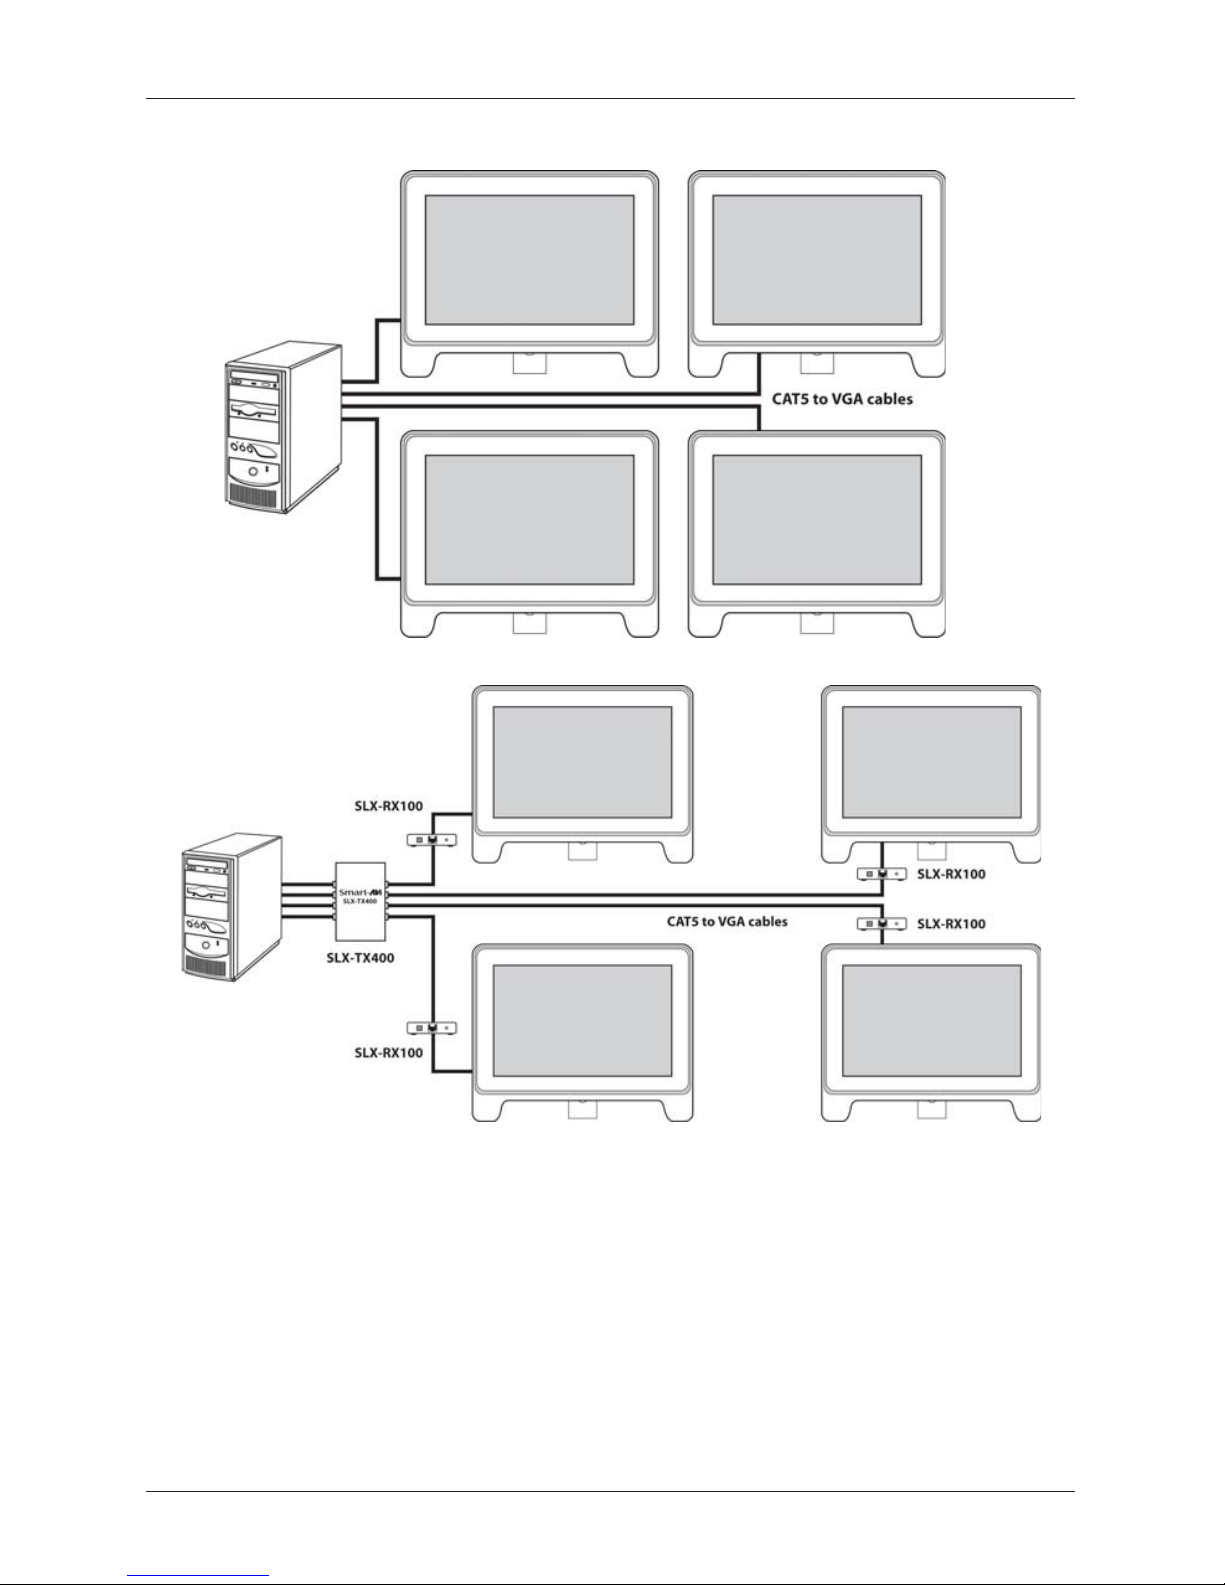
1. Presenter Pro - Connect the 12 Volt power supply to the SLX-TX400 and plug
it into the wall socket.
2. Presenter Pro - (Optional) Connect power adapter to remote units and plug
those into a wall socket. Power on the remote stations.
3. Power on your computer.
4. On boot up, Windows should recognize that new hardware has been
installed. This may take a few minutes as it recognizes the necessary
hardware for the Presenter Card.
Before you power up, ensure that all cables are properly connected as shown in
the diagram below.
Installation and OperationInstallation and Operation
Installation and OperationInstallation and Operation
Installation and Operation
Presenter
Presenter Pro
Questo manuale è adatto per i seguenti modelli
1
Indice


