Arenti Laxihub MiniCam Manuale utente

Kompatibilnís Amazon Alexa a Google Assistant
powered by
MiniCam
RYCHLÝ NÁVOD
CS Chytrá pokojová Wi-Fi kamera
EN Smart Indoor Wi-Fi Camera
FR Caméra Wi-Fi intérieure intelligente
NL Slimme Binnen wifi-camera
ES Cámara inteligente Wi-Fi para interiores
PT Câmera Wi-Fi inteligente
DE Intelligente WLAN-Innenkamera
IT Telecamera Wi-Fi Smart per interni
RU Умная крытая камера Wi-Fi
TU Akıllı Kapalı Wi-Fi Kamera
JP
スマート屋内Wi-Fiカメラ
© Sunnysoft s.r.o., distributor
www.sunnysoft.cz
EN
CS
Rychlýnávod 1x
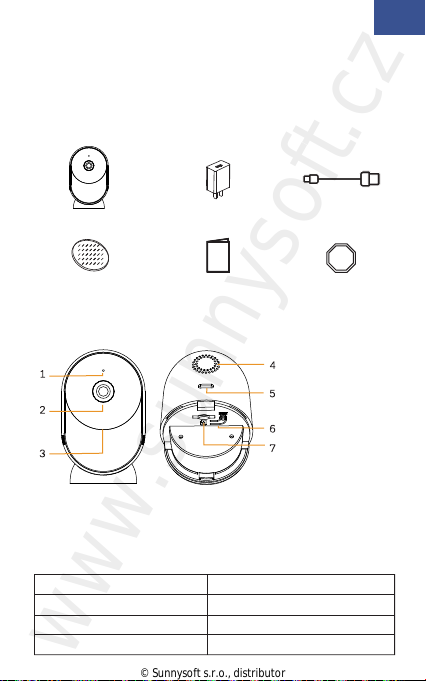
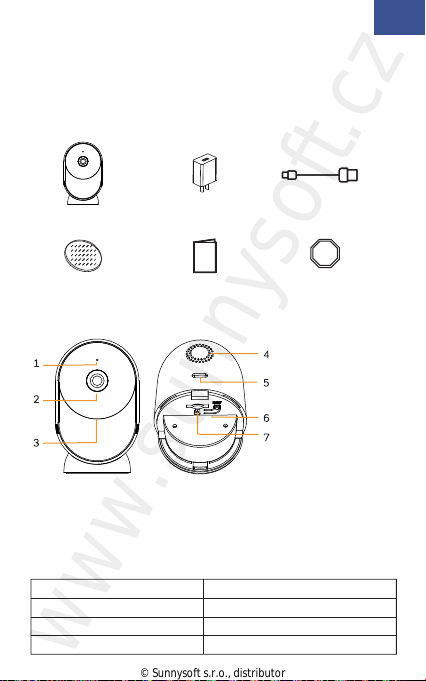
2. Popis zařízení
3M nálepka 1x Výstražná nálepka 2x
Rychlýnávod
1. Obsah balení
2. Popis zařízení
3. Instalace
4. Konfigurace zařízení
1. Obsah balení
Kamera 1x Adaptér 1x USB kabel 1x
1. Mikrofon
2. Objektiv
3. LED
4. Reproduktor
5. Port Typ-C
6. Reset
7. Slot na SD kartu
Poznámka
Reset zařízení: stiskněte a přidržte tlačítko reset po dobu 5 s. Po
úspěšném resetu, kamera zapípá.
LED kamery:
Červená LED pomalu problikává
Červená LED rychle problikává
Červená LED svítí
Modrá LED svítí
Čekání na konfiguraci sítě
Připojování k WiFi síti
Síťje nefunkční
Kamera pracuje správně
© Sunnysoft s.r.o., distributor
www.sunnysoft.cz
Poznámka
CS
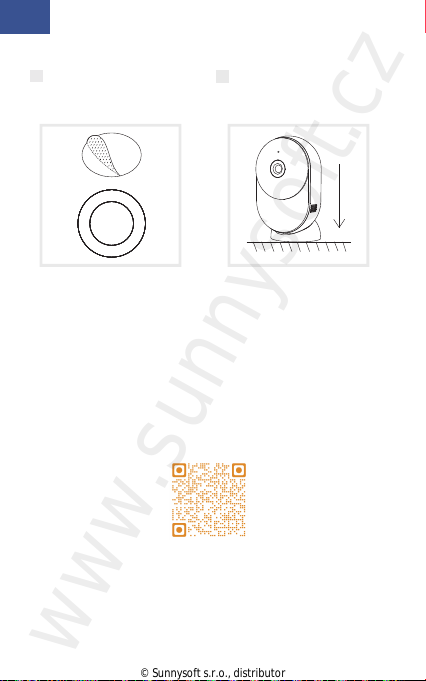
3. Instalace
1 Umístěte 3M nálepku
doprostřed spodní části.
2 Kameru nainstalujte na
rovnou čistou plochu.
4. Konfigurace zařízení
Krok 1 Kameru zapněte.
Krok 2 Připojte mobilní telefon k WiFi síti.
Krok 3 Stáhněte aplikaci Arenti z internetového obchodu
Google Play (Android) nebo z Apple Store (iOS).
Krok 4 Nainstalujte aplikaci Arenti a vytvořte si účet.
Krok 5 Postupujte podle instrukcích uvedených níže a
přidejte kameru do aplikace. Poté postupujte podle instrukcí
uvedených v aplikaci.
Více informací je uvedeno v QR kódu.
Pokud máte více kamer, opakujte krok 5 znovu a přidejte
další kamery do aplikace.
Pokud budete chtít změnit WiFi připojení. Kameru resetujte
do továrního nastavení a poté zopakujte krok 5 a přidejte
kameru.
© Sunnysoft s.r.o., distributor
www.sunnysoft.cz

1/3" CMOS
Color [email protected]
2 Mega pixels
3.6 mm F2.0
1/25-1/100,000 za s
Výkonná LED s ICR
10 m
H.264
32Kbps - 2Mbps
1920 x 1080
1-25 za s
podpora HD/SD; flip
SD karta (Max 256GB)
Obousměrný
HTTP, DHCP, DNS, RTSP
IEEE802.11b/g/n
2.4 GHz - 2.4835 GHz
WPA-PSK/WPA2-PSK
AES128
-20℃~40℃
DC5V,1A
2.5W MAX
143x57x36
TPA-67F050100VU01
100~240V AC
50~60Hz
5V DC
1A
5W
73.62%
< 0.1W
EN
CS
Specifikace
Typ sensoru
Minimální jas
Rozlišení
Objektiv
Závěrka
Infračervené světlo
Vzdálenost IČsvětla
Komprese videa
Přenosová rychlost
Maximální rozlišení
Snímková frekvence
Nastavení fotek
Uložiště
Zvuk
Protokoly
WiFi standard
Frekvence
Šířka pásma
Zabezpečení
Pracovní teplota
Napětí
Spotřeba
Rozměr (mm)
Model
Vstupní napětí
Vstupní frekvence
Výstupní napětí
Výstupní proud
Výstup
Účinnost
Spotřeba naprázdno
© Sunnysoft s.r.o., distributor
www.sunnysoft.cz

EN
CS
Pouze pro vnitřní použití
Distributor
Sunnysoft s.r.o.
Kovanecká 2390/1a
190 00 Praha 9
Česká republika
www.sunnysoft.cz
© Sunnysoft s.r.o., distributor
www.sunnysoft.cz

EN
Quick start guide
1. Packing list
2. Product description
3. Installation
4. Product configuration
5. Legal notice
1. Packing list
EN
Power adaptor X1 USB cable X1
Quick guide X1
2. Product description
1. Microphone
2. Lens
3. LED indicator
4. Speaker
5. Type-C port
6. Reset
7. SD card slot
Camera X1
3M tape X1
Notice
To reset the device, press and hold the reset button for 5s.
The camera beeps when the operation is complete.
LED indicator of camera:
Flashing red light (slow)
Flashing red light (fast)
Fixed red light
Fixed blue light
Wait for network config
Connecting the network
Network is malfunctional
Camera is working correctly
Warning sticker X2
© Sunnysoft s.r.o., distributor
www.sunnysoft.cz

3. Installation
EN
EN
4. Product configuration
Step 1 Turn on your camera.
Step 2 Connect your smartphone to the Wi-Fi network.
Step 3 Download Arenti app from the App Store or
Google Play depending on your device.
Step 4 Launch the App and sign up for the first use.
Step 5 Follow the on-screen instructions to add your
camera.
For more information, scan the QR code.
1 Stick the 3M tape in the
middle of camera
bottom.
2 Put the camera on the
clean plane.
If you have multiple cameras, please follow step 5 again
to add devices one by one.
To change Wi-Fi network, please restore the camera to
factory settings and follow step 5 to add the camera.
Notice
© Sunnysoft s.r.o., distributor
www.sunnysoft.cz

Sensor type
Min. brightness
Resolution
Lens
Shutter
Infrared
Infrared distance
Video compression
Bit rate
Max resolution
Framerate
Picture settings
Storage
Audio
Protocols
WiFi standard
Frequency
WiFi encryption
Security
Working temperature
Power
Consumption
Size(mm)
Model
Input voltage
Input frequency
Output voltage
Output current
Output power
Efficiency
No-load consumption
1/3" CMOS
Color [email protected]
2 Mega pixels
3.6 mm F2.0
1/25-1/100,000 per second
High power LED with ICR
10 meters
H.264
32Kbps - 2Mbps
1920 x 1080
1-25 per second
Support HD/SD; support flip
SD card (Max 256GB)
Two-way audio
HTTP, DHCP, DNS, RTSP
IEEE802.11b/g/n
2.4 GHz - 2.4835 GHz
WPA-PSK/WPA2-PSK
AES128
-20℃~40℃
DC5V,1A
2.5W MAX
143x57x36
TPA-67F050100VU01
100~240V AC
50~60Hz
5V DC
1A
5W
73.62%
< 0.1W
Specifications
EN
EN
© Sunnysoft s.r.o., distributor
www.sunnysoft.cz

EN
EN
Support
5. Legal notice
www.laxihub.com
Symbols
Direct current (DC)
Don't throw batteries or out of order products with
the household waste (garbage). The dangerous
substances that they are likely to include may harm
health or the environment. Make your retailer take
back these products or use the selective collect of
garbage proposed by your city.
Hereby, Laxihub, declares that the radio equipment
type ‘MiniCam' is in compliance with the
Directive 2014/53/EU
The full test of the EU declaration of conformity is
available at the following Internet address:
www.laxihub.com
For indoor use only
© Sunnysoft s.r.o., distributor
www.sunnysoft.cz
EN
Guide de démarrage rapide
1. Liste de colisage
2. Description du produit
3. Installation
4. Configuration de l'appareil
5. Mention légale
FR
Caméra X1 Adaptateur secteur X1 Câble USB X1
Manuel d'utilisation X1Ruban 3M X1
2. Description du produit
Remarquer
Pour réinitialiser l'appareil, maintenez le bouton de
réinitialisation enfoncé pendant 5 secondes.
Caméra émet un bip lorsque l'opération est terminée.
Indicateur LED de la caméra:
Attendez la configuration du réseau
Connexion au réseau
Le réseau est défectueux
La caméra fonctionne correctement
1. Liste de colisag
1. Microphone
2. Lentille
3. Indicateur LED
4. Orateur
5. Port de type C
6. Réinitialisation
7. Fente pour
carte SD
Lumière rouge clignotant (lent)
Lumière rouge clignotant (rapide)
Lumière rouge fixe
Lumière bleue fixe
Autocollant
d'avertissement X2
© Sunnysoft s.r.o., distributor
www.sunnysoft.cz
Indice
Lingue:
Altri manuali Arenti Macchina fotografica digitale


