Argosy HD353N Manuale utente

Gigabit Network HDD SATA
User Manual
Ver. 1.3

CONTENTS
Introduction................................................................................1
Key Features .....................................................................................1
System Requirements ........................................................................1
Parts Name and Functions............................................................2
Parts Name and Functions..................................................................2
LED Definition ...................................................................................2
Assemble of the Hard Disk Drive...................................................3
Connection and Removing Connection...........................................4
Network Connection...........................................................................4
USB Printer & Mass Storage Device Connection ...................................4
Removing Connection ........................................................................5
Setup of This Device....................................................................6
Login ................................................................................................6
Basic.................................................................................................6
Control Panel...................................................................................13
Personal Infomation.........................................................................26
Logout ............................................................................................27
Mapping a Folder in Windows XP ................................................ 28
Printer Setup............................................................................. 31
Mounting SMB Server in Mac OS X .............................................. 34
Mounting SMB Server in Linux .................................................... 38
Network Applications ................................................................. 40
Personal Data Backup ......................................................................40
Network File Sharing........................................................................40
FTP Server ......................................................................................40
Printer Server ..................................................................................41
USB Mass Storage Device.................................................................41
Trouble Shooting ....................................................................... 43

Introduction
Introduction
Thank you for purchasing this device. It is a flexible, economical and powerful solution for your
network storage application. The following instructions will help you to learn more about the
connections, set-ups, and configurations of it.
Key Features
•External 3.5" hard drive with ethernet interface
•Share music, pictures, movies and data over network
•Share files over LAN as SAMBA file server
•Share files over Internet as FTP server
•Features a USB printer server function
•Expansion of capacity with USB Mass Storage Devices
•Web-based configuration with password protection
•Works with Static IP, DHCP client, or DHCP server
•Easy firmware upgrade
•Hardware Reset key
•Support 3.5” SATA hard disk up to 750GB
•Support UPnP
•Interface: 10/100/1000 Base-TX(Auto MDI/MDI-X), supports auto crossover detection
•Aluminum enclosure with an internal cooling fan for continuous operation
System Requirements
•A PC with Ethernet port
•Windows Vista, Windows XP, or Windows 2000; Mac OS X v10.2.1 or above; Linux
1
Parts Name and Functions
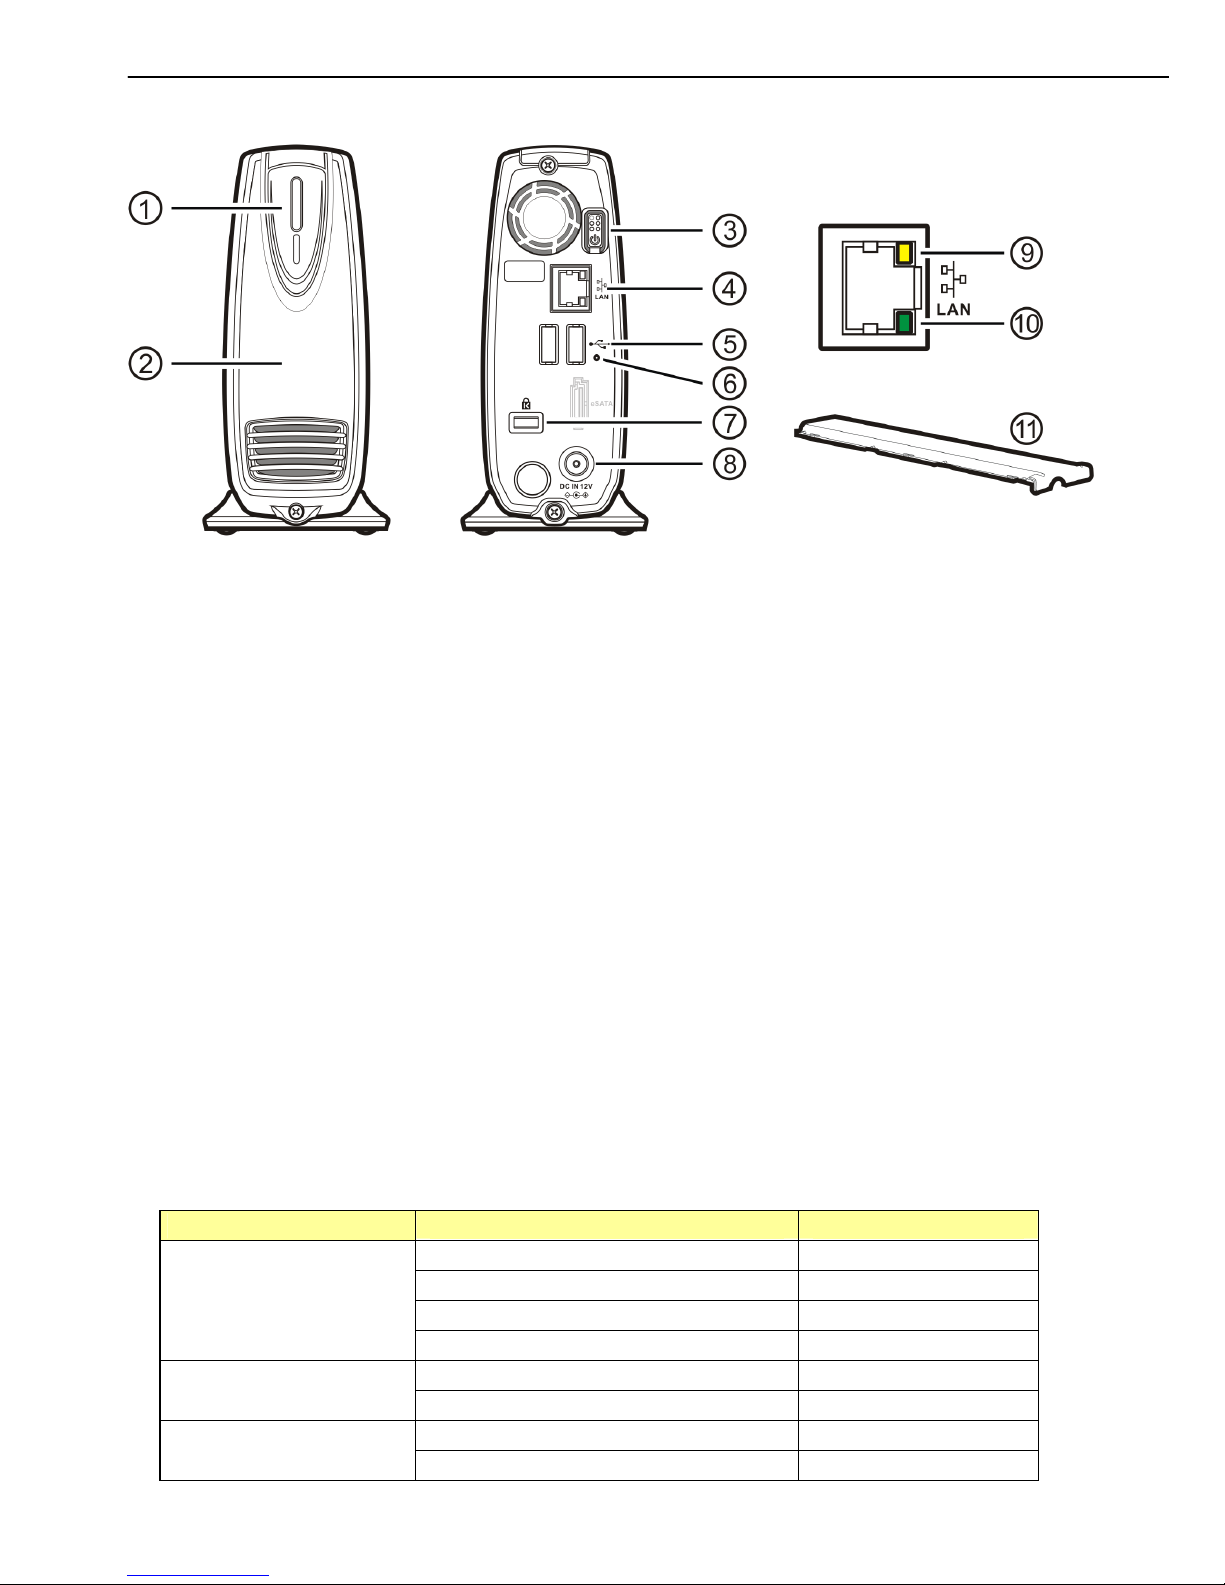
Parts Name and Functions
Parts Name and Functions
cPower LED: Power and access (blue) / Booting-up or reset(orange)
dFront cover: Covers the opening of the housing
ePower button: Push to turn on or off this device
fEthernet port: Connects to the Ethernet cable with RJ45 connector
gUSB host ports: Connects to USB printers and USB Mass Storage Devices
hReset key: Press 5 sec to restore factory default
iKensington Security Slot: Connects to a Kensington lock pin
jDC In jack: Connects to the AC adapter
kActivity LED (yellow): Activity status of Ethernet
○
10 Link LED (green): Link status of Ethernet
○
11 Plastic Upper Frame: Covers the groove and screws on the top of this device
LED Definition
LED Name Operating Status LED Color
Booting up Orange
Power ON Blue
NAS Accessing Blinking in blue
Power LED
Resetting Orange
Linked to the Ethernet Green
Link LED Disconnected from the Ethernet No signal
Accessing the Ethernet Orange
Activity LED Not Accessing No signal
2
Assemble the Hard Disk Drive
Assemble of the Hard Disk Drive
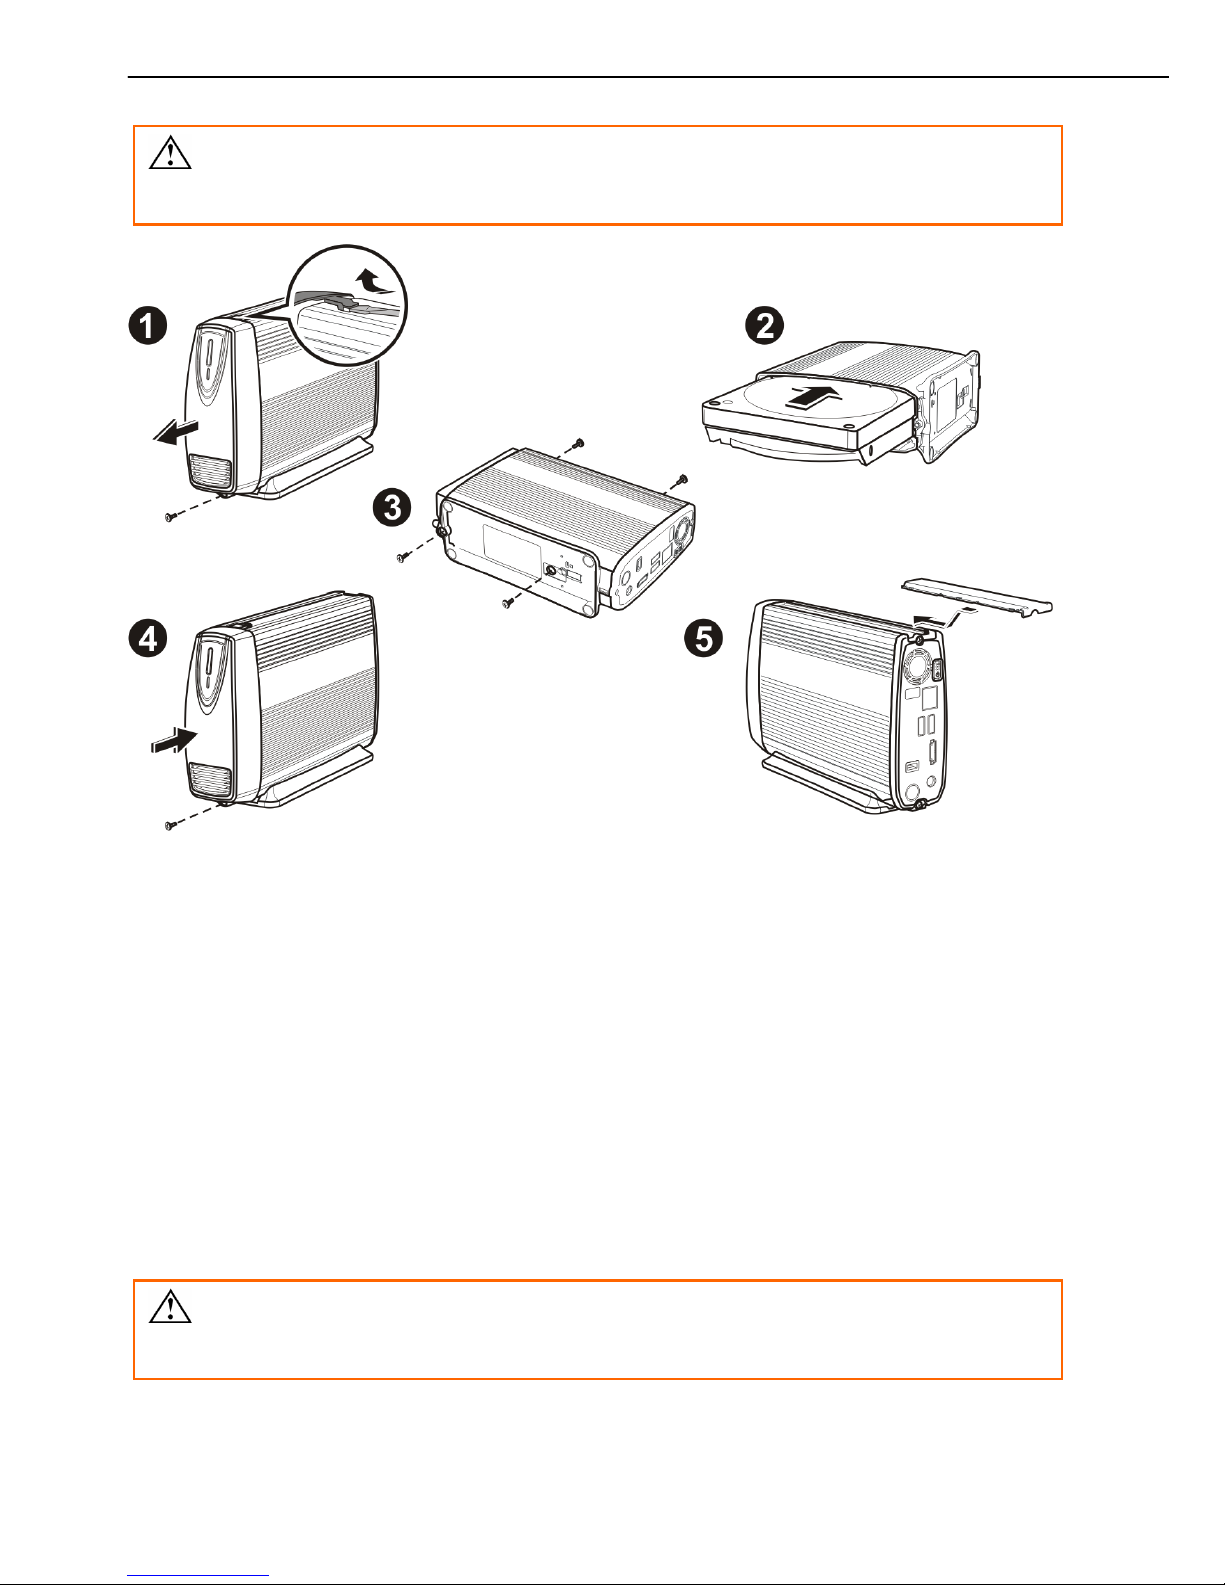
If you purchased this device with a hard disk drive preassembled, please do not
disassemble the device by yourself. Disassembling will void warranty!
1. Unfasten the screw on the lower part of the front cover. Remove the front cover by lifting
the clip with a flat screw driver.
2. Place the device horizontally; align the hard disk drive with the PCB board. Push slowly and
gently to the most inside until the hard disk drive is firmly seated.
3. Assemble the enclosure by fastening the screws on both top and bottom sides.
4. Attach the front cover to the case and secure the screw on the lower part.
5. Restore the plastic upper frame by sliding it into the gape on the top of the case. Make
sure the plastic upper frame matches the direction.
For a newly attached HDD, formatting it with the user interface of this device is required
before any further operation. (see page 22)
3
Connection and Removing connection
Connection and Removing Connection
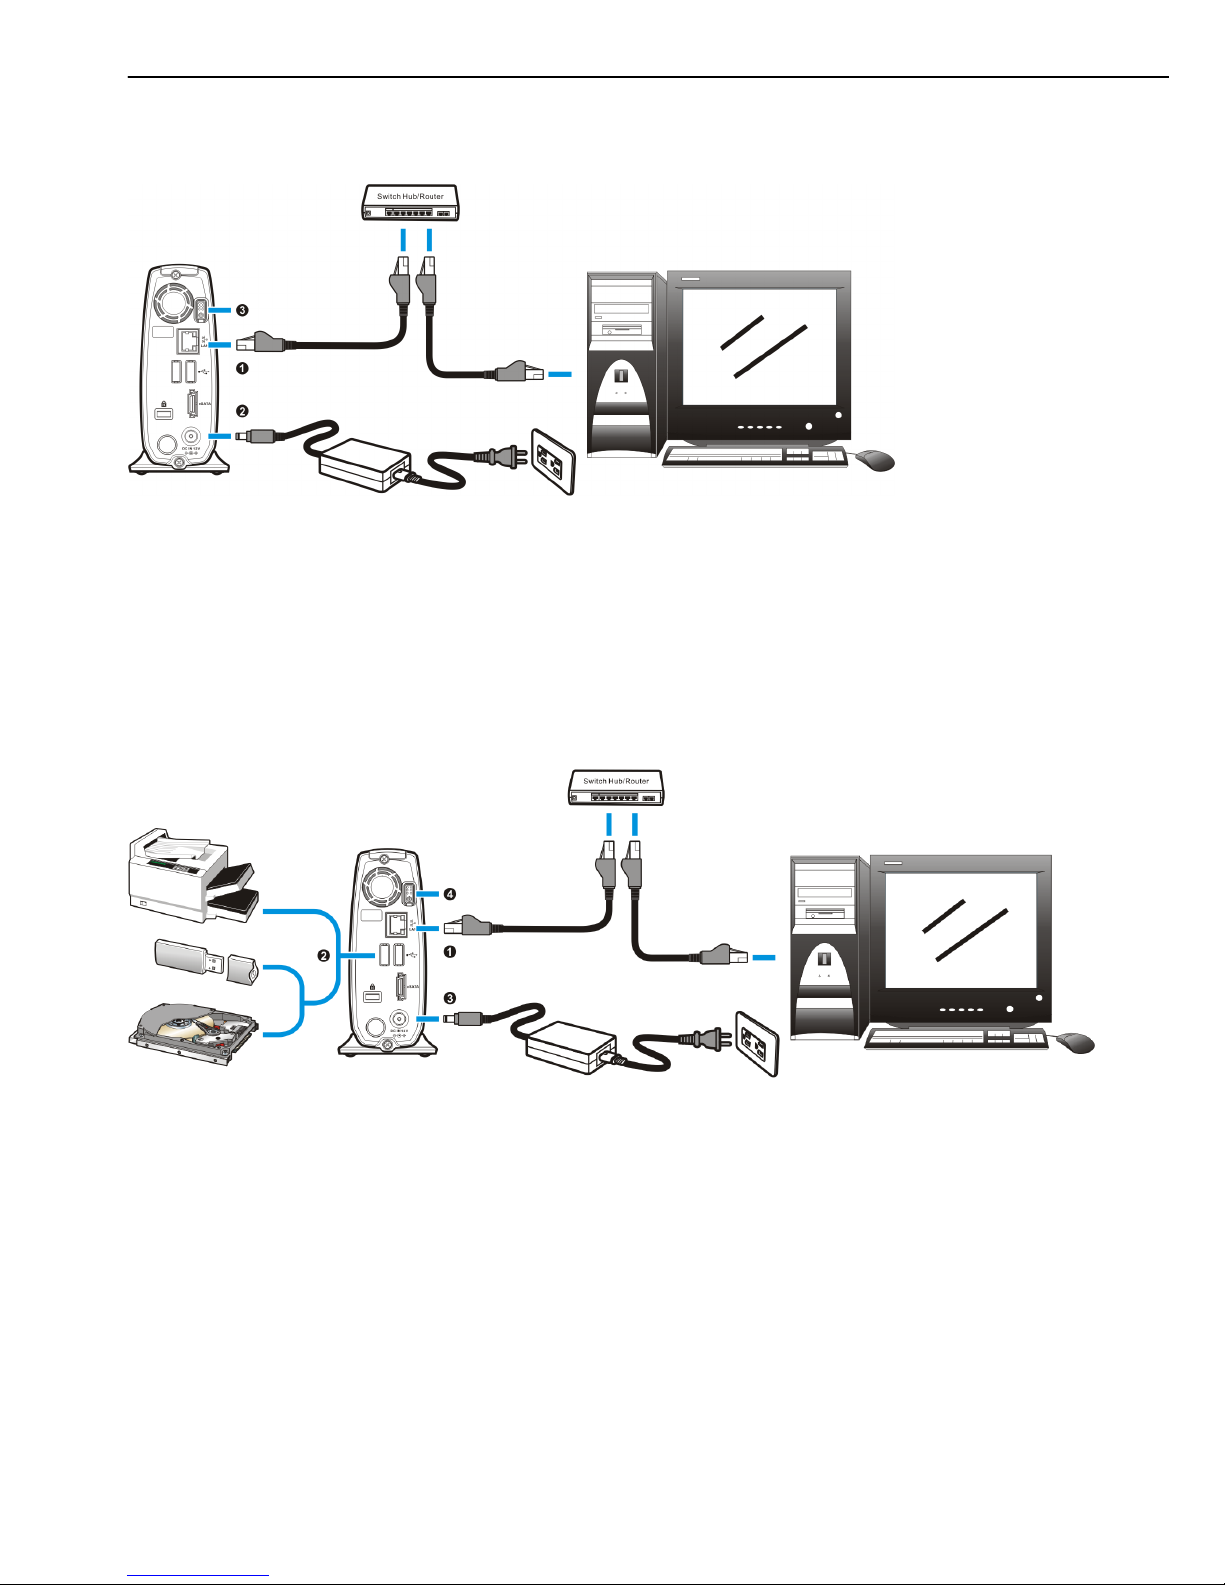
Network Connection
n:Connect this device and a Switch, Hub, Router, or a computer with a RJ45 Ethernet cable.
o:Connect the power supply to this device.
p:Press the “Power button” to turn on this device. The orange LED on the front cover will li
g
h
t
up during booting-up. This device will be ready to use when the blue LED lights up steadily.
USB Printer & Mass Storage Device Connection
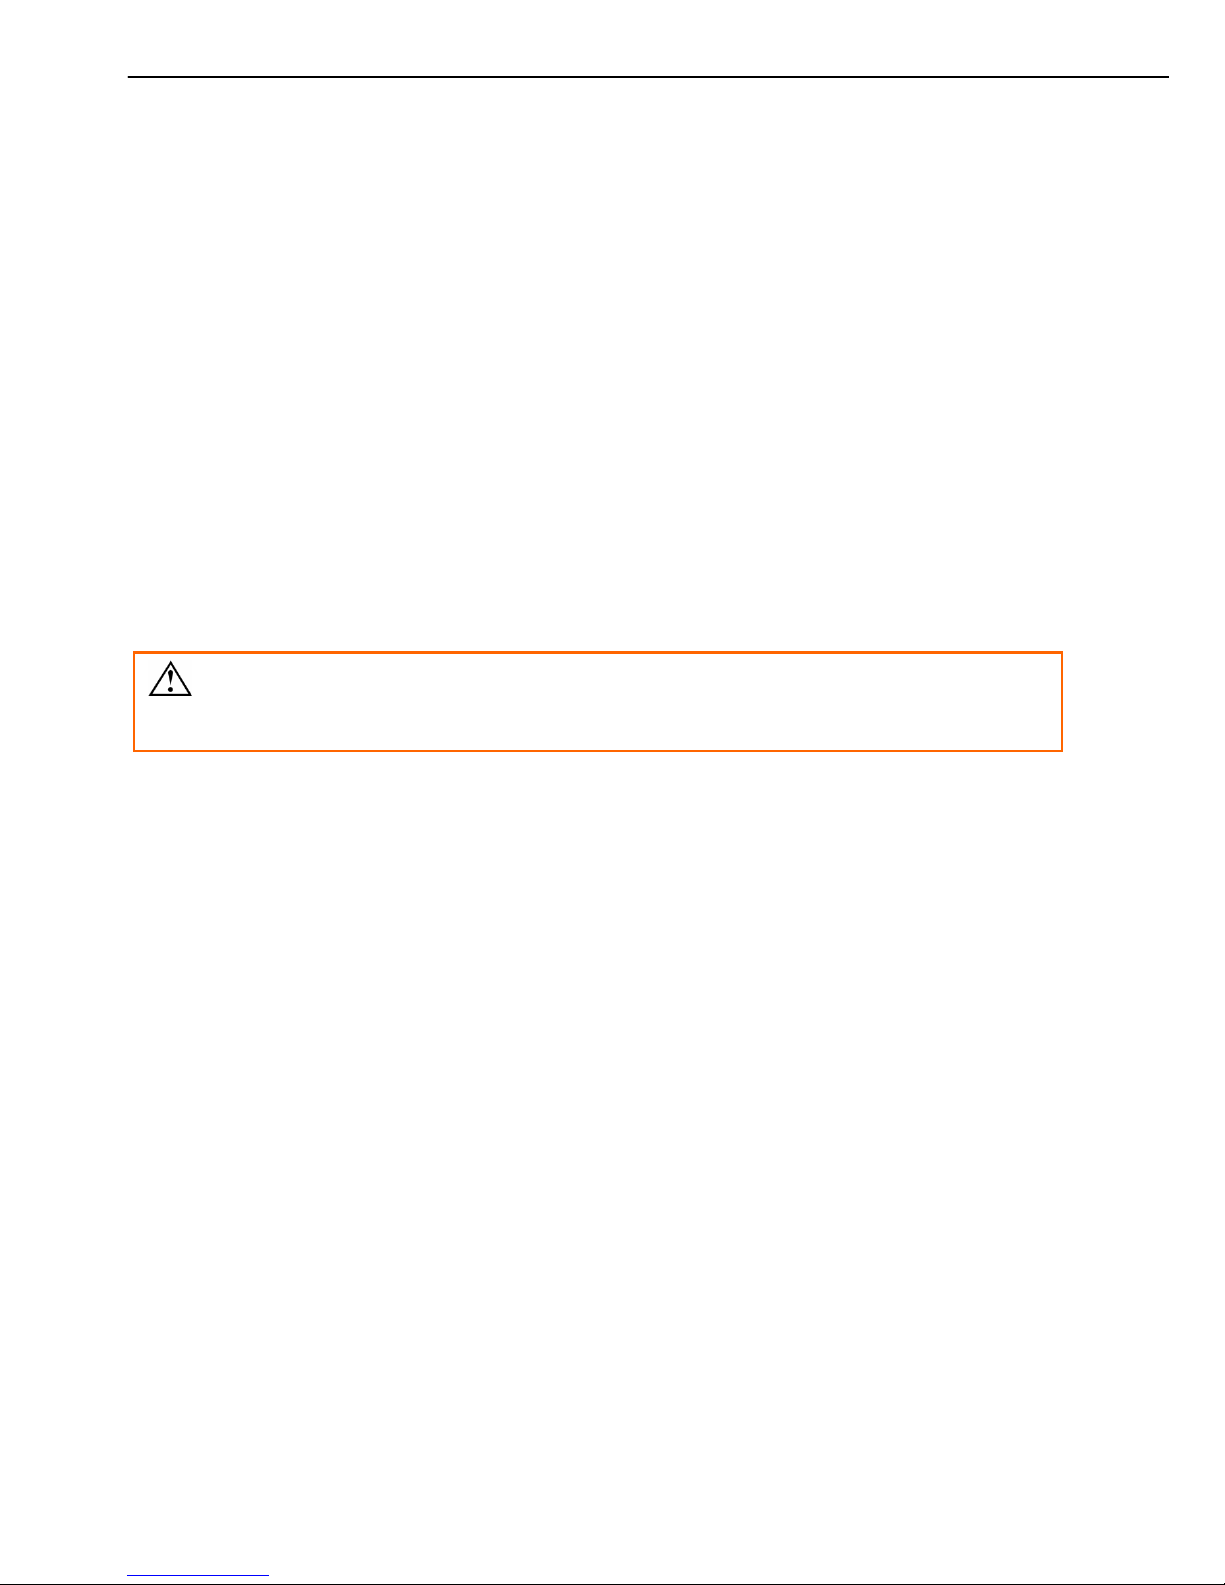
n:Connect this device and a Switch, Hub, Router, or computer with a RJ45 Ethernet cable.
o: Connect USB printer(s) or USB mass storage device(s) to this device with USB cable(s). This
device can automatically mount the USB devices connected. (page 28, 41) You may need to
connect the power adapter of the USB HDD in order to operate properly.
p:Connect the power supply to this device.
q:Press the “Power button” to turn on this device. The orange LED on the front cover will li
g
h
t
up during booting-up. This device will be ready to use when the blue LED lights up steadily.
4
Connection and Removing connection
Removing Connection
Removing USB Mass Storage Devices
This device will auto-mount a USB Mass Storage Device connected to it. But you need to
manually unmount the USB Mass Storage Device before disconnecting it. You can unmount a
USB drive by Control Panel > Maintenance > Disk Utility > clicking “Umount”
button (page 22).
Removing USB Printer
You have to unmount the printer before disconnecting it. You can unmount a USB printer
by Control Panel > File and Print > Printer Server > Unchecking “Enable” box.
(page 17)
Removing Power connection
Press the “Power button” to turn off the device, and then remove its connections.
It is essential that the device need to be turned off prior to the removal the power
connection, or else your data could be damaged.
5
Setup of This Device
Setup of This Device
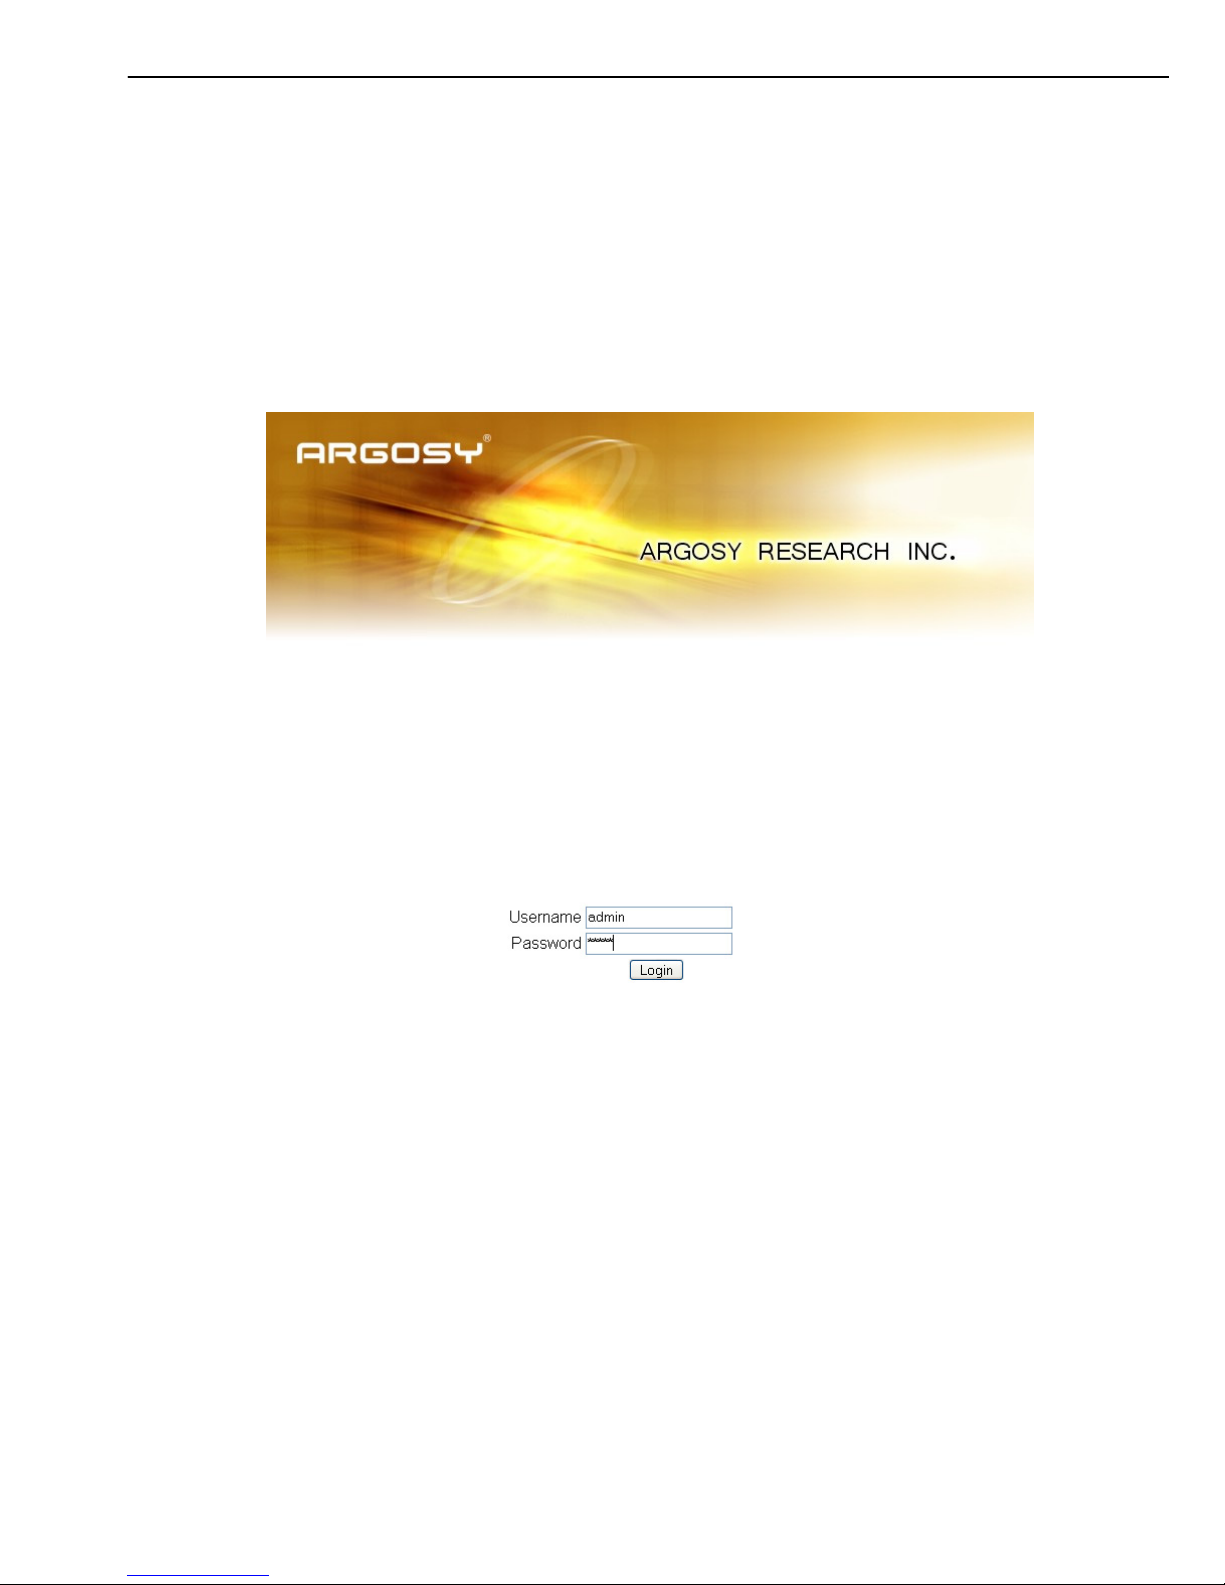
Login
You need to login to get setup access of this device. Key in the IP address assigned to this device
in the URL bar of a browser if a DHCP server is present; key in “192.168.2.1” either a DHCP server is
absent or this device is directly connected to your computer.
Login as username “admin” to perform settings. Default password for username “admin” is
“admin”. You can change the password in Personal Information > Account (page 27)
Basic
Quick Setup
Wizard
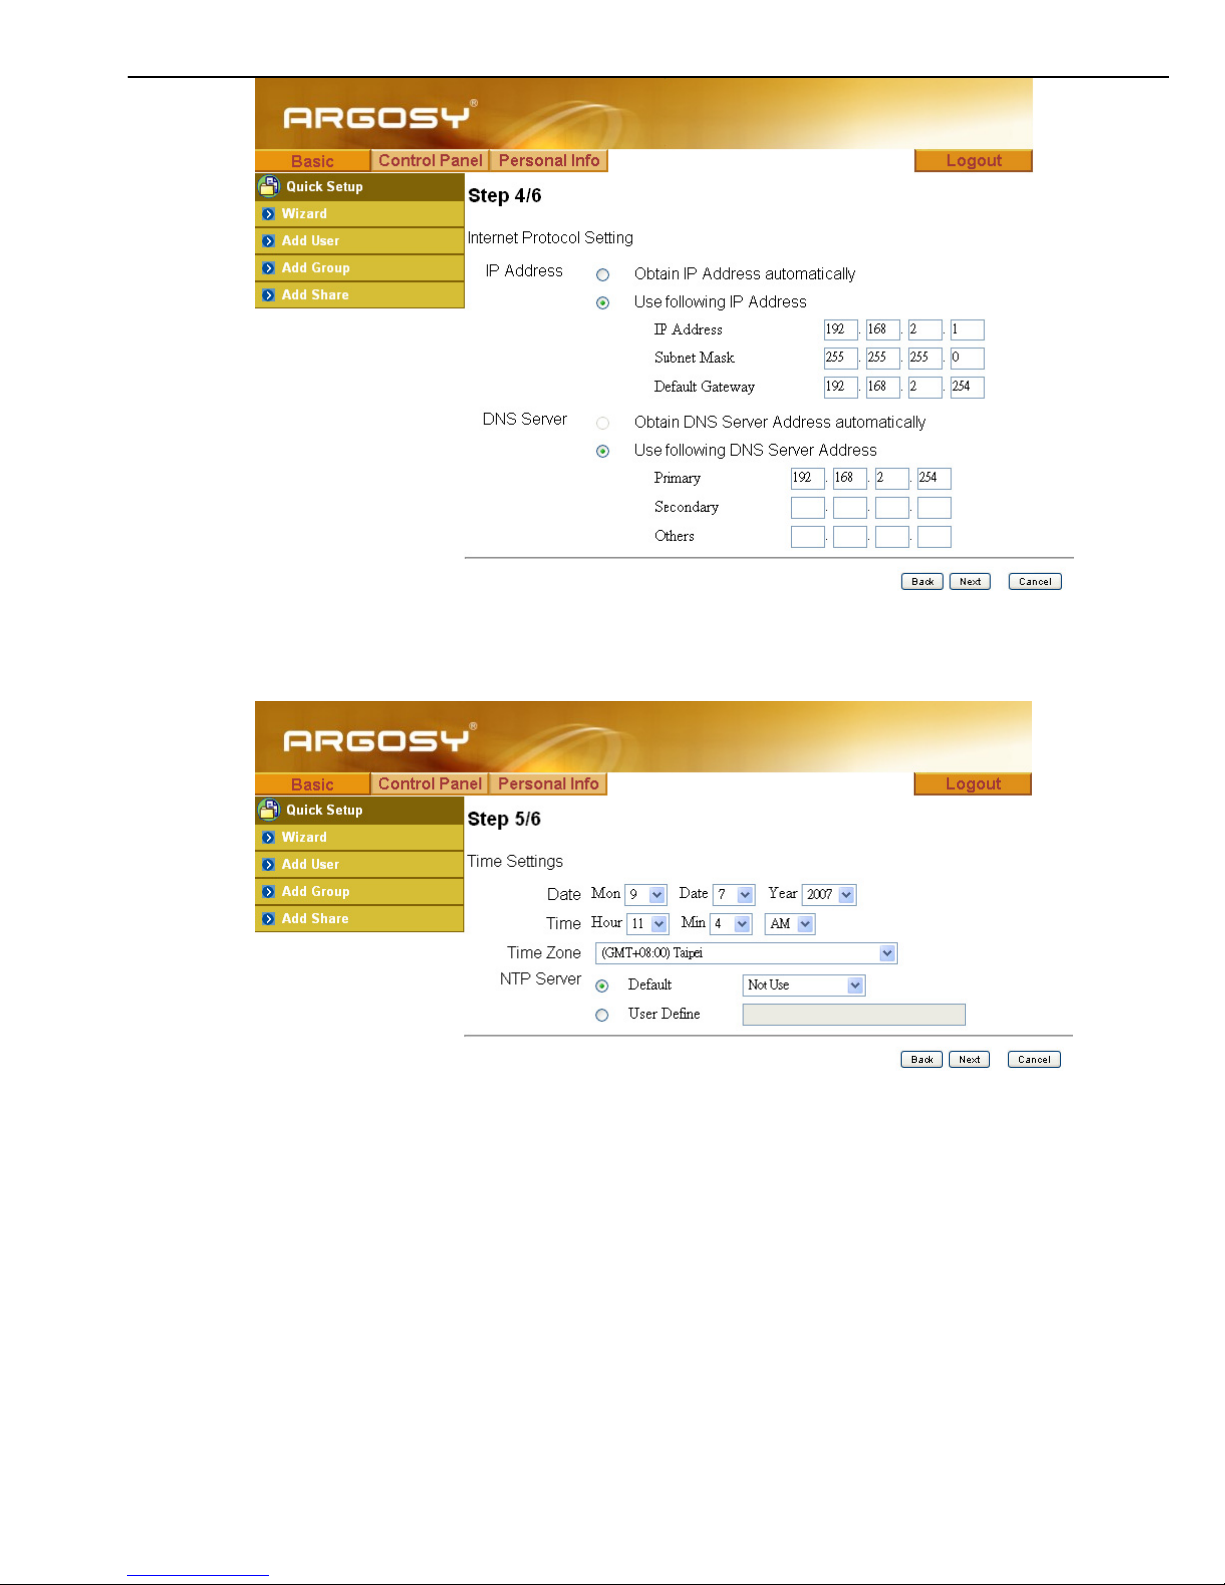
To setup basic configurations of this device, follow the diagram below.
1. Language Setting. Specify the language of this GUI.
6

Setup of This Device
2. Password Setting. Click “Next” to skip password change.
3. Hostname Setting. This hostname can be seen in My Neighborhood. (default arinas)
4. Internet Protocol Setting. You may specify a stationary IP address/DNS server address or
enable the “Obtain IP address/DNS server address automatically” checkbox, depending on
your LAN configuration.
7
Setup of This Device
5. Time Setting. Adjust date, time, and time zone of your local position. Or select a
NTP(Network Time Protocol) server for automatic time setting and calibration.
6. Wizard Setting Confirmation. Click complete to implement above settings.
8
Indice
Altri manuali Argosy Magazzinaggio

Argosy
Argosy HD260 Manuale utente

Argosy
Argosy HD363N Manuale utente

Argosy
Argosy HD 360U Manuale utente

Argosy
Argosy EP822 Manuale del proprietario

Argosy
Argosy DW567 Manuale utente

Argosy
Argosy Mobile Video HDD Manuale utente

Argosy
Argosy HD182 Manuale utente

Argosy
Argosy HD362 Manuale utente

Argosy
Argosy EBK Card Manuale utente


