Argus 300 Manuale utente

1
Welcome to the Exciting World of Argus Camera
Thank you for choosing Argus Camera to pursue your video adventures. Whether
you are creating a video of your friends and family or using the PC300 as a
business tool, since 1936 Argus Camera has been there, sharpening your
images with leading edge technology. To get the utmost satisfaction from your
PC300, please take a moment to read through this manual. Its contents will send
you on an educational jouney into your camera’s multiple capabilities.
Thank you again for choosing Argus !
PC Cam300-User’s Manual
USBPCCamera

2
Table of Contents
Getting Started.....................................................................................3
In Box Contents................................................................................................ 3
System Requirements........................................................................................ 3
PC300 Nomenclature....................................................................................... 3
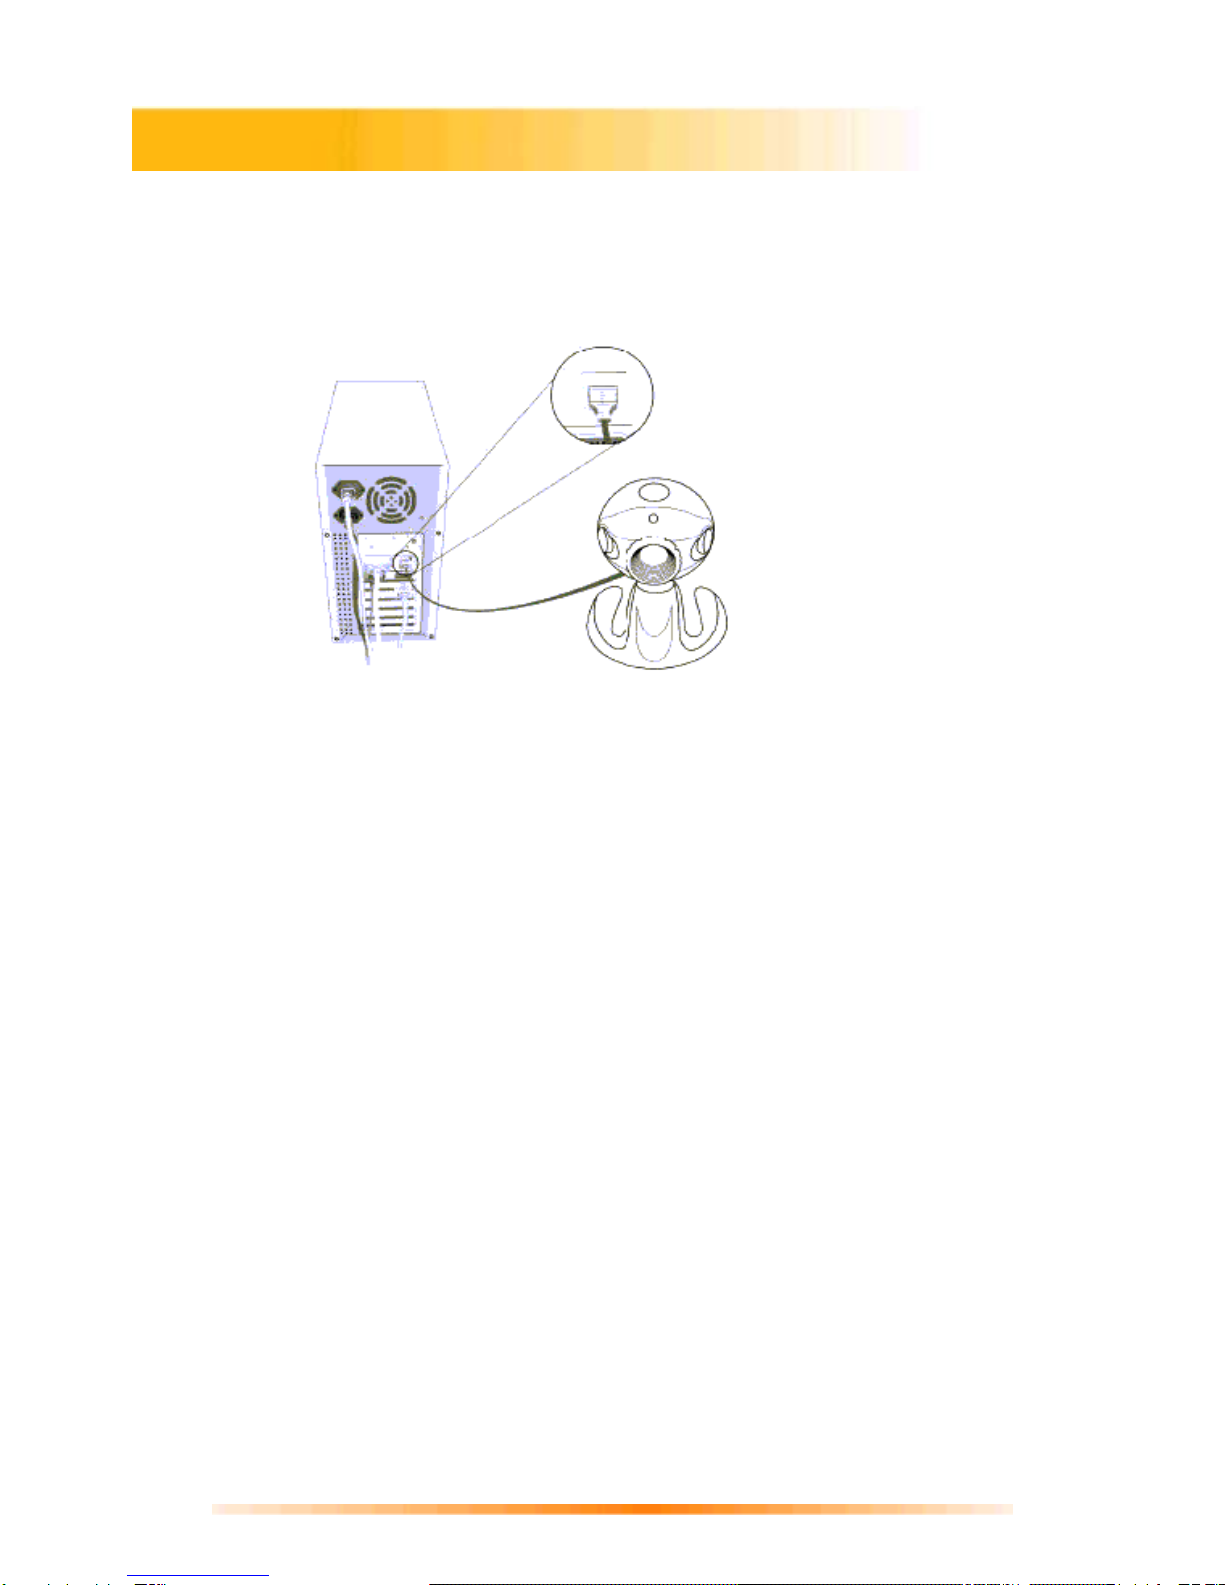
Verifying USB Presence................................................................................... 4
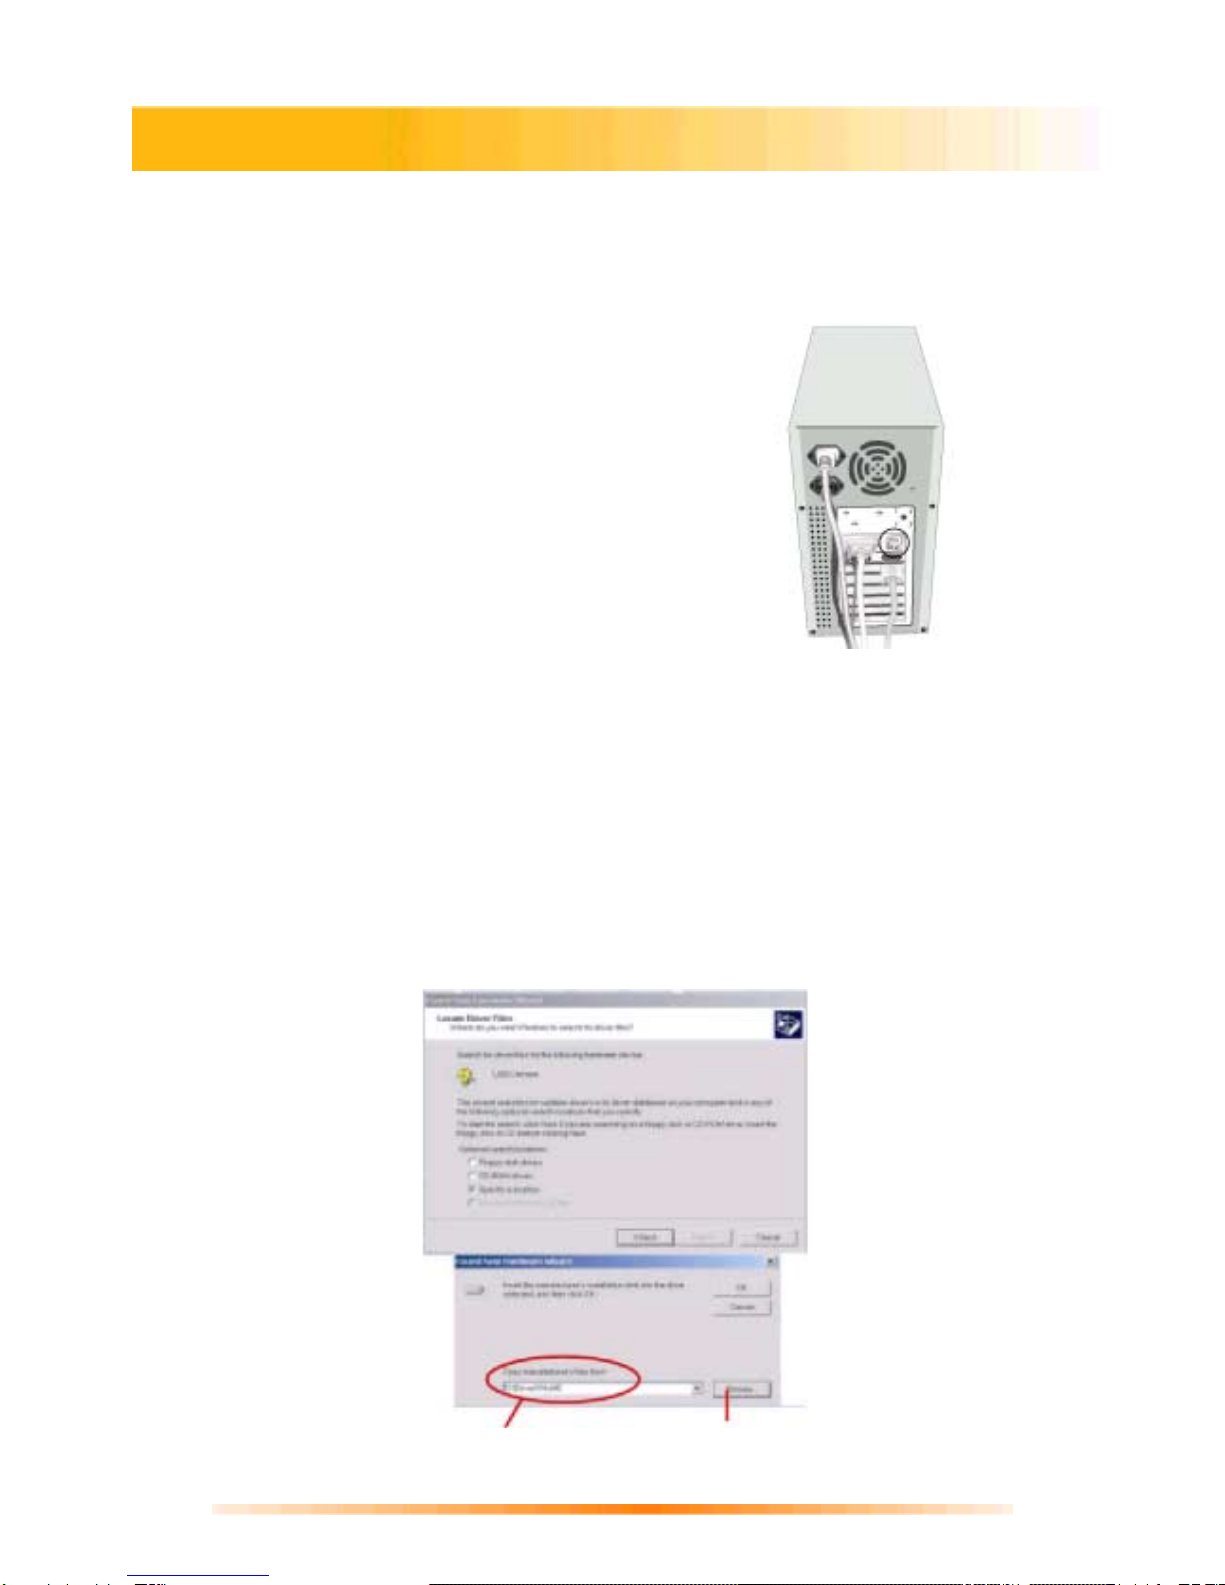
Windows Installation of PC300 Camera and PC300 Driver........................... 5
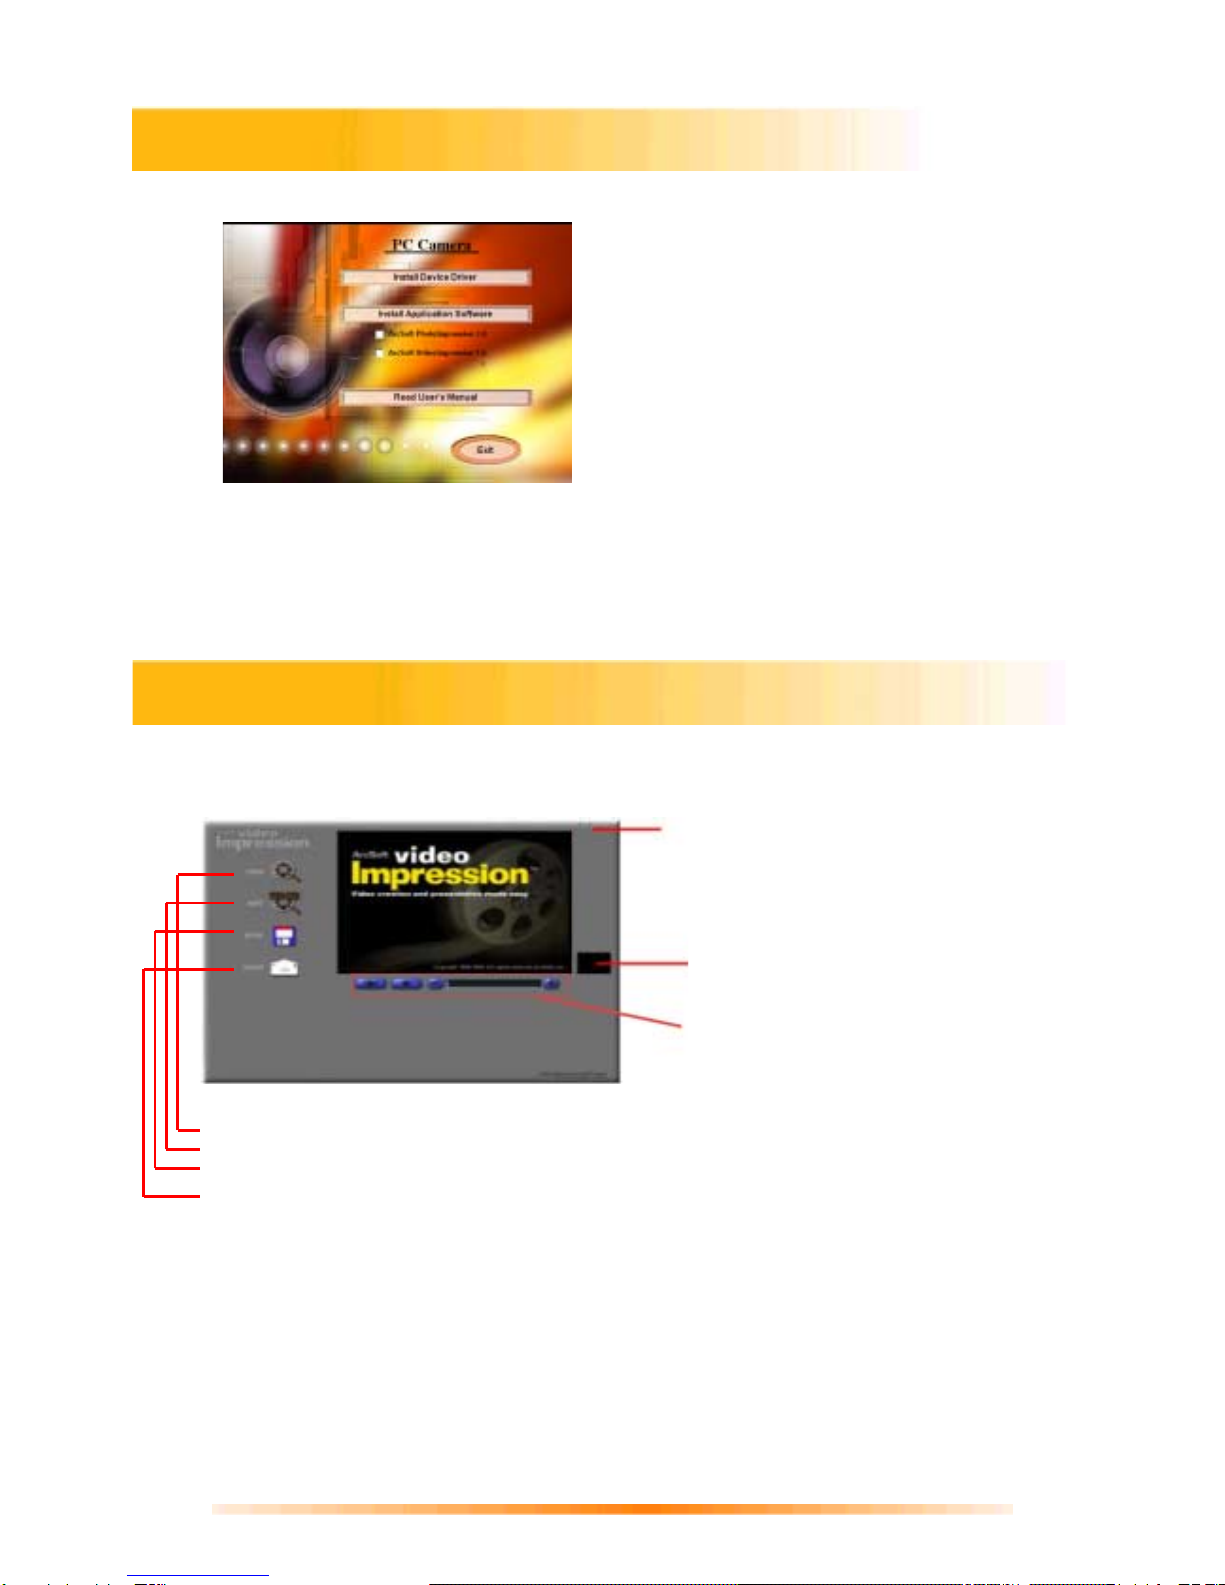
Installing Application Software........................................................................ 7
Creating a Video and Single Frame Snapshot ................................. 7
VideoImpressionMain Screen ........................................................................... 7
Setting the Focus of the PC300 Camera........................................................... 8
Capturing a Single Frame by Using Snapshot Button...................................... 8
Previewing Live Video or Single Frame........................................................... 9
Recording a Video or Single Frame ................................................................. 9
Playback of a Video or Single Frame............................................................... 9
Working with Albums...................................................................................... 10
Working with the Storyboard.......................................................................... 11
Editing Single Frame Snapshots..................................................................... 12
Editing a Video................................................................................................ 12
Editing Audio .................................................................................................. 12
Printing a Snapshot Image or a Still Image From a Video ............................ 13
Saving a Movie................................................................................................ 13
Getting Started with PhotoImpression 3.0.......................................14
Opening an Image from a Disc Drive............................................................. 16
Acquiring Images from a TWAIN Device ....................................................... 16
Downloading Images from The Internet......................................................... 16
Working with Albums...................................................................................... 17
Editing Images ................................................................................................ 18
Creative Project Templates............................................................................. 20
Saving Images................................................................................................. 20
Printing Images............................................................................................... 21
Getting Help.................................................................................................... 21
How to Install NetMeeting................................................................22
How to Install MSN Messenger........................................................23
Specifications.....................................................................................24

3
●PC300 Camera
●USB connector cable
●Quick Start Guide
●Installation CD-ROM
○Camera Driver
○Application Software
●ArcSoft VideoImpression 1.6
●ArcSoft PhotoImpression 3.0
○User’s Manual
●Intel Pentium II 350MHz Processor or equivalent
●64MB System RAM
●Windows 98SE/Me/2000/XP
●CD-ROM drive
●16-bit true color display or higher
Optional for VideoConference
●Full- or half- duplex sound card
●Modem for dial-up connection (or corporate internet)
●An authorized Internet account (user ID or IP address).
PC300 Nomenclature
In Box Contents
System Requirements
Snapshot Button
Focus Ring USB Connector Cable

4
Power up your computer and check to see if USB is implemented. Visually inspect the
USB ports of your computer. If you cannot find the USB ports at the back of your
computer (See Figure 1), read the documentation that came with your computer main
board.
For computer main board with USB supported:
Enter BIOS settings and enable USB, see the documentation that came with your
computer.
Normally, when the computer power is turned on, before starting windows, the computer
will hint you to press some keys for displaying BIOS menu.
For computer main board without USB:
In this case, USB can be implemented by an USB add-on card. The BIOS settings for
main board type USB are not required.
Verifying USB Presence
Figure 1

5
1. Installing PC Camera and PC Camera driver
Before installing Camera to your computer, make sure Windows starts up. Then follow the
steps below:
1. Plug PC camera's connector to the USB port
on your computer. (See Figure 2)
2. Check to make sure you have the correct
orientation while plugging the USB connector
into the USB port of your computer.
3. Once Windows has detected new hardware
added to the system, an USB Device
message appears on the screen, asking you
to search a new device.
4. Click “ Next ” to continue.
5. In the next dialog box, you will be asked to select a method to search for the driver for
your PC Camera. Choose “Search for a suitable driver for my device (Recommended).”
6. Insert PC Camera Installation CD into your CD-ROM drive.
Note: Close auto-run window while inserting CD into CD-ROM drive.
7. Click “Next” to continue.
8. The next screen shows the default path for the camera driver, depending on the existing
operating system on your PC. For example:
Letter D indicates the location of you
r
CD ROM drive. Click “Browser” to select driver location
CD-ROM:\Driver on your CD.
Windows Installation of PC300 Camera and PC300 Driver
Figure 2

6
9. When you have finished the location selection, click “Next” to continue.
10. Windows will search for your PC Camera device and driver location.
11. Click “Next”. Windows will copy Driver files into your system.
12. Click “Finish” to complete PC Camera driver installation.
13. Click “Start”, “Shut Down”, and select option “Restart” to restart your computer.

7
1. Insert Installation CD into your CD-ROM drive.
2. An Introduction screen will appear with a menu or CD contents.
Note: If the installer screen does not come up automatically, click “Start”, “Run”, and execute
the file “cdsetup.exe” on the CD to start the installer program.
3. Click “VideoImpression 1.6”.
4. Follow the on-screen wizard instructions to install.
5. When installation is complete, the VideoImpression 1.6 Program group will appear as a
folder in the Programs menu.
1. Click Start.
2. Select Programs>ArcSoft VideoImpression> ArcSoft VideoImpression 1.6.
3. The VideoImpression Main Screen will appear as shown below.
Control Buttons -
(“!”) Tips toggles pop-up tool tips on/off. When on, icon names will popup when you move your
mouse over an icon.
(“?”) Help launches VideoImpression Help. You can learn more about program functions and
procedures by using Help.
(“-”) Minimize moves VideoImpression to the background and places it in the Windows taskbar.
(“x”) Close closes VideoImpression.
VideoImpression 1.6 Main Screen Nomenclature
Installing Application Software
Control Buttons
Timer Window - shows the current
frame and the elapsed time within the
video. It becomes active when a
movie is opened (it will appear as a
black box when no movie is open).
Video Playback Controls - gives you the
ability to play, pause, and move
forward/backward to specific frames in
your movies.
New – Starts a new project, opens an existing one, and displays your albums.
Edit – Takes you back to the Storyboard (only when you have a prohect open.)
Save – Saves your work as a movie file in AVI format.
Send – Allows you to email your movie files. (A MAPI-compliant email program is needed
for this option.)

8
1. Click Start> Programs> ArcSoft VideoImpression 1.6> ArcSoft VideoImpression 1.6.
2. The introduction screen will appear with a menu of software contents.
3. Click “ New. ”
4. Select “Capture” . The window shows a Live preview as seen from the PC
Camera.
5. To focus the picture, turn the focus ring (the grooved plastic ring around the lens of the
PC Camera) until the image becomes sharp.
1. Click Start> Programs> ArcSoft VideoImpression 1.6> ArcSoft VideoImpression 1.6
2. The introduction screen will appear with a menu of software contents.
3. Click “ New. ”
4. Select “ Capture ” . The window shows a Live preview as seen from the PC
Camera
By pressing the Snapshot button :
1. Before you start the ArcSoft VideoImpression 1.6, AMCAP. A dialog box
appears allowing you to preview,capture live video and save the video clip.
2. At the same time you start ArcSoft VideoImpression 1.6 you will preview the
live video. ‘Start Image Capture’ will appear allowing you to save the captured
image.
NOTE : Use any image editing software to edit the image.
Setting the Focus
Capturing a Single Frame by Using Snapshot Button

9
1. Follow step 1-3 in “Setting the Focus” to enable live preview.
2. To stop preview, click on “Stop” ( ).
3. To resume preview, click on "Preview" ( ).
1. Follow steps 1~3 in “Setting the Focus” to enable live preview.
2. To start video recording, click on “Record” ( ).
3. To stop video recording, click on “Stop” ( ) or ESC.
4. To save captured video, click on “Save” ( ).
1. In VideoImpression Main Screen, select “New.”
2. Select source for replay by clicking on “Get”( ).or by choosing from the drop down
menu( ).
3. Double click the source to add it to “Edit Board”.
4. To replay captured video, click on “Play.”
Previewing Live Video or Single Frame
Record a Video or Single Frame
Playback a Video or a Single Frame

10
You can create movies by placing image and movie files onto the Storyboard from various
Albums. To create a movie, do the following:
1. Click on the New icon from the Main Screen. This will take you to the Album Screen.
2. Use the options on the Album Screen to construct your movie.
Select Album - (Located immediately to the right of the album name) Lets you choose the
album you wish to view or work from.
Selecting “New” will bring up a new, empty album. You can name/rename an album by
clicking in the box with the album name and typing over the existing text.
Get - Opens a window that allows you to browse through your computer to add image,
movie, or audio file thumbnails to the current album. You can add thumbnails for supported
file formats on your hard drive or any removable media (diskettes, CDs, etc.).
Acquire - Enables you to get images from TWAIN devices like digital cameras and
scanners. After clicking this icon, select the device you are using, and follow the
procedures provided for that device.
Capture - Allows you to acquire video from a video source or still images from digital
cameras.
Sort - Offers you options to arrange your thumbnails for easy management.
Add To Storyboard - Places the currently selected thumbnail on the next available frame
on the Storyboard. (Note: You can also add an image to the Storyboard by clicking and
dragging the thumbnail to it.)
Play Movie - Takes you back to the View Screen where you can play, save, and email
your movie.
Edit Movie - Lets you modify movie or still image files. You can add text as well.
Working with Albums
Questo manuale è adatto per i seguenti modelli
1
Indice


