Armani Exchange DATE MULTI-FUNCTION VX36 Manuale utente

INSTRUCTION
ENGLISH .........................3
DEUTSCH . . . . . . . . . . . . . . . . . . . . . . . 16
FRANÇAIS ......................30
ESPAÑOL ...................... 44
PORTUGUÉS ....................58
BAHASA INDONESIA.............72
POLSKI .........................86
PУССКИЙ ......................100
.......................... 114
中文............................126
繁體中文 ........................140
한국어 ..........................154
WARRANTY
ENGLISH .......................166
DEUTSCH . . . . . . . . . . . . . . . . . . . . . . 168
FRANÇAIS .....................170
ESPAÑOL ......................172
PORTUGUÉS ...................175
BAHASA INDONESIA............177
POLSKI ........................179
PУССКИЙ ...................... 181
..........................184
中文............................186
繁體中文 ........................187
한국어 ..........................189
SERVICE CENTERS ............. 191
CERTIFICATE OF WARRANTY ...195
NOTICES .......................197
2 3
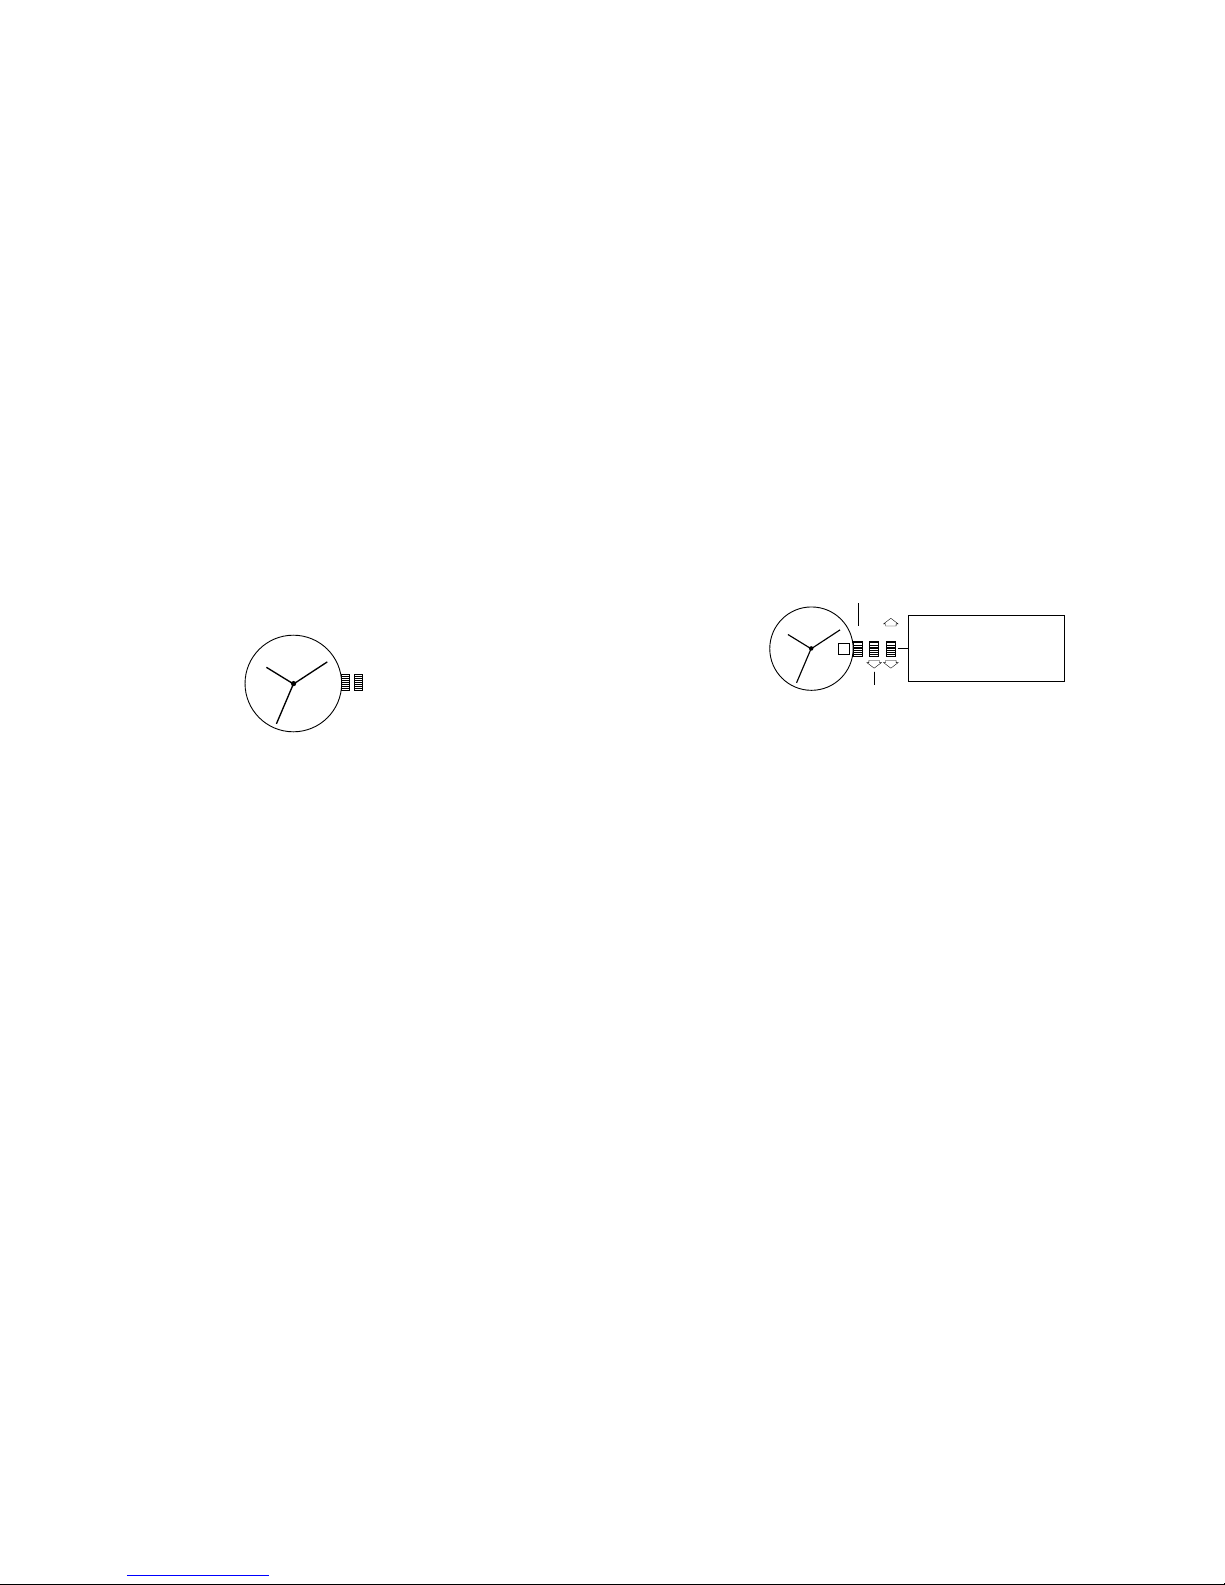
ANALOG INSTRUCTIONS
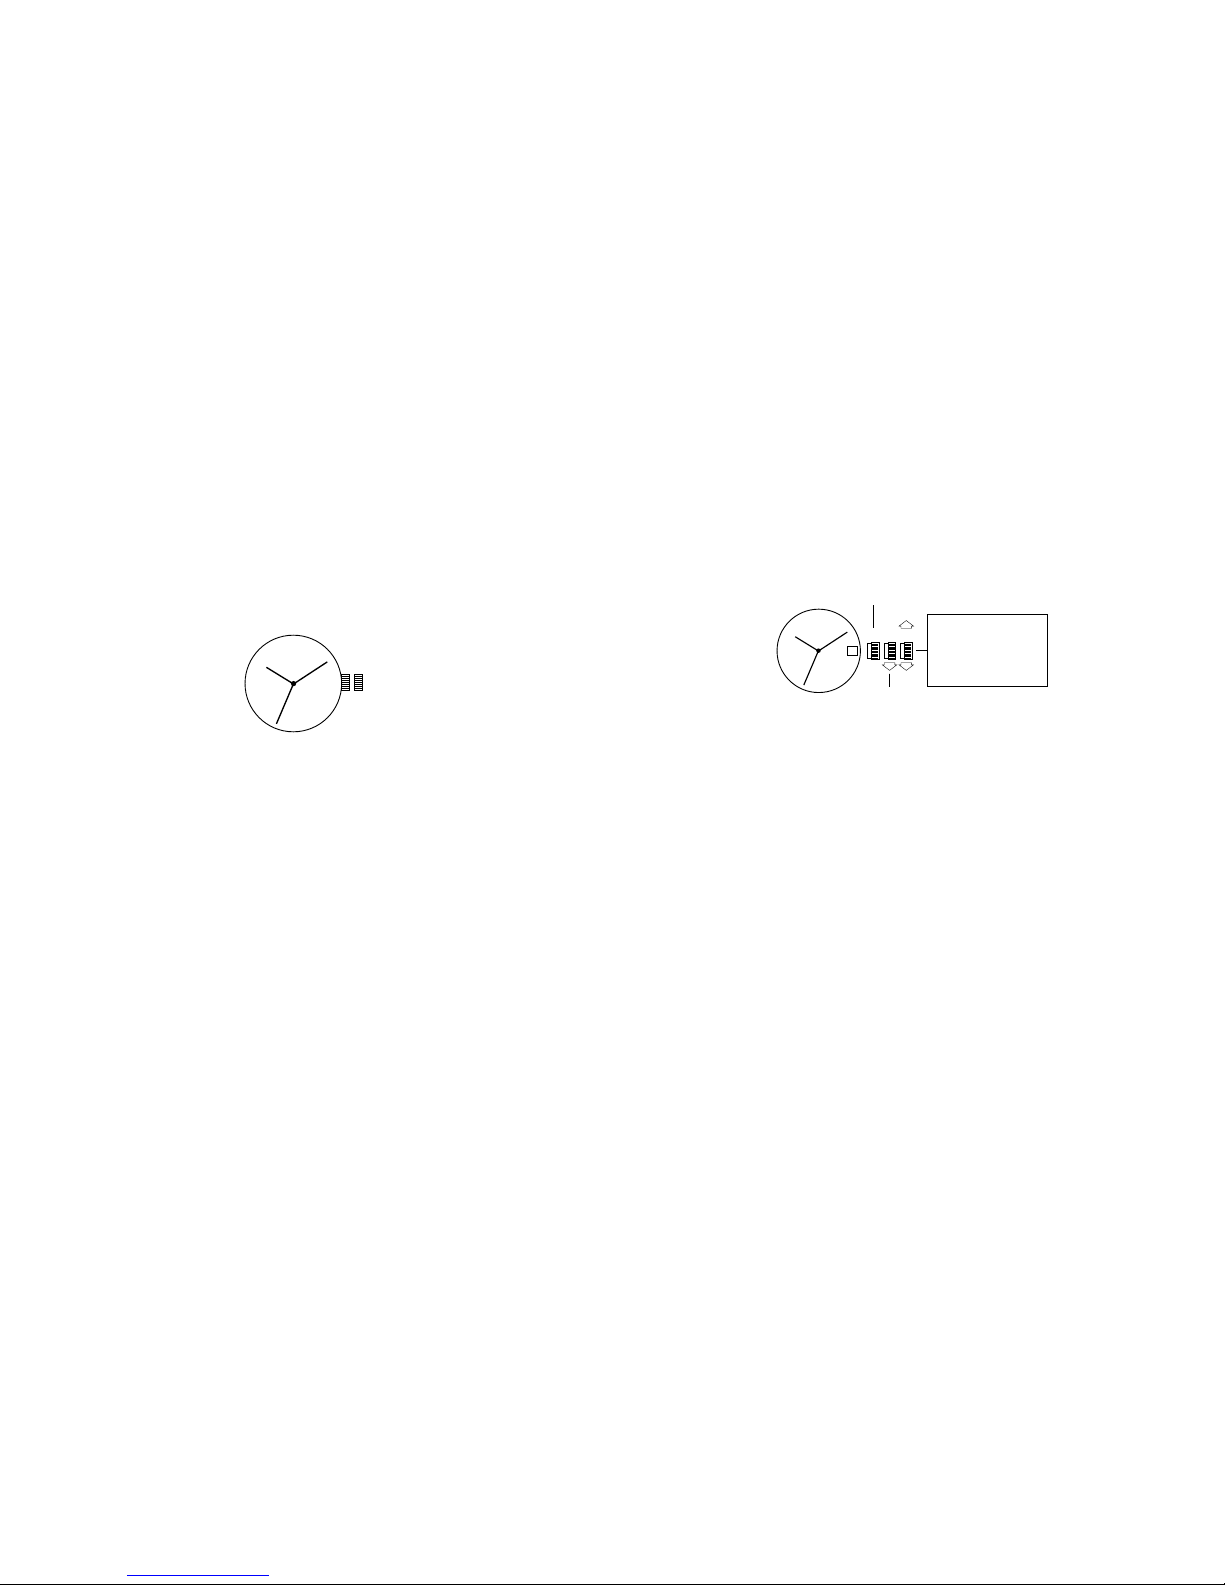
Time Setting
1. Pull crown out to position 2.
2. Turn crown to set hour and minute hands to desired time.
3. Return crown to position 1.
1 2
DATE MODELS
Date Setting
1. Pull crown out to position 2.
2. Turn the crown either clockwise or counter-clockwise and set the date for the previous
day.
The direction that moves the date varies on different watch models.
Time Setting
1. Pull crown out to position 3.
2. Turn counter-clockwise to advance the time and continue until the day changes to the
present day.
3. Set to the correct time.
Do not change the date between the hours of 10pm and 2am
.
This is the time when the
movement is in position to carry out the automatic date change, and any interference may
cause damage to the movement.
1 2 3
Rotate to set hour &
minute hands. Date
advances with each
24 hour rotation of
hour hand.
RAPID CORRECTION
OF DATE
CLOSED
ENGLISH

4 5
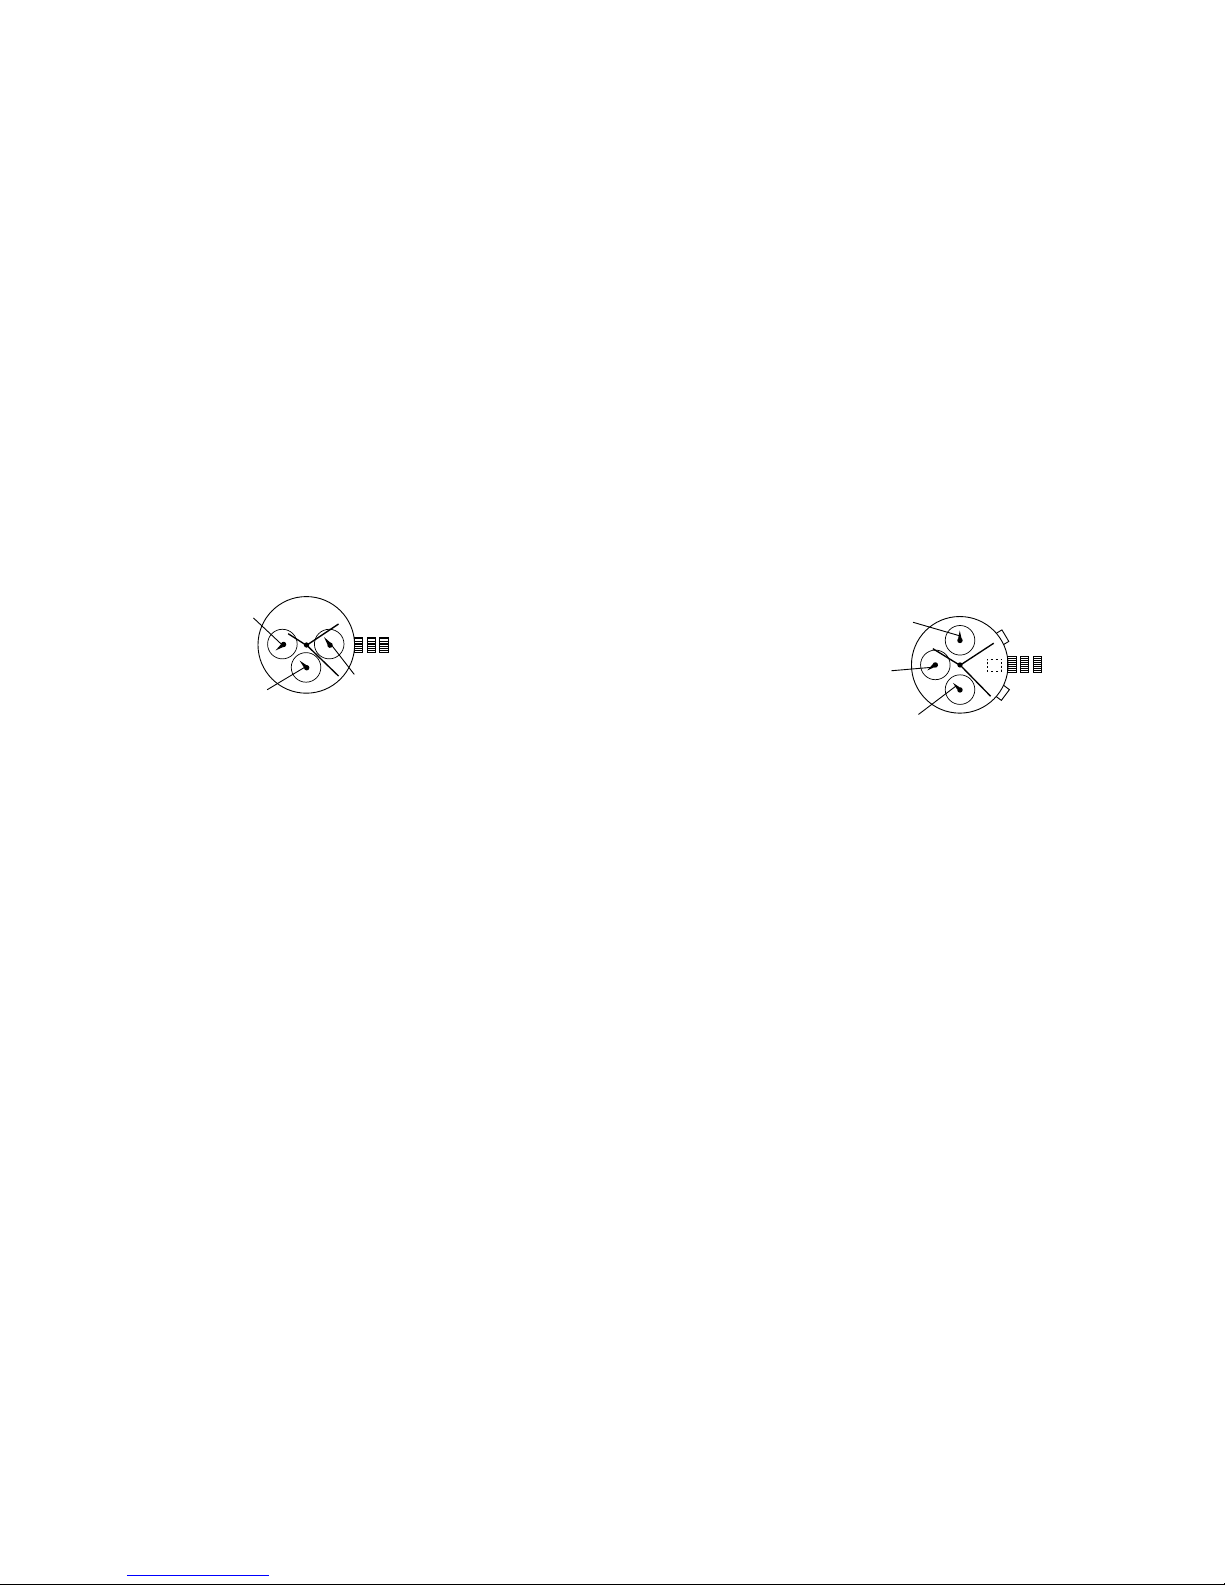
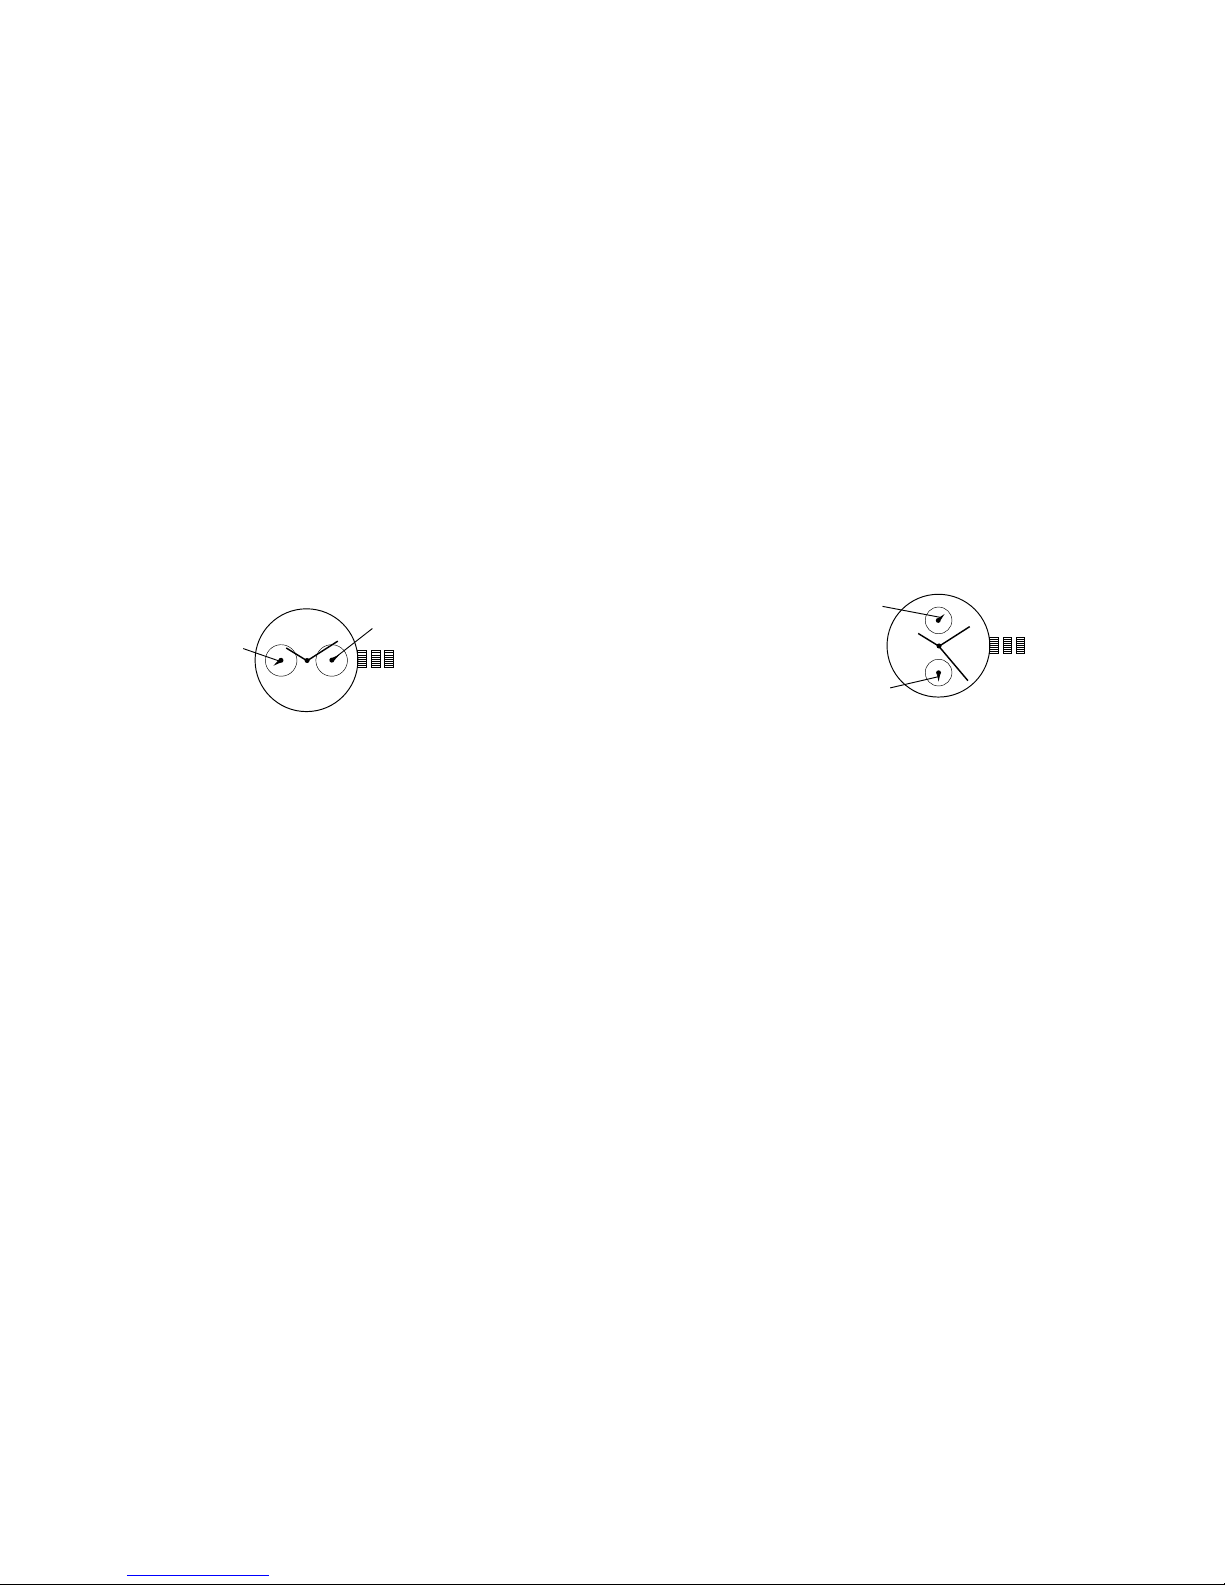
2 EYE DAY/DATE MULTI-FUNCTION VX36
Date Setting
1. Pull crown out to position 2.
2. Turn clockwise to advance date hand.
3. Push crown back to position 1.
Date and Time Setting
1. Pull crown out to position 3.
2. Turn clockwise to advance hour and minute hands.
The hand showing days of the week will also move with the hour and minute hands.
Keep turning until you have reached the desired day.
1 2 3
DAT E
DAY
MULTIFUNCTION 6P23
Time Setting
1. Pull crown out to position 3.
2. Turn clockwise to advance hour and minute hands. 24-hour hand will move with hour
and minute hands. Keep turning to reach desired time.
3. Return crown to position 1.
Date Setting
1. Pull crown out to position 2.
2. Turn crown counter-clockwise to set date.
3. Return crown to position 1.
DAT E
24-HOUR HAND
1 2 3
6 7
THREE EYE MULTI-FUNCTION 6P29/6P79
Date Setting
1. Pull crown out to position 2.
2. Turn clockwise to advance the date hand.
3. Push crown back to position 1.
Day and Time Setting
1. Pull crown out to position 3.
2. Turn clockwise to advance hour and minute hands.
The hand showing days of the week will also move with the hour and minute hands.
Keep turning until you have reached the desired day.
24-Hour Sub-Dial Setting
The 24-hour hand moves correspondingly with the hour and minute hands. When setting
the time be sure to check that the 24-hour hand is set properly.
1 2 3
DAT E
24-HOUR
DAY
Time and Date Setting
1. Before setting the time, make sure the chronograph is stopped and set to zero
(12:00) position.
2. Pull crown out to position 2 and turn crown clockwise to set date to the previous day.
3. Pull crown out to position 3 when the second hand is at the 12:00 position, and turn
clockwise until the present date is displayed. Continue turning crown to set the correct
a.m./p.m. time.
4. Return crown to position 1.
NOTE: When crown is in position 2, do not press the pushers. Otherwise the
chronograph hands will move.
NOTE: To ensure accuracy, do not set the date between 9:00 p.m. and 1:00 a.m.
Chronograph Functions
Basic Function
1. Press A to start/stop the chronograph.
2. Press B to reset to zero.
CHRONOGRAPH STOPWATCH VD55
(with date-VD57)
A
B
1 2 3
MINUTE COUNTER
SECOND COUNTER
1/10 SECOND
COUNTER

8 9
Interval Timing
1. Press B while the chronograph is running.
2. Press B again to return to the chronograph.
3. Press A to finalize timing.
4. Press B to reset.
Adjusting the Chronograph Hands to Zero Position
If one or more chronograph hands are not in their correct zero (12:00) positions after
pressing B (for example, following a battery change):
1. Pull crown out to position 3.
2. Press A to move the chronograph 1/10 second counter one increment; press and hold
A for fast advance.
3. Press B to reset the second and minute counters one increment; press and hold B for
fast advance.
4. Return crown to position 1.
CHRONOGRAPH STOPWATCH JS25/VD54
(with date-VD53)
Time and Date Setting
1. Before setting the time, make sure the chronograph is stopped and set to zero
(12:00) position.
2. Pull crown out to position 2.
3. Turn crown clockwise until the previous day’s date is displayed.
4. Pull crown out to position 3 when the second hand is at the 12:00 position.
5. Turn crown to set time.
NOTE: 24-hour hand moves correspondingly with the hour and minute hands. When
setting the time be sure to check that the 24-hour hand is set properly.
6. Return crown to position 1.
NOTE: When the crown is in position 2, do not press the pushers. Otherwise the
chronograph hands will move.
Chronograph
1. Press A to start/stop the chronograph.
2. Press B to reset to zero.
Split Time (VD53/VD54)
1. Press B while the chronograph is running.
2. Press B again to return to the chronograph.
3. Press A to finalize timing.
4. Press B to reset.
A
B
1 2 3
MINUTE HAND
SECOND HAND
24-HOUR HAND
10 11
Chronograph Zero Reset
1. If either of the chronograph hands is not at the zero (12:00) position, pull crown out
to position 3.
2. Press A to move hands clockwise; press B to move hands counter-clockwise.
3. Return crown to position 1.
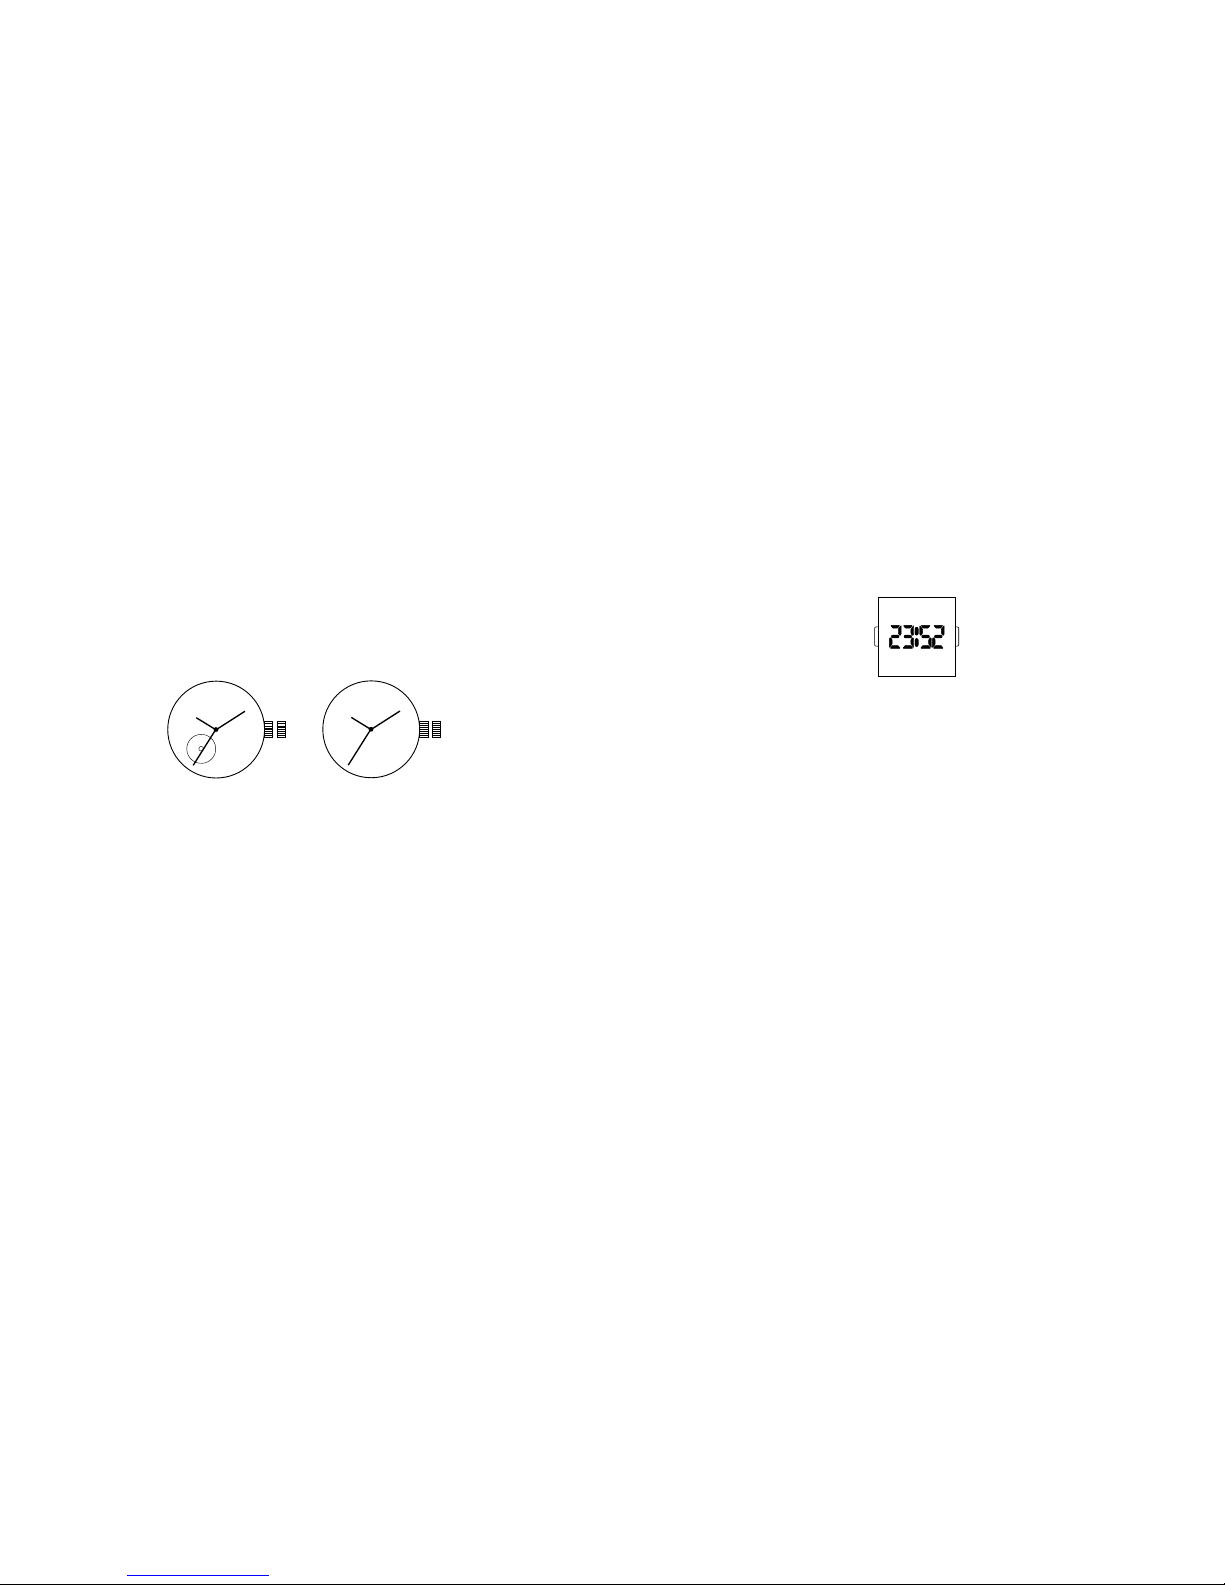
AUTOMATIC 82SO/2189
1. Pull crown out to position 2.
2. Turn crown clockwise to advance hour and minute hands.
3. Push crown back to position 1.
NOTE: A timepiece with an automatic winding movement obtains the power to wind itself
by the movement of your wrist, there is no battery. Therefore, not wearing the timepiece
for several consecutive days could exhaust the power reserve. If your watch stops, it is
recommended that you manually wind the movement by rotating the crown clockwise at
position 1 to achieve the necessary power reserve.
It is important your timepiece is adjusted to match the size of your wrist. A loose fit
may result in a loss in capacity of the timepiece to wind itself. When fully wound, your
timepiece has a power reserve of approximately 36 hours.
1 2
1 2
82SO 2189
DIGITAL LED – BJ-3470
Normal Time Display
1. Press B to display time; press B again to change display mode. Mode sequence is time,
date and seconds.
2. LED automatically turns off after 5 seconds.
Time / Calendar Setting
1. In time display mode, press and hold A for 2 seconds to enter setting mode. 12/24-
hour format will begin flashing.
2. Press B to choose 12 or 24-hour format. For 12-hour setting, “P” will be displayed for
afternoon/evening hours. For 24-hour setting, no symbol will be displayed.
3. Press A to advance to hour.
4. Press B to increase digits; press and hold B for fast advance.
5. Press A to advance to next setting value.
6. Setting sequence is: 12/24-hour format, hour, minutes, seconds, year, month, date, and
exit setting mode.
NOTE: In setting mode, if no pusher is operated for 5 seconds, all changes will be
saved and the watch will automatically turn off.
BA

12 13
DIGITAL UPCR-992A
Time Mode
1. Press B to change modes.
2. Press A for EL.
3. Press C to select 12/24 hour format.
4. Press D to enable/disable hourly chime.
Time Setting
1. In time mode, press and hold A for 2 seconds to enter time setting.
2. Press C to increase setting value. Press D to decrease setting value.
3. Press B to enter next setting field.
4. Press pusher A to exit setting mode.
Alarm Mode
1. Press B to enter alarm mode.
2. Press A for EL.
3. Press C to select alarm 1 or alarm 2.
4. Press D to enable/disable alarm.
Alarm Setting
1. Press and hold A for 2 seconds to enter alarm setting.
2. Press C to increase setting value. Press D to decrease setting value.
3. Press B to enter next setting field.
4. Repeat steps 2 and 3 until desired time is selected.
5. Press A to exit setting mode.
NOTE: Alarm turns on automatically when exiting setting mode.
Chrono Mode
1. Press B to enter chrono mode.
2. Press C to start chrono.
3. Press D to stop chrono.
4. Press and hold D for 2 seconds to reset chrono.
NOTE: Maximum chrono time is 23 hours, 59 minutes and 59 seconds. When chrono
reaches maximum time, it will stop running. Press and hold D to reset value to
run chrono. 1/00s resolution for first 59 minutes and 59.99 seconds.
14 15
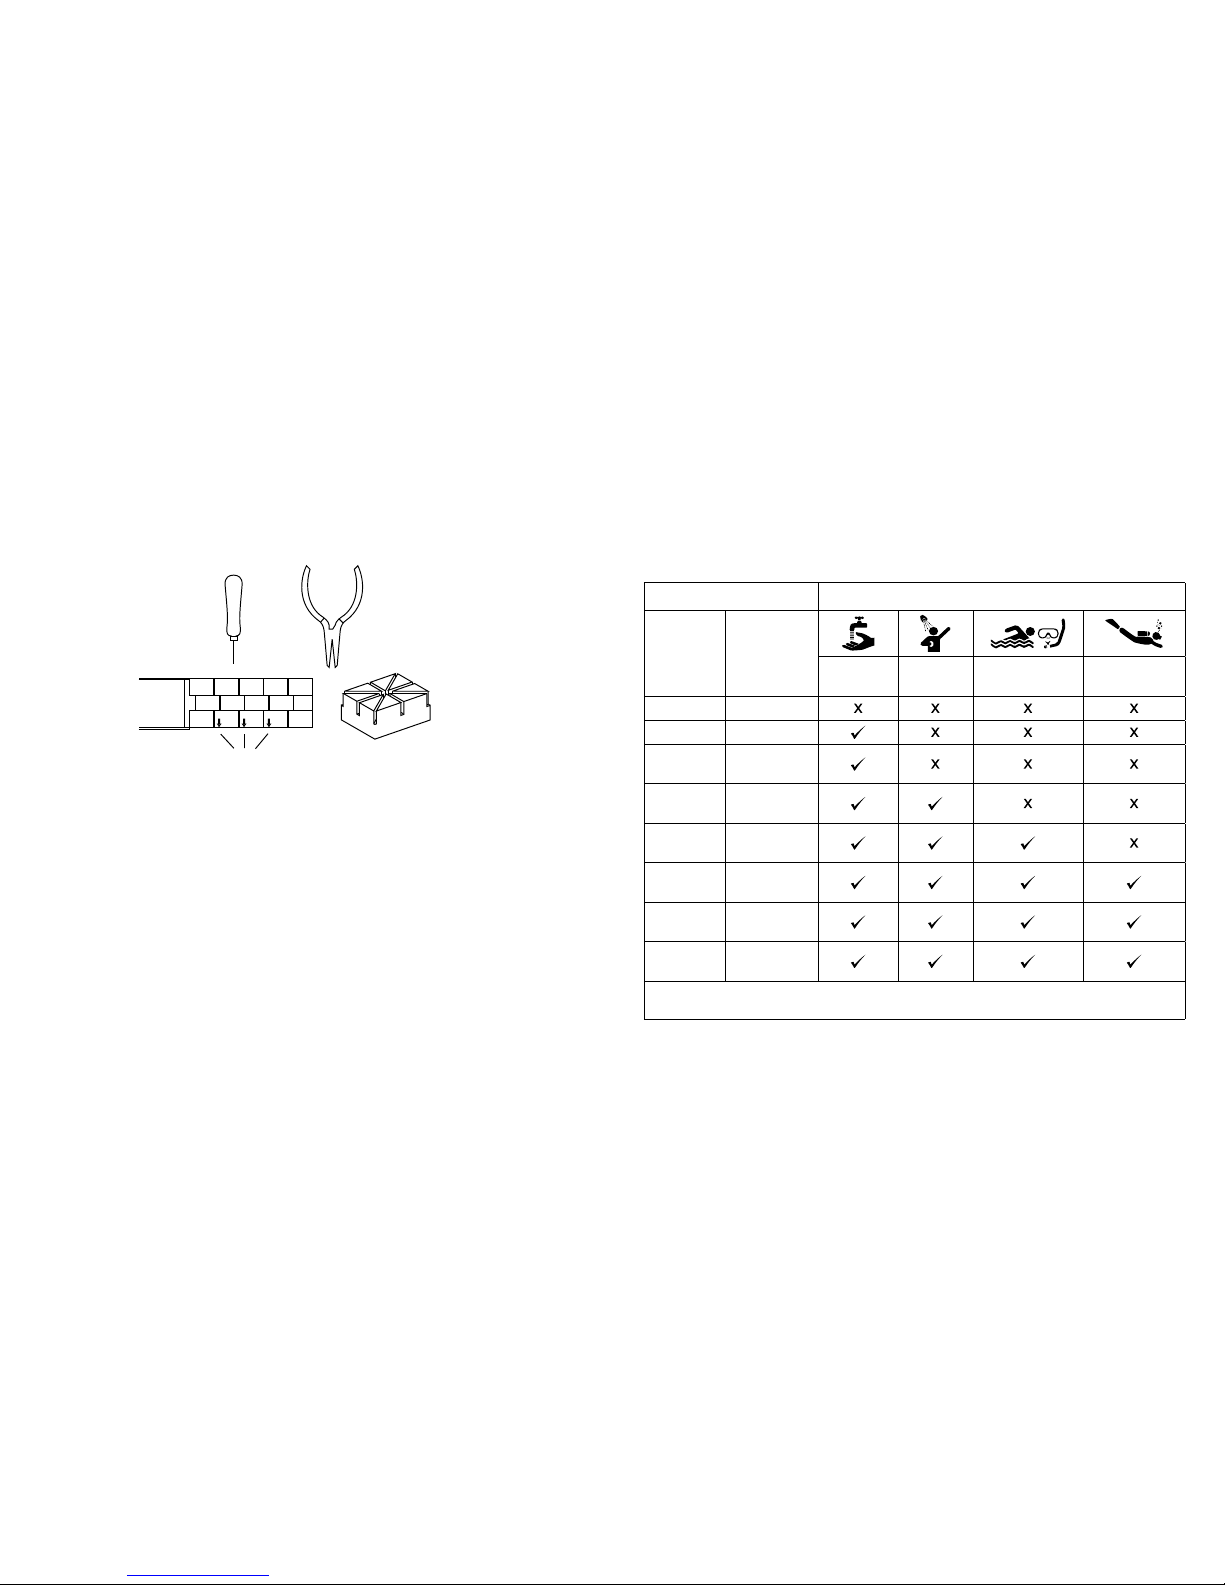
Link Removal
To remove a link from a pin link bracelet, you will need the bracelet holder, pin pusher,
and chain nose pliers (see pin link diagram).
1. Open the clasp on the bracelet.
2. Look on the inside of the bracelet and locate the arrows near the clasp (see diagram).
3. Place the band into the appropriate size slot of the bracelet holder with the arrows
pointing down (see diagram).
4. Center the desired pin to be removed over one of the holes in the bottom of the
bracelet holder.
5. With the pin pusher, push the pin, as far as possible, through the link.
6. Remove the watch from the bracelet holder and simply finish pulling out the pin with
the chain nose pliers.
NOTE:
Two pins hold each link in place and must be taken out before a link can be
removed.
Please note that the pins are partially split down the center.
PIN LINK DIAGRAM
BRACELET HOLDER
CHAIN NOSE PLIERS
PIN PUSHER
ARROWS
USE PRECAUTIONS - RESISTANCE TO WATER
Water Resistance Water-related Use
Caseback
Marking Depth
Washing
Hands
Shower,
Bathing
Swimming,
Snorkeling
Scuba
Diving
— —
WR —
3 ATM 3 Bar,
30 Meters
5 ATM 5 Bar,
50 Meters
10 ATM 10 Bar,
100 Meters
20 ATM 20 Bar,
200 Meters
30 ATM 30 Bar,
300 Meters
50 ATM 50 Bar,
500 Meters
Always set the crown in closed position (the normal position).
Tighten screw-lock crown completely.
16 17
ANLEITUNGEN ZUM ANALOGEN BETRIEB
Zeiteinstellung
1. Ziehen Sie die Krone auf Position 2 heraus.
2. Drehen Sie die Krone nach rechts, um den Stunden- und Minutenzeiger auf die
gewünschte Uhrzeit zu stellen.
3. Drücken Sie die Krone wieder in die Position 1.
1 2
MODELLE MIT DATUM
Einstellen des Datums
1. Krone bis in Stellung 2 herausziehen.
2. Krone entweder nach rechts oder links drehen, bis das Datum des Vortages erscheint
.
Die Drehrichtung unterscheidet sich von Modell zu Modell.
Einstellen der Zeit
1. Krone bis in Stellung 3 herausziehen.
2. Krone nach rechts drehen, bis die Datumsanzeige zum heutigen Datum wechselt.
3. Jetzt die richtige Zeit einstellen.
Vermeiden Sie es, das Datum zwischen 22.00 Uhr und 02.00 umzustellen
.
Während dieser
Zeitspanne führt das Uhrwerk die automatische Umstellung der Datumsanzeige durch,
und jeglicher Eingriff in diesen Vorgang kann zu Schäden am Uhrwerk führen.
DEUTSCH
1 2 3
GESCHLOSSEN
DATUMS-
SCHNELLKORREKTUR
Drehen, um den Stunden- und
Minutenzeiger einzustellen.
Das Datum schaltet mit jeder
24-Stunden-Umdrehung Ihres
Zeigers eine Ziffer weiter.
18 19
MULTIFUNKTION MIT ZWEI SEPARATEN ANZEIGEN VX36
Tageseinstellung
1. Ziehen Sie die Krone auf die Position 2 heraus.
2. Drehen Sie die Krone im Uhrzeigersinn, bis der richtige Tag in der
Tagesanzeige erscheint.
3. Drücken Sie die Krone wieder in die Position 1 zurück.
Einstellen von Datum und Zeit
1. Krone in Position 3 heraus ziehen.
2. Krone zur Einstellung von Stunden- und Minutenzeiger im Uhrzeigersinn drehen.
Der Zeiger zur Anzeige des Wochentags bewegt sich mit den Stunden- und
Minutenzeigern. So lange drehen, bis der gewünschte Tag angezeigt wird.
1 2 3
DATUM
TAG
MULTIFUNKTION 6P23
Time Setting
1. Ziehen Sie die Krone auf die Position 3 heraus.
2. Drehen Sie die Krone im Uhrzeigersinn, um die Stunden- und Minutenzeiger
vorzustellen. Der 24-Stunden-Zeiger bewegt sich mit den Stunden- und
Minutenzeigern. Beim Einstellen der Zeit darauf achten, dass der 24-Stunden richtig
eingestellt ist.
3. Drücken Sie die Krone wieder in die Position 1 zurück.
Datumseinstellung
1. Krone in Position 2 heraus ziehen.
2. Gegen den Uhrzeigersinn drehen, um den Datumszeiger einzustellen.
3. Krone wieder in die Position 1 zurück drücken.
DATUM
24-STUDEN-ZEIGER
1 2 3
Questo manuale è adatto per i seguenti modelli
12
Indice
Lingue:
Altri manuali Armani Exchange Orologio


