Arrakis Systems H Series Manuale utente

H Series Controller Manual
H Series Controller
Technical Manual
September 8th, 2023
www.arrakis-systems.com Page 1

H Series Controller Manual
Table of Contents
H Series Controller Software...................................................................................................................................4
Introduction.........................................................................................................................................................4
Support................................................................................................................................................................5
PC Requirements.................................................................................................................................................5
Setup....................................................................................................................................................................5
Main Screen.............................................................................................................................................................6
Meters..................................................................................................................................................................7
Up Down Timer................................................................................................................................................8
External Hardware Setup Screen.............................................................................................................................9
Soft Key..............................................................................................................................................................9
KMTronic Relay 2 & 8.....................................................................................................................................10
Broadcast Tools GPI 16 ....................................................................................................................................10
User Preset Setup Screen.......................................................................................................................................11
Creating & Editing User Presets.......................................................................................................................11
Assigning Soft Keys..........................................................................................................................................12
Setup Screen...........................................................................................................................................................14
Output Labels....................................................................................................................................................14
EAS Channel.....................................................................................................................................................15
Up Down Timer.................................................................................................................................................15
Channel Labels..................................................................................................................................................16
Fader Color Select.............................................................................................................................................16
Microphone Channels.......................................................................................................................................16
Meter Display Settings......................................................................................................................................17
Button Delay ....................................................................................................................................................17
User Preset Delay .............................................................................................................................................17
Auto-Restart after loss of power ......................................................................................................................17
www.arrakis-systems.com Page 2

H Series Controller Manual
www.arrakis-systems.com Page 3
H Series Controller Manual
H Series Controller Software
Introduction
The H Series Consoles can be controlled using the H Series Controller software. ne major benefit of the H Series
Controller is that it enables you to remotely control your H Series Analog console from anywhere in the world. To achieve
this, you will need:
•A Windows PC running the H Series Controller connected to your H Series Console via a USB cable.
•An internet connection to the PC running the H Series Controller.
•Third-party remote access software that allows you to connect remotely to the H Series Controller PC.
The H Series Controller combines the versatility of software with the reliability and user-friendliness of analog technology.
Its features include:
•Channel on/off control.
•Audio input channel monitoring.
•User presets for swift and simple channel activation/deactivation.
•Auto-startup in the event of a power loss.
•Robust logic control capabilities.
•And much more.
www.arrakis-systems.com Page 4

H Series Controller Manual
Support
The H Series Controller is free software that comes with the H Series Console. This software offers email support
exclusively, available from Monday to Friday, 8 am to 4 pm MST, excluding holidays. You can expect responses within 1
business day. To contact our email support team, please use the following address:
PC Requirements
A) Windows 10 Pro or newer
B) 8GB of RAM or more.
C) CPU with a benchmark of 6,000 or greater. A great site that gives accurate CPU benchmarks can be found at this link
here: http://www.cpubenchmark.net/cpu_list.php
D) SSD - A solid state drive is not required, but highly recommended. This allows quicker restart times, and better
performance.
E) For better reliability, it is best to dedicate this PC to running the Controller software, and to not install other
unnecessary programs. Contact our support team if you would like to schedule a PC Configuration for a minimal cost.
Setup
STEP 1 – Download the software. You can download the H Series Controller software from the console support page on our
website.
STEP 2 – Double-click the installation file and follow the setup instructions.
STEP 3 – Connect the H Series Console to your Windows PC using a USB cable.
STEP 4 – Power up the H Series Console and launch the H Series Controller software.
STEP 5 – During startup, the H Series Controller will search for the serial port of the H Series Console. If successful, it will
automatically establish a connection, and you're ready to proceed. If it fails, the External Hardware Screen will appear with
an error message.
IF C NNECTI N FAILS – In case the H Series Controller fails to connect to the H Series Console, please follow these
steps:
•Ensure that the Console is powered on and connected via USB to the computer running the H Series Controller.
•Try restarting both the console and the computer running the software.
•If the issue persists, click the Manually Find External Hardware button on the External Hardware Screen.
•Consider installing the Controller software on another Windows PC and attempt to establish a connection from
there.
•If none of the above solutions work, capture a screenshot of the External Hardware Setup Screen that appears
during startup and send it to our support team for further assistance.
www.arrakis-systems.com Page
H Series Controller Manual
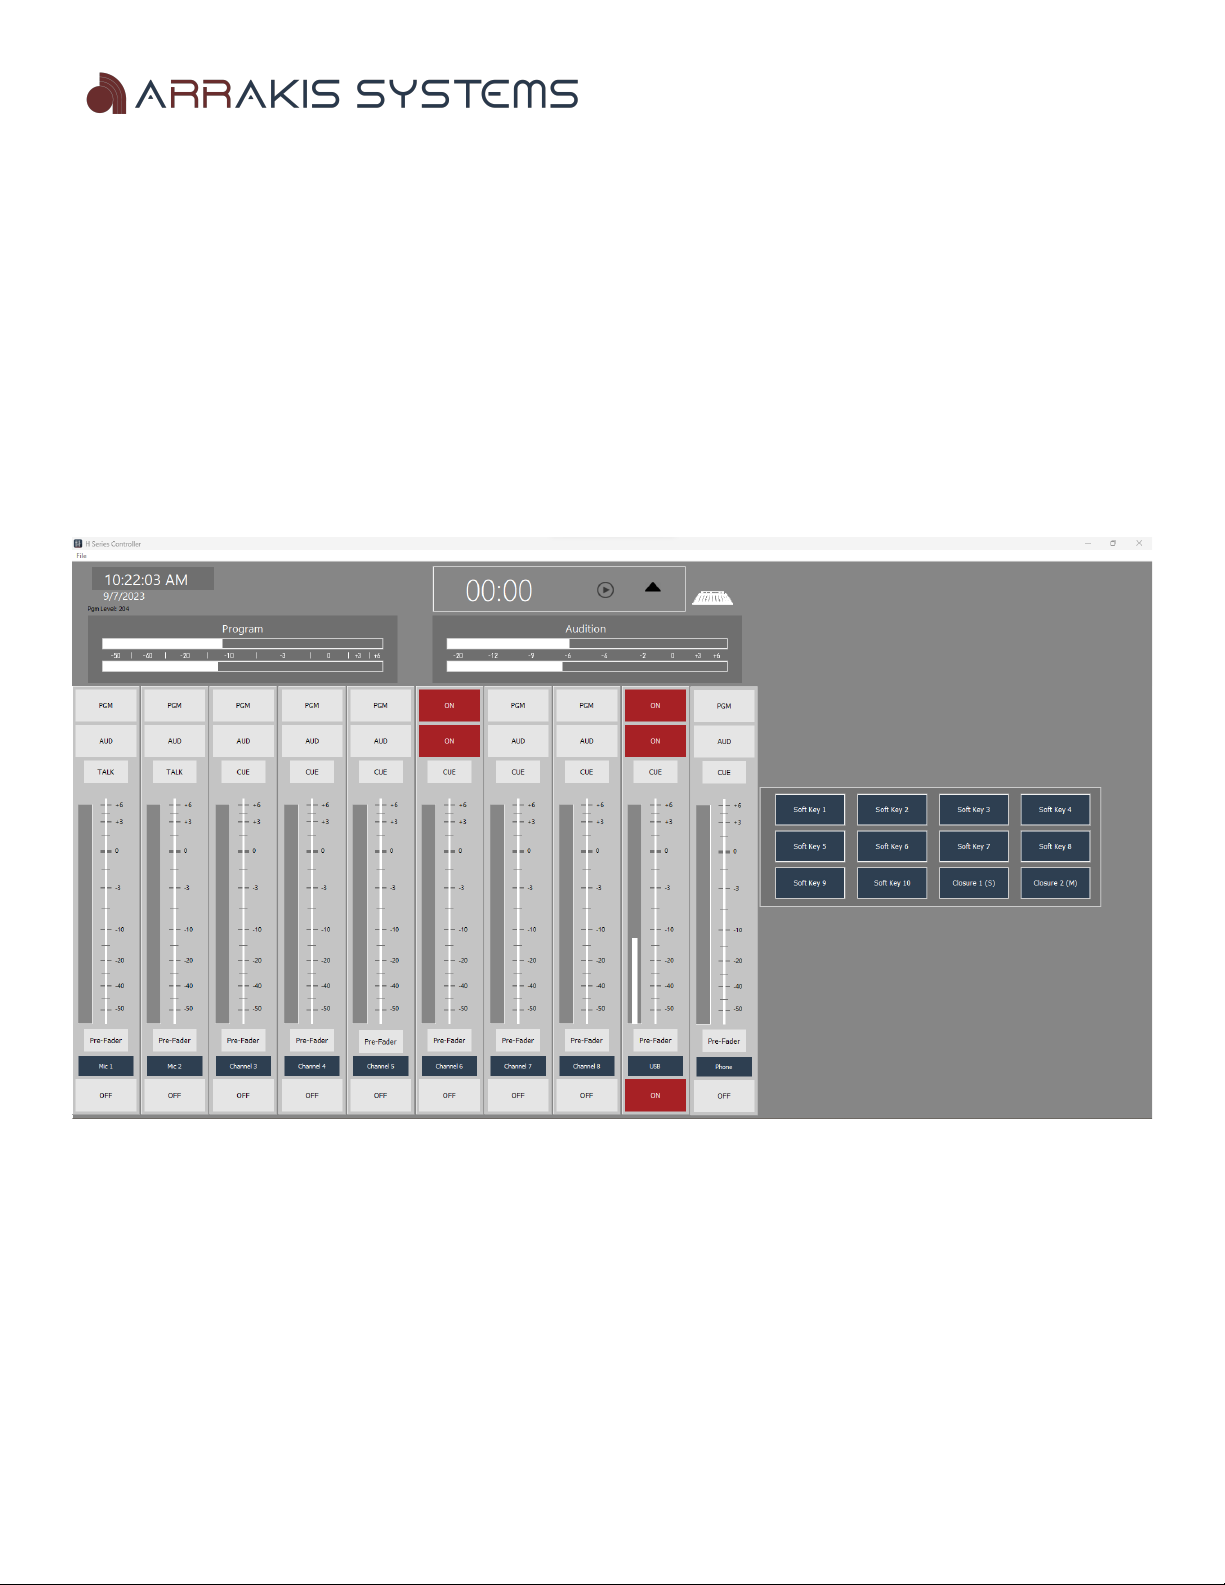
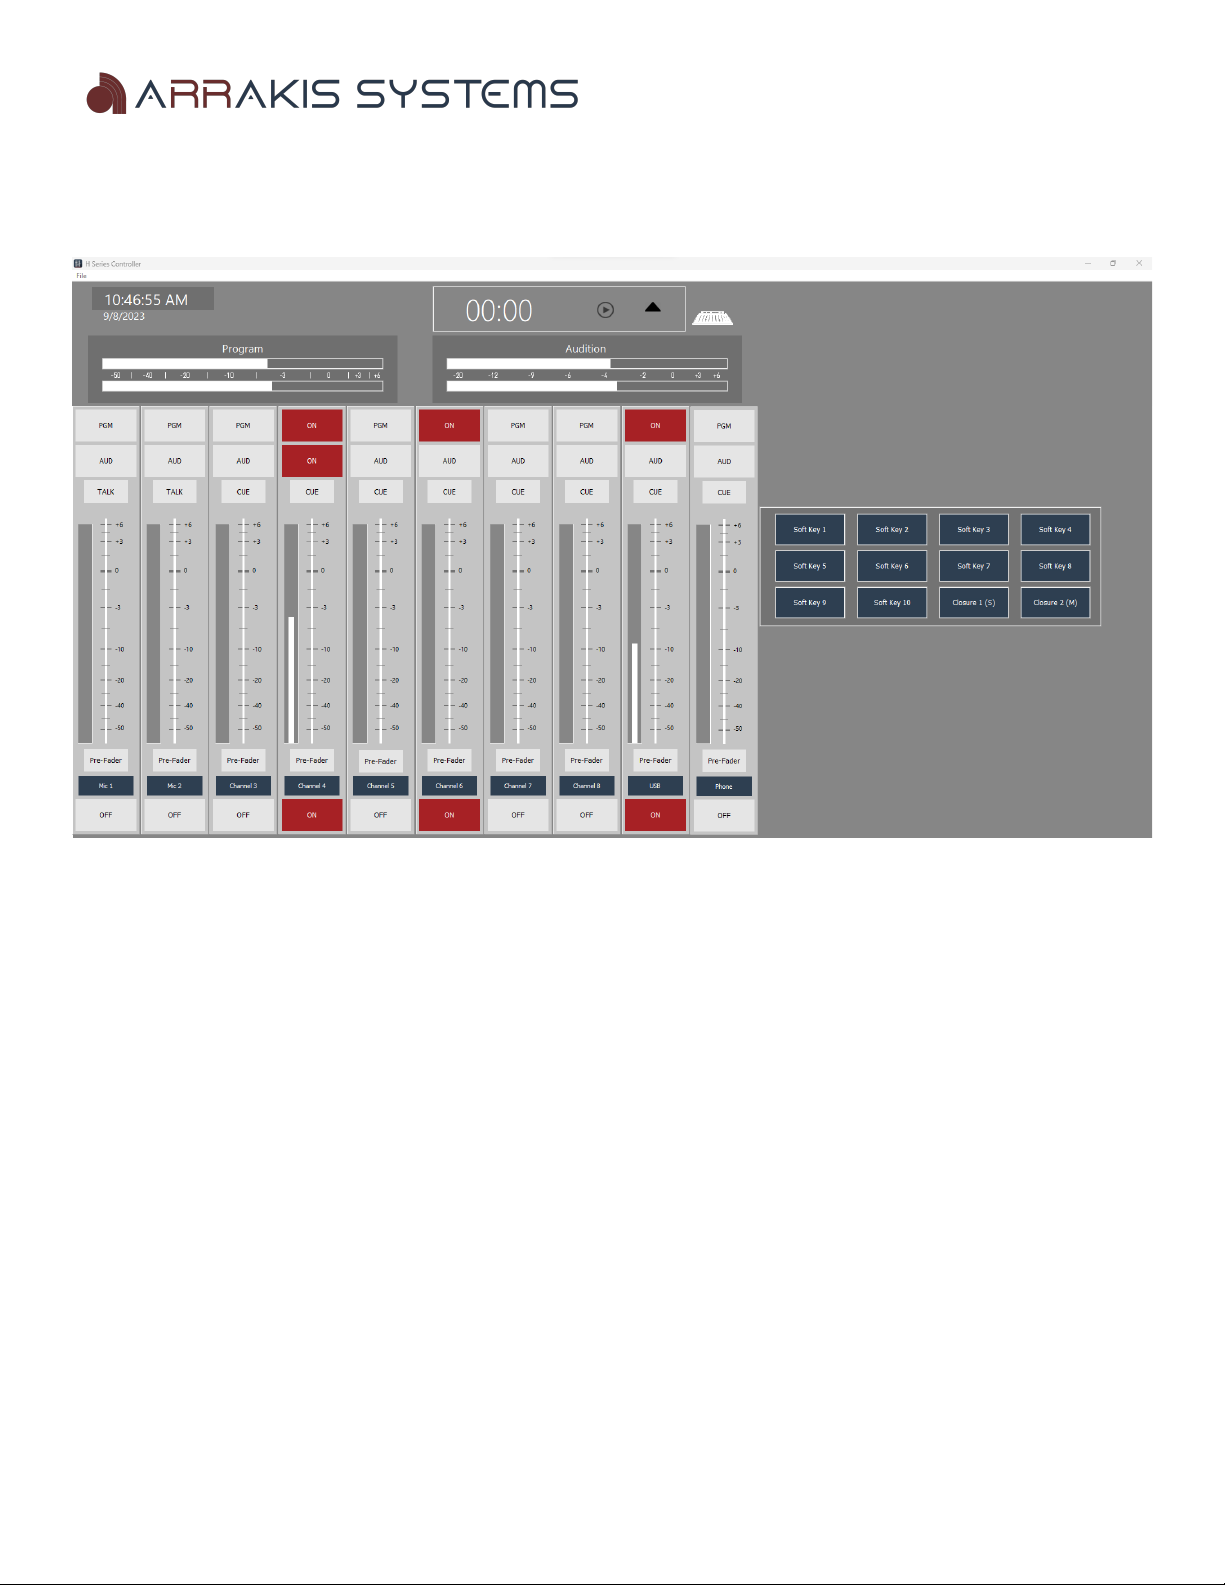
Main Screen
PGM (Program Button) – Pressing the Program Button toggles the Program output bus on or off on the H Series
Console. This output plays a mix of all selected input channels.
AUD (Audition Button) – Pressing the Audition Button toggles the Audition output bus on or off on the H Series Console.
This output plays a mix of all selected input channels.
CUE (Cue Button) – Pressing the Cue Button toggles the Cue output bus on or off on the H Series Console. Audio will be
played through the Cue speaker and the Cue output on the H Series Console.
TALK (Talk Button) – Pressing the Talk Button sends audio from the designated Mic input to the external studio.
Pre-Fader (Pre Fader Button) – When pressed, the selected input channel switches from the Fader Level audio to a Pre-
Fader level. This is useful when no one is at the studio, and you need to activate a channel, but the physical fader on the H
Series Console is turned down. Press the Pre-Fader button to switch to the audio levels prior to the Fader.
Channel Label – This is a custom label for each input channel, which can be changed within the Setup Screen.
N / FF ( n & ff Button) – Pressing the n / ff Button toggles the input channel on or off on the H Series Console.
Soft Keys – These are assignable buttons that can either trigger a User Preset or Closure (KMTronic USB device required
for sending closures). User Preset assignments are made in the User Preset Setup screen.
www.arrakis-systems.com Page 6
H Series Controller Manual
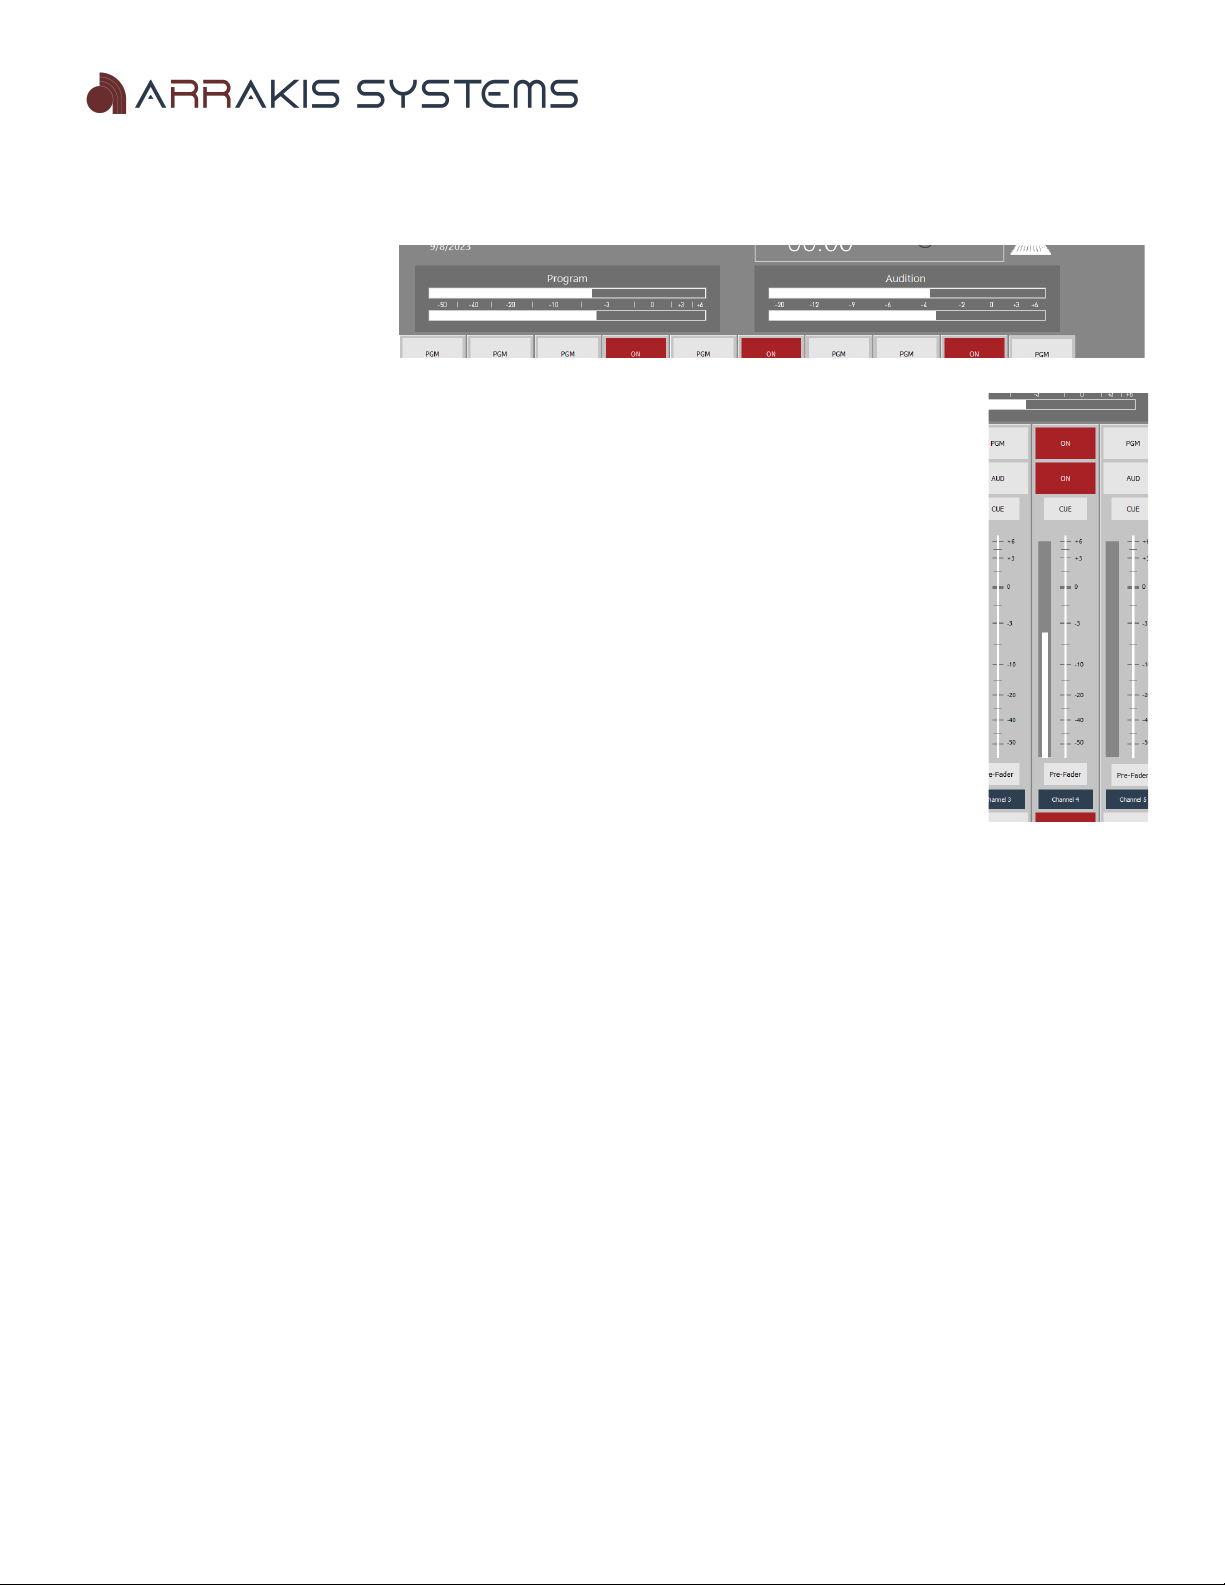
Meters
The H Series Controller features
meter level displays for each input.
These meters show input levels as
well as the mix of the Program and
Audition busses.
These meters help remote users visualize whether audio is being played on an input source and if audio
is being routed to the Program or Audition output busses.
IMP RTANT N TE - The levels shown in the software are approximate and are not meant for
calibrating audio inputs and outputs on your console. For accurate calibration, it's
recommended to use the physical meters on the H Series Console.
INPUT METERS – Each input displays audio levels. To view the input levels, make sure the channel
n/ ff button is activated, but the Program and Audition busses do not need to be turned on.
These levels are measured post-fader. If the level is too low, and you know there's audio on the input,
you can press the Pre-Fader button to see a pre-fader level. It's essential to calibrate your pre-fader
levels appropriately on the H Series Console for the Pre-Fader button to be effective.
PR GRAM & AUDITI N METERS – These meters show the maximum level from all the active
channels.
Please note that this is not a physical reading of the Program or Audition channel; it's a software-generated
representation to provide a basic idea of the levels playing through the respective output buses.
www.arrakis-systems.com Page 7
H Series Controller Manual
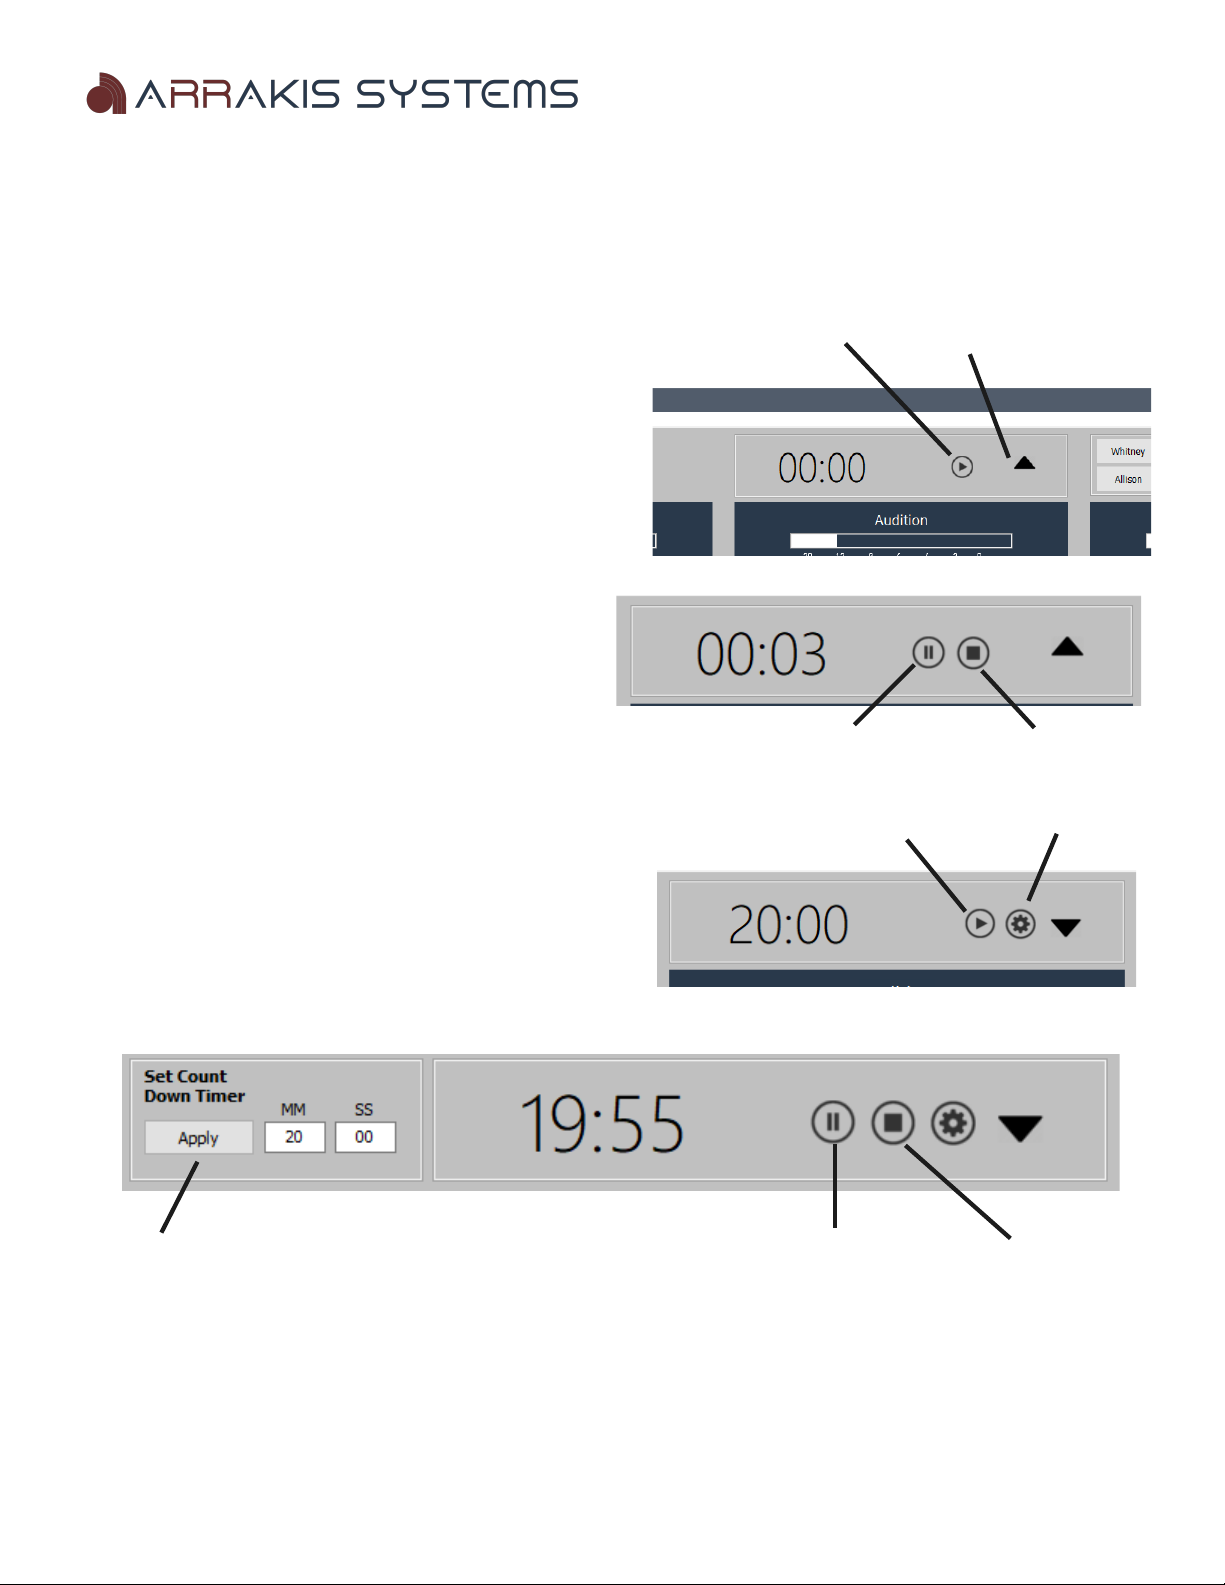
Up / Down Timer
The up/down timer allows you to keep track of time, either counting up or down. The default setting is to count up,
indicated by an up arrow.
Toggle count up /
Starts timer count down
UP TIMER
The up timer can be started manually or automatically when a
channel is turned on. You can adjust this setting in the Settings
screen.
Pause Timer Stop Timer
Starts timer Timer settings
D WN TIMER
The down timer will count down from a specific start time. The
default is 20 minutes.
Select the Timer Settings button to change the count down time.
Click Apply to change the time Pause Timer Stop Timer
www.arrakis-systems.com Page 8
H Series Controller Manual
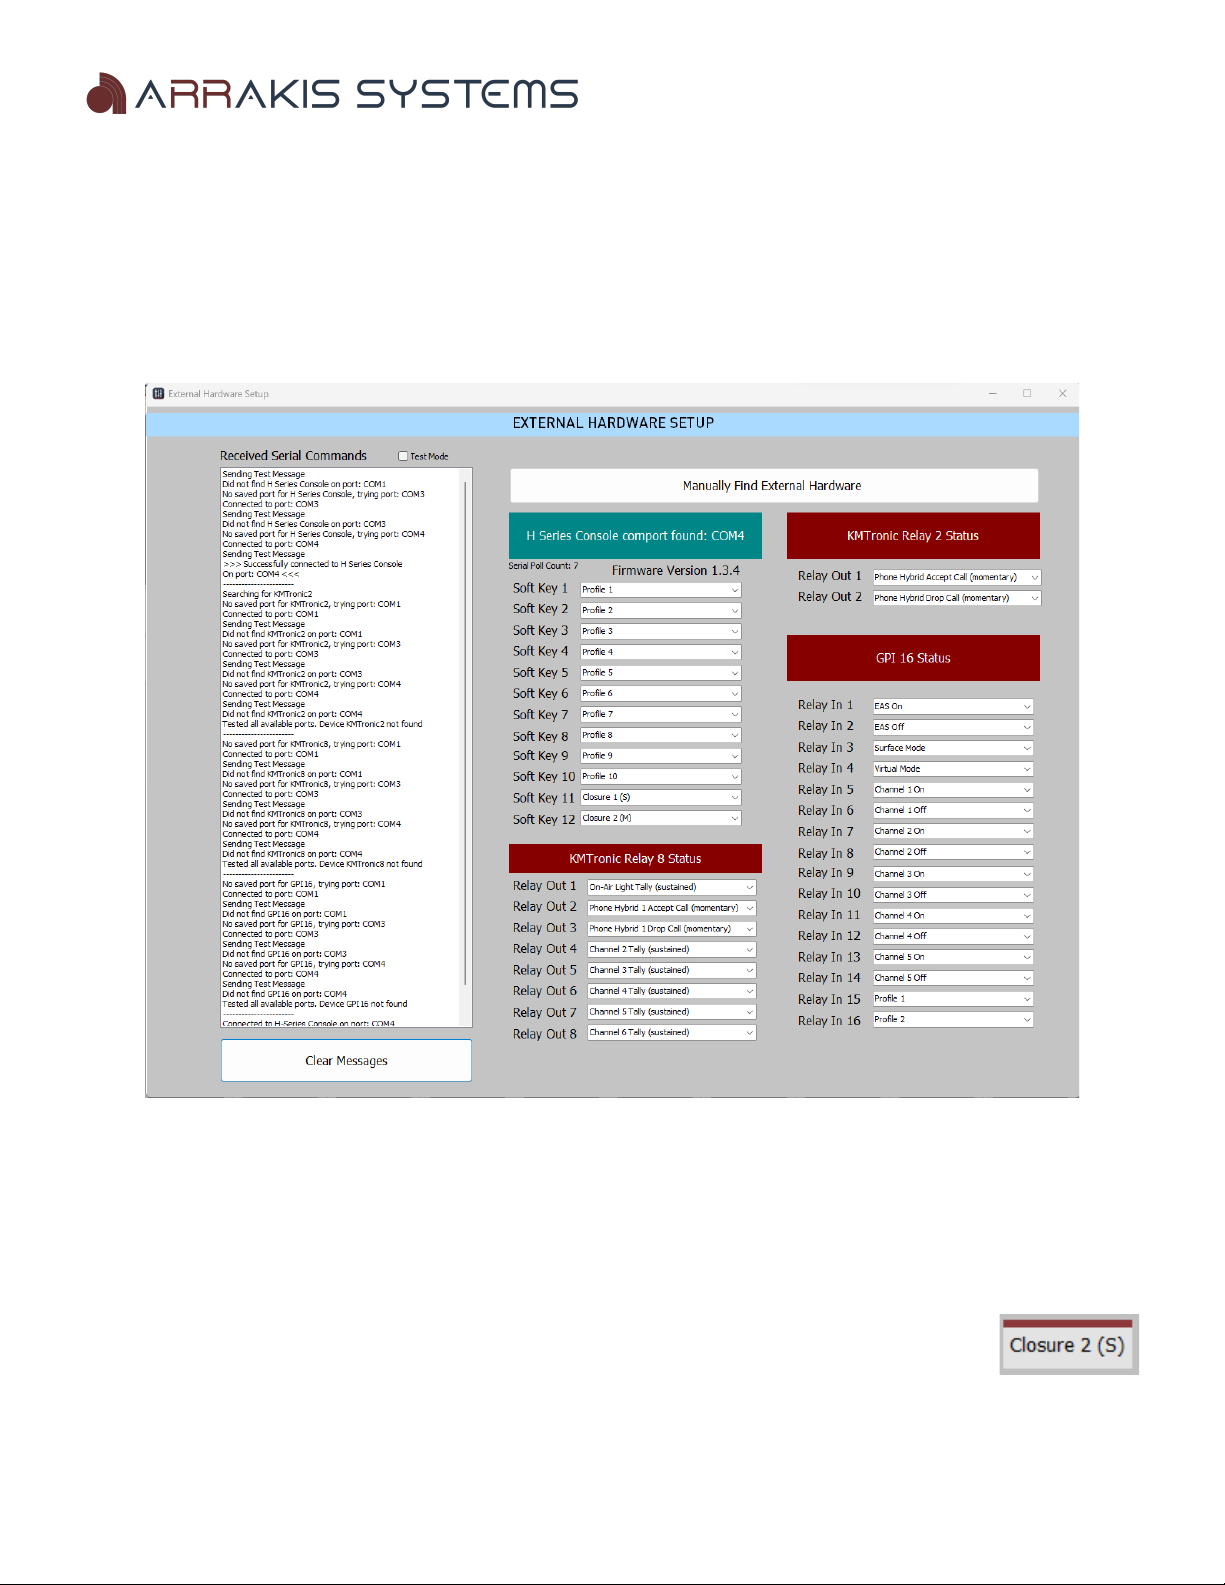
External Hardware Setup Screen
You may connect external hardware to work with the H Series Controller software. These devices are:
-H Series Console (Required)
-KMTronic output relay. 2 output or 8 output.
IMP RTANT N TE: You may only have one KMTronic device connected at a time.
-Broadcast Tools GPI-16 input relay.
Soft Key
These assignments can be triggered by clicking on the soft keys in the H Series Controller software. You have the following
options:
Profile – Choose from 12 different user presets. These presets are created from the User Preset Setup screen.
Closure – Choose this option to send a closure when the Controller soft key is pressed. Choose from:
A) Momentary (M) – For example, Closure 1(M) will do a momentary closure on pin 1 of the relay.
B) Sustained (S) – For example, choosing Closure 2(S) will activate a sustained closure when pressed
for pin 2 on the relay. Pressing the button again will turn Closure 2 off, indicated by a red line at the top of
the soft key when it's active.
IMP RTANT N TE: You can either have a KMTronic 2 or 8 connected via USB, but you cannot have both connected
simultaneously.
www.arrakis-systems.com Page 9
H Series Controller Manual
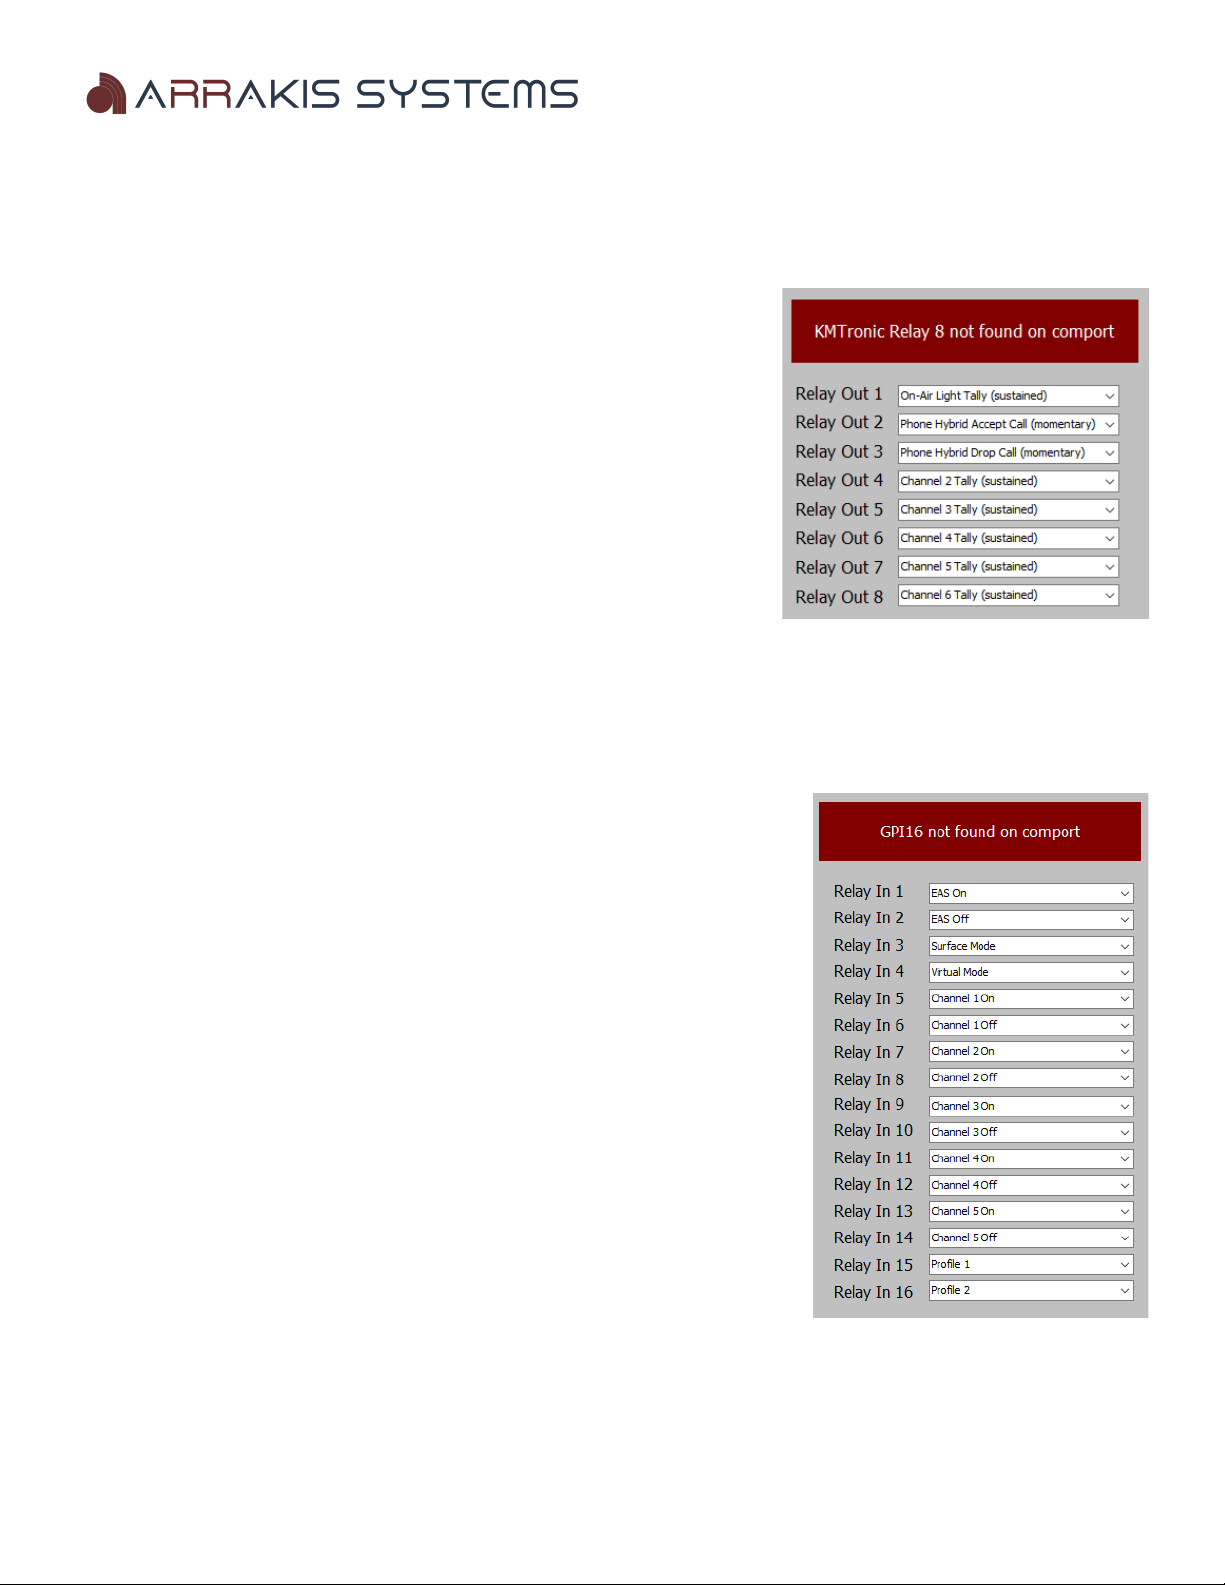
KMTronic Relay 2 & 8
Follow steps listed in KMTronic instructions for setup. Connect the Relay via USB, and the H Series Controller software
will auto-recognize the device.
This device is capable of sending closures to do tasks such as:
n-Air Light Tally (sustained) – This will turn an on-air light relay on and off.
This is a sustained closure. High will turn the light on, while Low will turn the
on-air light off. The KMTronic does not have enough power to power an on-air
light.
Phone Hybrid Accept Call (momentary) – This will send a momentary
closure to make a phone hybrid accept a call. It is triggered when the Phone
Channel is turned on.
Phone Hybrid Drop Call (momentary) – This will send a momentary closure
to make a phone hybrid drop a call. It is triggered when the Phone Channel is
turned off.
Channel '#' Tally (sustained) – This will send a sustained closure whenever the particular channel is turned on or off.
IMP RTANT N TE: You cannot have both the KMTronic 2 & KMTronic 8 connected at the same time.
Broadcast Tools GPI 16
Follow steps listed in the GPI 16 instruction manual for setup. Connect the device
via USB, and the DARC Virtual software will auto-recognize the device.
The GPI 16 gives you the ability to receive closures to trigger specific tasks:
EAS n – When this closure is received, it will switch to the designated EAS
channel. Additional info about EAS and setup can be found in the Setup Screen
section of this manual.
EAS ff – When this closure is received, it will turn the EAS channel off and go
back to the previous feed. Additional info about EAS and setup can be found in the
Setup Screen section of this manual.
Channel '#' n / ff – When this closure is received, it will either turn the
channel on, or off, depending on the setting selected.
Profile '#' - When this closure is received, it will switch to the selected profile.
Additional information about profiles, and user presets can be found in this
manual.
www.arrakis-systems.com Page 10
Altri manuali Arrakis Systems Controllori


