Astrel Instruments AST8300X Manuale utente

Astrel Instruments AST8300-X
Astrel Instruments
AST8300-X
GETTING STARTED
rev A
Getting Started 1/19 rev A

Astrel Instruments AST8300-X
Getting started ith the Astrel Instruments camera
Thank you for purchasing an Astrel Instruments CCD camera. Your new camera is a leading
edge scientific instruments: please take your time to read carefully the following User's anual
to learn how to get the best out of your equipment.
The philosophy behind your camera is the concept that the CCD camera could be the real brain
of your astronomical equipment. This is possible thanks to the powerful microprocessor that is in
charge of managing not only the camera itself but also, through the extended set of I/O
available on-board, the other components of your system.
Getting Started 2/19 rev A
Astrel Instruments AST8300-X
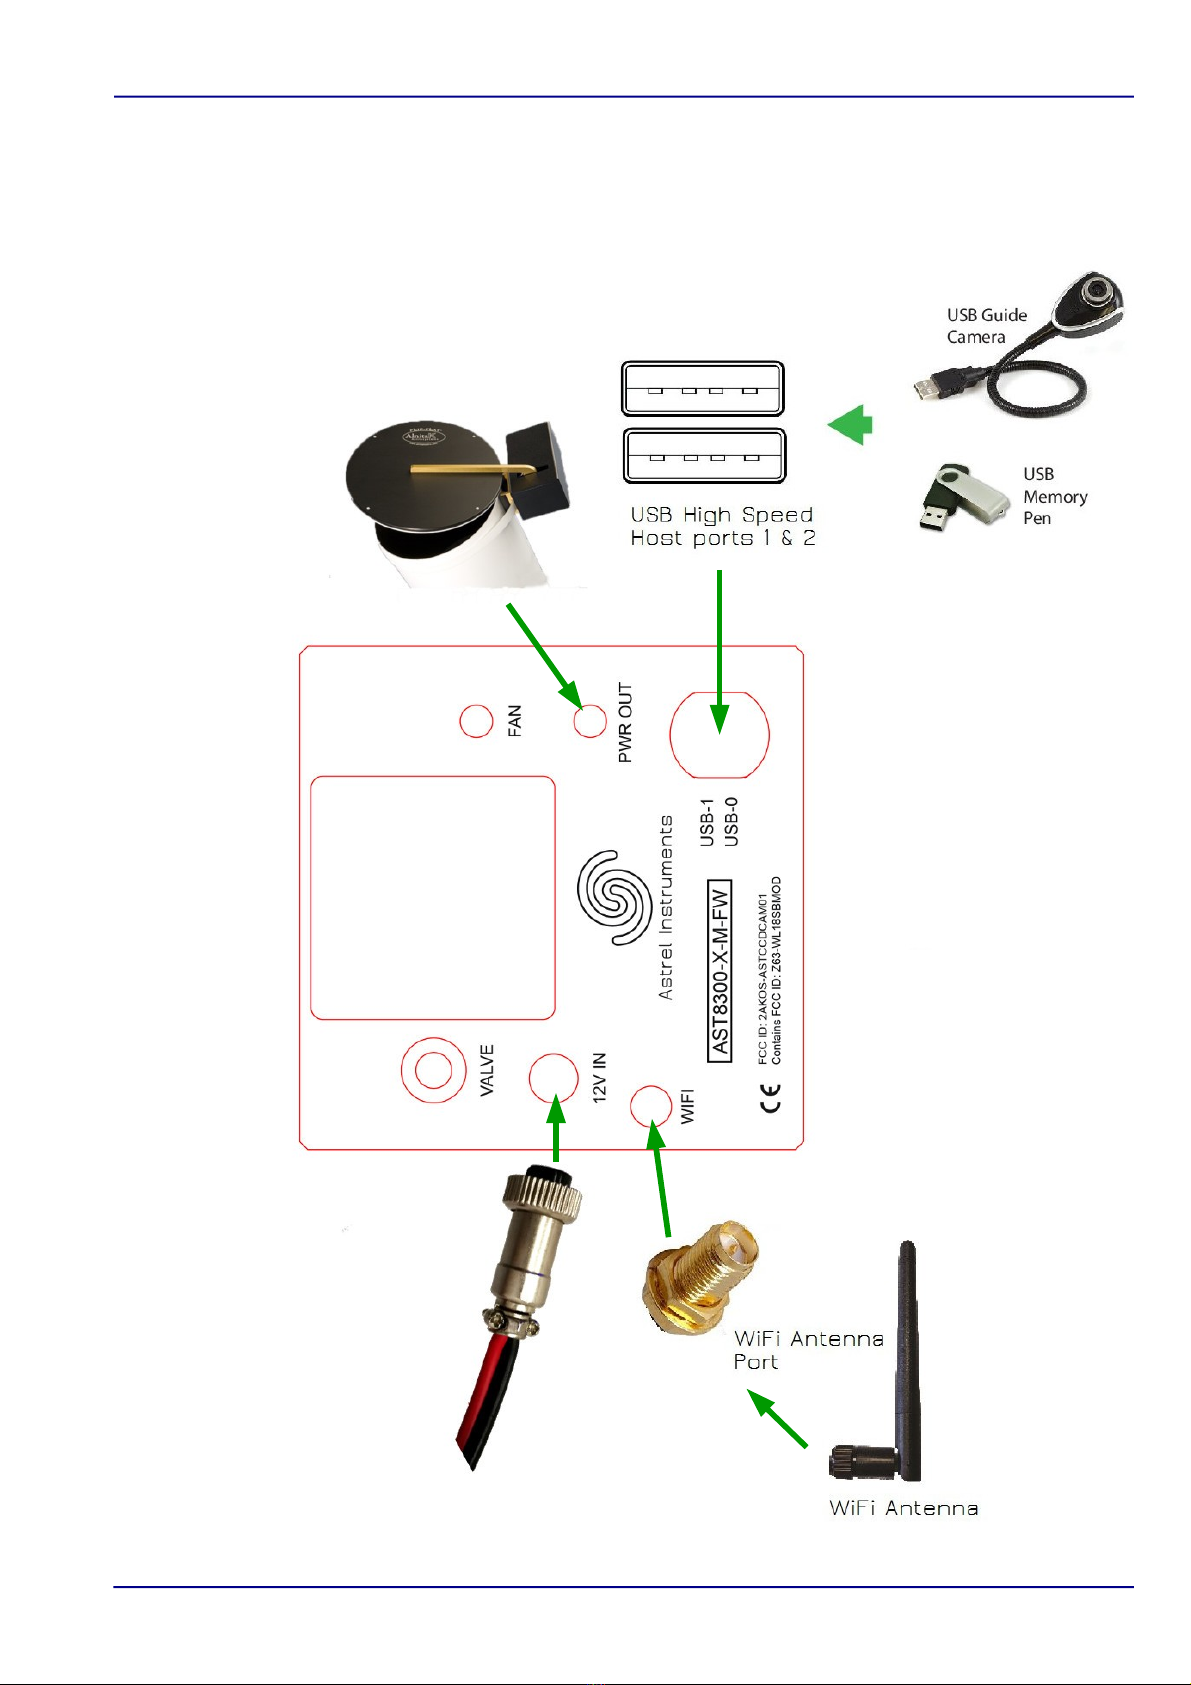
Camera connections
The following picture shows the I/O interfaces available:
Getting Started 3/19 rev A

Astrel Instruments AST8300-X
The following connectors are available on the camera:
•12V: the camera needs a 12V 3A power supply. The use of the included 3 meters cable
with its filter box is strongly suggested to connect the camera to a car lighter receptacle
using the included adapter, or to the optional 12V 3A power supply.
•USB 1&2: these two 480 bit/sec hi speed USB connectors can be used to connect
devices like USB dongles, guide cameras, keyboards and mice. USB hub can be used
when multiple connections are needed. Each USB port can drive max 500 mA.
•WiFi: this S A connector is used for the included WiFi Antenna.
•Flatbox controller: 12V controlled power out for powering your flatbox with the included
cable. The flatbox can be controlled using the flat maker app on the camera desktop
Getting Started 4/19 rev A

Astrel Instruments AST8300-X
Po ering up the camera
To correctly power up the camera, please follow this sequence:
•Connect the wifi Antenna.
•Connect USB devices. ost of them can be connected and disconnected at any time, but
it's always a good rule to connect any needed device before power up.
•Connect the power supply cable.
After the power supply is connected, the camera boots the Linux operating system and then
starts the Desktop application, from where all the camera's applications can be accessed.
Getting Started 5/19 rev A

Astrel Instruments AST8300-X
Po ering do n the camera
WARNING: never power down the camera by simply disconnecting power supply: your camera
has a true PC inside running Linux and, as any other PC, you should shut it down in the correct
way. The Shutdown application in the main page of the Desktop will take care of all this
sequence, so, before powering down the camera you must run the Shutdown application. After
pressing shutdown, the camera will disconnect from wifi and emit a certain number of regularly
timed weak beep sounds. When the beeps end the camera can be powered off unplugging the
power cable. In case the beeps can't be heard, after shutdown wait for 1 minute before
unplugging the power cable.
The Linux distribution inside the camera is stored into the internal SD card, which is the main
storage of the camera. In unlikely situations, removing the power supply while the operating
system or any application is writing on the SD card could damage the files stored on it.
Getting Started 6/19 rev A

Astrel Instruments AST8300-X
Wifi operations
The camera acts as a WiFi access point, like a normal wifi router, that you can connect to using
a PC/tablet/smartphone. The wifi connection is open, no password required, and by default the
network name is Astrel_ap_ followed by the camera s/n while the ip address is 10.0.0.1.
WARNING: remember to connect the WiFi antenna.
Once connected, you can operate the camera in Connected mode like described in the
following paragraph.
Getting Started 7/19 rev A

Astrel Instruments AST8300-X
PC/tablet/smartphone Connected mode
The camera is operated using the collection of applications available on-board, which can be
accessed using any VNC compatible remote desktop application on a PC/tablet/smartphone
with wifi connection.
Astrel proprietary applications are collected on the Astrel Desktop, which is organized in pages
of icons corresponding to applications. When choosing one tab, a different page of icons is
displayed. The applications and tabs can be customized modifying the desktop.cfg file. Here
follows a screenshot of the main Desktop page:
Other third-party applications are available on the Linux Desktop.
When operated in Connected mode, you only have to install a VNC client application on the
PC/tablet/smartphone, which is an application used to show the camera Desktop in a window in
the PC screen. There's no need to install any driver on the PC because the applications always
run on the camera, not on the PC, and all the communications use the wifi connection. This is
why you can run the same applications even with a tablet/smartphone.
any free VNC client are available for many architectures: here follows a brief list of the tested
ones:
•PC/Windows: TightVNC (http://www.tightvnc.com/)
•PC/Linux: TightVNC (http://www.tightvnc.com/)
Getting Started 8/19 rev A

Astrel Instruments AST8300-X
•Android: akRDC Free (available on the store)
•Windows Phone: TinyVNC (available on the store)
To install them just follows the steps indicated on their websites.
WARNING: closing the VNC client application doesn't shut down the camera: the VNC client
only shows the camera applications on the PC screen. That means that you always have to run
the Shutdown application before powering down the camera.
Getting Started 9/19 rev A

Astrel Instruments AST8300-X
Accessing the camera storage
The basic camera main storage is the internal 8Gb SD card, where the operating system and
the photos are stored. You can add more storage by simply connecting a USB dongle or even a
USB hard disk to either USB connectors.
If you need to access other folders (for example a USB dongle or hard disk) or simply prefer to
use a file-manager like application, you can use any remote file-manager application using the
ssh protocol: here follows a brief list of the tested ones:
•PC/Windows: WinSCP (http://winscp.net)
•PC/Linux: any file manager opening the location ssh://<camera ip address>
The username is astro and the password is astronomy.
Getting Started 10/19 rev A
Altri manuali per AST8300X
1
Indice
Altri manuali Astrel Instruments Macchina fotografica digitale

Astrel Instruments
Astrel Instruments AST183X Manuale utente

Astrel Instruments
Astrel Instruments AST492 Manuale utente

Astrel Instruments
Astrel Instruments AST-8300-B Manuale utente

Astrel Instruments
Astrel Instruments AST8300X Manuale utente

Astrel Instruments
Astrel Instruments AST-8300-A Manuale utente


