ASUSTOR AS-T10G3 Manuale utente

AS-T10G3
Quick Installation Guide
For AS67 / AS65R / AS71R Series
Ver. 4.1.01210
AS-T10G3 Quick Installation Guide
Page 2 of 21
Table of Contents
1. Notices..........................................................................................................................................................................3
2. Package Contents .........................................................................................................................................................4
3. Installation Guide .........................................................................................................................................................5
3.1. Parts and Tools Needed .......................................................................................................................................5
3.2. AS-T10G3 installation guide .................................................................................................................................5
3.3. Installing in the AS67 Series .................................................................................................................................6
3.4. Installing in the AS65R Series .............................................................................................................................12
3.5. Installing in the AS71R Series .............................................................................................................................16
4. Appendix.....................................................................................................................................................................21
4.1. Troubleshooting .................................................................................................................................................21
4.2. Contact ASUSTOR Technical Support.................................................................................................................21
AS-T10G3 Quick Installation Guide
Page 3 of 21
1. Notices
Federal Communications Commission Statement
This device complies with FCC Rules Part 15. Operation is subject to the following two conditions:
This device may not cause harmful interference.
This device must accept any interference received, including interference that may cause undesired operation.
This equipment has been tested and found to comply with the limits for a class A digital device, pursuant to Part 15 of the
Federal Communications Commission (FCC) rules. These limits are designed to provide reasonable protection against
harmful interference in a residential installation. This equipment generates, uses, and can radiate radio frequency energy
and, if not installed and used in accordance with the instructions, may cause harmful interference to radio communications.
However, there is no guarantee that interference will not occur in a particular installation. If this equipment does cause
harmful interference to radio or television reception, which can be determined by turning the equipment off and on, the
user is encouraged to try to correct the interference by one or more of the following measures:
Reorient or relocate the receiving antenna.
Increase the separation between the equipment and receiver.
Connect the equipment into an outlet on a circuit different from that to which the receiver is connected.
Consult the dealer or an experienced radio/TV technician for help.
Changes or modifications not expressly approved by the party responsible for compliance could void the user's authority
to operate the equipment.
CE Mark Warning
CE marking for devices without wireless LAN/Bluetooth
The shipped version of this device complies with the requirements of the EEC directives 2004/108/EC "Electromagnetic
compatibility" and IEC60950-1:2005 (2nd Edition)+A1:2009 "Information technology equipment-Safety ".”

AS-T10G3 Quick Installation Guide
Page 4 of 21
2. Package Contents
AS-T10G3 x1
Low-Profile Bracket x1
Full-Height x1

AS-T10G3 Quick Installation Guide
Page 5 of 21
3. Installation Guide
3.1. Parts and Tools Needed
Phillips head screwdriver
3.2. AS-T10G3 installation guide
Please refer to https://www.asustor.com/service/compatibility for more information on M.2 SSD compatibility.
1. Undo the heatsink screws on the AS-T10G3 expansion card.
2. Remove the protective covering on the heatsink thermal pad.
3. Insert the M.2 SSD into the slot at angle. Ensure the notch on the SSD connector is aligned with the slot. Insert the M.2
SSD into the slot and make sure the connector is fully inserted.
4. Bend back the lever slightly and press down on the SSD until the SSD is secure and flush with the PCB.

AS-T10G3 Quick Installation Guide
Page 6 of 21
5. Fasten the heatsink screws onto the AS-T10G3.
3.3. Installing in the AS67 Series
1. To add a 10-Gigabit Ethernet card, install ASUSTOR NAS PCIe Mode Switcher from App Central.
2. Select 10G NIC and press apply.

AS-T10G3 Quick Installation Guide
Page 7 of 21
3. Click OK
4. After confirmation, your NAS will shut down. After shutting down, you will now be able to install the 10-Gigabit
Ethernet card after disconnecting your NAS from mains electricity.

AS-T10G3 Quick Installation Guide
Page 8 of 21
5. Disconnect all cables and devices connected to the NAS including the power cord.
AS6704T
AS6706T
Note. The PCIe socket inside your NAS does not support hot swap functionality. Please shut down and unplug your.
NAS before changing between PCIe devices.
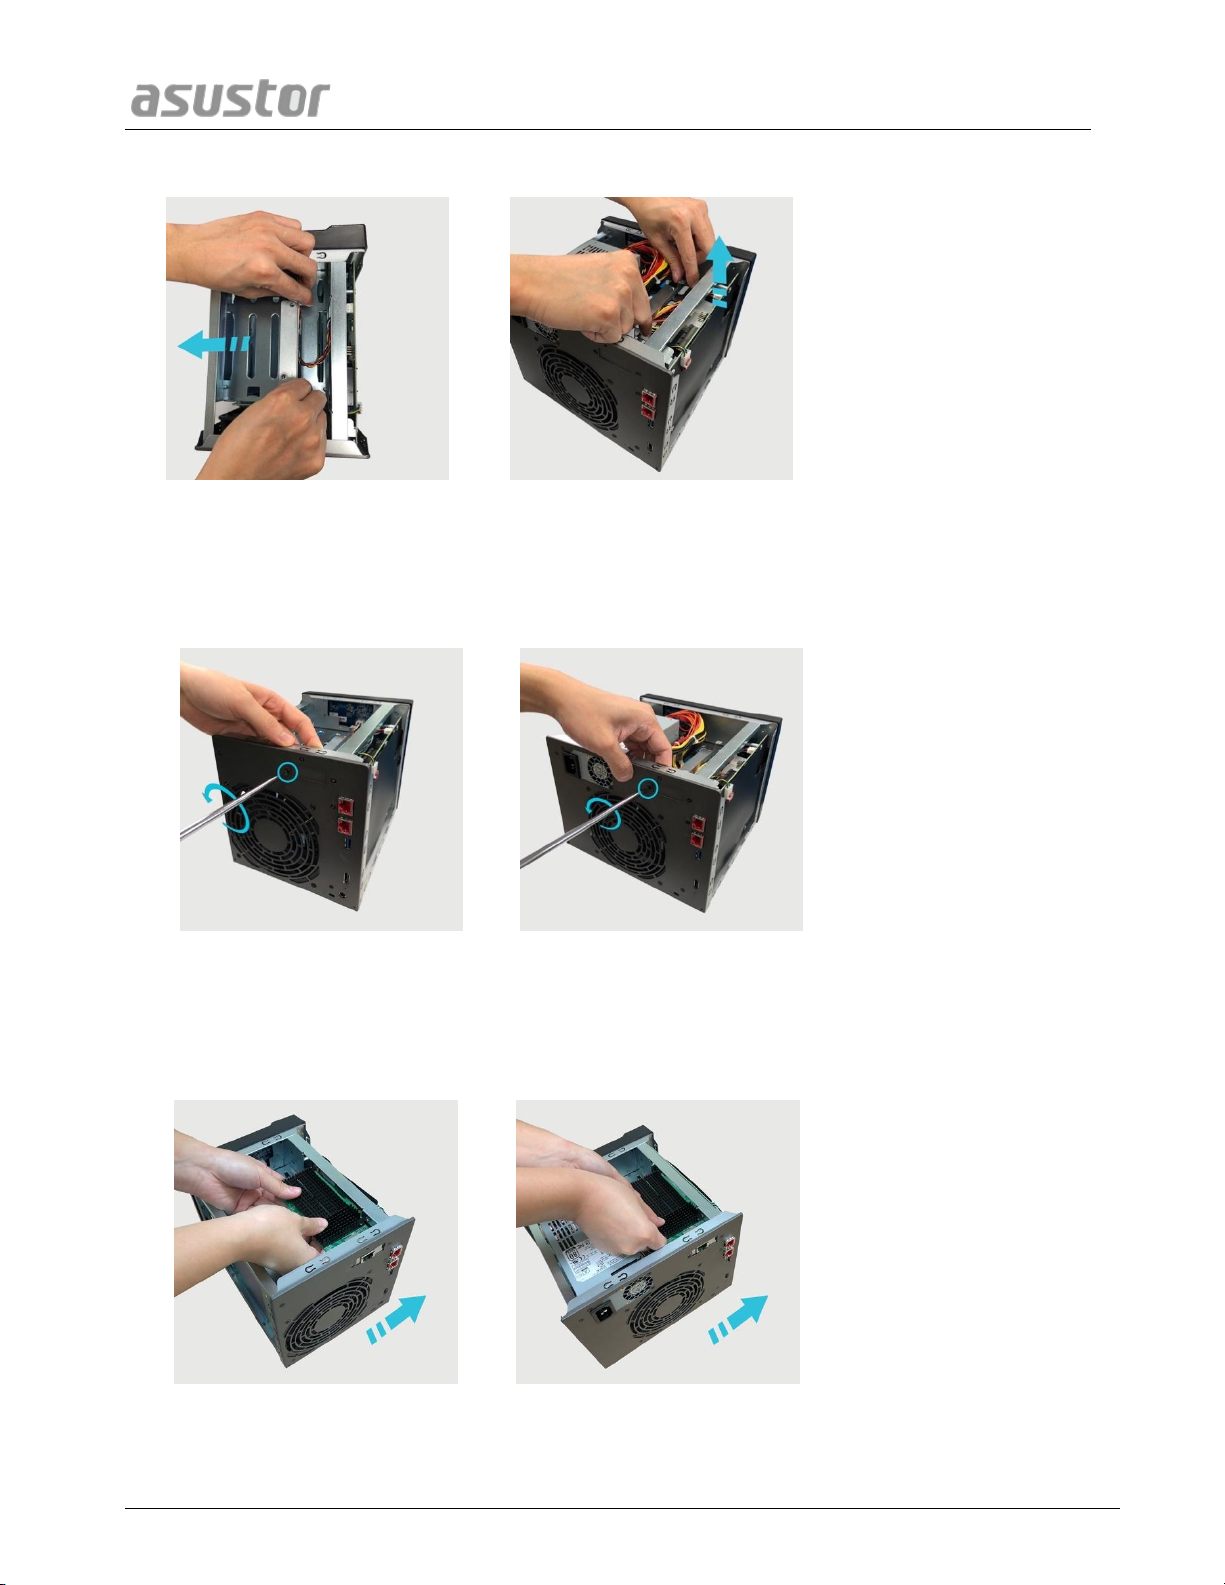
6. Use a screwdriver to loosen the three screws found on the rear of the NAS as shown in the illustration.
AS6704T
AS6706T
7. Grip the cover from both sides with two hands and then gently push it back to remove it from the chassis.
8. To remove the M.2 card, undo the screws as shown below.
AS6704T
AS6706T

AS-T10G3 Quick Installation Guide
Page 9 of 21
9. Gently pull the M.2 card from the PCIe slot as shown below.
AS6704T
AS6706T
10. Undo the two screws that hold the bracket for the M.2 card in place.
AS6704T
AS6706T
11. Lift the bracket out of the NAS.
AS-T10G3 Quick Installation Guide
Page 10 of 21
AS6704T
AS6706T
12. Remove both screws in the rear of the NAS and placeholder bracket.
AS6704T
AS6706T
13. Gently insert the network card into the PCIe slot of your NAS.
AS6704T
AS6706T
Indice
Altri manuali ASUSTOR Hardware di rete


Manuali Hardware di rete popolari di altre marche

Matrix Switch Corporation
Matrix Switch Corporation MSC-HD161DEL Manuale utente

B&B Electronics
B&B Electronics ZXT9-IO-222R2 Manuale utente

Yudor
Yudor YDS-16 Manuale utente

D-Link
D-Link ShareCenter DNS-320L Manuale utente

Samsung
Samsung ES1642dc Istruzioni per l’uso

Honeywell Home
Honeywell Home LTEM-PV Istruzioni per il montaggio


