Atkinson Dynamics AD-26 Guida rapida

Address all communications and shipments to:
2645 Federal Signal Drive
University Park IL 60466-3195
(888)751-1500
Atkinson Dynamics Intercoms
Models AD-26, AD-27, AD-56, and AD-57
Installation and Service Instructions

INSTALLATI N AND SERVICE INSTRUCTI NS F R ATKINS N DYNAMICS
HEAVY-DUTY INTERC MS
SAFETY MESSAGE T INSTALLERS, USERS AND MAINTENANCE PERS NNEL
It is important to follow all instructions shipped with this product. This device is to be installed by a
trained electrician who is thoroughly familiar with the National Electrical Code and will follow NEC
Guidelines as well as local codes. Marine installations shall be in accordance with Title 46 CFR
Parts 110-113.
The selection of the mounting location for the device its controls and the routing on the wiring is to
be accomplished under the direction of the facilities engineer and the safety engineer. In addition
listed below are some other important safety instructions and precautions you should follow:
• This is not a listed safety device and is not intended to be used as such.
• Read and understand all instructions before installing or operating this equipment.
• Disconnect power before connecting or doing any maintenance on this intercom.
• All effective warning speakers produce loud sounds which may cause in certain situations
permanent hearing loss. You should take appropriate precautions such as wearing hearing
protection.
• After testing is complete provide a copy of this instruction sheet to all operating personnel.
• Establish a procedure to routinely check the intercom installation for integrity and proper
operation. Any maintenance must be performed by a trained electrician in accordance with NEC
guidelines and local codes.
• This device can be installed in climates with wind blown dust and rain or splashing water. Do not
install this device in climates that exceed the unit's operating temperature range.
Failure to follow all safety precautions and instructions may result in property damage serious
injury or death to you or others.
A. General Features.
The Atkinson Dynamics intercom is a heavy-duty 2-way communications device designed for
industrial applications. There are four basic models: AD-26 12VDC; AD-56 24VDC; AD-27
120VAC 50/60Hz; and AD-57 240VAC 50/60Hz. The AC line is fused with a 1/2-amp 250
volt type GMC fuse in the 120/240VAC units. A description of the available models follows.
Basic Model Specifications
Model AD-26 Model AD-56 Model AD-27 Model AD-57
Supply Voltage 12 VDC 24VDC 120VAC 50/60 Hz 240VAC 50/60 Hz
Audio Power
Output (Max.) 8.0 Watts 11.7 Watts 11.3 Watts 11.3 Watts
Power Consumption
(Max.) 20.0 Watts 39.6 Watts 28.8 Watts 30.5 Watts
Operating Current
(nominal) 1.47 A 1.65 A 0.240 A 0.127 A
Operating
Temperature -31°F to 150°F -31°F to 150°F -31°F to 150°F -31°F to 150°F
Shipping Weight 10 lbs. 10 lbs. 10 lbs. 11 oz. 10 lbs. 11 oz
Dimensions See Figure 20 See Figure 20 See Figure 20 See Figure 20
Ratings UL cUL Marine-Listed CE (Model AD-27)
NEMA-Type 4X (excluding microphone models) Type IP56 (Model AD-27)
Table 1
-1-

Additional Model Information
Letter Group Function/Feature
“A” Call button
“C” Master mode
“D” Slave mode
Number Group
“-1” Remote power
“-2” Provisions for external talk/listen switch (Foot pedal ready)
“-3” External call contacts for auxiliary signal
“-4” Extreme temperature use (-50°F to 150°F)
“-6” Designed for use in a zoned system
“-7” Provisions for hand-held noise canceling microphone
“-8” Additional pre-amp for use with remote slave speaker
Miscellaneous
“-M22” Equipped with remote monitor switch
“-M34” Provisions for headset microphone with belt switch
“-M44” Remote speaker volume control
Table 2
MASTER UNITS:
“C” Models default to Master or speaker mode. In Master mode the unit acts as a speaker and
broadcasts audio signals generated elsewhere in the intercom system. Depressing the Talk switch
turns the unit into a microphone and enables the user to broadcast to all other intercoms in the
system. Releasing the switch returns the unit to Master mode. Figure 4 illustrates a Master/Slave
intercom system.
SLAVE UNITS:
“D” Models default to Slave or microphone mode. In Slave mode the unit is designed to serve
as a hands-free microphone with transmission to all Master units in the intercom system. The
Slave unit will act as a speaker and broadcast audio transmissions only when the Talk switch of
any Master unit in the intercom system is depressed. Figure 4 illustrates a Master/ Slave intercom
system.
CALL BUTT N:
“A” Models are equipped with a Call switch. Depressing the call switch transmits an 890Hz tone
to all units in the intercom system.
CAUTI N
The call signal is louder than normal voice messages being carried on the line. Do not depress the
call switch while carrying on a conversation with someone on the system. This will subject the
listener to very loud sound levels.
The volume of the call signal is affected by the volume control on the receiving unit so if volume is
turned all the way down at a receiving station the call signal will not be heard.
MICR PH NE:
“-7” Hand-Held Noise Cancelling Microphones are recommended for use in environments with
high levels of ambient noise. Keying the microphone overrides the default mode of the intercom
and enables audio transmission to all Master units in the intercom system. Figure 2 illustrates a
common intercom system where hand-held microphones are used.
-2-

-3-
HEADSET MICR PH NE WITH-BELT-SWITCH:
“M34” Headset Microphones and Belt Switches are an additional option for environments with a
high level of ambient noise. Keying the belt switch overrides the default mode of the intercom
and enables audio transmission to all Master units in the intercom system. Figure 5 illustrates a
common intercom system where a headset microphone and belt switch are used.
REM TE P WER:
“-1” Models are designed to provide power to “-1” remote intercom units. The AC-powered main
unit provides 12 Volts DC-power and audio in the same cable to the remote unit. A “-1” unit can
provide power to just one remote unit. Figure 3 illustrates this configuration.
PRE-AMPLIFIER:
“-8” Models are equipped with a pre-amplifier and are designed for use with Slave speaker units
such as the AD-SV-25 Remote Speaker with Volume Control. The “-M44” option equips the “-8”
Master unit with a knob for controlling the volume of remote speakers such as the AD-SF-25
Flush Mount Speaker or the AD-SS-25 Swivel Mount Speaker. Figures 6 and 7 illustrate intercom
systems with the “-8” and “-M44” options.
EXTERNAL-P WER-S URCE:
The use of an external power source allows the user to configure intercom systems made up of “-
1” DC-powered Master and Slave units. Figure 8 illustrates such a system.
SURGE PR TECTI N:
Metal Oxide Varistor (MOV) devices are used to protect the audio lines. The intercom must have
Earth or Chassis Ground terminated to it to ensure surge protection.
The output amplifier of the Atkinson Dynamics intercom offers full short circuit protection and
overheat protection on AC models only.
F T PEDAL READY:
Models with the “-2” option are designed for hands-free activation of the Talk/Listen switch.
Figures 9 10 and 17 show examples of intercoms with this option. A heavy-duty foot pedal
(Model ADFP) is available through Atkinson Dynamics.
AUXILIARY SIGNAL:
Models with the “-3” option are equipped with a call button that provides a contact closure for an
attention-getting auxiliary device e.g. a strobe light. Figure 13 demonstrates an intercom system
with this option. Atkinson Dynamics offers a low profile strobe light that is available with an
amber or red lens pipe or surface mount configuration and in three voltage variations.
Z NED SYSTEM REM TE:
Models with the “-6” option are designed for use in a zoned system. Figure 11 illustrates a zoned
intercom system. A master intercom can select (via a switch box) to talk to any one or more
remotes in a system. Each remote unit is equipped with a Talk/Listen switch that enables
communication to the master intercom even when that zone is not selected. Atkinson Dynamics
offers 6-zone and 12-zone switch boxes.
M NIT R SWITCH:
Models with the “-M22” option are equipped with a monitor on/off toggle switch. When the
monitor switch is in the on position the remote unit becomes a slave and defaults to talk mode.
Figures 14 and 15 illustrate systems with this feature.

B. Unpacking.
After unpacking the Atkinson Dynamics Intercom examine it for damage that may have
occurred in transit. If the equipment has been damaged do not attempt to install or operate it
and file a claim immediately with the carrier stating the extent of the damage. Carefully check
all envelopes shipping labels and tags before removing or destroying them.
Before attempting to install the intercom be sure that all parts listed in the KIT CONTENTS
LIST have been supplied.
C. Kit Contents List.
Qty.Description Part Number
1 Resistor 1K 1W 101216
D. Mounting.
CAUTI N
The selection of the mounting location for the device its controls and the routing of the wiring
is to be accomplished under the direction of the facilities and the safety engineer.
N TE
Intercoms supplied with flexible cords for connection to field wiring are not intended
for permanent mounting.
The intercom is intended to be mounted on any relatively flat and rigid surface by the two
mounting ears on the exterior of the housing. Figure 9 is a dimensional outline drawing
showing the proper mounting configuration. The two mounting ears are 13/32" diameter holes
spaced 5.68" apart. Hardware for mounting the intercom to the surface shall be provided by the
installer.
WARNING
This unit is heavy and should be mounted on a rigid surface capable of supporting the weight
of the intercom.
WARNING
For shipboard applications installations shall be in accordance with the United States Coast Guard
Title 46 CRF Parts 110-113.
For units using the noise cancelling hand-held microphone install the supplied microphone
mounting clip on any rigid surface near the intercom. Avoid locating the microphone where it
may be exposed to excessive moisture or dust.
E. Electrical Connections.
Plug each intercom into a nearby power source with a protective earth grounding. The plug
should remain readily accessible for disconnection. Connect the audio inputs in parallel.
Audio wires should be sized properly by your licensed installation electrician for your
specified application.
Optional: A 1K 1W resistor is included in a kit with each intercom. Installing the resistor
across the audio lines helps to reduce noise in certain environments. Only one resistor needs to
be installed on the lines for any system installation.
See figures 1 through 19 for typical intercom connections and wiring information.
-4-

F. Service.
1. General.
Federal Signal will service your equipment or provide technical assistance with any
problems that cannot be handled locally.
Any units returned to Atkinson Dynamics for service inspection or repair must be
accompanied by a Return Material Authorization. This R.M.A can be obtained only from the
factory by calling (888)751-1500.
At this time a brief explanation of the service requested or the nature of the malfunction
should be given.
Address all communications and shipments to:
ATKINS N DYNAMICS
Service Department
2645 Federal Signal Drive
University Park IL 60466-3195
-5-

-6-
2. Replacement Parts.
WARNING
Replace fuse with GMC-1/2 only. DO NOT substitute.
Description Part Number
Belt switch assembly K137146B
Connector 3-Position (12/24V PC Boards) K140411A-03
Cover plate gasket K8590013B
Fuse GMC-1/2 K148A155A
Headset assembly K137145A
Knob volume control K141A129A
Microphone assembly K137144A
PC Board 120VAC K2001875B
PC Board 120VAC w/headset K2001875B-M34
PC Board 12V AD-26 K2001878B
PC Board 12V AD-26-7 K2001878B-06
PC Board 12V AD-26-8 K2001896B-01
PC Board 12V AD-26-8-M44 K2001896B
PC Board 12V AD-26A K2001878B-05
PC Board 12V AD-26C K2001878B-01
PC Board 12V AD-26D K2001878B-02
PC Board 12V AD-26SA-25 K2001878B-17
PC Board 240VAC K2001875B-01
PC Board 240VAC w/headset K2001875B-01M34
PC Board 24V AD-26SA-25 K2001878B-19
PC Board 24V AD-56 K2001878B-07
PC Board 24V AD-56-8 K2001896B-03
PC Board 24V AD-56-8-M44 K2001896B-02
PC Board 24V AD-56A K2001878B-12
PC Board 24V AD-56C K2001878B-08
PC Board 24V AD-56D K2001878B-09
PC Board 120VAC -1 Models K2001885A
PC Board 240VAC -1 Models K2001885A-01
Kit potentiometer w/ on/off switch K8590236A
Kit push button switch (12/24V models) K8590242A
Kit push button switch (120/240V models) K8590241A
Resistor 1K 1W K101216A
Rubber boot push button switch K288697A
Rubber boot toggle switch K288696A
Rubber boot volume control K288A542A
Kit toggle switch DPDT K8590238A
Kit potentiometer 10K Ohm K8590237A
Kit toggle switch 3PDT (AD-27A-M34 & AD-27A-4-M34 only) K122342A
Kit toggle switch 3PDT K8590239B
Kit pushbutton switch 3PDT K8590288A
Kit potentiometer 1K Ohm K8590289A
Voice Coil/Diaphragm Assembly-Series C K8590181A
G.Warranty.
Atkinson Dynamics guarantees their intercoms to be free of defects at the time of delivery. If
damage is found to be a factory defect Atkinson Dynamics will warrant all labor charges for
repair for one full year and all replacement parts for two full years.

-7-
290A3693
BLK
WHT
BLK
WHT
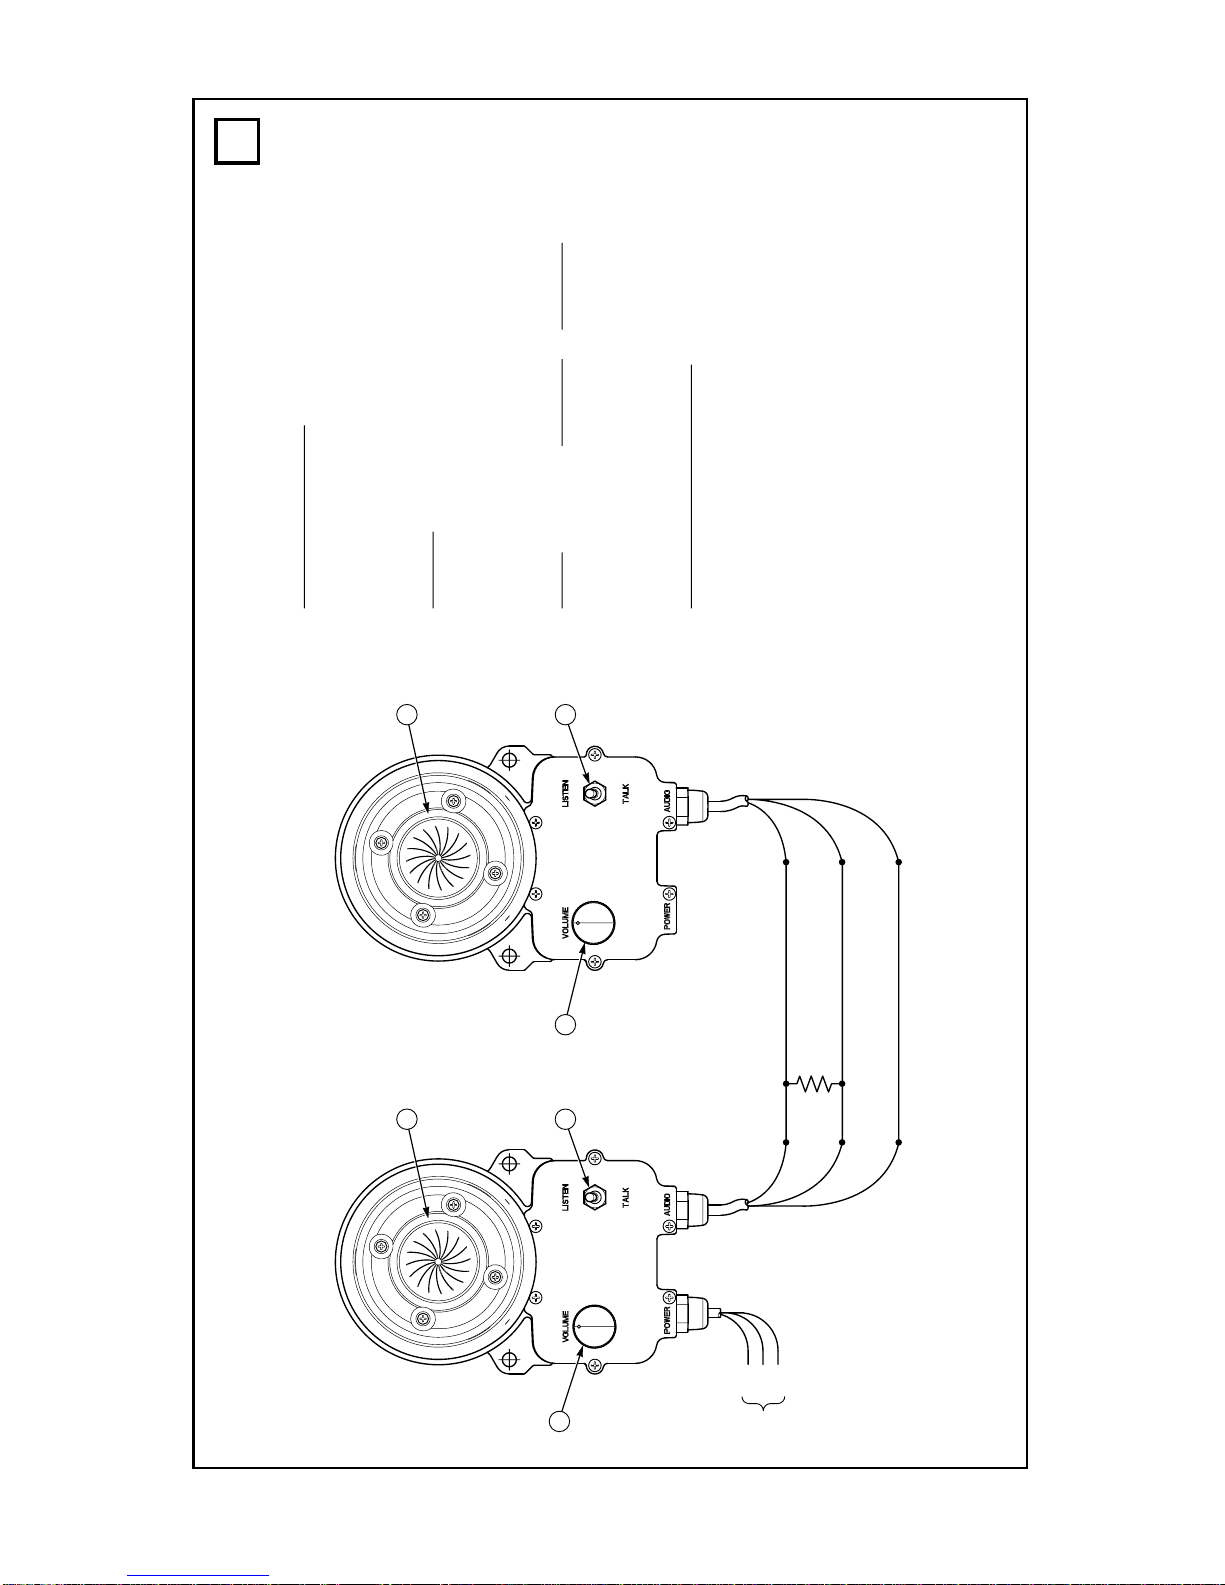
AUDIO LINE TO OTHER INTERCOMS
1K
1WATT
AUDIO CABLE
REMOTE A REMOTE B
AUDIO CABLE
1
3
2
1
3
2
4
BLK
WHT
GRN
*
SEE POWER
CONNECTIONS
*
BLK
WHT
GRN
*
Reminders:
• Before installing remote intercoms precautions should be taken to prevent feedback
between two or more remotes in close proximity and acoustically reflective areas.
• 16–20 gauge low voltage audio cable. Twisted pair not required..
• Shielded audio cable not required unless operating in high electromagnetic fields. Ground
one end of the shield to earth ground.
• Type of power cable depends on intercom model.
• 7 foot provided for audio and power.
perating Principle:
• When one talks all intercoms will hear.
• To talk to other stations press the talk/
listen switch and speak into the speaker/
microphone.
Release talk switch to listen.
N TES:
1. Speaker/Microphone
2. Off/On/Speaker Volume Control
3. Talk/Listen Switch
4. “Call” Tone Switch
Power Remote A Remote B
12–18VDC AD-26 AD-26A
120V 50/60Hz AD-27 AD-27A
22-30VDC AD-56 AD-56A
240V 50/60Hz AD-57 AD-57A
P WER C NNECTI NS:
BLK +DC Power 12/24V Models
HOT 120/240V
Models
WHT Common 12/24V Models
Neutral 120/240V
Models
GRN Earth Ground 120/240V
Models only
1

BLK
WHT
GRN
*
290A3694
BLK
WHT
BLK
WHT
AUDIO
COMMON
REMOTE A REMOTE B
TO OTHER
REMOTES
1K
1WATT
1
3
5
2
1
3
2
4
BLK
WHT
GRN
*
SEE POWER
CONNECTIONS
*
perating Principle:
• When one talks all remotes will hear.
• To talk press talk switch and speak into speaker/
microphone. Release talk switch to listen.
• To talk into hand-held microphone press talk switch
on microphone and speak into microphone element.
N TES:
1. Speaker/Microphone
2. Off/On/Speaker volume control
3. Talk/Listen switch
4. “Call” Tone push button switch
5. #137144 hand-held noise cancelling microphone
with push-to-talk switch
Power Remote A Remote B
12–18VDC AD-26-7 AD-26A-7
120V 50/60Hz AD-27-7 AD-27A-7
22-30VDC AD-56-7 AD-56A-7
240V 50/60Hz AD-57-7 AD-57A-7
P WER C NNECTI NS:
BLK +DC Power 12/24V Models
HOT 120/240V Models
WHT Common 12/24V Models
Neutral 120/240V Models
GRN Earth Ground 120/240V
Models only
- -
Reminders:
• Before installing remote intercoms precautions should be taken to prevent feedback between
two or more remotes in close proximity and acoustically reflective areas.
• 16–20 gauge low voltage audio cable. Twisted pair not required.
• Shielded audio cable not required unless operating in high electromagnetic fields. Ground one
end of the shield to earth ground.
• Type of power cable depends on intercom model.
• 7 foot (2 meter) cable provided for audio and power.
2
290A3695
GRN
BLK
WHT
GRN
BLK
WHT
1K
1WATT
AUDIO
COMMON
(+) DC POWER
3/16-20 AWG
REMOTE A REMOTE B
1
3
2
1
3
2
BLK
WHT
GRN
*
SEE POWER
CONNECTIONS
*
perating Principle:
• When one talks the other stations will hear.
• To talk into the intercom press the talk switch
and speak into the speaker/microphone.
Release to listen.
N TES:
1. Speaker/Microphone
2. Off/On/Speaker volume control
3. Talk/Listen Switch
Power Remote A Remote B
Not applicable AD-26-1
120V 50/60Hz AD-27-1
240V 50/60Hz AD-57-1
P WER C NNECTI NS:
BLK +DC Power 12/24V Models
HOT 120/240V Models
WHT Common 12/24V Models
Neutral 120/240V Models
GRN Earth Ground 120/240V
Models only
3
-9-
Questo manuale è adatto per i seguenti modelli
3
Indice
Altri manuali Atkinson Dynamics Sistema di interfono


