
Atomic G03510W Manuale utente

1-888-996-2729
FAX: 1-866-873-3531
We strive to ensure that our products are of the highest quality
and free of manufacturing defects or missing parts. However, if
you have any problems with your new product,
DO NOT RETURN IT TO THE STORE,
please contact us toll free @:
Or write to:
Escalade Sports
Customer Service Department
P.O. Box 889
Evansville IN 47706
Your Model Number G03510W
have your model number when inquiring about parts.
Please
Date Code 2 - G03510W - - WJ
© 2012 Escalade Sports For Customer Service Call 1-888-996-2729
When contacting Escalade Sports please provide your model number, date
code (if applicable) and part number if requesting a replacement part. These
numbers are located on the product, packaging, and this owners manual.
1
All Rights Reserved.
Purchase Date
PLEASE RETAIN THIS INSTRUCTION MANUAL FOR FUTURE REFERENCE
Make sure you understand the following tips before you begin to assemble your hockey table.
1. Start all bolts by hand before tightening.
2. Some drawings or images in this manual may not look exactly like your product. Please
read and understand the text before starting each assembly step.
TWO ADULTS ARE REQUIRED TO ASSEMBLE
THIS BLAZER 7FT HOCKEY TABLE
Assembly Tips
Tools Required:
READ AND FOLLOW ALL ASSEMBLY, OPERATION, AND
SAFETY INSTRUCTIONS CAREFULLY. AT LEAST TWO
ADULTS ARE NEEDED TO PUT THIS HOCKEY TABLE
TOGETHER.
T1 - Wrench(Included)
IMPORTANT! READ EACH STEP
IN THIS MANUAL BEFORE YOU
BEGIN THE ASSEMBLY.
© 2012 Escalade Sports For Customer Service Call 1-888-996-2729
Phillips Screwdriver
Furniture Polish and Cloth
2
All Rights Reserved.
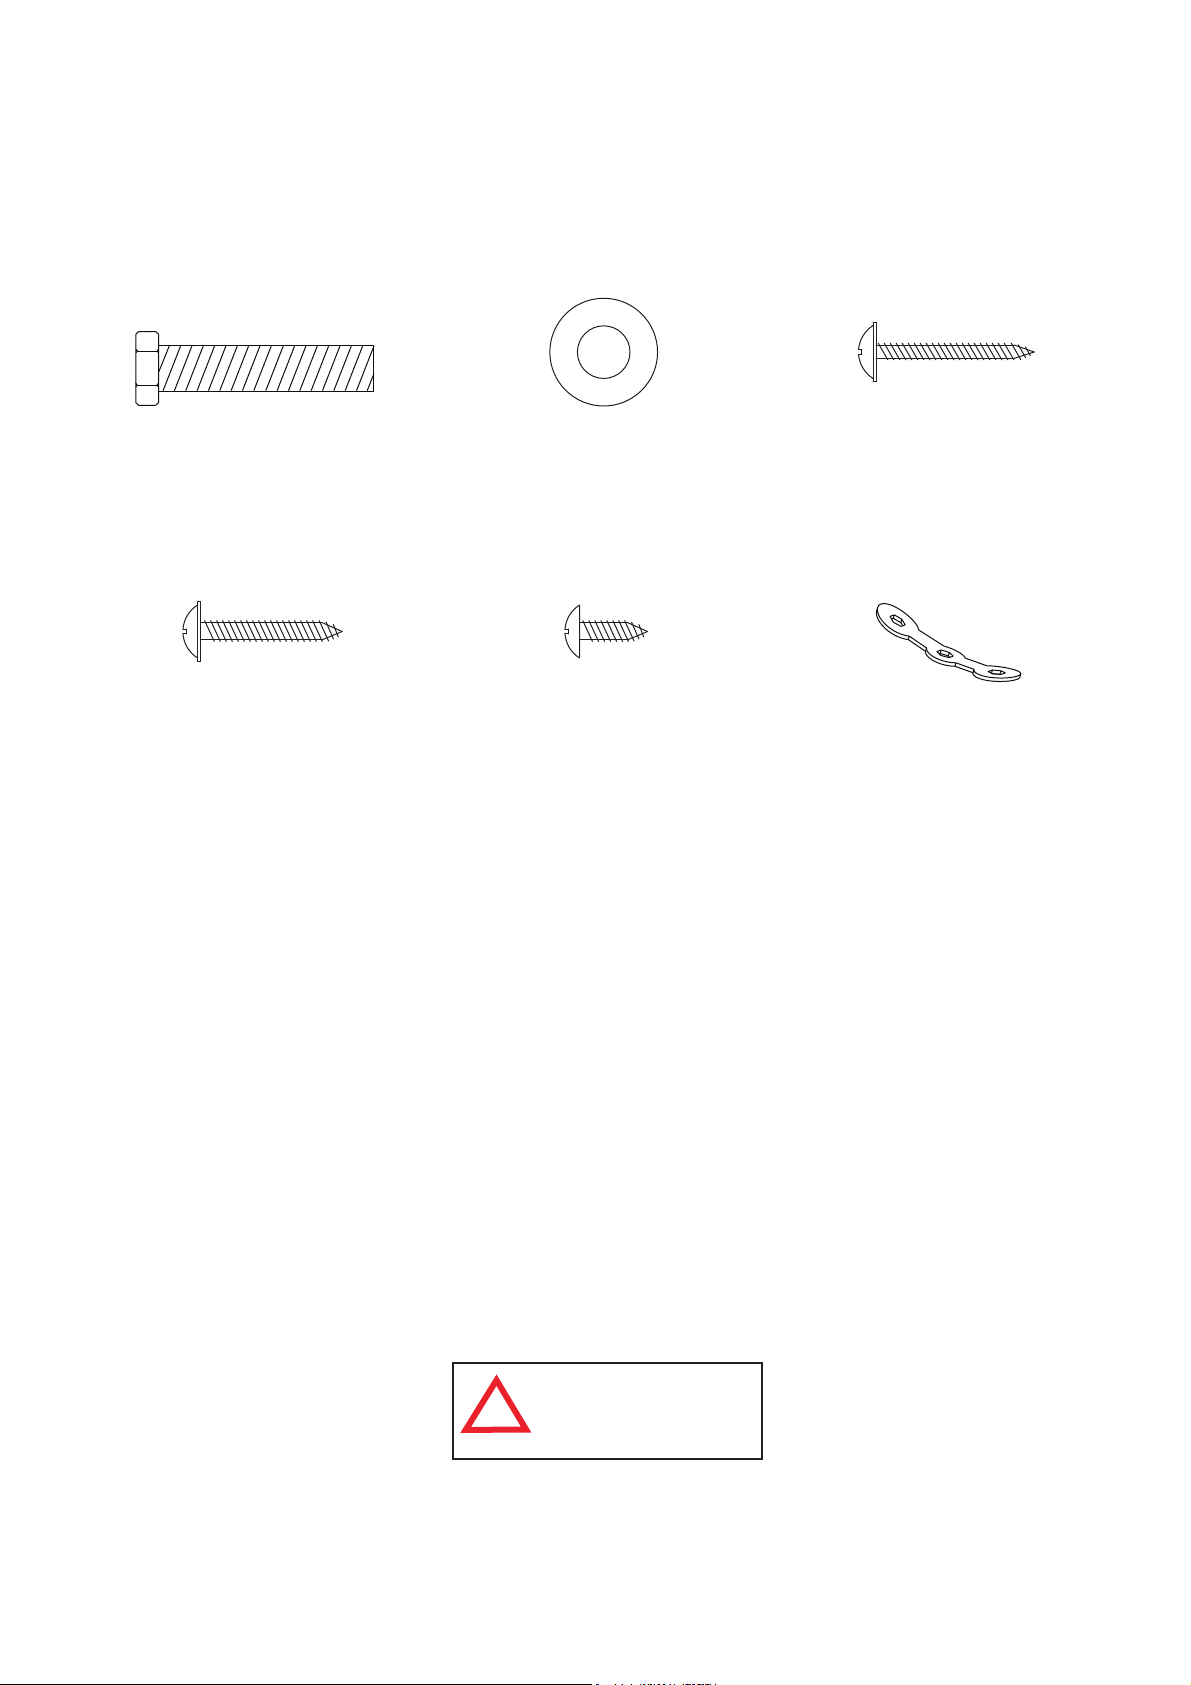
HARDWARE IDENTIFIER
( To Scale)
©2012 Escalade Sports For Customer Service Call 1-888-996-2729
3
All Rights Reserved.
H1 - 8mm x 38mm
Hex Bolt (8 pcs)
H2 - 8mm x 19mm
Flat Washer (8 pcs)
H3 - 3.5mm x 28mm
Phillips Washer Head
Screw (12 pcs)
H4 - 4mm x 25mm
Phillips Washer Head
Screw (8 pcs)
H5 - 4mm x 12mm
Phillips Round Head
Screw (4 pcs)
(Not to Scale)
T1 - Wrench (1 pc)
!WARNING:
CHOKING HAZARD
Small parts.
Not for children under 3 yrs.
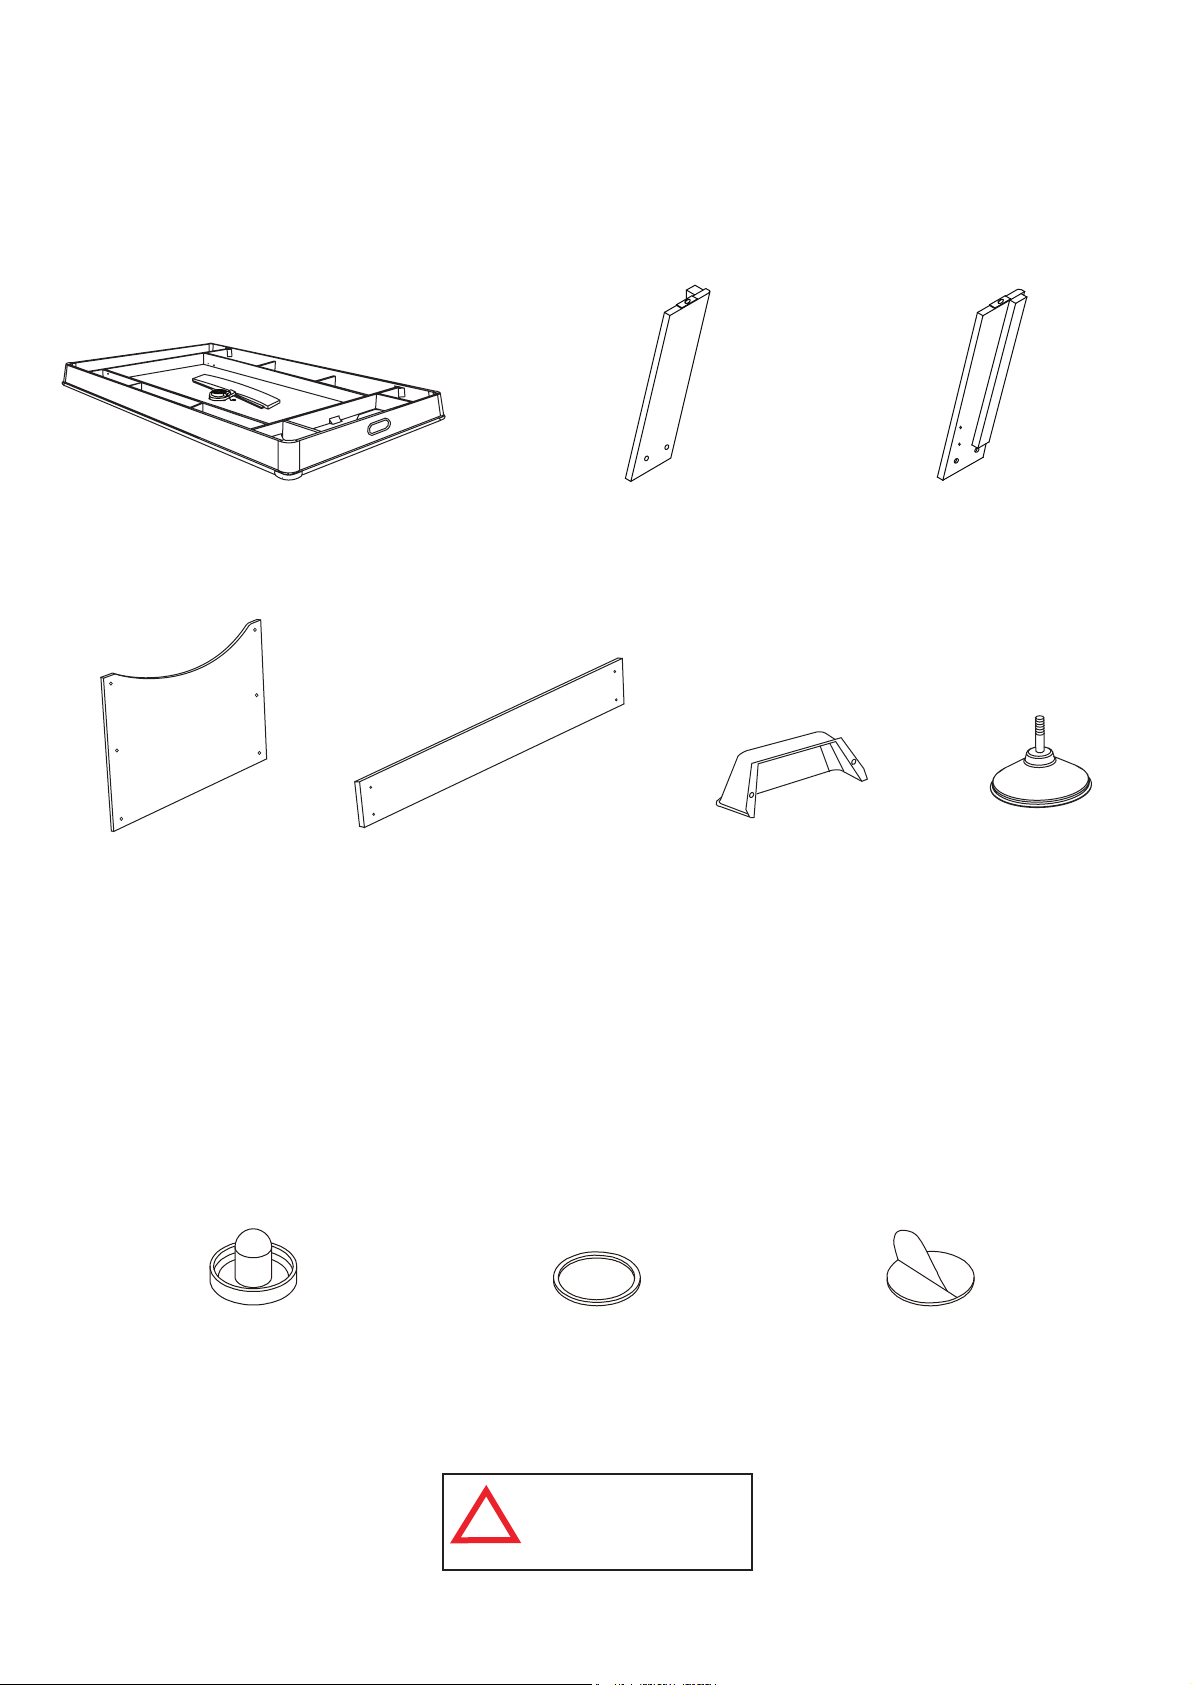
PARTS IDENTIFIER
( Not to Scale)
© 2012 Escalade Sports For Customer Service Call 1-888-996-2729
4
All Rights Reserved.
P1 - Hockey Table Cabinet (1 pc) P2 - Right Leg (2 pcs) P3 - Left Leg (2 pcs)
P4 - End Leg
Panel (2 pcs)
P6 - Puck
Catcher (2 pcs)
P7 - Leg
Leveler (4 pcs)
P5 - Side Leg
Panel (2 pcs)
ACCESSORY IDENTIFIER
(NottoScale)
A1 - Striker (4 pcs) A2 - Puck (4 pcs) A3 - Felt Pad (4 pcs)
NOTE: P4 End Leg Panels
are packed under the table
cabinet and underneath
styrofoam block.
!WARNING:
CHOKING HAZARD
Small parts.
Not for children under 3 yrs.
NOTE: A3 Felt Pads may already
be attached to A1 Strikers.
© 2012 Escalade Sports For Customer Service Call 1-888-996-2729
5
All Rights Reserved.
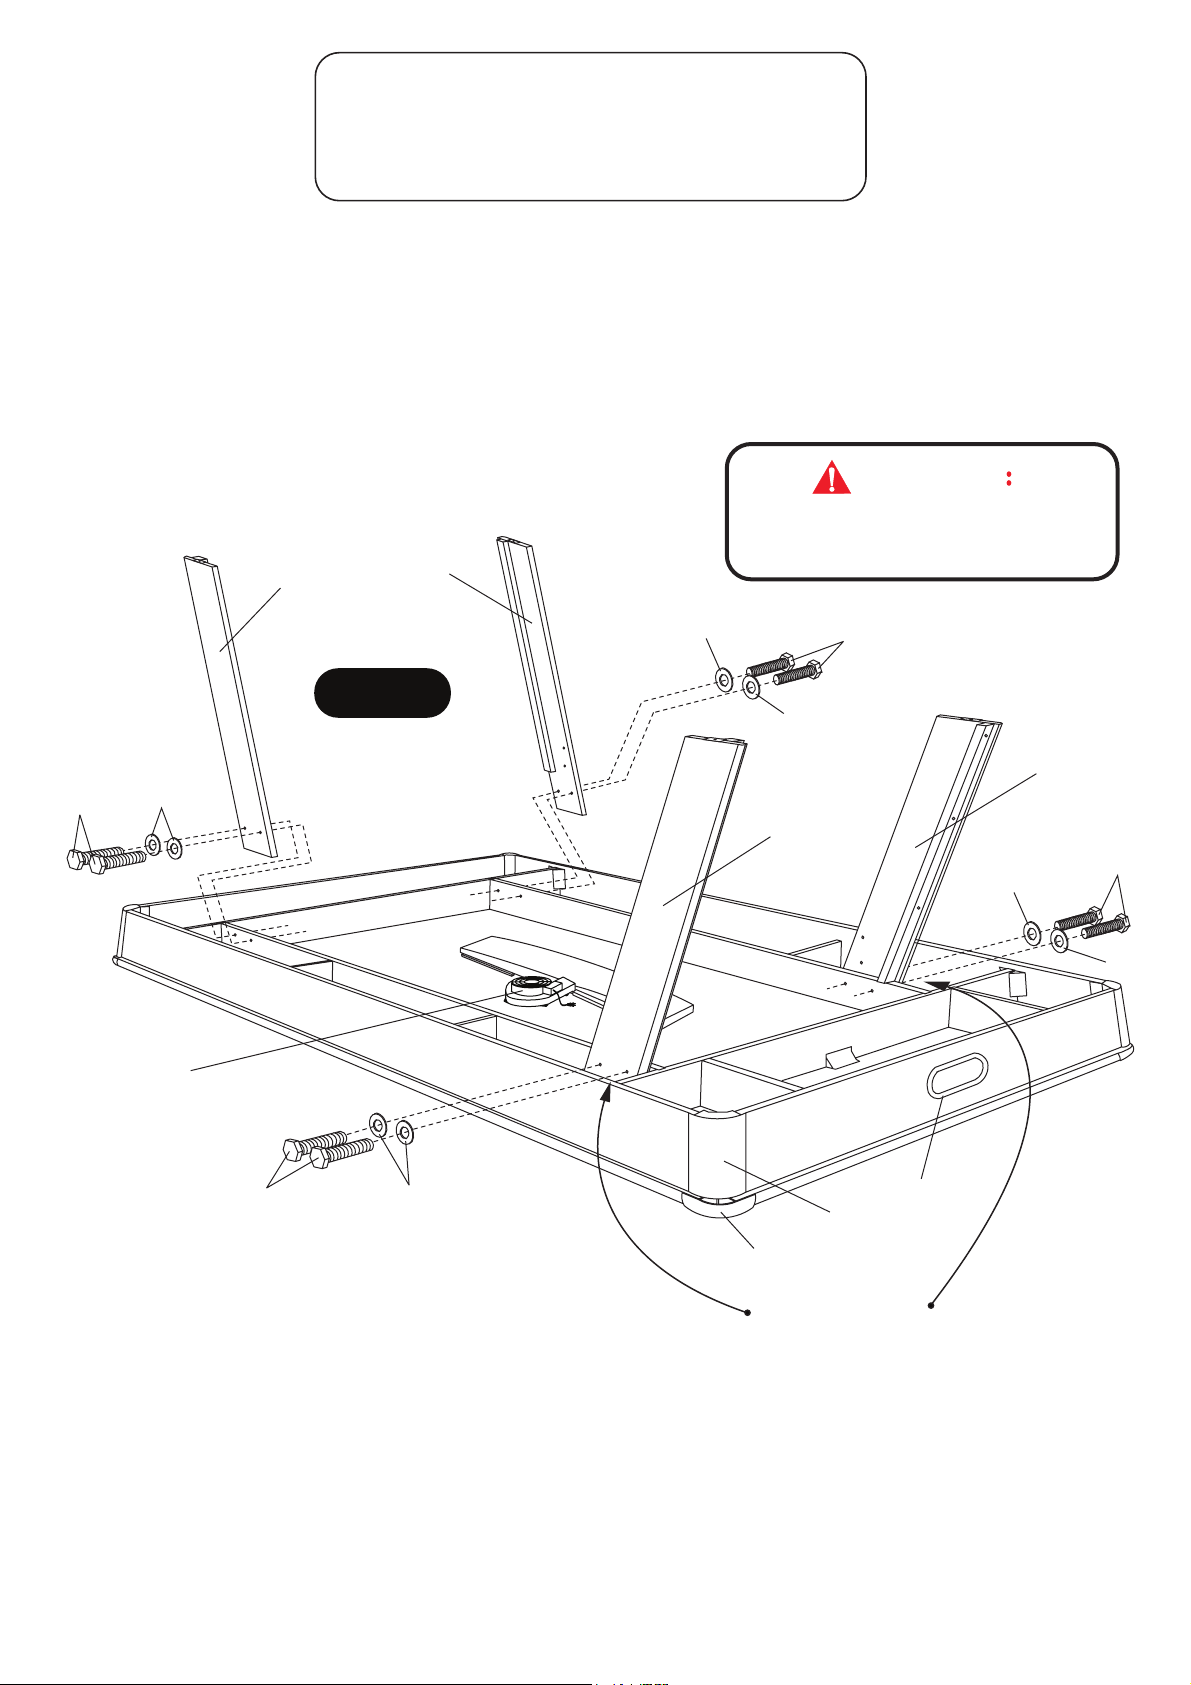
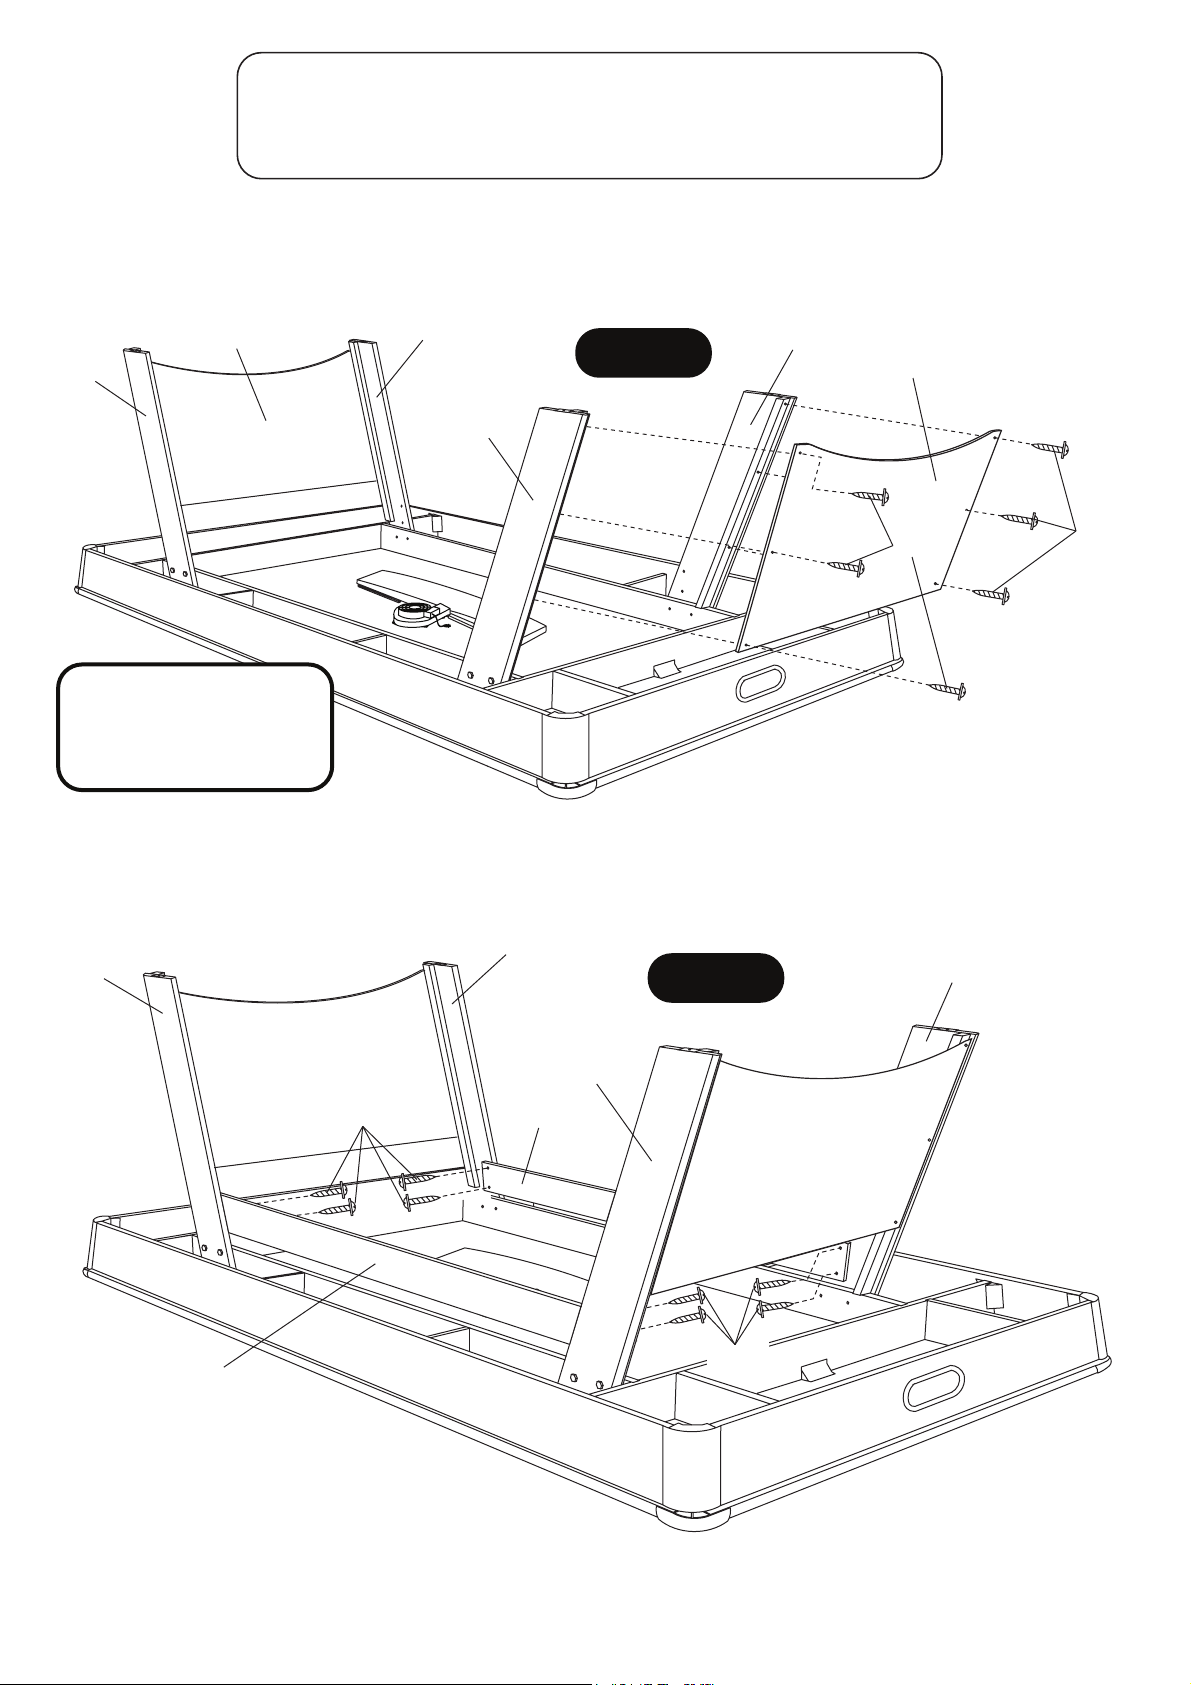
STEP 1:
To assemble this table, leave P1 Hockey Table Cabinet face down in the carton lid.
Attach P2 Right Legs and P3 Left Legs using H1 Hex Bolts with H2 Flat Washers as shown in FIGURE 1.
Use T1 Wrench to tighten all bolts.
IMPORTANT NOTE: Be sure P2-Right Legs and P3-Left Legs are installed OUTSIDE of Support Beams
as shown in FIGURE 1.
PARTS REQUIRED:
8 pcs - H1 Hex Bolt 2 pcs - P2 Right Leg
8 pcs - H2 Flat Washer 2 pcs - P3 Left Leg
1 pc - P1 Hockey Table Cabinet 1 pc - T1 Wrench
FIGURE 1
IMPORTANT NOTE:
BE SURE P2-RIGHT LEGS AND
P3-LEFT LEGS ARE INSTALLED
OUTSIDE OF SUPPORT BEAMS
AS PER DIAGRAM.
CAUTION
PLEASE BE SURE TO ASSEMBLE P2-RIGHT
LEGS AND P3-LEFT LEGS EXACTLY AS PER
DIAGRAM.
H1
H2
H2
H1
H2
H2
P3
P2
P2
P3
H1 H2
H2
H1
C6
C7
C8
C5
© 2012 Escalade Sports For Customer Service Call 1-888-996-2729
6
All Rights Reserved.
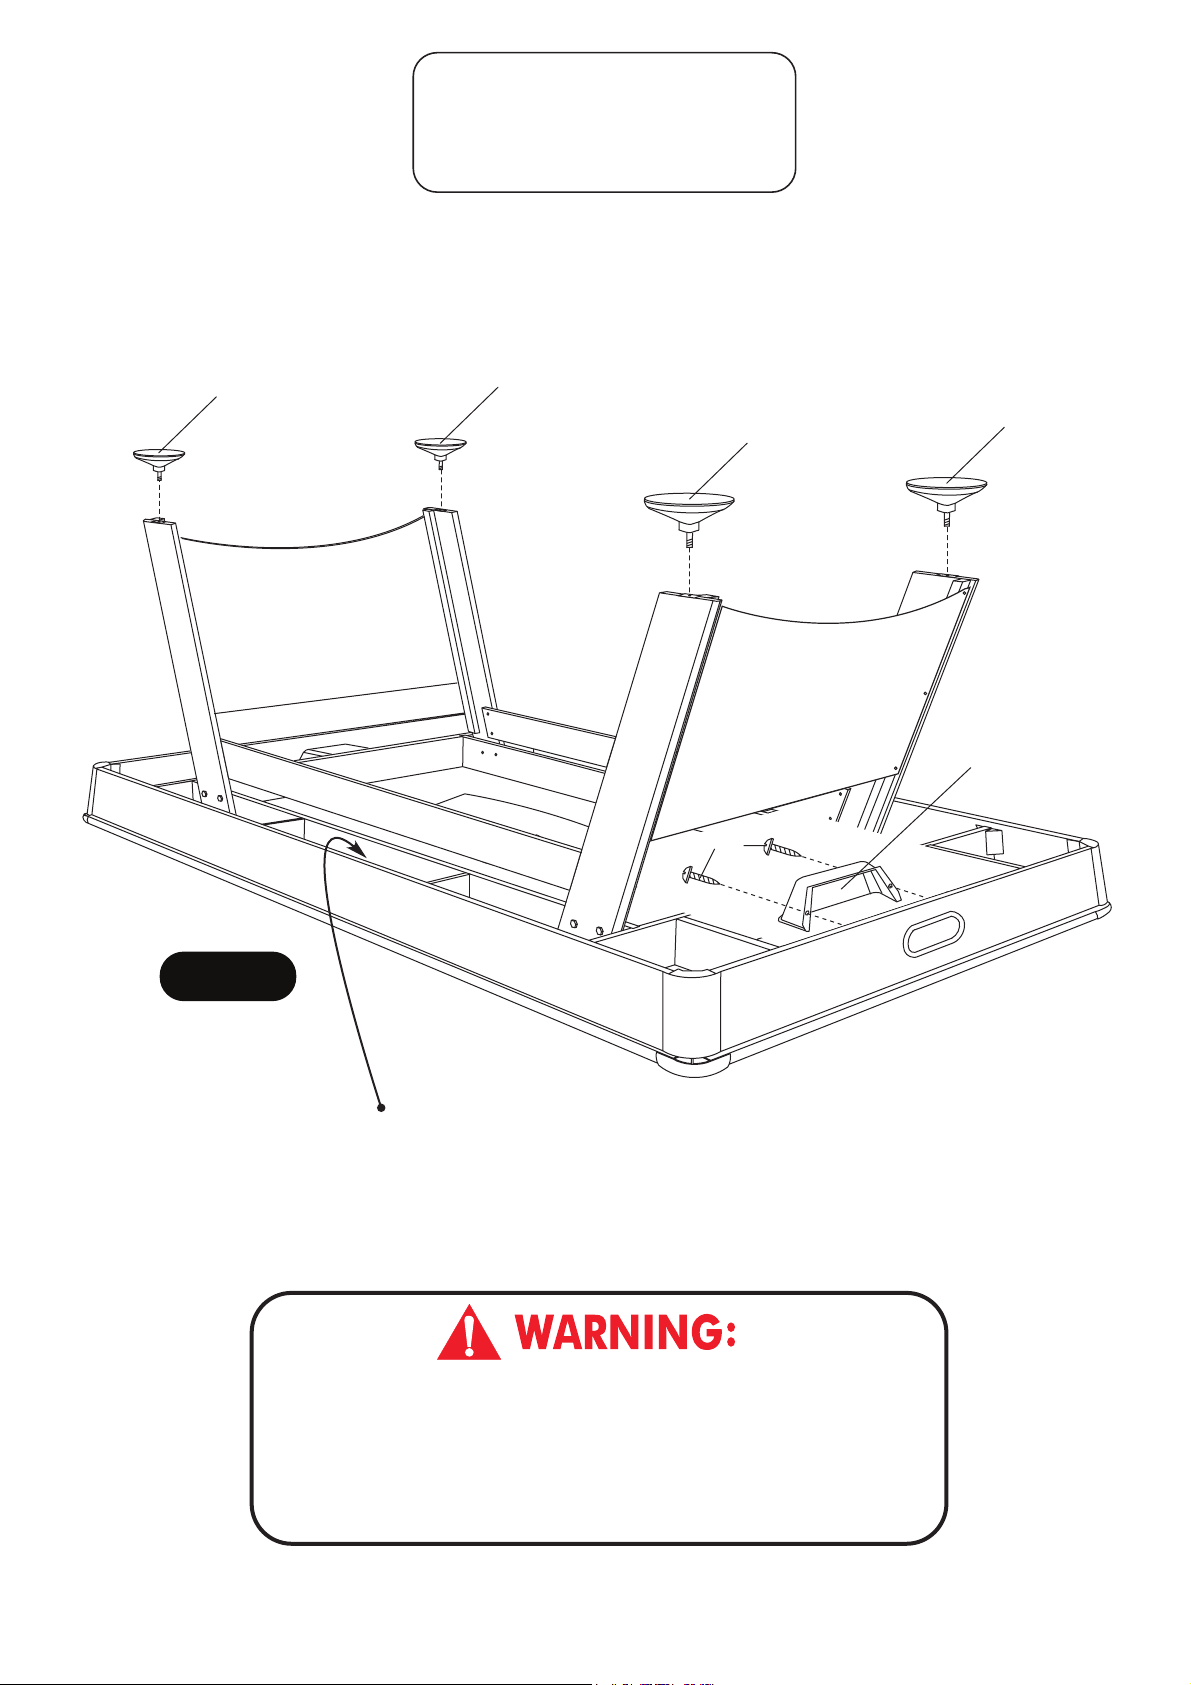
STEP 2:
Attach P4 End Leg Panels between two legs of P2 Right Legs and P3 Left Legs using pre-drilled pilot holes
with H3 Screws as shown in FIGURE 2. Tighten, but do not strip out H3 screws.
PARTS REQUIRED:
12 pcs - H3 Phillips Washer Head Screw 2 pcs - P4 End Leg Panel
8 pcs - H4 Phillips Washer Head Screw 2 pcs - P5 Side Leg Panel
FIGURE 2 P3
P2
STEP 3:
Attach P5 Side Leg Panels between and inside P2 Right Legs and P3 Left Legs using pre-drilled pilot holes
with H4 Screws as shown in FIGURE 3. Tighten, but do not strip out H4 screws.
FIGURE 3 P3
P2
P2
P3
P2
P3
P4
P4
H4 P5
H4
P5
H3
H3
NOTE: P4 End Leg Panels
are packed under the table
cabinet and underneath
styrofoam block.
© 2012 Escalade Sports For Customer Service Call 1-888-996-2729
7
All Rights Reserved.
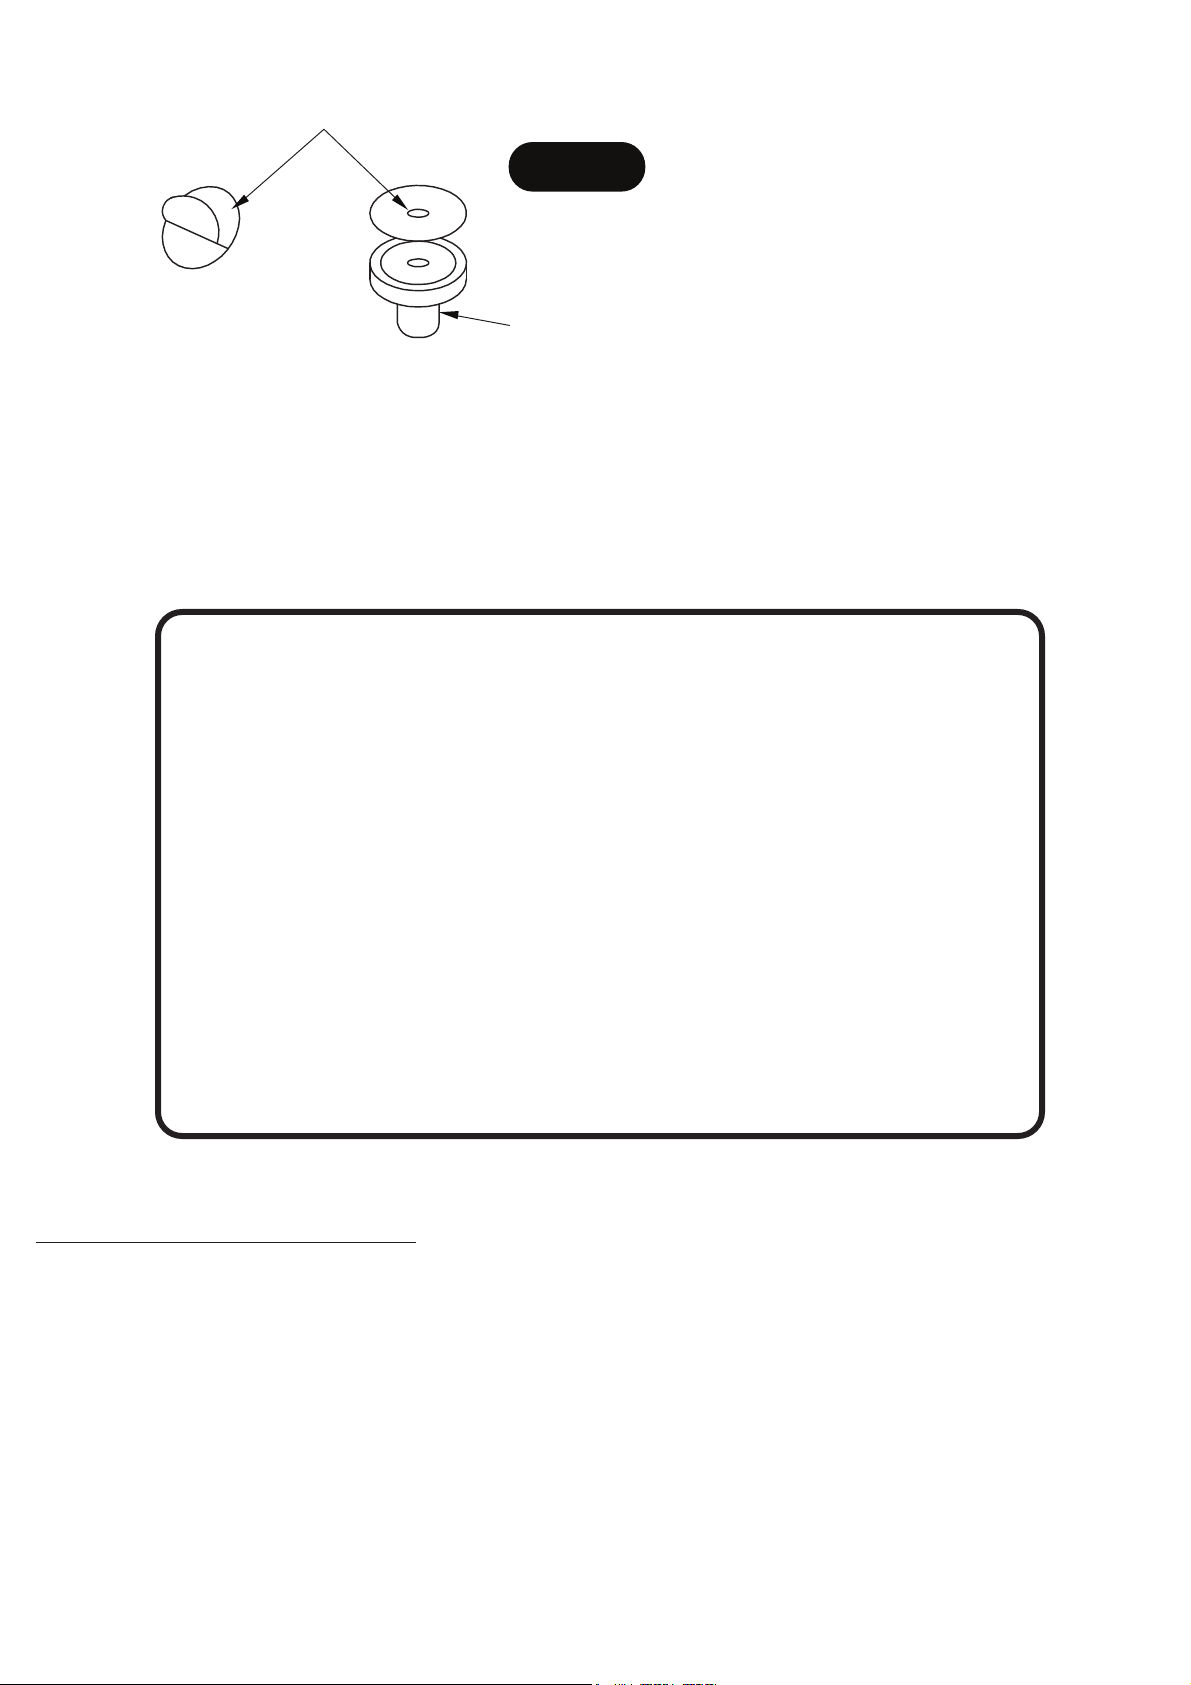
PARTS REQUIRED:
4 pcs - H5 Phillips Round Head Screw
2 pcs - P6 Puck Catcher
4 pcs - P7 Leg Leveler
STEP 4:
Attach P6 Puck Catchers on the inside of end apron using pre-drilled pilot holes with H5 Screws as shown in
FIGURE 4. Tighten, but do not strip out H5 screws.
Thread P7 Leg Levelers into the Leg assembly as shown in FIGURE 4.
FIGURE 4
H5
P6
P7
P7
P7 P7
THIS STEP REQUIRES FOUR OR MORE ADULTS.
VERY CAREFULLY TURN THE TABLE OVER AND SET IT ON
ITS LEGS. BE CAREFUL. THE TABLE IS VERY HEAVY.
DO NOT LIFT OR TURN THE TABLE OVER USING THE
CORNERS AS THIS MAY DAMAGE THEM.
Under the table, remove screw using a small phillips screwdriver and open the battery box. Insert 4(four)
AA batteries (not included) in the order of polarity as shown on the inside cover. Then close using a small
phillips screwdriver.
(If the game will not be used for a long period of the time, we recommend that the batteries be removed)
© 2012 Escalade Sports For Customer Service Call 1-888-996-2729
8
All Rights Reserved.
STEP 5:
Peel the backing off A3 Felt Pad and attach to A1 Striker as shown in FIGURE 5.
FIGURE 5
A3
A1
Congratulations! You have now assembled your Atomic Hockey Table. Please note the
instructions below to ensure many years of trouble free use of your Atomic Hockey Table.
CARE AND USE OF YOUR ATOMIC HOCKEY TABLE
1. Use only a suitable 120v AC household outlet, and insure the cord is not a
trip hazard.
2. Spray furniture polish is recommended to both protect the play field and
increase the puck speed. Apply and wipe off with the air motor on.
3. Use a carpenters level to properly level table using the leg levelers.
4. This product is intended for INDOOR use only.
5. DO NOT operate the motor if the cord is damaged in any way.
6. DO NOT sit, climb or lean on the table.
7. DO NOT drag the table when moving it. This will damage the legs.
8. DO NOT lift and move the table using the CORNERS as this may
damage them.
9. DO NOT set drinks on the table.
10. It is suggested that this table be placed close to a wall thus allowing the
air motor cord to NOT be a trip hazard. Always turn air motor off when
table is not in use.
HOCKEY GAME RULES:
1. This game is designed to be played with two (2) players, one at each end, or with four (4) players, two at each
end of the game table.
2. Flip a coin to determine who will begin play, or a face-off can be held at the center of the table.
3. Play begins when the puck is placed on the playing surface. Players must hit the puck with the strikers and
attempt to shoot into the opponent’s goal.
4. One point is awarded when a puck is shot into the opponent’s goal.
5. Winning the game: the winning score is accomplished by being the first player to reach a predetermined score
or by being the player to score the most points within a given period of time.
NOTE: A3 Felt Pads may
already be attached to
A1 Strikers.
© 2012 Escalade Sports For Customer Service Call 1-888-996-2729
9
All Rights Reserved.
4
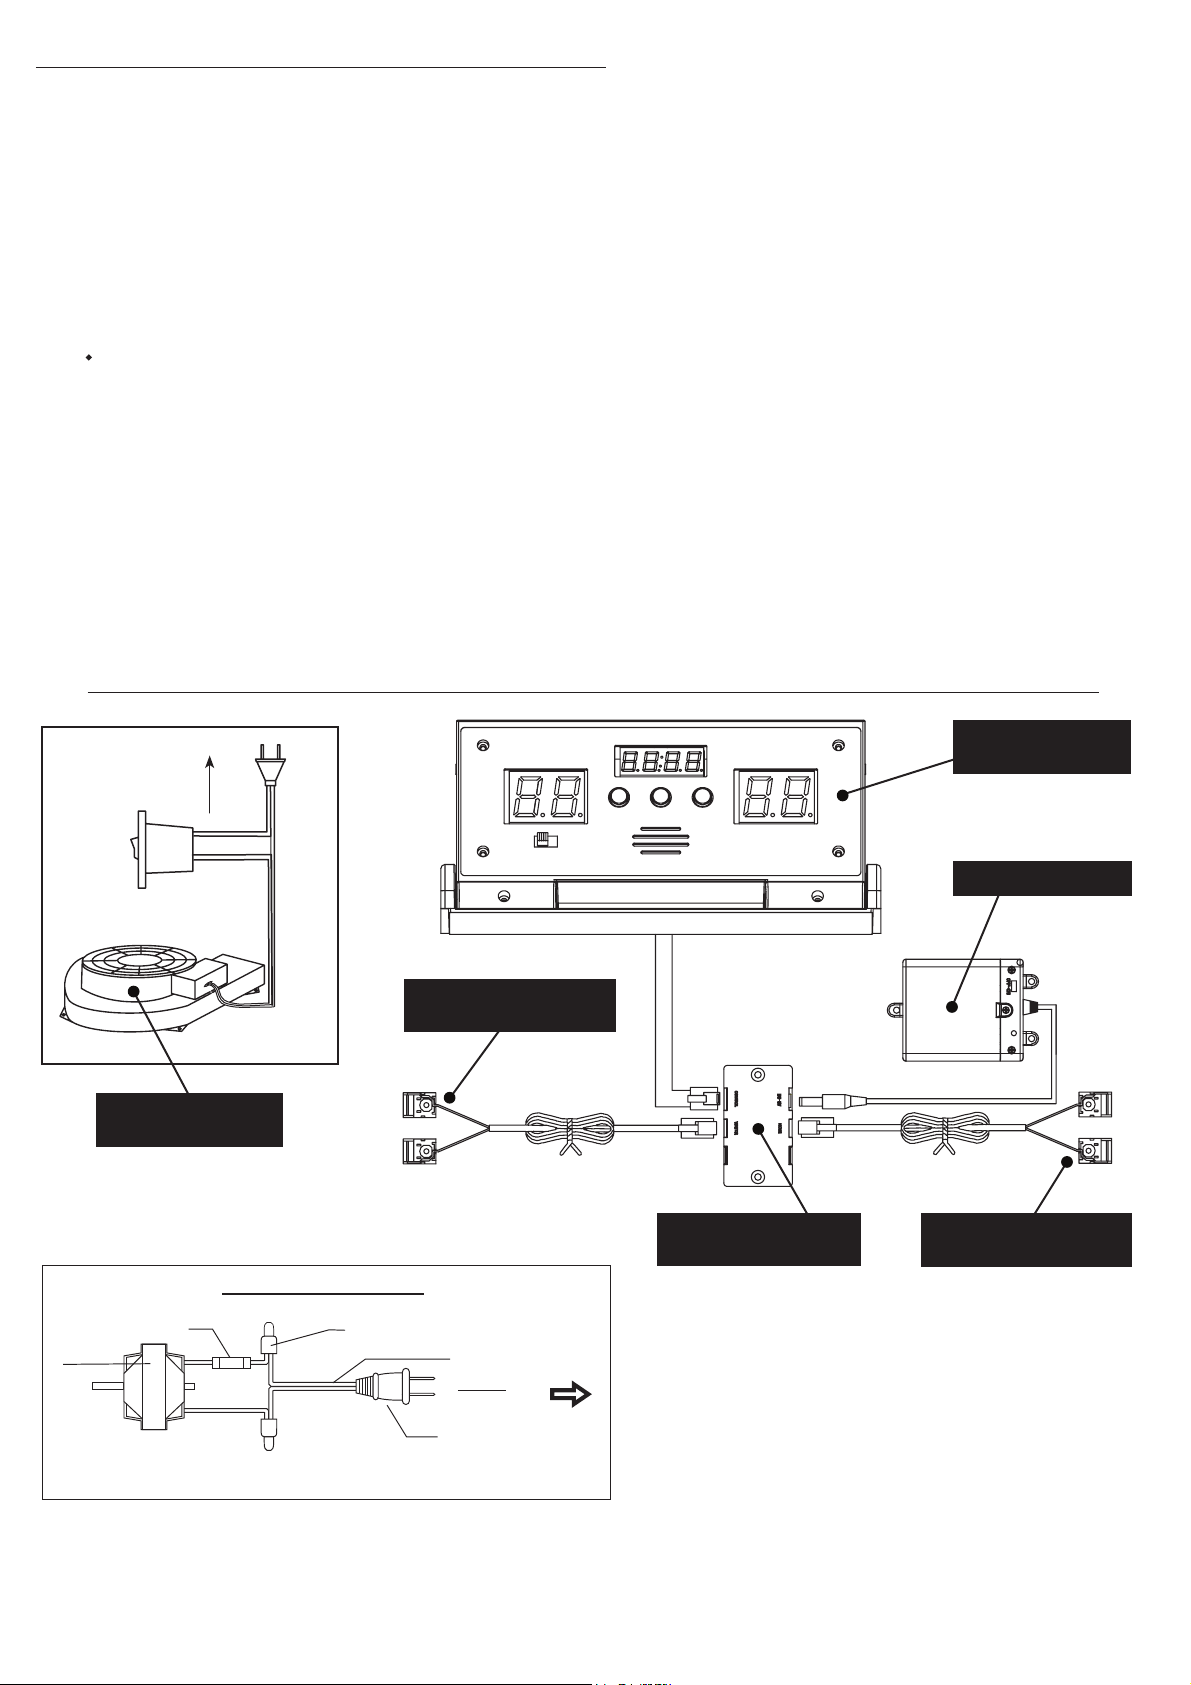
ELECTRICAL CONNECTIONS & SPARE PARTS DRAWINGS
ELECTRONIC SCORER OPERATION:
1. Under the table, remove screw using a small phillips screwdriver and open the battery box. Insert 4(four) pcs AA
batteries (not included) in the order of polarity as shown on the inside cover. Then close using a small phillips
screwdriver.
(If the game will not be used for a long period of the time, we recommend that the batteries be removed).
2. Turn on the scorer using the on/off switch located on the scoring display. You will hear music and the Home
and Visitor screens will show “00”.
3. There is one pre-set period of 15 minutes which can be adjusted to 10 minutes, 5 minutes, or “No Time Limit”
mode by pressing the “MINUTES” button.
4. Press the “START/RESET” button to start the game.
5. During Play - When “START/RESET” button is pushed, the following will occur:
Home and Visitor Score will reset to “00” and time will reset to it’s original setting.
6. “Sound ON/OFF” - Press this button while the game is on to turn the sound OFF and ON.
7. Once Home or Visitor reaches “99” points, Home or Visitor display will stop the scorer and keep flashing.
Please reset it by pressing the “START/RESET” button.
To Wall Outlet
NOTE: If no score has been made for 15 minutes, the scoreboard will automatically turn off. You can turn it on
again by pressing the “START/RESET” button. However, we suggest turning the power off when the game will
not be used for an extended period of time.
C3 - LED Scorer
& Timer Display
C2 - Battery Box
C1 - Main Electronic
Unit
C4 - Scoring Sensors
with Wire
THERMAL
PROTECTOR
SCHEMATIC DIAGRAM
CONNECTOR
SPT-2 POWER CORD
MOTOR
POLARIZED PLUG
AC 120V
ELECTRIC RATING : AC 120 V, 60 HZ, 0.31A
C5 - Blower Motor
with ON/OFF
C4 - Scoring Sensors
with Wire
ON/
OFF

© 2012 Escalade Sports For Customer Service Call 1-888-996-2729
10
All Rights Reserved.
Description Qty.
H1
H2
H3
H4
H5
T1
P1
P2
P3
P4
P5
P6
P7
A1
A2
A3
C1
C2
C3
C4
C5
C6
C7
C8
K1
M1
Key # Part #
PRODUCT PARTS LIST FOR MODEL # G03510W
03510WJH1
03510WJH2
03510WJH3
03510WJH4
03510WJH5
03510WJT1
03510WJP1
03510WJP2
03510WJP3
03510WJP4
03510WJP5
03510WJP6
03510WJP7
03510WJA1
03510WJA2
03510WJA3
03510WJC1
03510WJC2
03510WJC3
03510WJC4
03510WJC5
03510WJC6
03510WJC7
03510WJC8
03510WJK1
03510WJM1
8mm x 38mm Hex Bolt
8mm x 19mm Flat Washer
3.5mm x 28mm Phillips Washer Head Screw
4mm x 25mm Phillips Washer Head Screw
4mm x 12mm Phillips Round Head Screw
Wrench
Hockey Table Cabinet ( no blower motor )
Right Leg
Left Leg
End Leg Panel
Side Leg Panel
Puck Catcher
Leg Leveler
Striker
Puck
Felt Pad
Main Electronic Unit
Battery Box
LED Scorer and Timer Display
Scoring Sensors with Wire
Blower Motor with ON/OFF Switch
Plastic Corner Cap
Plastic Corner Post
Puck Return Tray
Hardware Kit
Owner’s Manual
8
8
12
8
4
1
1
2
2
2
2
2
4
4
4
4
1
1
1
2
1
4
4
2
1
1
Indice
Lingue:
Altri manuali Atomic Accessori per videogiochi

Manuali Accessori per videogiochi popolari di altre marche


Sega
Sega Visual Memory Unit Manuale utente

Datel
Datel Go-tcha Expedition Manuale utente

TruGolf
TruGolf TruFlight 2 Manuale utente

CH Products
CH Products CH PRO THROTTLE Manuale utente

Thrustmaster
Thrustmaster T2PA Manuale utente

Cube Controls
Cube Controls Mercedes-AMG - GT Edition SIM Wheel Manuale utente


