Audio Authority Cat 5 HDMI Extender HDP-11 Manuale utente
User Manual
Model HDP-11
Cat 5 HDMI Extender
1381T and 1381R
2
3
WARNINGS
• Read these instructions before installing or using this product.
• To reduce the risk of fire or electric shock, do not expose this unit to rain or mois-
ture.
• This product must be installed by qualified personnel.
• Do not open the cover—there are no user-serviceable parts inside.
• Do not expose this unit to excessive heat.
• Install only in dry, indoor locations.
• Clean the unit only with a dry or slightly dampened soft cloth.
LIABILITY STATEMENT
Every effort has been made to ensure that this product is free of defects. Audio
Authority cannot be held liable for the use of this hardware or any direct or indirect
consequential damages arising from its use. It is the responsibility of the user of the
hardware to check that it is suitable for his/her requirements and that it is installed
correctly. All rights are reserved. No parts of this manual may be reproduced or
transmitted by any form or means electronic or mechanical, including photocopying,
recording or by any information storage or retrieval system without the written
consent of the publisher.
Audio Authority reserves the right to revise any of its hardware and software
following its policy to modify and/or improve its products where necessary or
desirable.
Audio Authority and the Double-A Symbol are registered trademarks of Audio
Authority Corp. Copyright June, 2007. All third party trademarks and copyrights are
recognized.
User Manual
Model HDP-11
Cat 5 HDMI Extender

2
3
Table Of Contents
1.0 Introduction . . . . . . . . . . . . . . . . . . . . . . . 4
2.0 Checking Package Contents . . . . . . . . . . . . . . . 4
3.0 Installation . . . . . . . . . . . . . . . . . . . . . . . . 5
4.0 Operating the Units . . . . . . . . . . . . . . . . . . . 8
5.0 Troubleshooting . . . . . . . . . . . . . . . . . . . . . 9
6.0 Specications . . . . . . . . . . . . . . . . . . . . . 10
7.0 Limited Warranty . . . . . . . . . . . . . . . . . . . 11
8.0 Regulatory Compliance . . . . . . . . . . . . . . . . 12
9.0 Contact Information . . . . . . . . . . . . . . . . . . 12

4
5
1.0 INTRODUCTION
Thank you for purchasing this Cat 5 HDMI extender system from Audio
Authority. The HDP-11 transmits HDMI signals over Cat 5e/6 cables
to achieve distances many times those possible using an HDMI cable.
The HDP-11 can achieve distances of 450 feet (150m) with 1080p and
embedded 2-channel audio.
The HDP-11 employs a combination of digital and analog transmission
methods over two Cat 5 cables (Cat 5, Cat 5e or Cat 6 Unshielded
Twisted Pair (UTP) cables may be used). Cat 5 cable A carries the
digital video and audio signals, and cable B caries the HDCP and
DDC channels. When transmitting video signals that are not protected
by HDCP, it is possible that only cable A may be required. Call Audio
Authority technical support for details.
Audio Authority offers an extensive line of audio and video switchers,
converters, and distribution amps available for purchase online at
www.audioauthority.com or through authorized dealers.
1.1 SYSTEM FEATURES
• Resolutions to 1080p @ 60Hz,1920x1200
• Normal operation requires two Cat 5, 5e or Cat 6 cables
• Maximum distance 450 feet (150 meters)
• HDMI digital audio embedded (2-channel PCM)
• Compliant with HDMI 1.2, HDCP 1.1 and DVI 1.0 specifications
• Single cable operation is sometimes possible, depending on source
• Compatible with HDMI and DVI-D signals
• Gain and EQ controls on 1381R Receiver optimize digital and analog
signals for long distances
• Locking power connector ensures system stability
4
5
2.0 CHECKING PACKAGE CONTENTS
Before connecting the HDP-11, please make certain the following
items are in the shipping carton. (If you purchased the 1381T or 1381R
separately, ignore irrelevant items.)
• 1381T Transmitter
• 1381R Receiver
• 5V DC Power Adapter
• User Manual
3.0 INSTALLATION
Before connecting the HDP-11 Cat 5 extender system, verify that the
display device on the receiving end can support the output resolution and
signal format by connecting it directly to the source device via a short,
known good, HDMI cable.
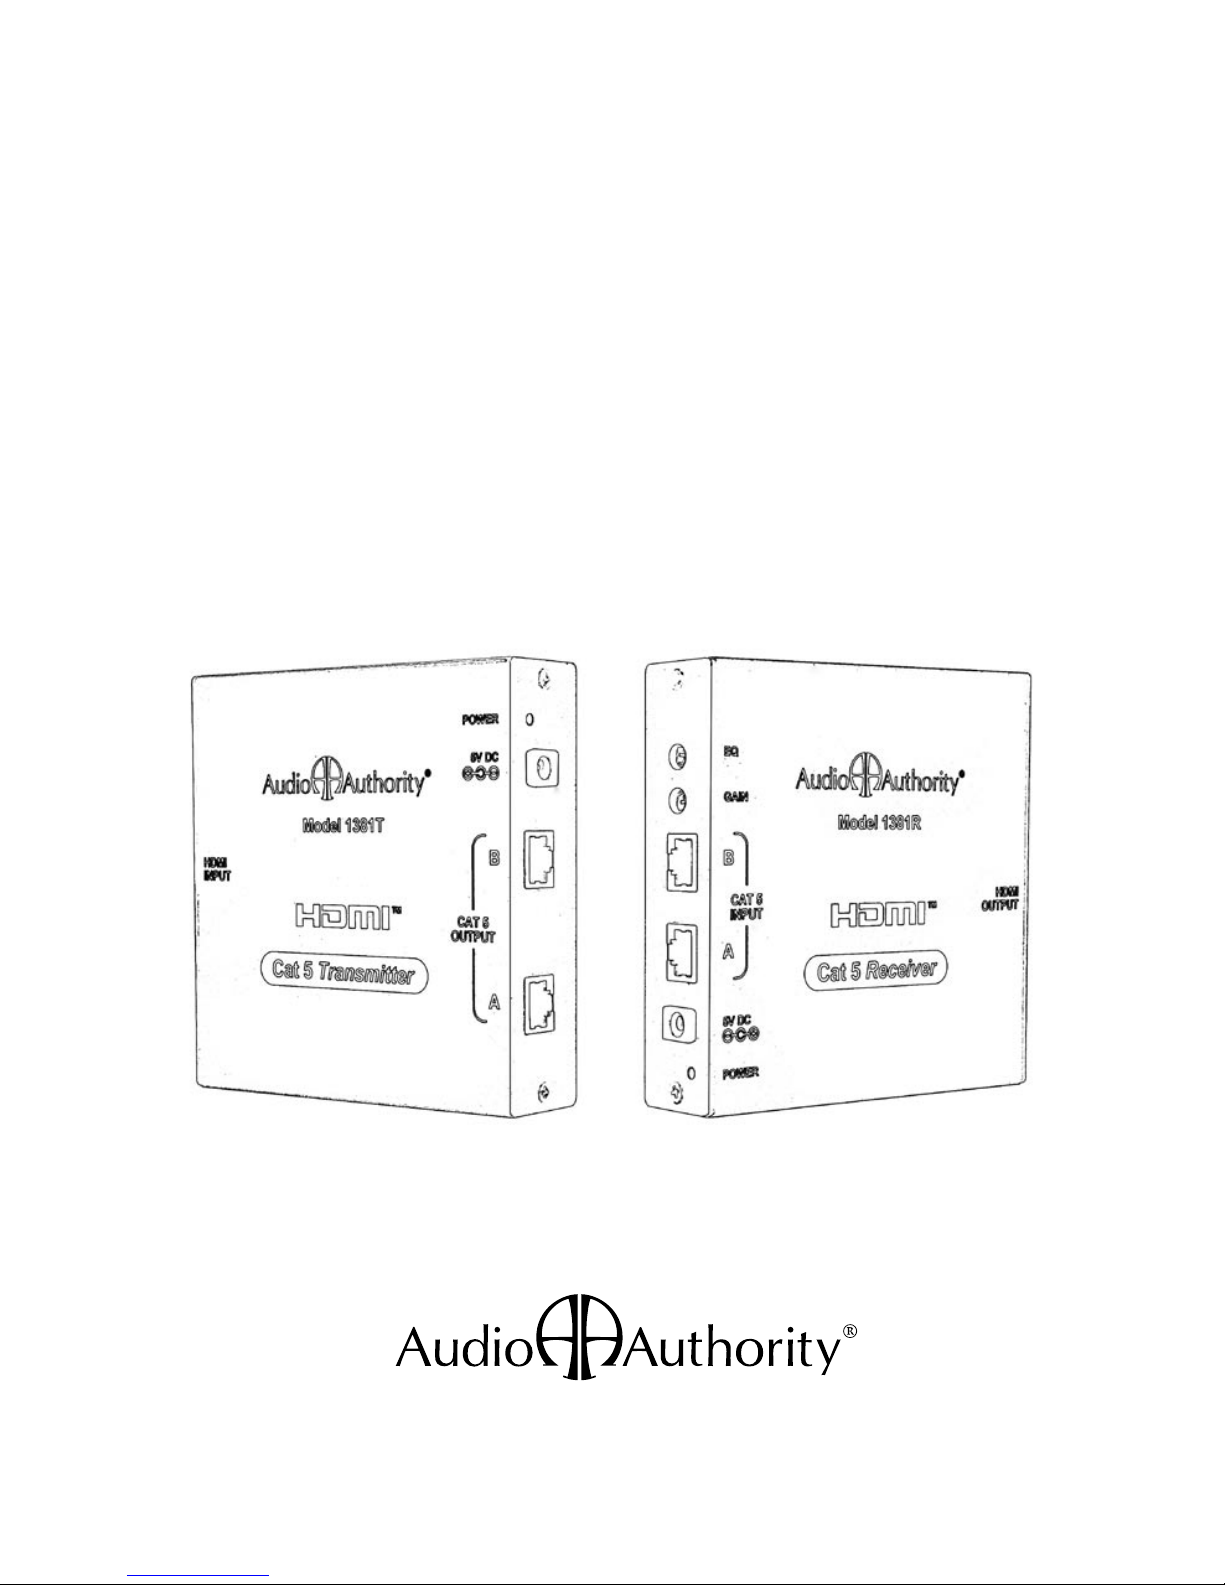
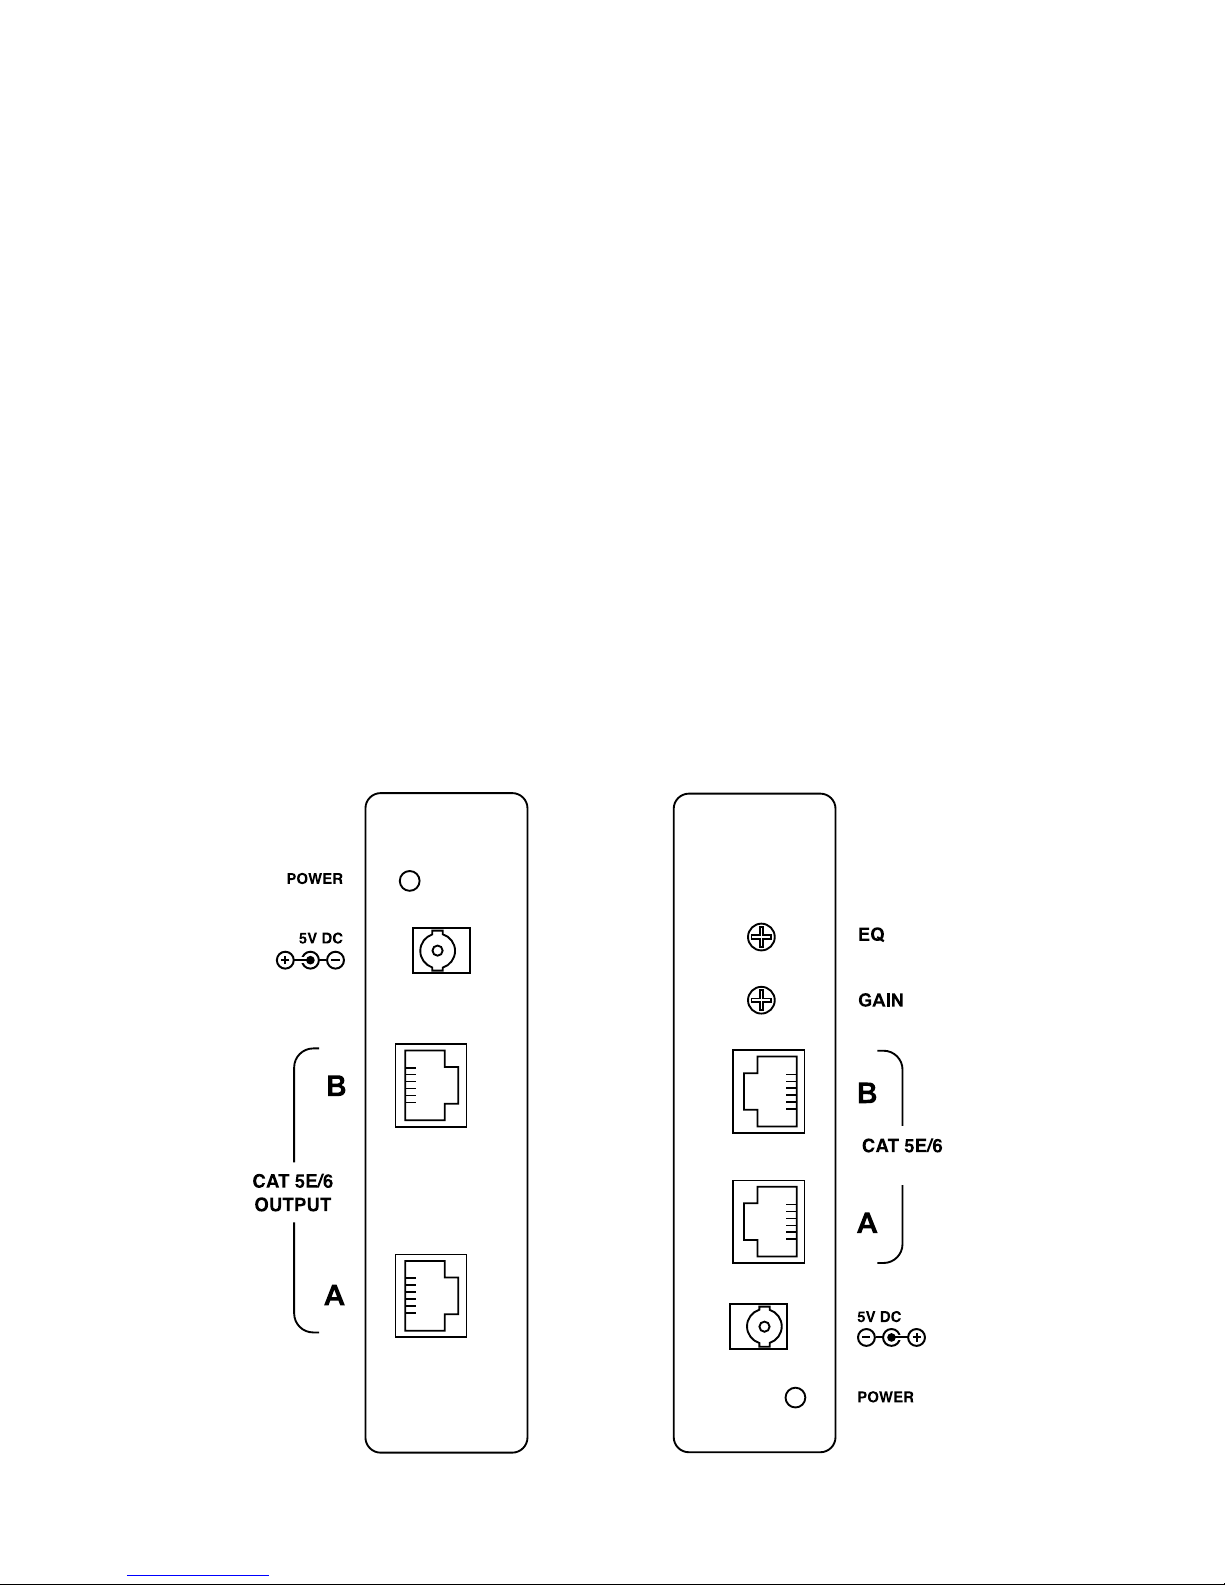
The panel drawings below show the Cat 5 signal output/input
connections, power connections and adjustable controls. (The HDMI
input and output jacks on opposite end of each unit are not shown.)
Note: Please retain the original packing material
in case you need to return the unit. If you find
any items are missing, contact Audio Authority
immediately. Have the model number and invoice
available for reference when you call.
Transmitter Model 1381T Receiver Model 1381R
INPUT
6
7
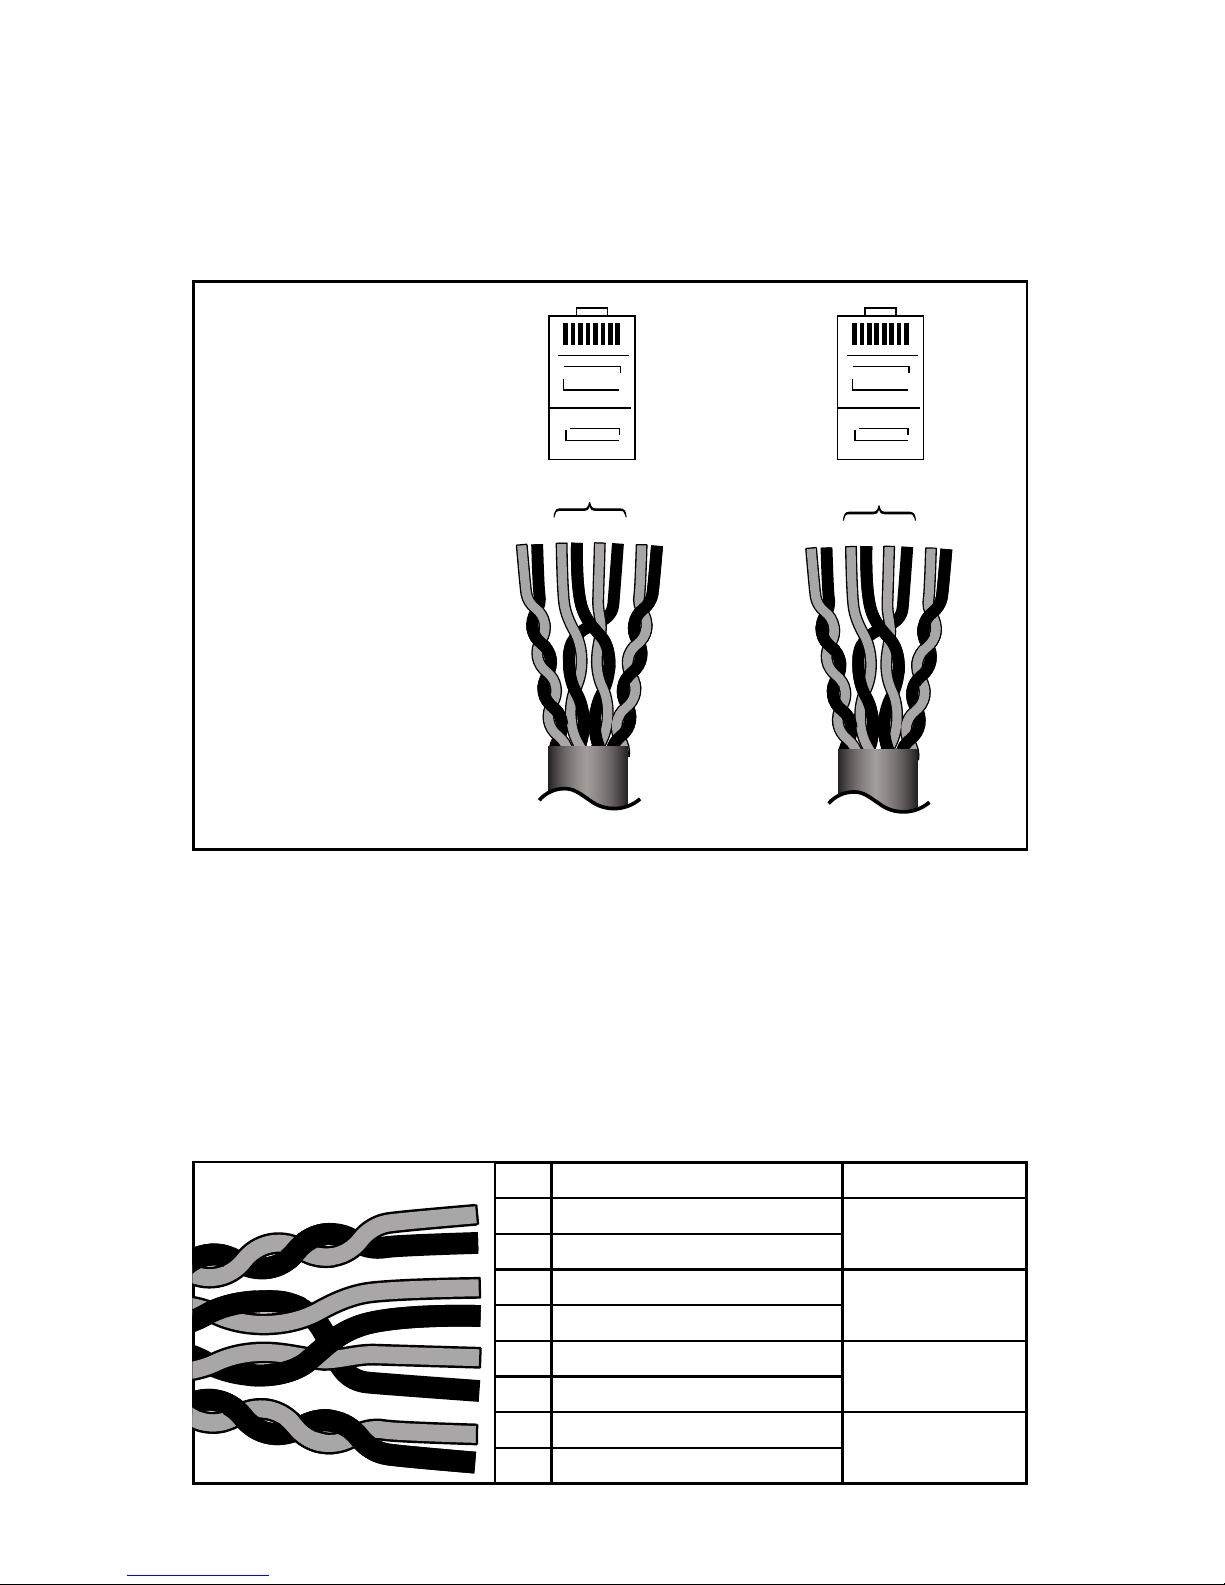
PIN WIRE COLOR TWIST DENSITY
1HIGH
2
3LOW
4
5LOW
6
7HIGH
8
12 34 56 78
12 34 56 78
3.1 TERMINATING CAT 5E/6 CABLES
Use standard EIA-568A or B pairing, assigning low twist density pairs
to the four center pins, and high density pairs to outside pins. Correct
pairing is vital, and should always be checked with a network cable
tester. The correct pairing is straight through, pin-to-pin, as shown.
Cat 5e/6 cable pairs have different twist densities (twist pitches). There
are two pairs with high density twist and two pairs with low density. Pairs
1-2 and 7-8 should be assigned to high density twists. Failure to assign
correct twist densities can result in image jitter. Twist densities can be
seen by stripping off about four inches of insulation.
Colors vary by manufacturer, so once you identify the high density twist
pairs, use the chart below to assign the colors to the correct RJ-45 pins.
RJ45
RJ45
EIA-568B
RJ-45 Pin Assignments:
1381T END 1381R END (IDENTICAL)
LOW
DENSITY
Pins 1-2 and 7-8
should be assigned to
high density twists.
Pins 3-6 should
be assigned to
low density twists.
12 34 56 78
LOW
DENSITY
TWIST DENSITY
AND WIRE PAIRING RJ-45
CONNECTORS
PINS FACING UP,
LATCH DOWN
PAIRING CHART

6
7
3.2 CONNECTING THE HARDWARE
1. Connect the HDMI source device’s output to the HDMI INPUT
connector of the 1381T Transmitter, using a short, high quality, HDMI
cable.
2. Connect a correctly terminated and tested Cat 5 cable to the Cat 5
Output A connector of the Transmitter. Connect a second Cat 5 cable
to the Cat 5 Output B. Mark the cables at both ends so that you do
not inadvertently swap them. Do not connect the AC adapter until the
Cat 5 cables are correctly connected to both the transmitter and the
receiver.
Again, always test the HDMI source on the intended display with a
known good HDMI cable before using the HDP-11. This precaution
insures that the source can be (and is) set to a resolution that is
compatible with the display, and that both are functioning correctly
together.
3. At the remote location, connect the appropriate Cat 5 cables to the Cat
5 Input A and B connectors of the 1381R Receiver. Be careful not to
interchange the A and B cables. Cable A must be connected to both
the transmitter and the receiver and Cable B must be connected to the
B inputs on both devices in most cases, depending on the source.
4. Connect the HDMI OUTPUT of the 1381R to the HDMI input of the
video display or other device, using the appropriate cable.
5. Connect the supplied AC adapters first to the 1381T and 1381R and
then to the AC outlets.
6. Turn on the source device and video display. The source video signal
should appear on the display. If not, consult the Troubleshooting Guide
in this manual.

8
9
4.0 OPERATING THE UNITS
The Gain and Equalization controls on the 1381R Receiver should be
adjusted to optimize the video signal for the Cat 5 cable length. Low
Gain and Equalization settings are usually best for shorter cable runs
but receivers located at the end of cable runs near the limit of specified
range may benefit from higher Equalization and/or Gain adjustments.
It is best to make adjustments after permanent source and video
display equipment is installed. EQ and Gain settings are retained by the
Receiver even when power is removed.
4.1 ADJUSTING EQUALIZATION
Locate the EQ (Equalization) and GAIN adjustments on the side of the
1381R Receiver. The EQ control is at the top of the left side, and the
Gain Control is just below it.
Symptoms: On long cable runs, the high frequency detail can be
compromized, which appears as a “soft” or “smeared” picture. The effect
is most evident in text and other hard, high contrast edges.
Adjust the EQ to sharpen the image. While viewing an image on a
display connected to the 1381R Receiver, insert a small screwdriver into
the EQ adjustment on the side panel of the 1381R. Turn the screwdriver
gently until the image is optimal.
4.2 ADJUSTING GAIN
If the image is too dark or too bright, insert the screwdriver into the Gain
adjustment and rotate until the brightness of the image is optimal. When
using long Cat 5 cables, you may notice an increase in video noise
(sometimes called “snow”) in the picture at higher gain settings.

8
9
5.0 TROUBLESHOOTING
• Poor image quality: see the previous section, Operating the Units.
• No surround sound (multi-channel audio): this system does not accept
multi-channel digital audio; adjust the source to output 2-channel PCM
digital audio.
• No picture: perform the verifications below.
• Check the HDMI cables at all four connections to see if any of the
connectors have become loose.
• Make certain the 1381T and 1381R are connected to live AC outlets
and check the power indicators on both units.
• Use a network cable tester to make certain your Cat 5/5e/6 cable is
terminated correctly and the RJ-45 connectors are securely attached
to the cable at both ends. Check for cable defects or damage.
• Connect the display device directly to the source with the 1381T HDMI
connection cable, then test with the 1381R connection cable. If an
image is present under those circumstances the display, the source,
and the HDMI cables can be eliminated as the cause of the problem.
• If the above circumstances do not produce a picture, try a short,
known good HDMI cable, and make sure the source is set up to output
a resolution that the display can accept.
If you encounter difficulty, contact the Audio Authority Technical Service
department via email: support@audioauthority.com, or call 800-322-8346
or 859-233-4599.

10
11
6.0 SPECIFICATIONS
Digital Audio/Video I/O
1381T Transmitter – HDMI In 1x via HDMI connector
1381R Receiver – HDMI Out 1x via HDMI connector
Cat 5e/6 Connections I/O
1381T Transmitter – Cat 5e/6 output 2x via RJ-45 (A & B)
1381R Receiver – Cat 5e/6 input 2x via RJ-45 (A & B)
Cat 5e/6 Structure
Cat 5 Connector A HDMI video/audio signal
Cat 5 connector B HDCP/DDC control signal
Video Performance
Maximum resolution Up to 1920x1200, 1080p/60Hz
TMDS clock speed 1.65MHz
Data bit rate 1.65Gbps
Maximum range 450 feet (150m)
Audio Performance
PCM Digital Audio 2-channel audio
Environmental
Operating Temperature 0° to +50° C (+32° to +122° F)
Operating Humidity 10% to 90%, Non-condensing
Storage Temperature -10° to +70° C (12° to +158° F)
Storage Humidity 10% to 90%, Non-condensing
Regulatory Approvals
Transmitter and Receiver FCC, CE, RoHS
Power Supply UL, CUL, CE, PSE, GS, RoHS
Cable Requirements
Cat 5, Cat 5e or Cat 6 Network Grade, Premium
Mechanical
Dimensions: H-W-D inches (mm) 1.18 x 4.84 x 4.92 (30x123x125)
Weight 1381T 1.54 lbs (700g)
1381R 1.54 lbs (700g)
Accessories Included
Power Adapter 5 VDC@2A, Locking DC
User Manual
Warranty
Limited Warranty 1 Year Parts and Labor
Questo manuale è adatto per i seguenti modelli
2
Indice
Altri manuali Audio Authority Estensione

Audio Authority
Audio Authority 1170 Manuale del proprietario

Audio Authority
Audio Authority Cat 5 HDMI Extender System EDP-11 Manuale utente

Audio Authority
Audio Authority SCP-11 Manuale utente

Audio Authority
Audio Authority HCX-11 Manuale utente

Audio Authority
Audio Authority 1391 Manuale utente

Audio Authority
Audio Authority HCX-11 Manuale utente


