
Audion Elektro VMS 43 Manuale utente

AUDION ELEKTRO®
Audionvac Digital
VMS 43-53-93-113-133-133L
VMS 43 t-m 133L ENG Rev14
MANUAL

2
All rights reserved. Nothing from this edition is allowed to e copied and/or made pu lic y means of print, photo copy or any other way
without previous written permission of AUDION ELEKTRO.
AUDION ELEKTRO reserves the right to change spare parts and/or specifications without previous notice. Contents of this manual can
also e changed without previous warning.
AUDION ELEKTRO cannot e hold responsi le for eventual damage caused y specifications deviating from the standard model.
Although extreme care has een exercised during writing this manual, AUDION ELEKTRO will not accept any lia ility for eventual errors
in this manual and/or for the consequences of (mis)interpretation of the contents.
AUDION ELEKTRO is not responsi le for damage or pro lems which result from the use of other than the original spare parts.
If this manual has not een supplied with instructions for certain repairs, adjustments and maintenance, you should contact your dealer of
AUDION ELEKTRO.

3
Contents
1 Precautions .................................................................................................................................. 5
1.1 Explanation of the clip arts ............................................................................................... 5
1.2 Prohibitions ......................................................................................................................... 6
2 Installation .................................................................................................................................... 7
2.1 Description of the workplace ........................................................................................... 7
2.2 Checking the oil level ........................................................................................................ 7
2.3 Taking into use .................................................................................................................. 8
3 Progra ing ................................................................................................................................ 9
3.1 Description of the progra cycle for digital ti e control ........................................... 10
3.2 Set / change function values ......................................................................................... 11
4 Maintenance ............................................................................................................................... 12
4.1 Regular aintenance ...................................................................................................... 13
4.2 Maintenance of the seal bar .......................................................................................... 14
4.2.1 Re oving the seal bar ............................................................................................ 14
4.2.2 Replacing the PTFE ................................................................................................ 14
4.2.3 Replacing the seal wire .......................................................................................... 14
4.3 Maintenance of the vacuu pu p ............................................................................... 15
4.4 Silicone rubber of the pressing bar ............................................................................... 15
4.5 Lid rubber .......................................................................................................................... 15
5 Proble solving ......................................................................................................................... 16
6 To discard the AUDIONVAC ................................................................................................... 17
7 Conditions of guarantee ........................................................................................................... 17
7.1 Liability .............................................................................................................................. 17
7.2 Guarantee ......................................................................................................................... 17
8 Reco ended spare parts ..................................................................................................... 18
9 Technical specifications ........................................................................................................... 24
10 Pneu atic diagra ................................................................................................................... 26
11 Electrical diagra s and index sheets .................................................................................... 27
12 Exploded view achine............................................................................................................ 56
13 Exploded view seal bar ............................................................................................................ 62
14 Vacuu pu p ............................................................................................................................ 63

4
INTRODUCTION
With the purchase of this vacuum chamber machine you will be able to pack a great variety of
products. To use the vacuum chamber machines Audion made sure that all the machines, from the
smallest to the biggest model, fulfill the greatest demands. Besides the superior quality of the
machines they are all very easy to handle.
The machines are qualified for sealing Polyethylene PE), Polypropylene PP),
Polyethylene/Polyamide PEPA) or combinations of all the above. We recommend to use the
proper materials for the Audionvac machines only.
The manual consists of two parts. In the first part, the user manual, all important information will be
discussed like safety precautions or programming the machine. Also maintenance and possible
solutions for eventual problems are discussed. The final section of the first part will discuss the
guarantee and liability. In the second part, the technical part, all technical data, the pneumatic
diagram, the electrical diagram and the exploded views will be discussed.
Make sure, during unpacking, all data on the identification plate are right Fig. 1.1) and record the
information you found on the identification plate in figure 1.1
Fig. 1.1: identification plate
The Audionvac is packed in a box. We advise you to store the box so you can transport the
Audionvac, if necessary, safely in the future.
While unpacking the machine, use the following list to check if everything is present:
• Bottle of oil 250 ml
• Filler plates 2x)
• Mains cable
• Allan key for oil plug
• Panel tool 2x)
Read manual first Pack later

5
PART I: USER MANUAL
1 Precautions
1.1 Explanation o the clip arts
BREAK CONTACT BETWEEN PLUG AND SOCKET
The socket
Identification plate with Voltage V), Frequency Hz) and Consumption W)
OK O.K.
Fluid
Long period
Do not continue, this is dangerous
Contact Audion Elektro BV or your dealer
Watch out!
Reparation/ Maintenance
Audion Elektro BV
Symbol for your Audionvac machine
Temperature meter with boundary conditions
Empty
Oil replacement
Gas-spring of the lid
The oil level
Vacuum meter
Tension of the springs

6
1.2 Prohibitions
Never pack live material.
Don’t pack in a clean room environment.
Don’t use in an explosive environment.
Don’t pack in a medical sterile environment.
Don’t pack pharmaceutical and / or therapeutically products.
Don’t use gas-mixtures containing higher concentrations than 25% of oxygen (O2)
because danger of explosions.
The pressure unit of the gas bottle if the machine is gas fit mustn’t
be higher than 1 bar. A higher pressure can damage the machine.
The pressure from the compressor if external sealing pressure must be applicable
mustn’t be higher than 1 Bar. A higher pressure can damage the machine.
Only dry compressed air may be used for the external seal pressure.
Don’t pack poisonous corrosive or irritating substances.
Don’t pack poisonous suffocating or irritating gasses.
Don’t pack (dangerously) stuffy products.
Don’t pack explosive materials.

7
2 Installation
2.1 Description o the workplace
Whenever the model is a table model place it on a firm and stable table. Place the model on the
ground in a well ventilated and luminated space when you’re dealing with a floor model. Make sure
the Audionvac isn’t exposed to sunshine, extreme temperatures, humidity, dust or sand.
The Audionvac mustn’t be exposed to mechanical shocks and vibrations. Always leave room free
around the machine.
+ = OK ?!
Make sure the voltage, consumption and frequency of the power supply are the same as on the identification panel
2.2 Checking the oil level
Make sure the Audionvac is in the OFF position. If necessary switch the main switch to the OFF
position see fig. 3.1) before one can start with the process of connecting the power supply.
In order to be able to check the oil level the machine must be at a flat underground, well leveled.
The oil level glass figure 2.2b) has been mounted in one of the sides of the machine, or in the
backside of the machine. The oil level must lie between the signs: “MIN” and “MAX”. For the
machines the rule is that the oil reservoir must be filled until 80%. An exception is the VMS43
from which the oil reservoir must be filled only until 60%. A little less oil is better than a bit more.
In practice this means that the oil in the oil reservoir mustn’t be higher than 2mm above the
measurement point in the middle of the measurement-glass.
=
When the oil reservoir is empty it must e filled with oil first
To replace the oil or to fill the oil reservoir you do the following:
Replacing the oil
Filling oil reservoir
− Turn off the machine.
− Loosen the oil drain plug (figure 2.2c) and drain
the oil.
− In case the oil drain plug is behind de back
plate, remove the back plate.
− When there is no oil drain plug present, the oil
level glass functions as drain plug (figure 2.2b).
− Mount the oil drain plug again.
− or further instructions see: “filling oil reservoir”
− Turn off the machine.
− Unscrew oil filling plug (figure 2.2a) above the oil
level glass.
− In case the oil-filling plug is behind de back plate,
remove the back plate.
− Pour in new oil and let the oil level stabilize after
every little bit.
− Repeat this until the oil level has reached the right
level (look at the oil level glass).
− Screw the oil-filling plug back on.
− Mount the back plate again.
Machine with corresponding oil:
VMS43
VMS53/
VMS93/ VMS113/
VMS123/ VMS133/ VMS133L/
VMS153/ VMS153V/ VMS163/
VMS163B/ VMS173
VMS193/ VMS223/ VMS233/
VMS333/ VMS253/ VMS263/
VMS283/ VMS503/ VMS883/
VM203/ VM303/ VM243/ VM273
Shell Vitrea 22 Shell Vitrea 32 Shell Vitrea 100
Aral Motanol GM 22 Aral Motanol GM 32 Aral Motanol GM 100
BP Energol CS 22 BP Energol CS 32 BP Energol CS 100
Texaco Regal R+O 22 Texaco Regal R+O 32

8
Hint: It is easier to drain the oil when it is warm. When possible keep the machine running for a
few minutes before the draining of the oil. The oil will become warm then.
Figure 2.2a: oil filling plug Figure 2.2 : oil level glass Figure 2.2c: oil draining plug
(lower plug only at VMS 43/53) and draining plug (only VMS 43/53) (VMS 113/133)
2.3 Taking into use
0-30°C
The surrounding temperature must lie etween 0-30 degrees Celsius
Put the plug in a socket which has an earth connection and is fused max. 16 Amp - 230V). See
electrical diagrams and index sheets, in case of other voltages.
After the Audionvac has been connected to the mains voltage the machine can be taken into use.
Turn on the main switch. Check the direction which the pump is turning when the machine is
connected to a three phase power source.
With the insert plates the product can be placed on right level see figure 2.3).
The insert plates reduce the volume of the vacuum chamber; which means a shorter vacuuming
time. Now the proper amount of insert plates is in the machine you can put the bag in the chamber.
Put the opening of the bag over the seal bar see figure 2.3 for an explanation of the proper way).
Adjust the vacuuming and sealing time. see chapter 3). Close the lid. After the vacuuming and
sealing process the lid will automatically open.
When the machine is not eing used for a longer period, shut off the power supply
Check the vacuum and the produced seal. Adjust the vacuuming time into a longer period when
the vacuum is too low; and vice versa. When the seal is not strong enough adjust the sealing time
into a longer period. When the seal looks melted or when the bag tears where the seal is the
sealing time has been too long. The right sealing time has to be found by trial and error. The
material and the thickness of the material determine the sealing time.
Figure 2.3: drawing and details of ag in cham er
1: Vacuum bag
2: Insert plates
3: Gas nozzle
4: Seal bar

9
3 Programming
The digital control is implemented with a function program that can be set with different function
values per cycle to be able to pack different products). A program cycle is the complete program
of set functions vacuum and seal) that the machine runs through to package a product.
The control panel is implemented standard with a conditioning program for the regular
maintenance of the pump and two STOP keys for complete function interruption or for only active
function interruption. There are also a number of built-in service programs. Contact the supplier or
Audion Elektro B.V. for more information about these functions.
The value of the functions can be set for a certain time period.
The vacuum function can be set to whole seconds with a maximum of 99 seconds.
The seal function can be set with an interval of 0.1 seconds and a maximum of 6.0 seconds.
Figure 3.1: Control panel
DISPLAY (1):
THIS DISPLAY SHOWS THE STATUS OF THE ACTIVE FUNCTION
DURING THE RUN OF THE PROGRAM CYCLE OR THE SET VALUE
OF THE SELECTED FUNCTION WHEN MACHINE IS NOT RUNNING.
Function selection key (2):
Select function vacuum or seal) for viewing or changing function
values. The function is selected if the function light is on in front of the
function description under the display.
Conditioning programmer key (3):
Start the conditioning program for pump duration 15 minutes)
see § 4.4.
VACUUM
SEAL
Process display (4):
This display shows what process is active at the moment.
10
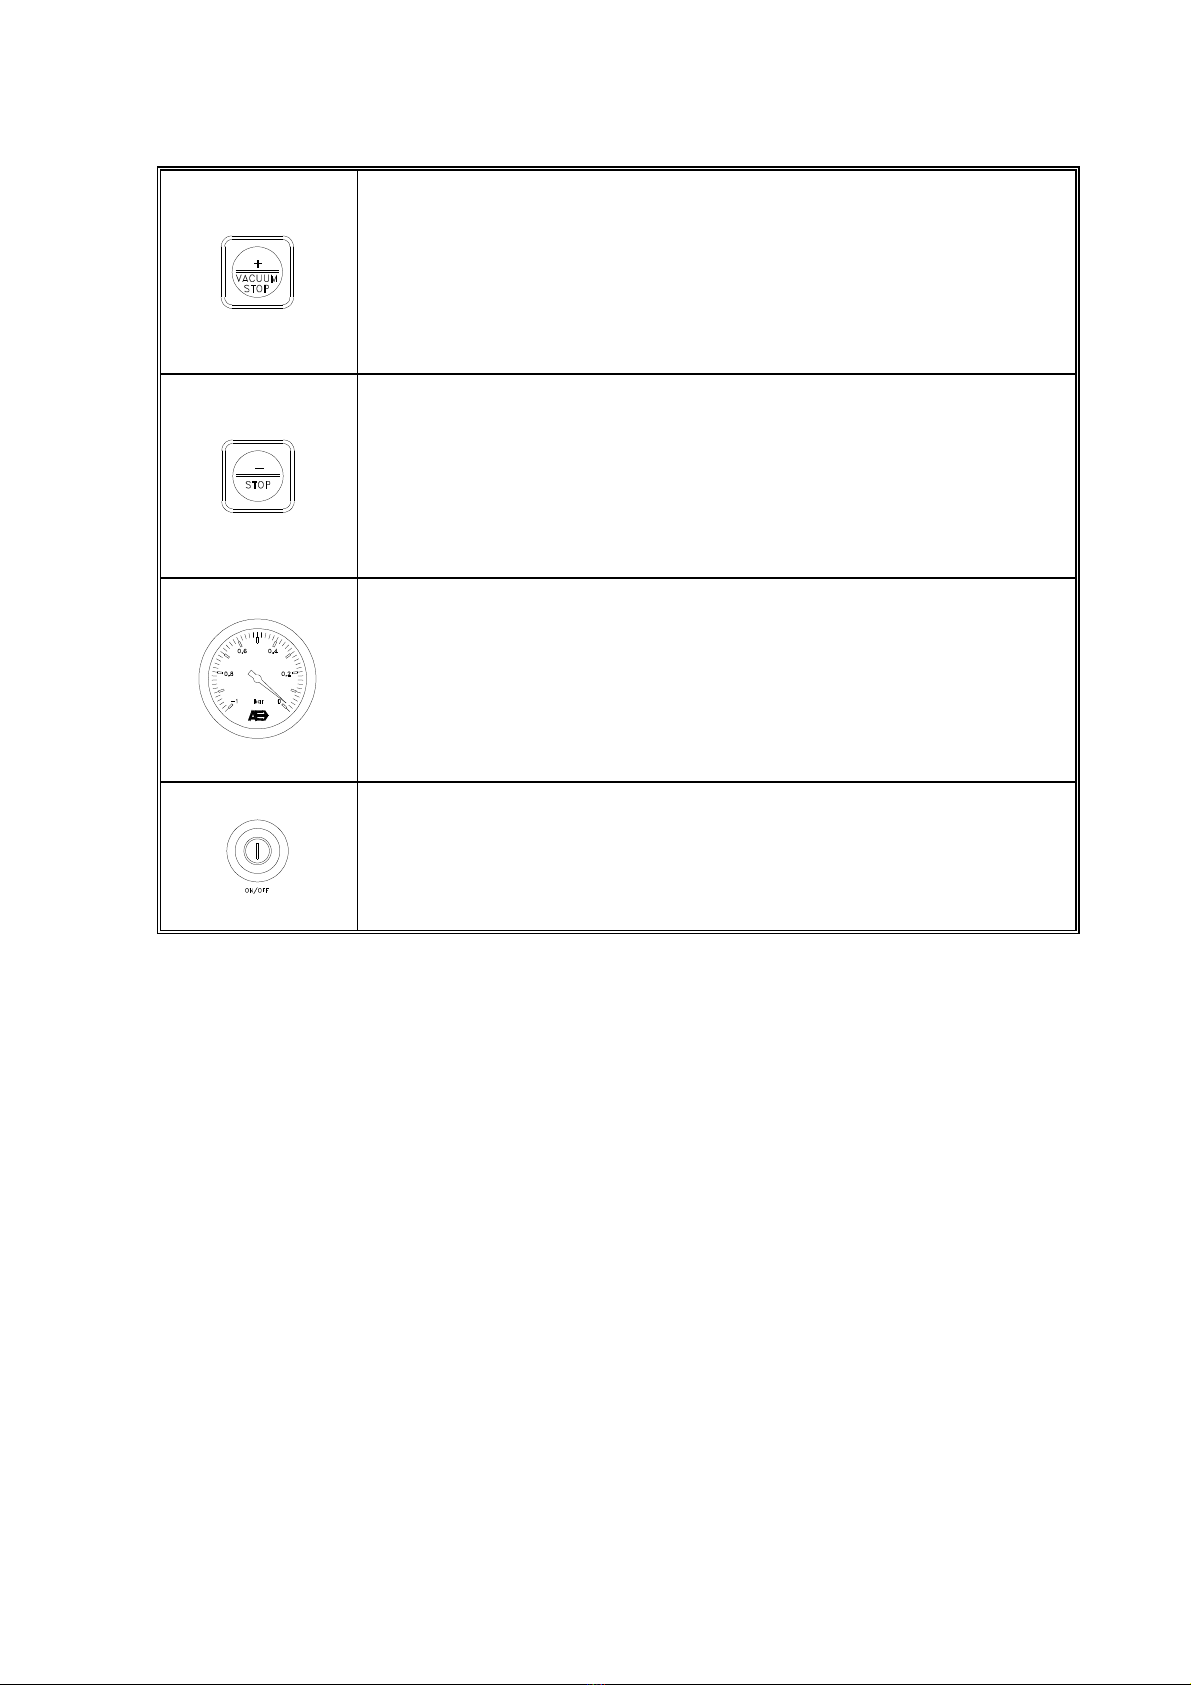
FUNCTION DURING CYCLE (5):
INTERRUPTION OF THE VACUUM FUNCTION DURING THE
PROGRAM CYCLE. THE CYCLE IMMEDIATELY CONTINUES WITH
THE NEXT FUNCTION.
GENERAL FUNCTION:
INCREMENT THE VALUE OF THE SELECTED FUNCTION.
Function during cycle (6):
Terminates the program cycle completely. The cycle immediately
switches into the ventilation function.
General function:
Decrement the value of the selected function.
Vacuum meter (7):
The vacuum meter shows the percentage of vacuum inside the
chamber. The maximum level of vacuum is about 99.95 percent. The
vacuum meter will show ‘-1’ The minimum level of vacuum will be when
the pressure outside the chamber is the same as inside the chamber.
The vacuum meter will show ‘0’
ON/OFF switch (8):
3.1 Description o the program cycle or digital time control
1) Functions vacuum and sealing) are set with the correct values see § 3.2 for settings).
2) Close the lid.
3) Vacuum function: The machine starts to vacuum the chamber.
The light in front of [VACUUM] goes on.
Display: decrementing time per second starting at the time set
max. 99 sec.). Vacuum meter starts increasing to the left.
4) Sealing function: Once the vacuum function is finished, the sealing function starts to
seal
the vacuum bag s). The light in front of [SEAL] goes on.
Display: decrementing time per 0.1 second starting at the time set
max. 6.0 sec.). The reading on the vacuum meter stays the same.
5) Ventilating function: After ending the seal function the ventilating function starts ventilating
the chamber to 1 atmosphere/ATO and the lid opens. There are no
longer any lights on in front of the functions. Display: lines moving up
and down until the lid is opened. The vacuum meter runs back to the
right to zero and the lid opens automatically.
6) The product is packed and ready to remove.
Questo manuale è adatto per i seguenti modelli
5
Indice
Altri manuali Audion Elektro Attrezzature per l'imballaggio


