Aurender W20 Manuale utente
for
W20/N10/A10/N100/
N100C/X100/ACS10
Quick Start Guide
V 2.2.1

- 3 -
What Is Required
STEP 1: Download the Aurender App
STEP 2: Connect the Aurender to your local network and USB
external drive
STEP 3: Update the Aurender's System Software to the latest
version
STEP 4: Preparing Internal Music Content
STEP 5: Preparing Streaming Music Content
STEP 6: Playing Music
Important Notice Regarding Power Off Procedure
Table of Contents
4
5
6
7
9
12
15
17
.....................
.....................
.....................
.....................
.....................
.....................
.....................
.....................
•For ACS10 owner’s only
•For unique features like CD ripping which is available only on ACS10, please refer to the WEB manual.
•ACS10 is configured as RAID 1 (Mirror) when released from the factory. If you want to maximize the HDD
capacity, please download ACSManager App from Apple App Store and goto Settings->Disk Information
menu and click DELETE RAID. All contents will be deleted and you will see two HDDs after automatic
formatting.
Please refer to the manual on www.aurender.com for more information.

- 4 -
1. Aurender Music Server
W20/N10/A10/X100/N100/N100C/ACS10
2. Apple iPad Air or later
The iPad Air2 or iPad Pro are recommended for their fast processing speed and 801.11ac wireless connection.
3. Wireless router* with gigabit ethernet** ports
A router that supports gigabit ethernet is recommended for faster music file transfer over LAN (Local Area
Network) and faster connection speed for streaming content.
*Wireless Access Point or a Wireless router set to a "bridge mode/access point" configuration.
**Although a 10/100Mb ethernet switch will work, gigabit (10/100/1000) is recommended for faster content
transfer if copying music over the network.
4. Various lengths of CAT5E/CAT6 LAN cable
What Is Required:
- 5 -
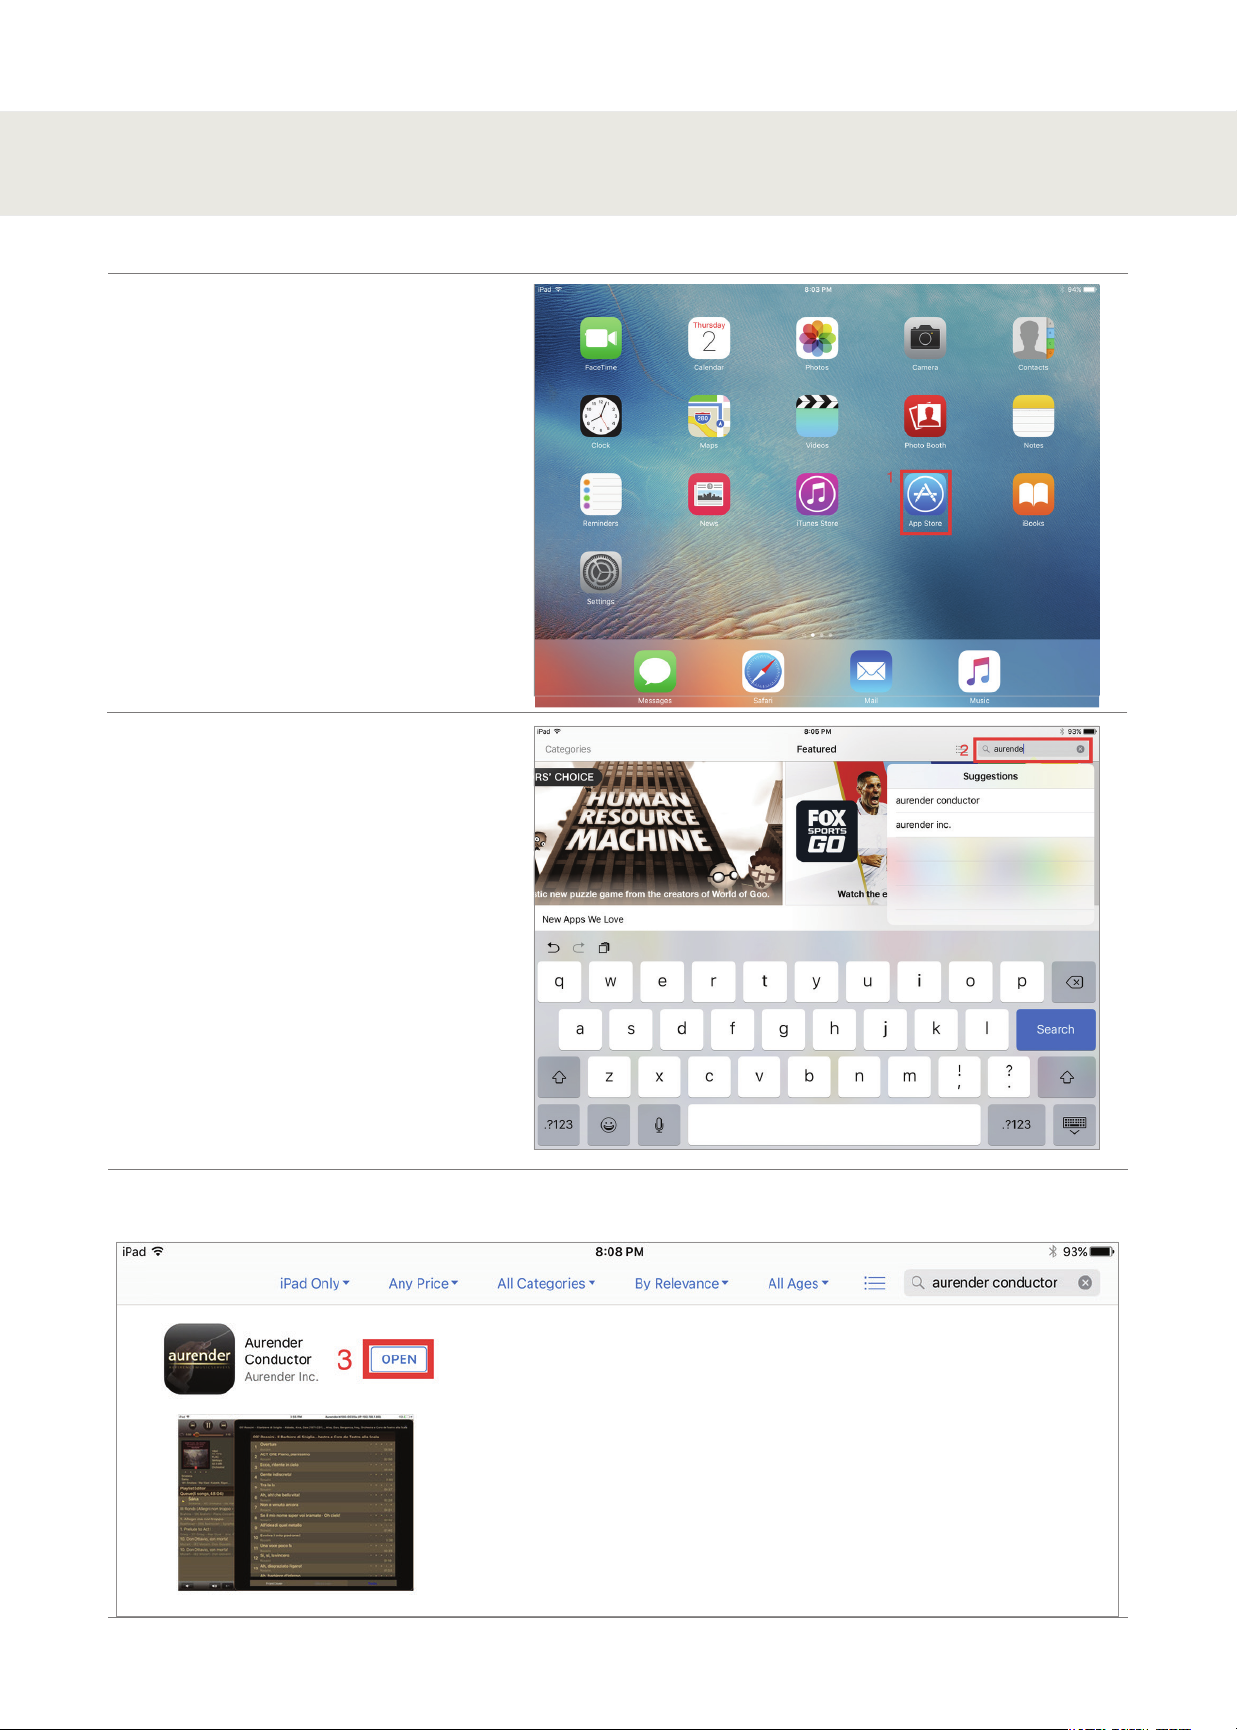
First, find the App Store on your iPad
and open it (1).
Search for the Aurender Conductor App
in the App store (2).
Get and Install the free Aurender Conductor App and open it (3).
STEP 1: Download the Aurender App
- 6 -
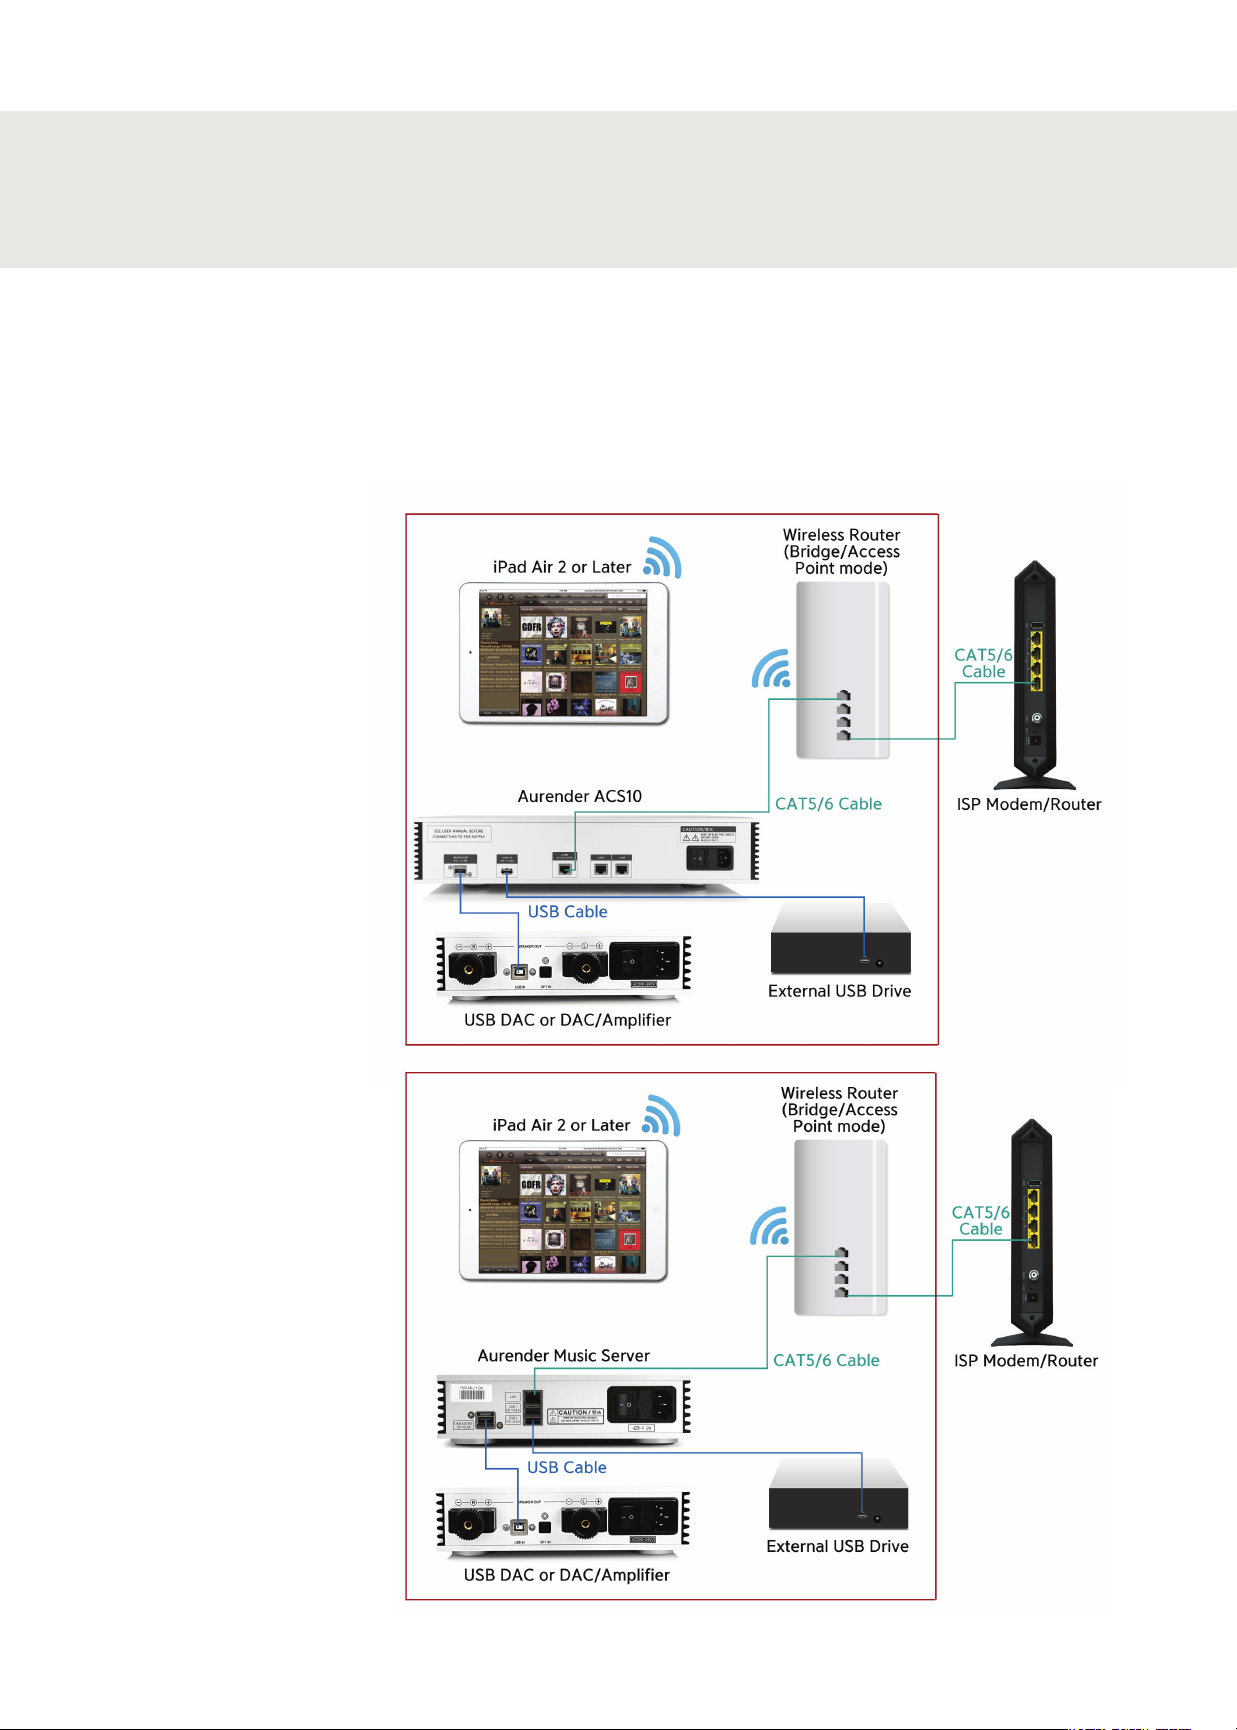
The diagram below is a guideline to configure the Aurender for setup with your home network and connecting to
an external USB drive for transferring music content*. For best performance, Aurender recommends locating your
WiFi router/Access Point in the same room the Aurender music server will be located in. In order to avoid network
conflicts, Aurender also recommends that your WiFi router is configured for "bridge" or "access point" mode.
*Please note, the diagram below is based on a typical home network configuration using the modem and router
provided by an internet service provider. For more advanced network configurations, please refer to our network
configuration guide on our support site: support.aurender.com
STEP 2: Connect the Aurender to your
local network and USB external drive
ACS10
All Other Aurender
- 7 -
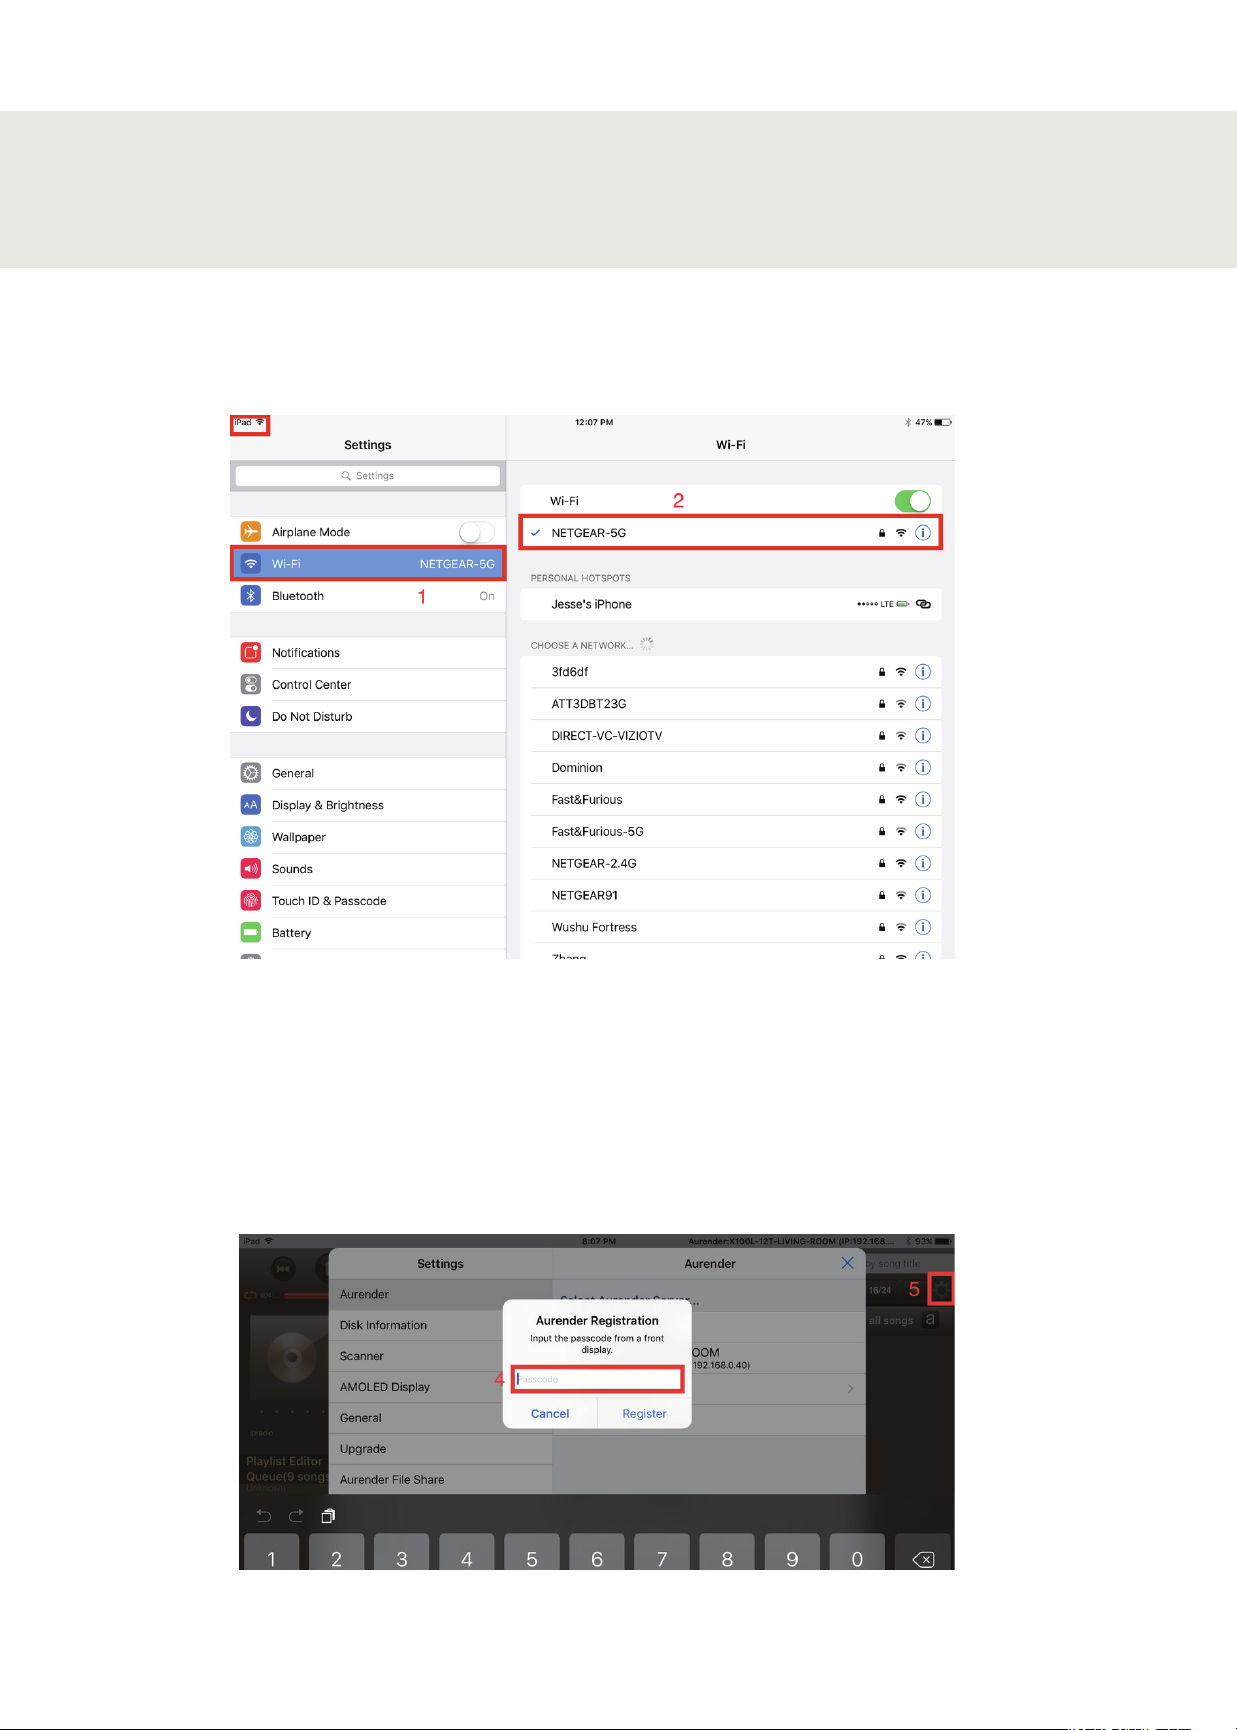
Once the Aurender has been connected to the home network and an external USB drive with music content as
shown in Step 2, ensure the iPad is connected to the same wireless router as the Aurender by accessing the WiFi
settings of the iPad (1), and selecting the proper WiFi network (2).
STEP 3: Update the Aurender's System
Software to the latest version
Open the Conductor App, and wait for the app to connect to the Aurender. If you only have one Aurender located
on the network, the app will automatically connect; in the case of multiple Aurender's, you will need to specify
which Aurender you wish to connect to. The first time you connect to the Aurender from the iPad app, you will be
prompted to enter a 6-digit passcode (4). This 6-digit passcode will be displayed on the Aurender's front panel.
Once the 6-digit passcode has been entered, tap the "Settings" icon (5), which looks like a gear, and is located just
below the search bar at the top right corner of the app.
- 8 -
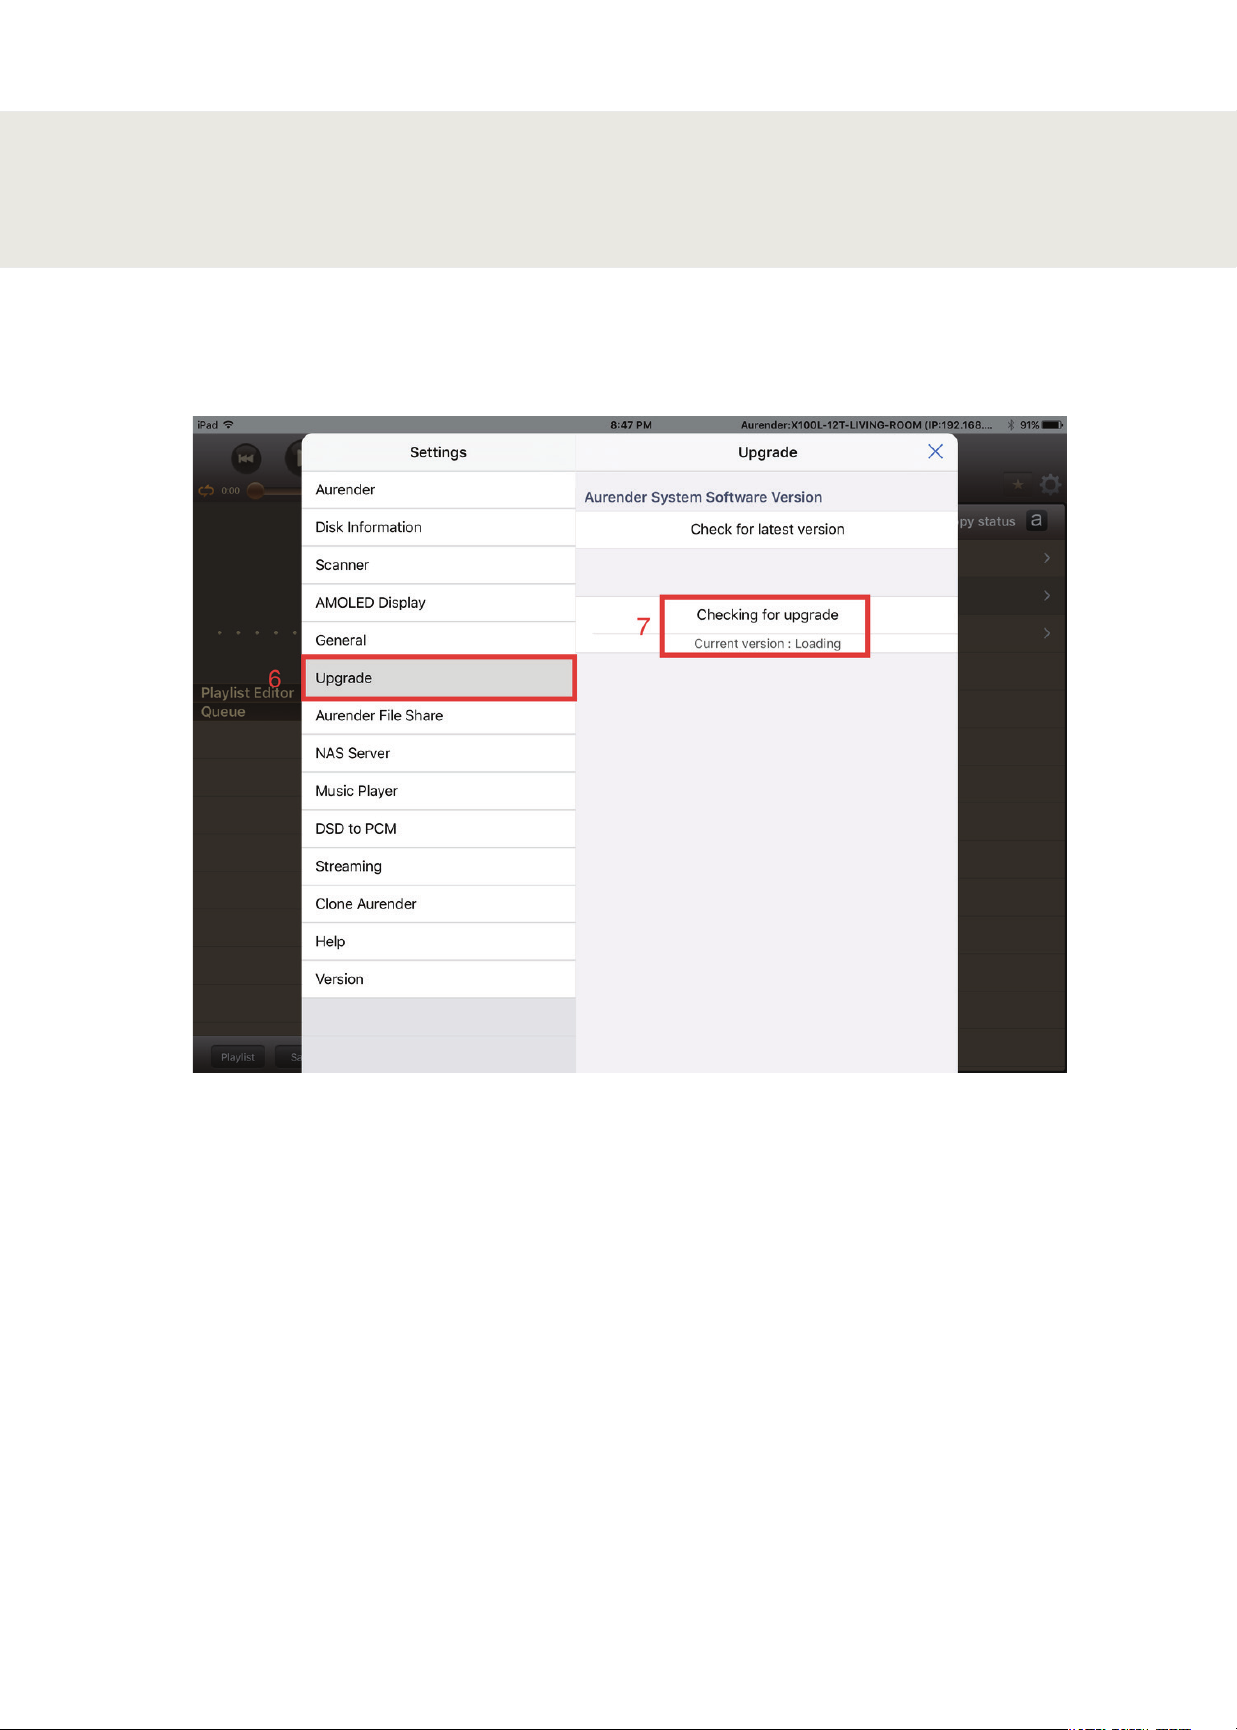
Check the software version of the Aurender by navigating to the Upgrade tab in the Settings menu (6). The unit will
automatically check for the latest software version. If an update is available, the button will allow you to install the
latest version of the system software (7).
STEP 3: Update the Aurender's System
Software to the latest version
After selecting the latest software update, a download will start in a few seconds. After the download is finished, you
need to start upgrade by pressing “Upgrade Aurender System Software” in the same UI and the Aurender’s front
panel will display the status of the software update progress based on the percentage (%) completed. At this point
you should exit the Conductor app and wait for the update to complete. The Aurender will reboot after the update
is finished, and you may open the Conductor App again to begin copying music to the internal storage.
- 9 -
For initial music transfer to the Aurender's internal storage, it is recommended to transfer music files from a USB
external drive* connected to one of the Aurender's rear panel USB data ports using the "Smart Copy" feature (system
software 4(5).4.58 or later).
* If you wish to copy files from your NAS drive or your computer, please refer to FAQ section of our support web site
(support.aurender.com).
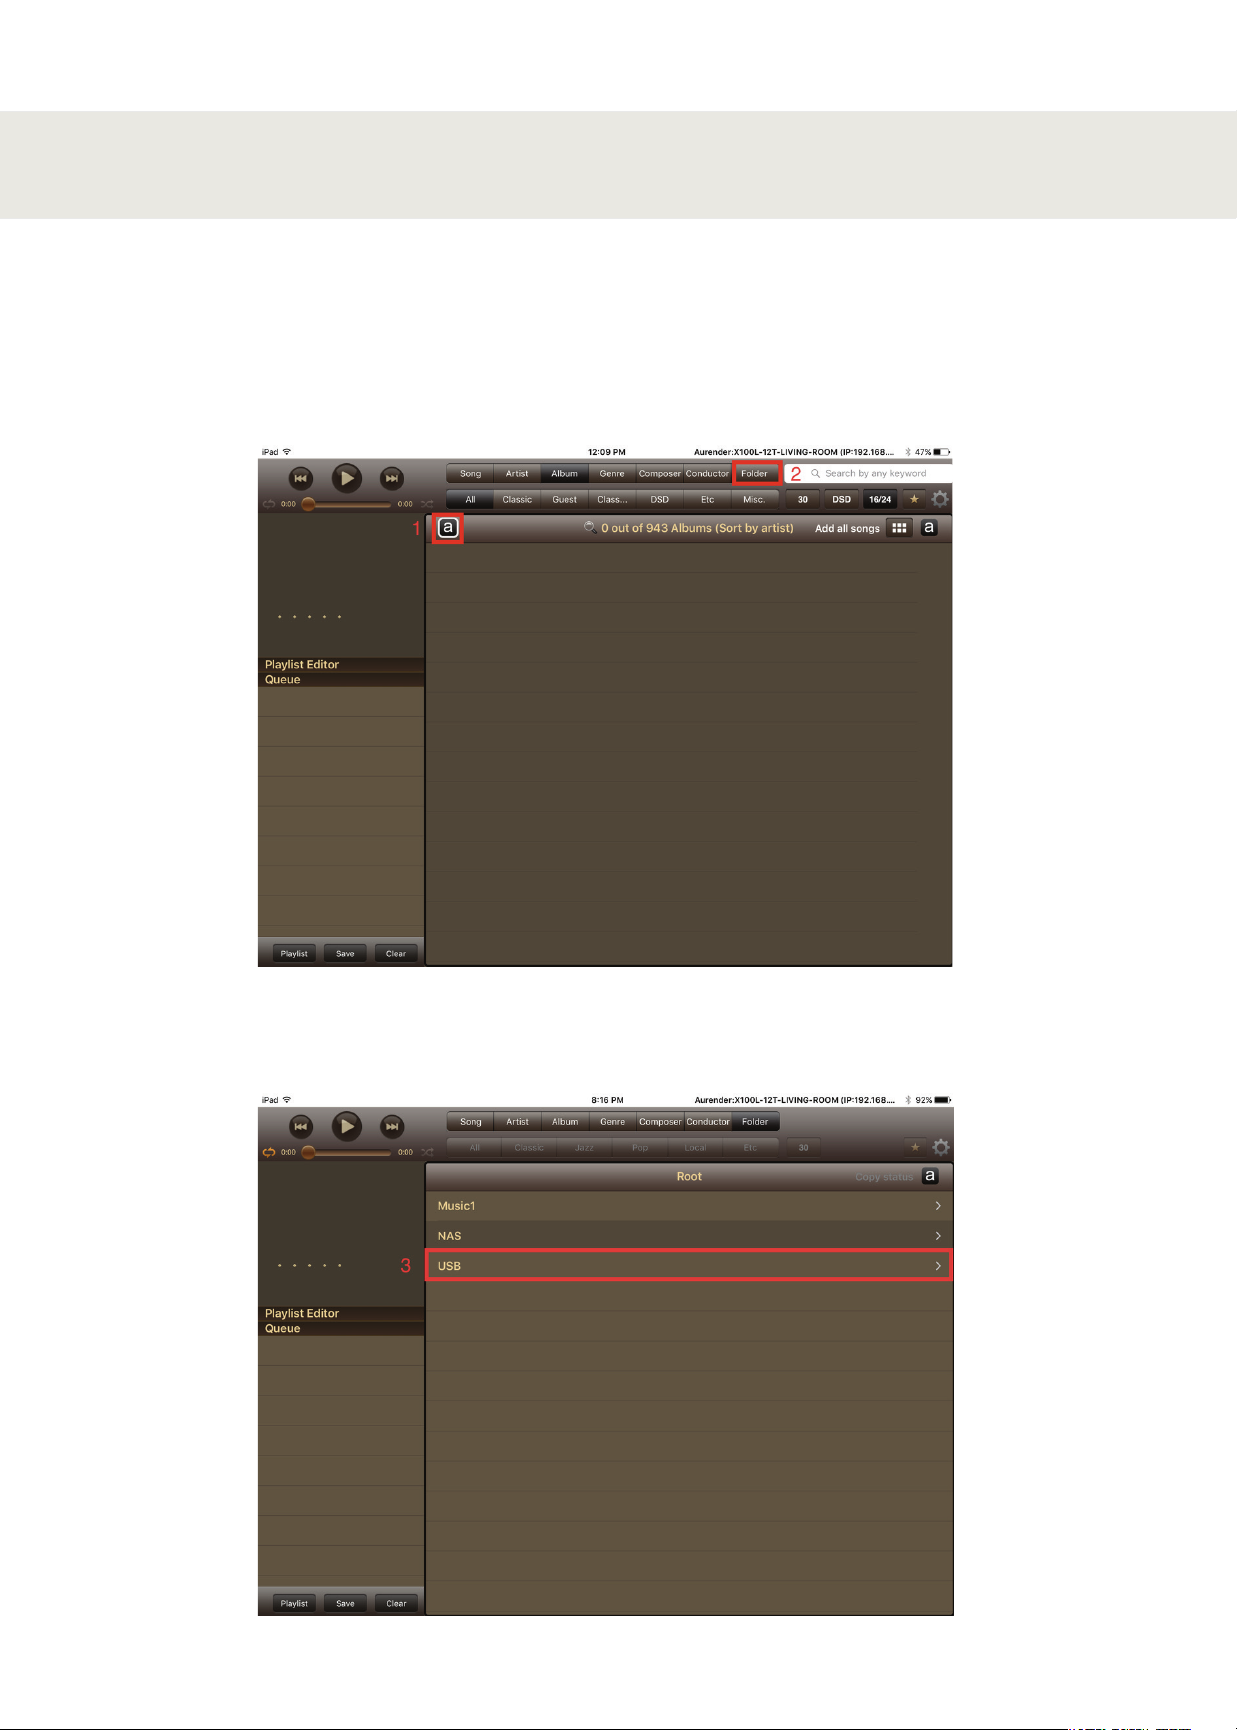
First, select the "Aurender" button (1) in order to navigate to the Folder tab (2)
STEP 4: Preparing Internal Music Content
Once the folder view has been selected, the root folder menu will appear. If an external USB drive is attached to one
of the Aurender's rear panel data ports, you will be able to browse the contents of the drive by selecting the USB
option (3).
- 10 -
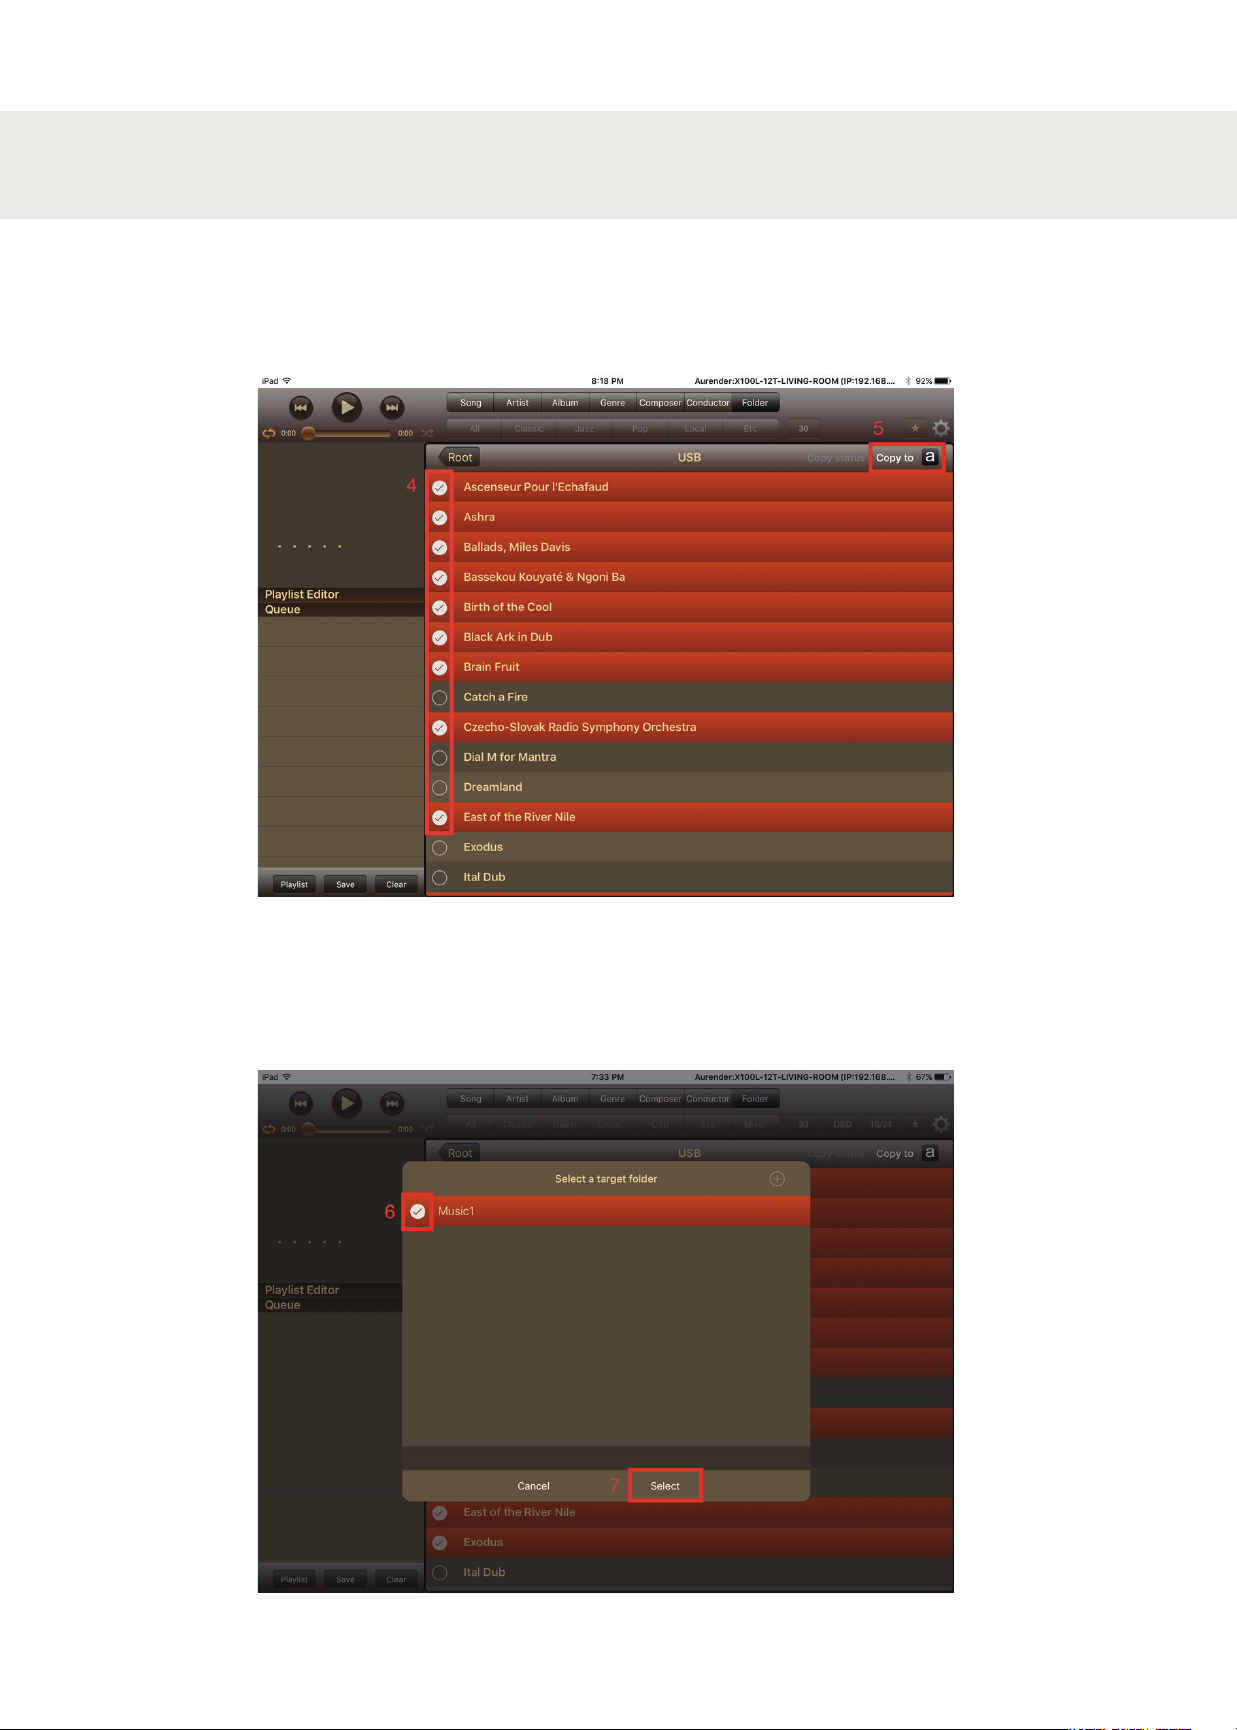
When USB is selected, a list of folders located in the root directory of the USB drive will appear. You can select as
many or as few as you like by tapping the round check space next to each folder (4). In the screenshot example, we
have selected some of the folders while leaving others unselected. Once you have selected the folders you wish to
copy, press the "Copy to (aurender button)" text on the top right of the window (5).
STEP 4: Preparing Internal Music Content
A window will appear requesting you to select a target folder. Select one of the main folders listed (Music1 or
Music2) by tapping the round checkbox next to the folder name (6)* and tap the select option to start the copy
process (7).
*Note that an existing subfolder can be copied to and a new folder can also be created to copy content to. Please
refer to our support site support.aurender.com for further information.
- 11 -
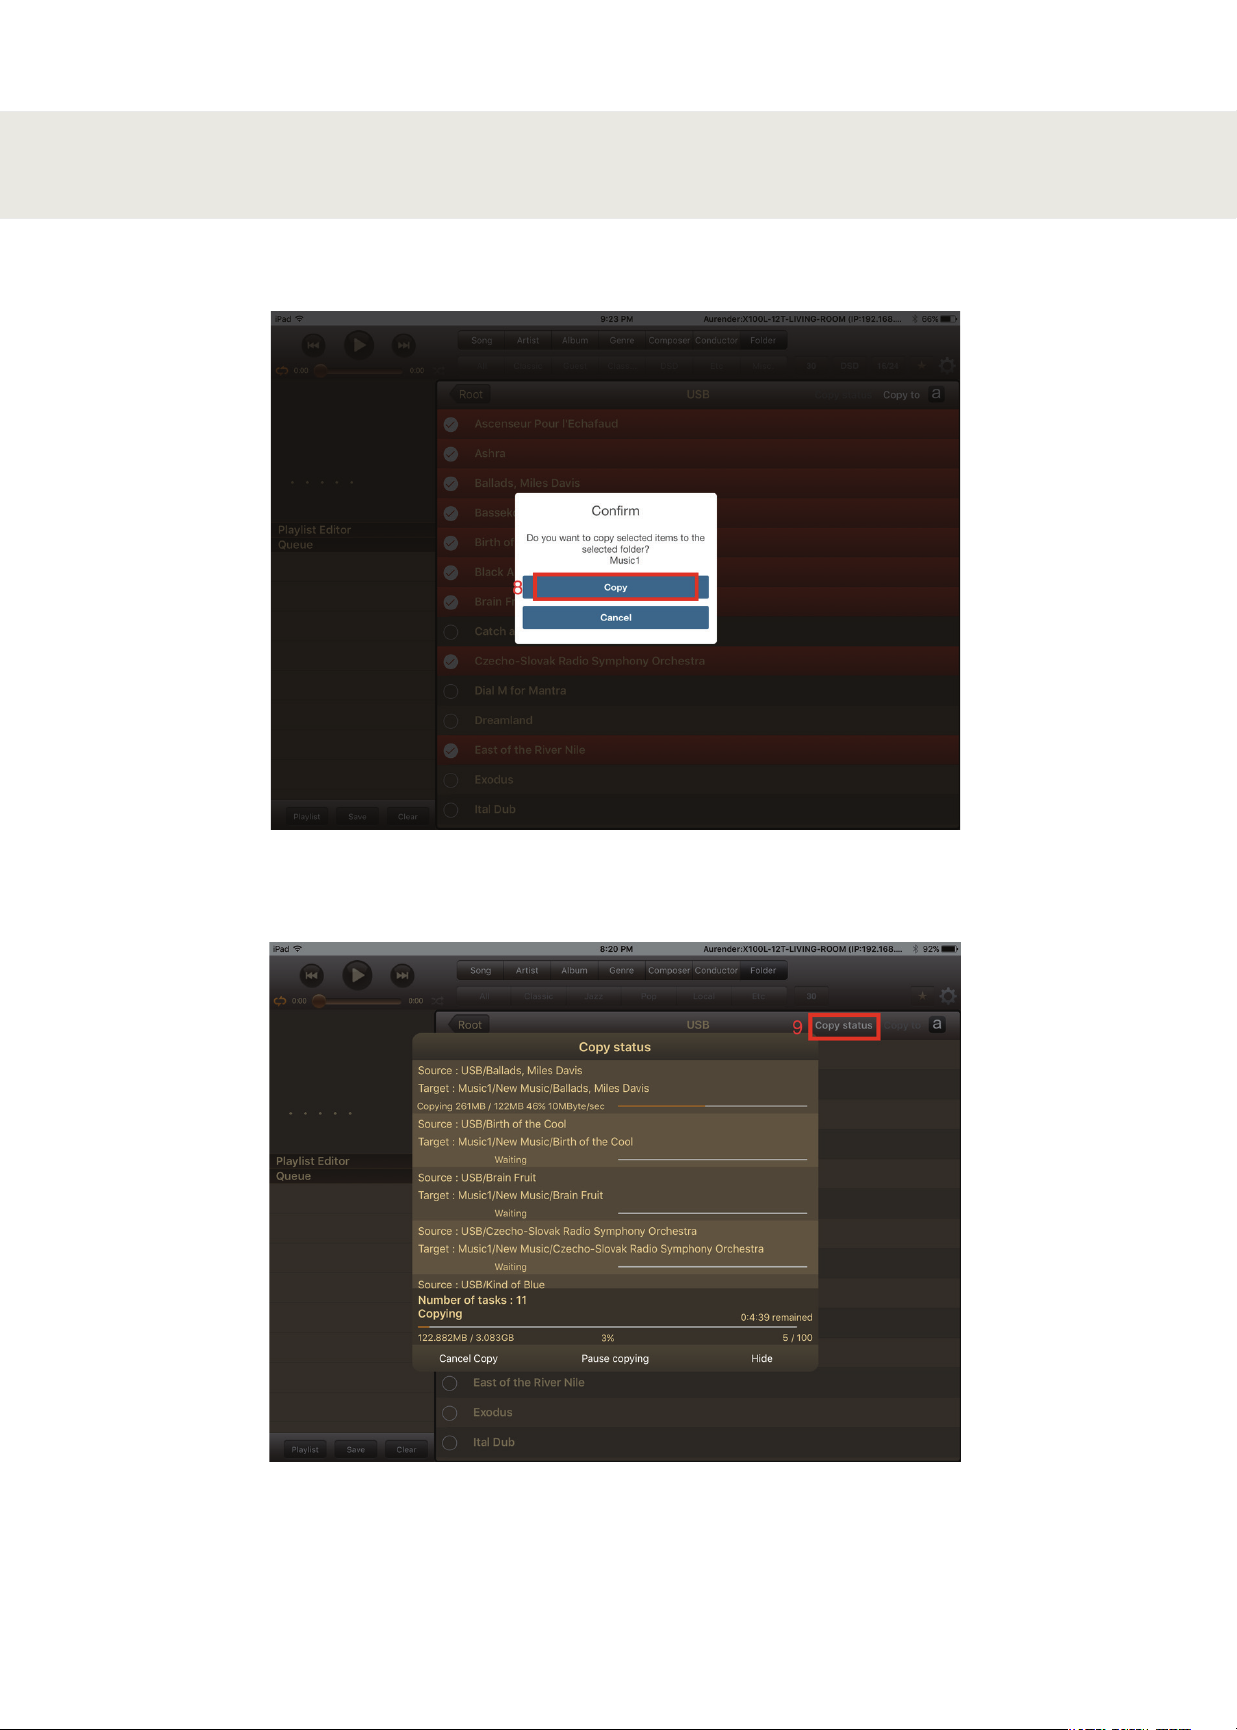
A confirmation window will appear, select the "Copy" button (8) to start the copy process.
STEP 4: Preparing Internal Music Content
Once the Smart Copy process has been initiated, you can view the status by selecting the "Copy Status" option on
the top right of the app screen (9).
Altri manuali per W20
5
Questo manuale è adatto per i seguenti modelli
6
Indice
Altri manuali Aurender Impianto stereo


