
Badger Basket WB26BCI Manuale utente

WILD BADGER POWER 1
OPERATOR’S MANUAL
STRAIGHT SHAFT
TRIMMER &
BRUSH CUTTER
MODEL: WB26BCI
SAVE THESE INSTRUCTIONS
DO NOT RETURN THIS UNIT TO THE RETAILER. PROOF OF
PURCHASE WILL BE REQUIRED FOR WARRANTY SERVICE.
For assistance regarding the assembly, operation or maintenance of the unit, please call 1-844-786-7335
(in the United States) or contact email box CUSTOMERSERVICE@BADGERPOWERPRODUCTS.COM
Warranty service is available through an authorized service center. To locate a service center in your
area, please write us email or call the number listed above. Service on this unit, both within and after
the warranty period, should only be performed by an authorized and approved service center. When
servicing, use only identical replacement parts.
All information, illustrations, and specifications in this manual are based on the latest product
information available at the time of printing. We reserve the right to make changes at any time
without notice. The product may vary slightly from the illustrations contained in this manual.
IMPORTANT: Read this manual thoroughly before using this product. Follow all instructions.

2 WB26BCI STRAIGHT SHAFT TRIMMER & BRUSH CUTTER
STARTING INSTRUCTIONS
Do not start the unit until it has been completely assembled.
Always follow these procedures when cold starting the trimmer.
QUICK START GUIDE
BASIC ASSEMBLY
For detailed assembly instruction consult the assembly section of
this operators manual.
1. FILL WITH 50:1 MIX
Using the measuring fuel
container included.
1. CONNECT SHAFTS
By removing plug & cap,
attaching the two shafts
and tightening the knob.
4. PULL 3-5X
Until the engine begins
to try to start.
2. MOVE CHOKE
TO START
By moving the priming lever
up to the START position.
2. ATTACH HANDLE
Using the bolts and
hex wrench provided.
5. MOVE CHOKE TO RUN
By moving the priming lever
down to the RUN position.
3. PRIME ENGINE 10X
By pressing the priming
bulb beside the gas cap.
3. ATTACH GUARD
Using the bolts and
hex wrench provided.
6. PULL UNTIL THE
ENGINE STARTS

WILD BADGER POWER 3
SAFETY
The purpose of safety symbols is to attract your attention to possible dangers. The safety symbols,
and their explanations, deserve your careful attention and understanding. The safety warnings do
not by themselves eliminate any danger. The instructions or warnings they give are not substitutes
for proper accident prevention measures.
SYMBOL MEANING
DANGER: Signals an EXTREME hazard. Failure to obey a safety DANGER symbol WILL
result in serious injury or death to yourself or to others.
WARNING: Signals a SERIOUS hazard. Failure to obey a safety WARNING symbol CAN
result in serious injury to yourself or to others.
CAUTION: Signals a MODERATE hazard. Failure to obey a safety CAUTION symbol MAY
result in property damage or injury to yourself or to others.
NOTE: Advises you of information or instructions vital to the operation or maintenance of the
equipment.
SPARK ARRESTOR NOTE
NOTE: For users on U.S. Forest Land and in the states of California, Maine, Oregon and Washington.
All U.S. Forest Land and the state of California (Public Resources Codes 4442 and 4443), Oregon and
Washington require, by law that certain internal combustion engines operated on forest brush and/
or grass-covered areas be equipped with a spark arrestor, maintained in effective working order, or
the engine be constructed, equipped and maintained for the prevention of fire. Check with your
state or local authorities for regulations pertaining to these requirements. Failure to follow these
requirements could subject you to liability or a fine. This unit is factory equipped with a spark ar-
restor. If it requires replacement, contact your local service dealer to install the appropriate muffler
assembly.
CALIFORNIA PROPOSITION 65
WARNING: This product contains a chemical known to the state of California to cause
cancer, birth defects or other reproductive harm.
Read the operator’s manual and follow all warnings and safety instructions. Failure to do so can
result in serious injury to the operator and/or bystanders.
IMPORTANT SAFETY INSTRUCTIONS
READ ALL INSTRUCTIONS BEFORE OPERATING
WARNING: When using the unit, all safety instructions must be followed. Please read
these instructions before operating the unit in order to ensure the safety of the operator
and any bystanders. Please keep these instructions for later use.
• Read the instructions carefully. Be familiar with the controls and proper use of the unit.
• Do not operate this unit when tired, ill or under the influence of alcohol, drugs or medication.
• Never allow children to operate the unit. Teens must be trained, accompanied and supervised by
an adult. Never allow adults to operate the unit without proper instruction.
• All guards and safety attachments must be installed properly before operating the unit. Inspect the
unit before use. Replace damaged parts. Check for fuel leaks. Make sure all fasteners are in place
and secure. Replace parts that are cracked, chipped, or damaged in any way. Do not operate the
unit with loose or damaged parts.

4 WB26BCI STRAIGHT SHAFT TRIMMER & BRUSH CUTTER
• Only use the trimming line described in the Specifications section of this manual. Never use met-
al-reinforced line, wire, chain or rope. These can break off and become dangerous projectiles.
• Do not replace the cutting head with rigid or metal blades. Doing so could result in serious injury.
• Be aware of risk of injury to the head, hands and feet.
• Carefully inspect the area before starting the unit. Remove rocks, broken glass, nails, wire, string
and other objects that may be thrown or become entangled with the unit.
• Clear the area of children, bystanders and pets; keep them outside a 50-foot (15 m) radius, at a
minimum. Even then, they are still at risk from thrown objects. Encourage bystanders to wear eye
protection. If you are approached, stop the unit immediately.
• Squeeze the throttle control and check that it returns automatically to the idle position. Make all
adjustments or repairs before using the unit.
• Do not change the engine governor settings or over-speed the engine.
• This unit is intended for occasional, household use only.
SAFETY WARNINGS FOR GAS UNITS
WARNING: Gasoline is highly flammable and its vapors can explode if ignited. Take the
following precautions:
• Store fuel only in containers specifically designed and approved for the storage of such materials.
• Always stop the engine and allow it to cool before filling the tank. Never remove the fuel tank cap
or add fuel when the engine is hot. Always loosen the fuel tank cap slowly to relieve any pressure in
the tank before fueling.
• Always mix and add fuel in a clean, well-ventilated outdoor area where there are no sparks or
flames. DO NOT smoke.
• Never operate the unit without the fuel cap securely in place.
• Avoid creating a source of ignition for spilled fuel. Wipe up any spilled fuel from the unit immedi-
ately, before starting the unit. Move the unit at least 30 ft. (9.1 m) from the fueling source and site
before starting the engine. DO NOT smoke.
• Never start or run the unit inside a closed room or building. Breathing exhaust fumes can kill. Oper-
ate this unit only in a well ventilated outdoor area.
• Before setting the unit down, always make sure the engine is off and all moving parts have stopped.
• If you strike or become entangled with a foreign object, stop the unit immediately and check for
damage. Do not operate the unit before repairing damage. Do not operate the unit with loose or
damaged parts.
• Turn the engine off and disconnect the spark plug for maintenance or repair.
• Use only original equipment manufacturer (OEM) replacement parts and accessories for this unit.
These are available from your authorized service dealer. Use of any other parts or accessories could
lead to serious injury to the user, or damage to the unit, and void the warranty.
• Keep the unit clean. Carefully remove vegetation and other debris that could block moving parts.
• To reduce fire hazard, replace a faulty muffler and spark arrestor. Keep the engine and muffler free
from grass, leaves, excessive grease or carbon build up.
• If the unit starts to vibrate abnormally, stop the unit immediately. Inspect the unit for the cause of
the vibration. Vibration is generally an indicator of trouble.
WHILE OPERATING
• Wear safety glasses or goggles that meet current ANSI / ISEA Z87.1 standards and are marked as
such. Wear ear/hearing protection when operating this unit. Wear a face mask or dust mask if the
operation is dusty.
• Wear heavy long pants, boots, gloves and a long sleeve shirt. Do not wear loose clothing, jewelry,
short pants, sandals or go barefoot. Secure hair above shoulder level.
• The cutting head shield must always be in place while operating the unit. Do not operate the unit
without both trimming lines extended and the proper line installed. Do not extend the trimming
line beyond the length of the shield.
• The cutting head should remain stationary when the engine idles. If it does not, refer to Adjusting

WILD BADGER POWER 5
the Idle Speed.
• Adjust the handle to provide the best grip, if applicable.
• Make sure the cutting head is not in contact with anything before starting the unit.
• Use the unit only in daylight or good artificial light.
• Avoid accidental starting. Be in the starting position whenever pulling the starter rope. The opera-
tor and unit must be in a stable position while starting. Refer to Starting and Stopping.
• Use the right tool. Only use this tool for its intended purpose.
• Always hold the unit with both hands when operating. Keep a firm grip on both handles or grips.
• Do not overreach. Always keep proper footing and balance. Take extra care when working on stairs,
steep slopes or inclines. To avoid serious injury, do not operate the unit while on a ladder or a roof.
• Keep hands, face, and feet away from all moving parts. Do not touch or try to stop moving parts.
• Do not touch the engine, gear housing or muffler. These parts get extremely hot from operation,
even after the unit is turned off.
• Do not operate the unit faster than the speed needed to do the job. Do not run the unit at high
speed when not in use.
• Do not force the unit. It will do a better, safer job when used at the intended rate.
• Always stop the unit when operation is delayed or when walking from one location to another.
• Before setting the unit down, always make sure the engine is off and all moving parts have stopped.
• If you strike or become entangled with a foreign object, stop the unit immediately and check for
damage. Do not operate the unit before repairing damage. Do not operate the unit with loose or
damaged parts.
• Turn the engine off and disconnect the spark plug for maintenance or repair.
• Use only original equipment manufacturer (OEM) replacement parts and accessories for this unit.
These are available from your authorized service dealer. Use of any other parts or accessories could
lead to serious injury to the user, or damage to the unit, and void the warranty.
• Keep the unit clean. Carefully remove vegetation and other debris that could block moving parts.
• To reduce fire hazard, replace a faulty muffler and spark arrestor. Keep the engine and muffler free
from grass, leaves, excessive grease or carbon build up.
• If the unit starts to vibrate abnormally, stop the unit immediately. Inspect the unit for the cause of
the vibration. Vibration is generally an indicator of trouble.
OTHER SAFETY WARNINGS
• Maintain the unit with care.
• All service, other than the maintenance procedures described in this manual, should be performed
by an authorized service dealer.
• Never remove, modify or make inoperative any safety device furnished with the unit.
• Before inspecting, servicing, cleaning, storing, transporting or replacing any parts on the unit:
1. Stop the unit.
2. Make sure all moving parts have stopped.
3. Allow the unit to cool.
4. Disconnect the spark plug wire.
• Secure the unit while transporting.
• Never store the unit with fuel in the tank, inside a building where fumes may reach an open flame
(pilot lights, etc.) or sparks (switches, electrical motors, etc.).
• Store the unit in a dry place, secured or at a height to prevent unauthorized use or damage. Keep
the unit out of the reach of children.
• Never douse or squirt the unit with water or any other liquid.
• Keep handles dry and clean (free from debris, oil and grease).
• Clean the unit after each use. Refer to Cleaning and Storage. Do not use solvents or strong deter-
gents.
• Keep these instructions. Refer to them often and use them to instruct other users. If you loan this
unit to others, also loan them these instructions.
SAVE THESE INSTRUCTIONS
6 WB26BCI STRAIGHT SHAFT TRIMMER & BRUSH CUTTER
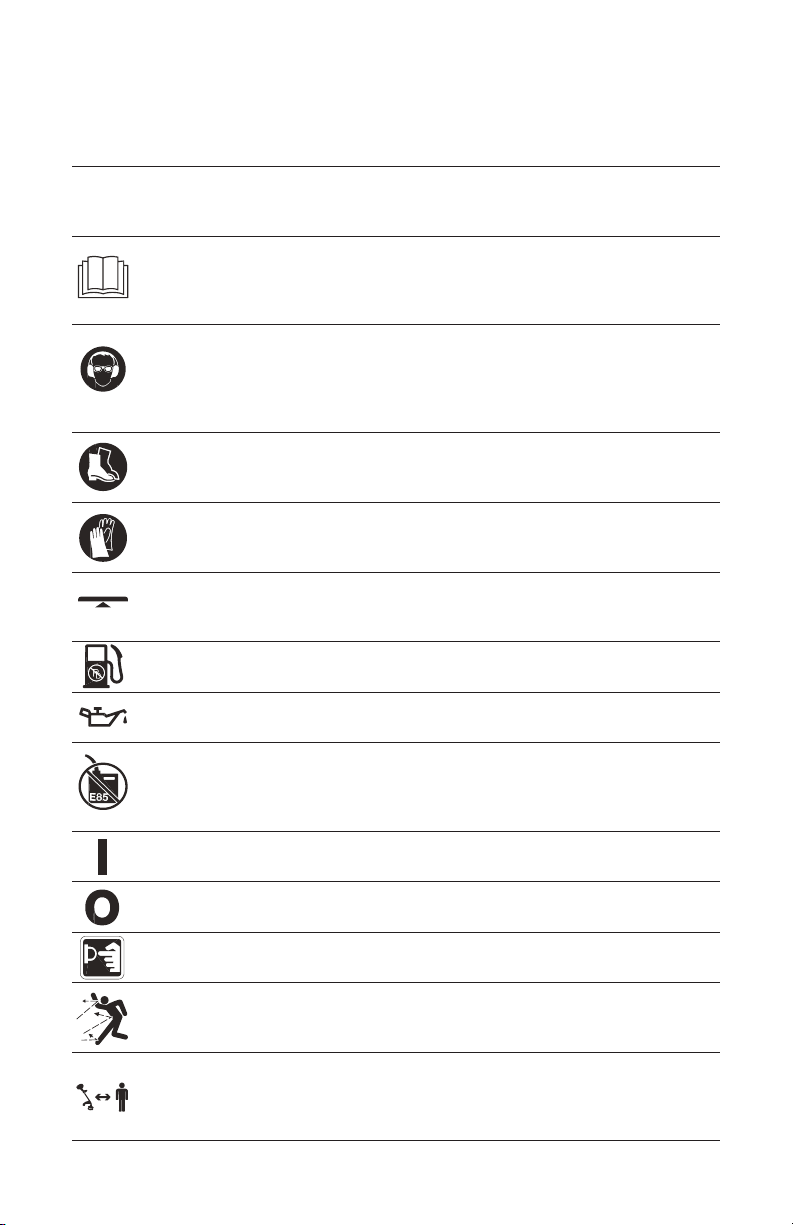
SAFETY & INTERNATIONAL SYMBOLS
This operator’s manual describes safety and international symbols and pictographs that may appear
on this product. Read the operator’s manual for complete safety, assembly, operating and mainte-
nance and repair information.
SAFETY ALERT SYMBOL: Indicates danger, warning or caution. May be used in conjunc-
tion with other symbols or pictographs.
READ OPERATOR’S MANUAL
WARNING: Read the operator’s manual(s) and follow all warnings and safety instructions.
Failure to do so can result in serious injury to the operator and/or bystanders.
WEAR EYE AND HEARING PROTECTION
WARNING: Thrown objects and loud noise can cause severe eye injury and hearing loss.
Wear eye protection meeting current ANSI / ISEA Z87.1 standards and ear protection
when operating this unit. Use a full face shield when needed.
WEAR FOOT PROTECTION: Always wear heavy-duty, non-slip footwear when
operating this unit.
WEAR HAND PROTECTION: Always wear heavy-duty, non-slip gloves when
handling this unit.
HANDLE POSITION: Make sure the handle is positioned beyond the end of the
safety label.
UNLEADED FUEL: Always use clean, fresh unleaded fuel.
OIL: Refer to operator’s manual for the proper type of oil.
DO NOT USE E85 FUEL IN THIS UNIT
WARNING: It has been proven that fuel containing greater than 10% ethanol will likely
damage this engine and void the warranty.
ON/OFF STOP CONTROL: ON / START / RUN
ON/OFF STOP CONTROL: OFF or STOP
PRIMER BULB: Push primer bulb, fully and slowly, 10 times.
THROWN OBJECTS CAN CAUSE SEVERE INJURY
WARNING: Small objects can be propelled at high speed, causing injury.
KEEP BYSTANDERS AWAY
WARNING: Keep all bystanders especially children and pets, at least 50 feet (15 m) from
the operating area.
Min. 50
ft
15 m
Min. 50
ft
15 m
Min. 50
ft
15 m
Min. 50
ft
15 m
Min. 50
ft
15 m
Min. 50
ft
15 m
Min. 50
ft
15 m
Min. 50
ft
15 m
Min. 50
ft
15 m
Min. 50
ft
15 m
Min. 50
ft
15 m
Min. 50
ft
15 m
Min. 50
ft
15 m

WILD BADGER POWER 7
HOT SURFACE WARNING: Do not touch a hot muffler or cylinder. You may get burned.
These parts get extremely hot from operation. When turned off, they remain hot for a
short time.
SHARP BLADE
WARNING: There is a sharp blade on the cutting head shield. To prevent serious injury,
do not touch the line cutting blade.
KNOW YOUR UNIT
APPLICATIONS
As a trimmer /brush cutter:
• Cutting grass and light weeds.
• Edging
• Decorative trimming around trees, fences, etc.
Other optional attachments may be used with this unit.
Fuel Cap
Spark Plug
Muffler
Throttle
Lockout
On/Off
Switch
Harness
Hanger
Shaft Housing
Cutting Head
Rear
Handle
Throttle
Control
Handle
Coupler
Cutting Head
Guard Pull Cord
Primer Bulb
Choke Lever
Min. 50
ft
15 m
Min. 50
ft
15 m

8 WB26BCI STRAIGHT SHAFT TRIMMER & BRUSH CUTTER
SPECIFICATIONS
All specifications are based on the latest product information available at the time of printing. We
reserve the right to make changes at any time without notice.
ASSEMBLY
When assembling this machine, please follow the instructions for assembly steps.
1. Connecting the upper and lower shafts:
Remove the rubber shaft plug and cap (1). Press in the spring-loaded pin
(2) and push the lower shaft (3) into the aluminum coupler (4) until the
spring loaded pin (2) clicks into the hole (3) of the aluminum coupler.
Once the spring-loaded pin is completely inserted, tighten the coupler
knob (4).
2. Attaching the handle:
Insert hex screws into the handle. Place the handle on the shaft. Insert the lower plate into the
handle (bottom), and tighten the knob.
3. Attaching the blade guard:
Attach the guard using the hex key included. The guard is attached to the lower shaft with two hex
screws facing the operator.
Warning! Use only original manufacturer’s replacement parts, accessories and attachments. Failure
to do so can cause poor performance, possible injury and may void your warranty. Never use the
trimmer without the guard securely attached!
Model name . . . . . . . . . . . . . . . . . BCI 26
Engine type . . . . . . . . . . Air-Cooled, 2-Cycle
Engine displacement . . . . . 25.4cc (1.52 cu. in.)
Rated motor power . . . . . . . . . . 0.7kw 0.7kw
Lubrication . . . . . . . . . . . . Fuel/Oil Mixture
Fuel/Oil ratio . . . . . . . . . . . . . . . . . . . 40:1
Volumes of fuel tank . . . . . . . . 20 oz. (600ml)
Trimmer mechanism . . . . . . . . . Bump Head
Cutting path diameter . . . . . . . .17in (430mm)
Trimming line. . . . . . . . . . . 0.095 in. (2.4mm)
Max. engine speed (with cutting
attachment, no-load) . . . . . . . . . . 9700/min

WILD BADGER POWER 9
4. Attach/detach cutting heads:
a) Remove the brush cutting blade nut and flange. Line up the holes of flange and shield, use the
hex key included to prevent the shaft from turning. Turn the included socket wrench clockwise.
c) Attach/detach the brush cutting blade. Remove the nut and outer flange. Place the blade, outer
flange, shield and nut on the trimmer head in the order as shown. Note the blade rotation direction
must match arrows marked on the blade. Line up the holes of the flange and shield, use the hex key
included to prevent the shaft from turning. Turn counter-clockwise, ensuring the nut is tight. To
detach the brush cutting blade turn the nut clockwise until it is released from the shaft and remove
the blade.
WARNING: Verify the cutting head is tight and has been assembled correctly before every use!
b) Attach/detach the string trimmer head. Line up the holes of flange and shield, use the hex key
included to prevent the shaft from turning. To attach the string trimmer head turn clockwise until
snug. To detach the string trimmer head turn counter-clockwise until it is released from the shaft.
5. Fit/attach the shoulder harness:
Place strap over the operators head and one shoulder. Adjust the harness length to the operators
arm reach. Clip harness to the harness hanger on the trimmer.

10 WB26BCI STRAIGHT SHAFT TRIMMER & BRUSH CUTTER
BEFORE OPERATION
When operating this machine, please follow the instructions for operations steps.
1. Filling with fuel
DANGER OF INJURY!
FUEL IS EXPLOSIVE! Indicates danger, warning or caution. May be used in conjunction
with other symbols or pictographs.
RISK OF DEVICE DAMAGE!
The device is supplied without motor or gearbox oil. Before operating you must fill it
with fuel.
Never use oil for 4-cycle engine use or water-cooled 2-cycle engines. It can cause spark plug foul-
ing, exhaust port blocking or piston ring sticking. Mixed fuels, which have been left unused for a
period of one month or more may clog the carburetor or result in the engine failing to operate
properly. Put unused fuel into an airtight container and keep it in the dark and cool room.
Mix a regular grade gasoline (leaded or unleaded, alcohol-free) and a quality-proven motor
oil for air-cooled 2 cycle engines.
RECOMMENDED MIXING RATIO
GASOLINE 50: OIL 1
WARNING! Always shut off engine before fueling. Never add fuel to a machine with a running or
hot engine.
WARNING! Never smoke while refueling and avoid inhaling petrol fumes.
WARNING! Be careful when opening the fuel tank as pressure may have formed inside.
Before refueling:
• Shake the fuel mixture container well.
• Place the unit on a flat stable surface, with the fuel tank cap facing upwards.
• Clean the fuel tank cap and the surrounding area to avoid any dirt
from entering the tank during refilling.
• Carefully open the fuel tank cap to allow any pressure inside to
decrease gradually.
• Unscrew the mixture container cap.
• Use a funnel to refill and avoid over-filling the tank.
• Pour the fuel carefully to avoid spilling.
• Screw the tank cap on firmly by hand.
Draining fuel
• Hold a collection container beneath the fuel drain bolt.
• Unscrew the tank cap and remove it.
• Allow the fuel to run out completely.
• Screw the tank cap on firmly by hand.
WARNING! Always close the fuel tank cap firmly.
WARNING! Immediately clean all traces of fuel which may have dripped
on the machine or the ground and do not start the engine until the
petrol fumes have dissipated.
Altri manuali per WB26BCI
1
Indice
Altri manuali Badger Basket Tagliabordi


