barkman oasis Istruzioni per l'installazione

oasis compact fireplace
stone oasis collection
assembly, operation and maintenance guide

2
IMPORTANT: READ PRIOR TO INSTALLATION
It is the responsibility of the consumer to read and follow the proceeding information.
WARNING:
1. FAILURE TO FOLLOW THESE INSTRUCTIONS COULD RESULT IN FIRE OR
EXPLOSION, WHICH COULD CAUSE PROPERTY DAMAGE, PERSONAL INJURY OR
DEATH.
2. IMPROPER INSTALLATION OR MAINTENANCE OF THIS PRODUCT MAY RESULT IN
DAMAGE TO PROPERTY, INJURY OR DEATH.
3. Read the installation, operation and maintenance instructions thoroughly before
installing or servicing this equipment.
Barkman Concrete Ltd. is not liable for any property damage or bodily injury caused
by failure to follow the installation instructions, improper use of the product or any
negligence or carelessness of the consumer.
INSTALLATION AND USE:
1. Improper installation, adjustment, alteration, service or maintenance can cause injury,
or property damage. Read the installation instructions thoroughly before installing the
fireplace.
2. DO NOT TOUCH AREAS IF FIRE IS BURNING, SEVERE BURNING MAY RESULT.
CLOTHING IGNITION MAY RESULT.
3. Carefully supervise children near the fireplace.
4. Keep clothing, furniture, draperies and other combustibles away from the fireplace.
5. Fireplace is for outdoor use only. Place the fireplace in an area where wind won’t
disturb the flames.
6. DO NOT OBSTRUCT THE OPENING OF THE FIREPLACE, OR OTHERWISE
OBSTRUCT THE FLOW OF AIR.
7. FIREBRICK-RELATED FIRE CAN OCCUR WHEN THERE IS A FAILURE TO MAINTAIN
THE REQUIRED CLEARANCES (AIR SPACES) TO COMBUSTIBLE MATERIALS.
8. Certain steps in the installation process will require more than one person.
9. Curing is crucial to the operation of your fireplace. Ensure to follow the direction on
page 14 of the instruction guide.
10. Plan to install the fireplace a week before intended use to allow enough time for the
curing process.

3
FIRE WARNING:
DO NOT USE LANDSCAPE GLUE TO THE FIREBRICK AND
FIRECAP COMPONENTS AS THIS IS A FIRE HAZARD. ONLY USE
SILICONE FOR THIS PURPOSE.
DO NOT OVERLOAD WOOD INTO THE FIREBOX WHEN IN USE.
11. Never leave the fireplace unattended when in use.
12. We strongly recommend the installation of a steel fireplace grate on the floor of the
fireplace before starting to make fires. This makes it easier to ignite the fire, directing
heat away from the floor which extends the life of the floor by inhibiting the formation
of small cracks from excess heat.These grates are available at hardware and building
supply outlets.
DANGERS OF FIRE:
1. If the information in these instructions is not followed exactly, a fire or explosion may
result in property damage, injury or death.
2. Beware of flying sparks from mouth of the firebox, made up of firebrick components.
Make sure that no combustible materials are within range of firebrick components at any
time.
3. Beware of extremely high temperatures in the fireplace when in use and for hours
after use. DO NOT PUT UNPROTECTED HANDS OR ARMS INSIDE WHILE FIREPLACE
IS LIT.
4. DO NOT USE CHARCOAL, PRESSURE TREATED LUMBER, CHIPPED WOOD
PRODUCTS, SAPPY WOOD (SUCH AS PINE), LAMINATED WOOD, OR ANY MATERIAL
OTHER THAN DRY MEDIUM OR HARD NATURAL FIREWOOD.
5. DO NOT USE LIQUID FUEL (firelighter fluid, gasoline, kerosene or similar liquids) TO
START OR MAINTAIN A FIRE.
PROXIMITY TO BUILDINGS AND OTHER COMBUSTIBLE MATERIALS:
1. The fireplace should be used in accordance with the by-laws, regulations, local
building codes and laws of your jurisdiction. Please confirm that use of this product is in
compliance with the by-laws, regulations and laws of your jurisdiction before installing or
using it.
2. Make sure that you locate your respective gas lines, wires, water pipes and/or any
above ground and underground services in your area and install your fireplace in the
proper distance away from them. Check with your provider for location and distance
requirements prior to installation.
This manual must be kept by the customer as long as they own their fireplace kit. Check
with your insurance provider concerning the installation, use, value implications and/or
any other considerations in regards to your fireplace kit.

4
This kit measures 44”W x 40”D x 78”H.
Materials Included:
8” x 12” quarry stone - 115 pieces
8” x 8” quarry stone - 37 pieces
8” x 4” quarry stone - 39 pieces
firebricks - 83 pieces
4” x 2.25” - 2 pieces
7.5” x 2.75” - 1 piece
7.5” x 4” - 8 pieces
7.75” x 4” - 4 pieces
9” x 2.25” - 6 pieces
9” x 2.75” - 2 pieces
9” x 4” - 60 pieces
hearth
mantle 1
mantle 2 (front and back)
mantle 3 (front and back)
mantle 4
firecap
spark arrestor
plastic shims
2 tubes of landscape glue
2 tubes of high temperature silicone
gloves
instruction guide
Note:
If installing your oasis compact fireplace on an
unstructured base, please ensure to follow these
steps:
• Excavate area approx. 9” below grade
• Excavate approx. 6” larger than your actual
kit dimensions to ensure a stable base.
• Fill with ¾” down limestone and compact
firmly
• Level out ½” of sand and install kit as per the
instruction guide.
• If you are installing on a solid base such as
an existing patio and/or base prep is not
necessary, then you can proceed to the first
step.
These instructions may not refer to all base
conditions. As this kit is incredibly heavy, base
prep will greatly depend on existing ground
conditions and may require alternate techniques.
8 x 12 quarry stone 8 x 4 quarry stone
8 x 8 quarry stone 4 x 2.25 firebrick
7.5 x 2.75 firebrick 7.5 x 4 firebrick
7.75 x 4 firebrick 9 x 2.25 firebrick

5
hearth
mantle 2 (front)
mantle 3 (back)
9 x 4 firebrick9 x 2.75 firebrick
mantle 1 mantle 2 (back)
mantle 3 (front)
plastic and steel shims
mantle 4
firecap spark arrestor

6
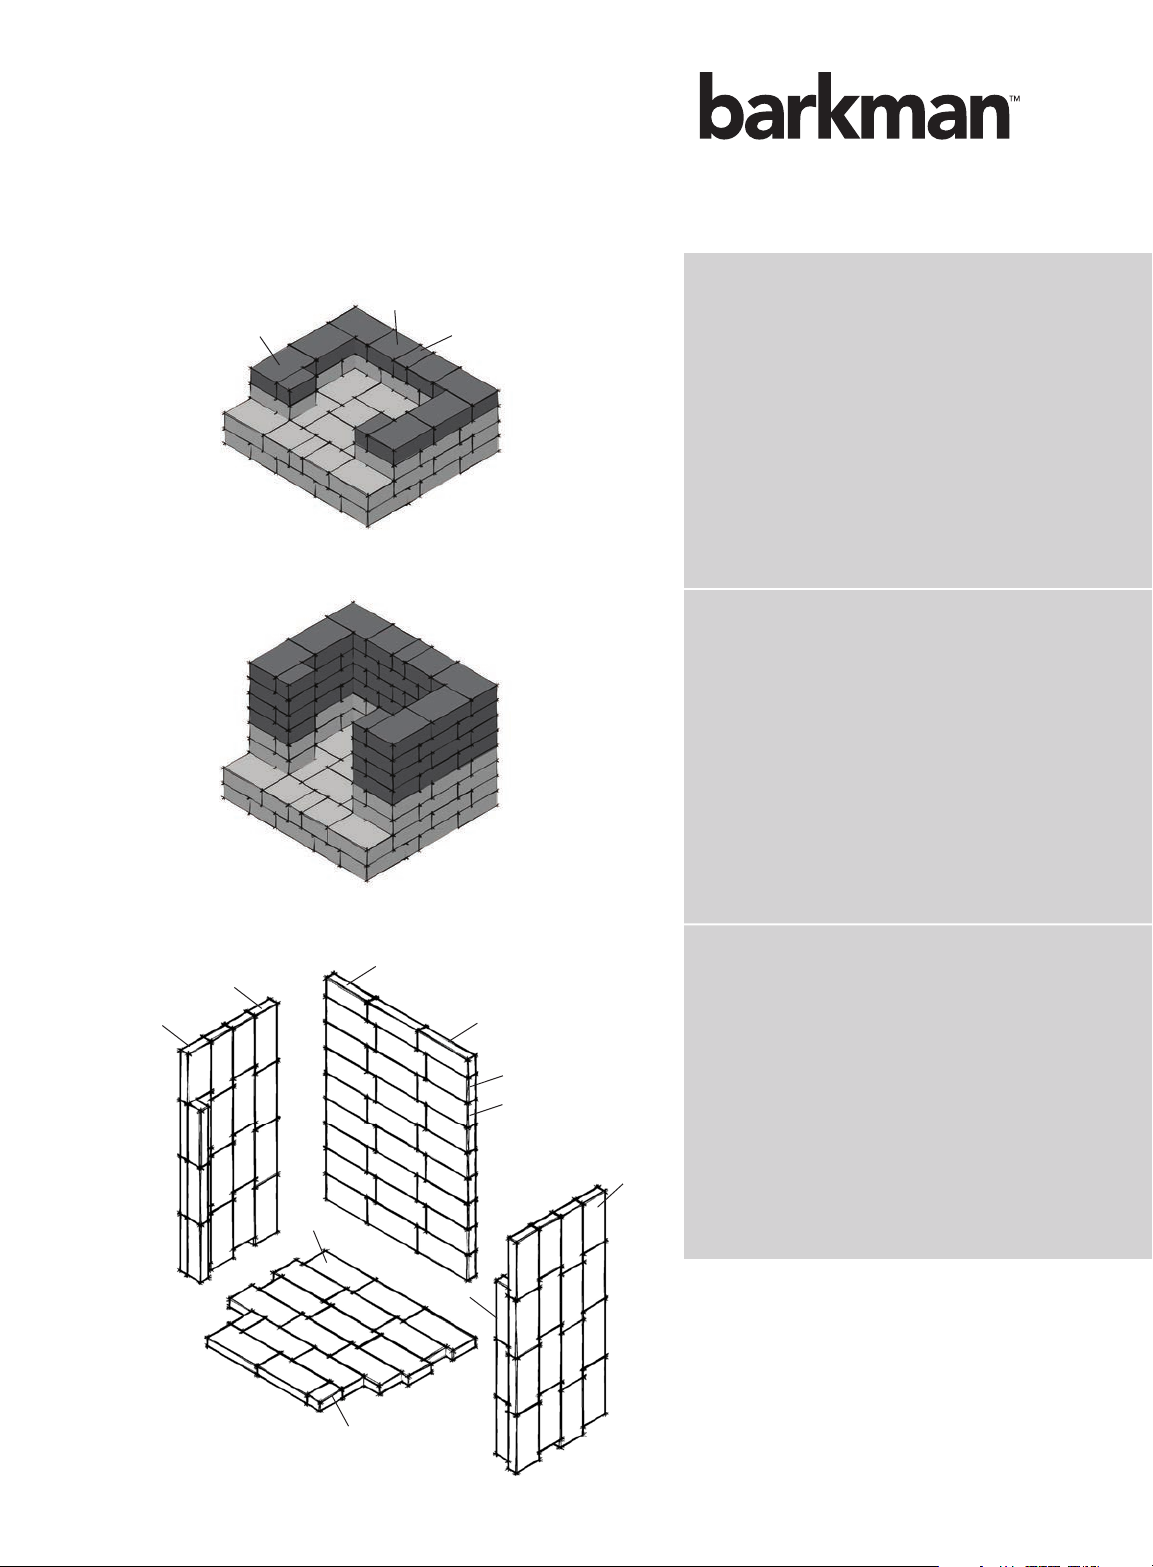
1. On your prepared level base, lay out
the first layer as in the diagram.
8 x 12 (14)
8 x 8 (4)
8 x 4 (5)
IMPORTANT: Periodic checks must
be made to ensure that the horizontal
and vertical layers remain level. If layers
are not level, use the included shims to
adjust as necessary.
2. Lay out the second layer directly on
top of the first.
8 x 12 (15)
8 x 8 (4)
8 x 4 (2)
3. Lay out the third layer of the wall
surround as shown in the diagram.
Glue this layer down using the
included landscape adhesive.
8 x 12 (7)
8 x 8 (2)
8”x12”
8”x4”
8”x12”
8”x4”
8”x8”
8”x8”
8”x8”
8”x12”
7
4. Lay out the fourth layer of the wall
surround as indicated in the diagram.
8 x 12 (6)
8 x 8 (2)
8 x 4 (3)
IMPORTANT: Periodic checks must
be made to ensure that the horizontal
and vertical layers remain level. If layers
are not level, use the included shims to
adjust as necessary.
5. Repeat the patterns from steps 3&4
three times to a height of 8 layers.
6. Start installing the firebrick surround
inside the wall of the fireplace as
indicated by the diagrams to create a
firebox. Install in this order:
bottom first; then left and right sides;
finally the back. Affix firebrick pieces
to the wall using the included high
temperature silicone. Ensure that
both surfaces are dry and free of
debris to allow for optimal adhesion.
Run silicone along each horizontal
layer along with the backs of each
individual piece.
Firebrick Pieces:
4 x 2.25 (2)
7.5 x 2.75 (1)
7.5 x 4 (8)
7.75 x 4 (4)
9 x 2.25 (6)
9 x 2.75 (2)
9 x 4 (60)
8”x12”
8”x 8”
8”x4”
LEFT
BACK
RIGHT
BOTTOM
9”x2 3/4”
7 1/2”x4”
9”x4”
7 1/2”x2 3/4”
7 3/4”x4”
9”x4”
9”x4”
4”x2 1/4”
7 3/4”x4”
9”x2 1/4”

8
7. Lay out the ninth layer of the wall
surround as indicated in the diagram.
8 x 12 (5)
8 x 8 (2)
8 x 4 (4)
IMPORTANT: ONLY USE
SILICONE IN SECURING THE
FIREBRICK.
8. Place the mantle into the ninth layer
as indicated in the diagram. Glue
the mantle where is contacts the
quarry stone below using the
included landscape adhesive.
9. Lay out the tenth layer as indicated in
the diagram.
8 x 12 (8)
8 x 8 (2)
8 x 4 (2)
8”x8”
8”x12” 8”x4”
8”x12”
8”x4” 8”x8”

9
10. Lay out the eleventh layer as
indicated in the diagram. Glue the
accent 8x12 to the quarry stone using
the included landscape adhesive.
8 x 12 (8)
8 x 8 (2)
8 x 4 (2)
11. Lay out the twelfth layer as indicated
in the diagram.
8 x 12 (6)
8 x 8 (2)
8 x 4 (3)
IMPORTANT: Periodic checks must
be made to ensure the horizontal and
vertical layers remain level. If layers are
not level, use included shims to adjust
as necessary.
12. At this stage, the firebox should be
complete. Double check if all the
pieces are completely flushed
against the inside wall of the
fireplace.
Firebrick Pieces:
4 x 2.25 (2)
7.5 x 2.75 (1)
7.5 x 4 (8)
7.75 x 4 (4)
9 x 2.25 (6)
9 x 2.75 (2)
9 x 4 (60)
8”x8”
8”x4”
8”x12”
LEFT
BACK
RIGHT
BOTTOM
9”x2 3/4”
7 1/2”x4”
9”x4”
7 1/2”x2 3/4”
7 3/4”x4”
9”x4”
9”x4”
4”x2 1/4”
7 3/4”x4”
9”x2 1/4”
8”x12”
8”x8”
8”x4”

10
This shows how the fireplace will
look including all the firebricks
installed.
13. Install the firecap on top of firebrick
as indicated in the diagram. Apply
high temperature silicone to the
tops of the firebrick as well as to the
quarry stone supports on the front.
14. Place the spark arrestor at the top of
the fireplace setup as shown.
IMPORTANT: ONLY USE SILICONE
IN SECURING THE FIREBRICK.
ALLOW SILICONE TO SET 2 HOURS
BEFORE INSTALLING THE FIRECAP.
Altri manuali per oasis
2
Indice
Altri manuali barkman Camino da interno


