Bike Friday Ever-E-Day 2021 Manuale utente
Using Your Bike Friday®
Ever-E-Day

Green Gear Cycling, Inc.
3364 W 11th Ave. Eugene, OR 97402
800-777-0258 USA & Canada
+1-541-687-0487 Int’l • +1-541-687-0403 Fax
www.bikefriday.com • [email protected]
version 4/30/20
800-777-0258 •+1-541-687-0487 www.bikefriday.com

Table of Contents
Congratulations / If You Need Help
3
A Word on Safety / Your Tools
4
Unpacking your Ever-E-Day
5
Assembly: Install seatmast and seatpost
6-10
Assembling Riser, Stem, and Handlebars
7
Connect OSATA Frame
8
Installing wiring, housing, and cabling
9
Install and connect battery
10
Using a Quick Release
11-12
Assembly: Install Front Wheel, Disc Brake
12
Adding Brake Cable Slack
13
Double Check Steering
14
Install Pedals
15
Double Check Your Bike Friday
16
Adjusting your Ever-E-Day
17-18
Saddle Height
17
Handlebar Height
18
Bike Friday Service Overhauls
19
Bike Friday Service
20
More Maintenance Tips and Information
21-23
Airport and Travel Tips
24
Warranty Information
25
2www.bikefriday.com 800-777-0258 •+1-541-687-0487

Welcome to the Community
Congratulations!
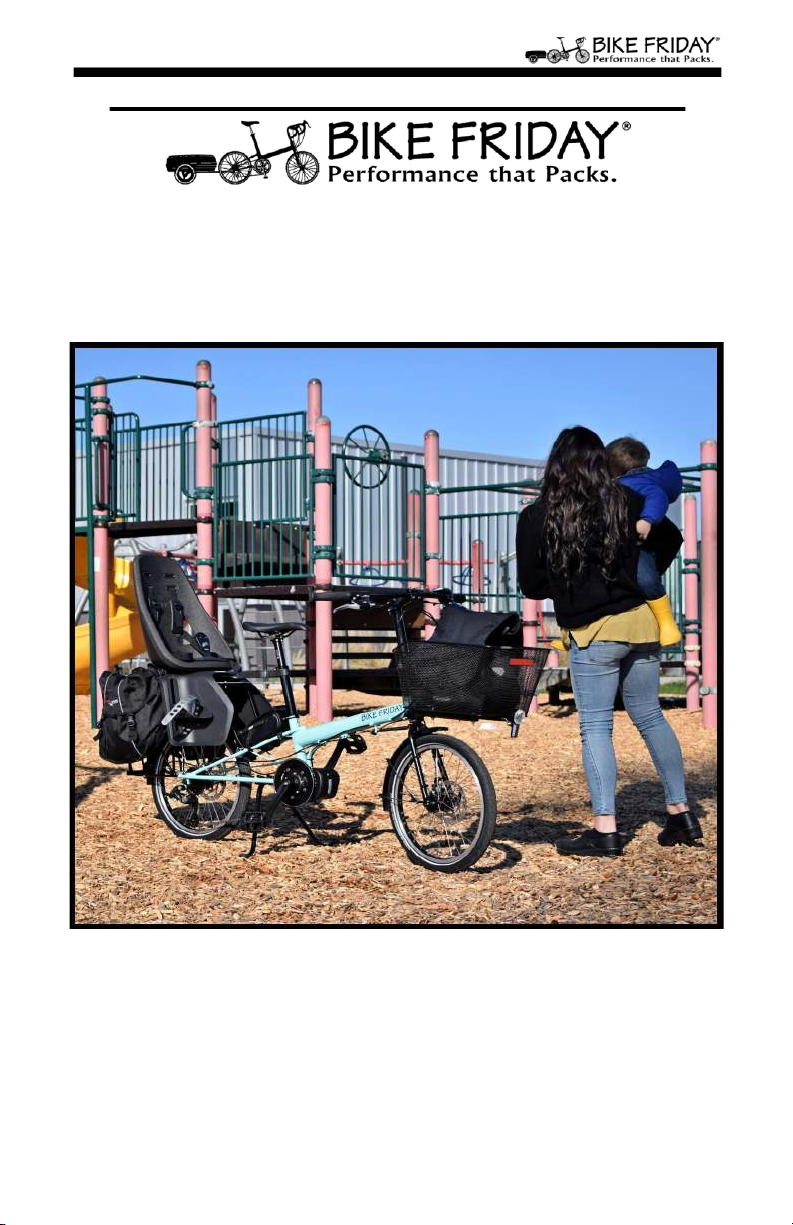
You have just purchased the most versatile Electric Cargo
Bike available today. Your bike has been carefully
designed and constructed for your personal needs. All of
our bikes are manufactured in our Eugene, Oregon factory
by real cyclists who care about our customers and our
products.
Please take your time reviewing this manual before you
assemble your new Bike Friday. You will find your new
bicycle to be simple and reliable anywhere you go!
If You Need Help . . .
If you need technical assistance with any Green Gear® Cycling
product, or are unclear on the proper operation of your Bike
call and a Service Technician will help you get back on the
road. Our toll-free number in the US and Canada is
800-777-0258; international is +1-541-687-0487. Normal
business hours are 9 a.m. to 5 p.m. Monday through Friday
Pacific Time.. Because we understand the needs of world
travelers, we offer 24-hour technical support in emergencies.
If necessary, please call our regular number and our
answering service can forward you to a Service Technician on
call.
Extra Accessories
We also sell an extensive line of bicycle and travel
accessories. Whether you are riding the local back roads or
venturing into foreign lands we have the gear you need. Call
us for information on spare tires, tubes, replacement parts,
fenders, racks, bags, or other items to complete your Travel
System. You can purchase these products from our online
store: www.store.bikefriday.com
More Information
To check out our products, find other useful information,
discover Bike Friday events and Yak with other Bike Friday
owners on the bulletin board, go to our main website at:
www.bikefriday.com
Blue skies and happy trails from Green Gear Cycling
3www.bikefriday.com 800-777-0258 •+1-541-687-0487

A Word on Safety
Bicycles are a lot of fun, but improper use can result in
harm. Please, always ride safely!
• Always have all passengers wear a helmet.
• Follow the rules of the road, and be courteous.
• Use front and rear lights after dark.
• Dress appropriately for the weather, the season, and
lighting conditions. Be seen!
• Always carry a spare tube, patch kit, pump and a tool
kit.
• Keep your bicycle in good shape.
• Check your tire pressure before every ride.
• Make sure all quick releases are secure.
• Have your bicycle routinely serviced for trouble-free
travels.
Bicycle Assembly and Maintenance
Correct assembly is essential to ensuring your comfort,
performance and safety while riding the Ever-E-Day. Even if
you have the experience and tools to complete these
essential assembly steps before your first ride, Bike Friday
recommends having a reputable bike mechanic check your
work.
If you feel you do not have the experience and tools to
complete assembly and fit, Bike Friday strongly
recommends having the bike assembled by a reputable bike
mechanic for best results.
Your Ever-E-Day uses industry standard components and
most bike shops should be able to service your bicycle.
They are welcome to call or email us with questions. We
also encourage you to learn how to work on your own bike.
If you are not familiar with bicycle maintenance, consider
taking a local class. It will improve your confidence and
self-sufficiency as you venture across the globe or explore
your own hometown.
4www.bikefriday.com 800-777-0258 •
+1-541-687-0487
Unpacking your Ever-E-Day
Unpacking Your Ever-E-Day From a Box
Opening your box may present an intimidating
sight, particularly if you ordered many accessories.
Do not worry; we work hard to keep our products as
simple as possible. We recommend finding a quiet
area and some room to spread out.
This manual will address the fundamentals of unpacking,
assembly and adjusting techniques. However, because
your bicycle was built for you, you might discover that
your bike was packed at the factory slightly different
than the one in this manual.
Your Ever-E-Day should only require minimal assembly. It
will take approximately 40-60 minutes and require a
basic level of technical skill.
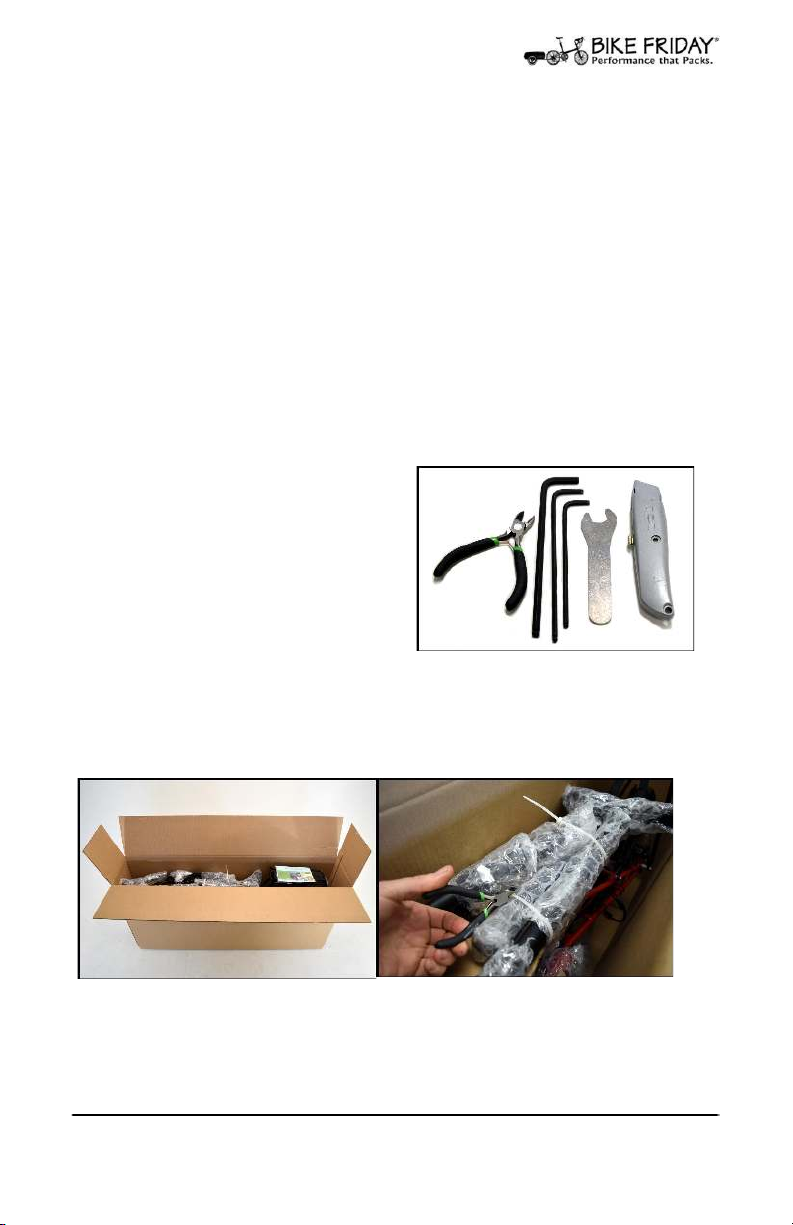
You will need a safety knife for
cutting the box open, 4, 5 and
6mm Hex/Allen wrenches, a
15mm open/pedal wrench and
a pair of scissors (or better yet
wire cutters, snips or diagonal
cutters) to cut zip ties.
Fig. 1 Tools Required for Ever-E-Day assembly.
[Note: Depending on the components and accessories you
have purchased with your Bike Friday, your specific model
may require additional tools.]
Fig. 2 Open the shipping box and remove this manual,
packing material, and various bicycle parts at the top of
the box. Take care not to damage the frame while cutting
zip ties.
5www.bikefriday.com 800-777-0258 •+1-541-687-0487
Unpacking your Ever-E-Day
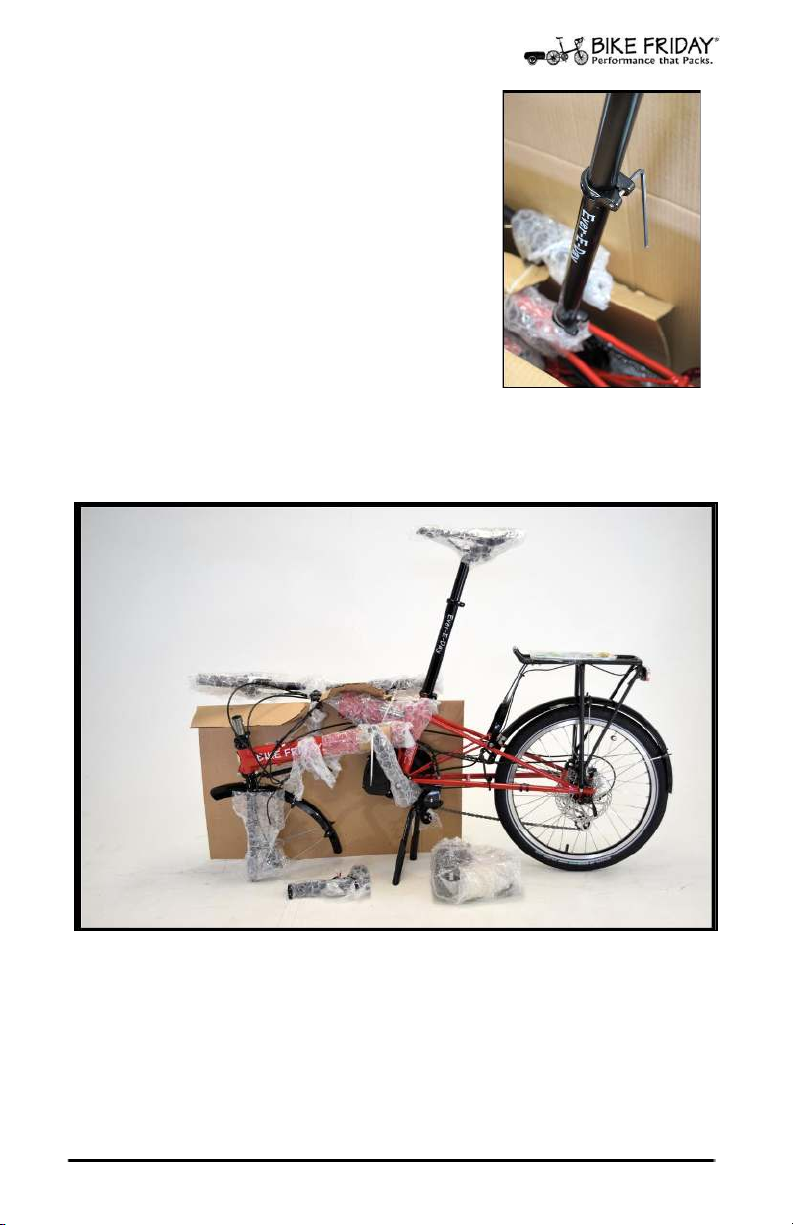
Remove the bubble wrap and zip ties
to expose your seatmast, seatpost, and
saddle. Minding the minimum insertion
marks, install these components using
the 5mm Allen as shown to the right in
Fig 3.
Note: The minimum insertion mark is
etched at 4” from the bottom on the
mast. This is the minimum amount of
the mast that must be inserted
(overlapped) in the frame.
Now the bike is ready to be lifted and clamped in a repair
stand if desired. The instructions for assembly will
proceed as if you do not have a repair stand available.
Fig. 4. Either cut the front panel of the box and fold it
down, or lift the bike out of the box so it is set up as
shown. Accessories and components will differ for your
specific Ever-E-Day ensemble.
6www.bikefriday.com 800-777-0258 •+1-541-687-0487
Assembling your Ever-E-Day
Assembling Riser, Stem, and Handlebars
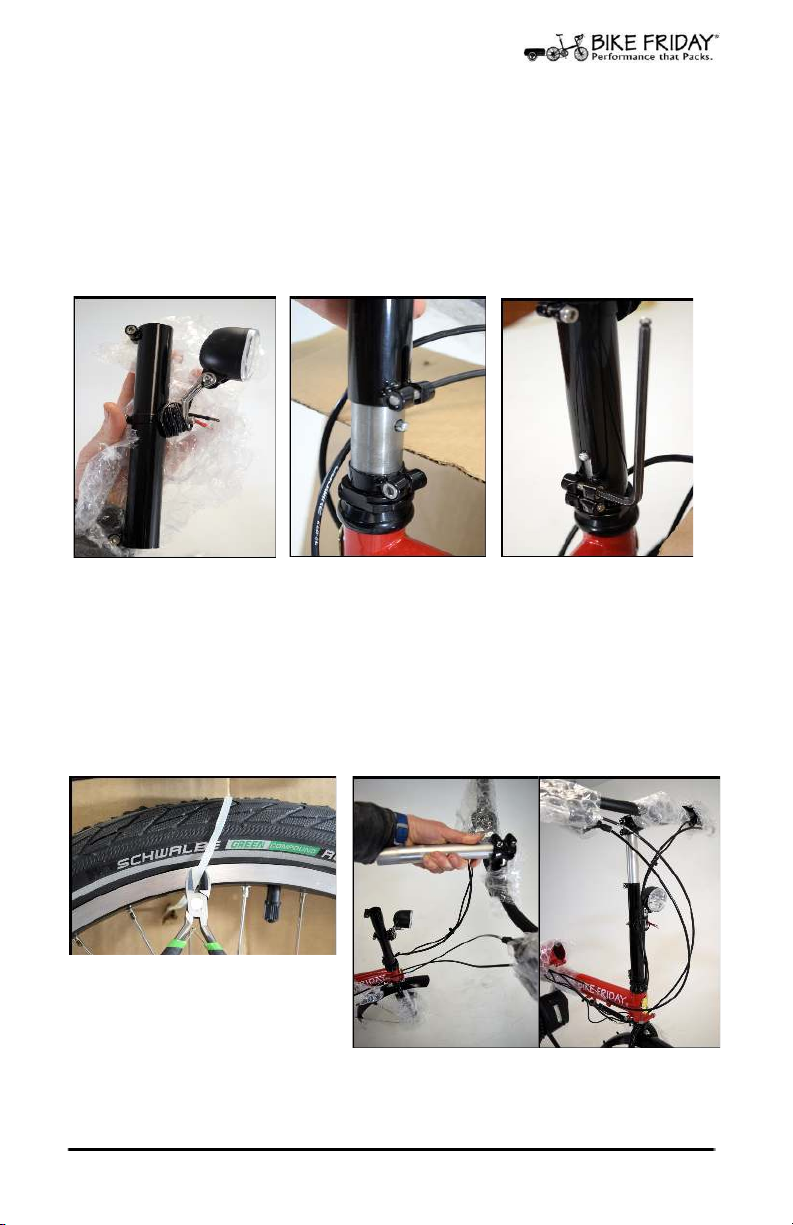
Locate riser clamp [Fig.5] Push down the button on the steerer
tube, slide riser clamp over steerer tube until button pops into
place. [Fig. 6] Tighten riser clamp. [Fig. 7]
Check that this system is secure by holding the front wheel
between your legs and attempt to turn the handlebars. If
properly adjusted you should be unable to turn the handlebars
while the wheel is held in place.
Fig. 5 Riser Clamp Fig. 6 Push Button Fig. 7 Tighten Riser Clamp
Cut zip ties over the front wheel and handlebars [Fig.8]
Check that all cables and housing are not kinked or twisted
around before installing [Fig.9] . Also note minimum insertion
mark on aluminum riser. This mark must be covered by the top
of the riser clamp for safe riding. Use 5mm allen to tighten.
Fig. 8 Cut zip ties over the
front wheel and
handlebars
Fig. 9 Ensure housing is untwisted
7www.bikefriday.com 800-777-0258 •+1-541-687-0487
Assembling your Ever-E-Day
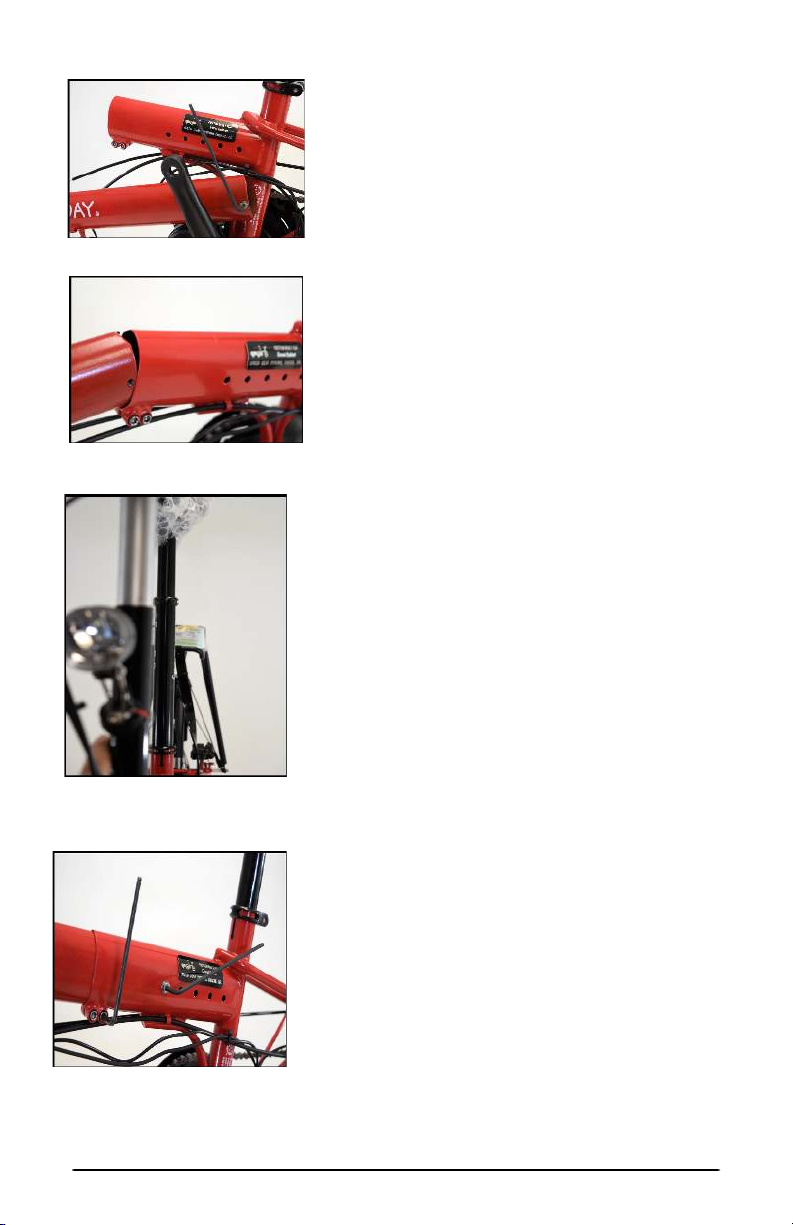
Fig. 10 Remove sizing bolt
Fig. 11 Insert front section
Fig. 12 OSATA frame aligned
properly
Fig. 13 Tighten pinch bolts and
sizing bolt.
Attaching front section to
mid section (One Size
Adjusts To All (OSATA))
Cut zip ties and remove packing
material on the front frame
section. Remove the sizing bolt
from the front frame section.
[Fig.10]
Insert the front frame section
(male) into the frame mid
section (female) opening.This
connection should be greased
and slide easily when aligned.
[Fig. 11] Align threaded hole at
end of front section to
preferred OSATA sizing hole.
50-60cm range. Reinsert sizing
bolt.[Fig. 13]
Before tightening the OSATA
pinch bolts, align the frame by
sighting along the riser and seat
mast. Riser and mast should be
parallel.[Fig.12]
Tighten the sizing bolt. Tighten
the main frame pinch bolts with
a 5mm hex wrench. [Fig. 13]
Alternate tightening OSATA
pinch bolts until 8-10 Nm
torque is reached. This is
important for handling and
safety!
8www.bikefriday.com 800-777-0258 •+1-541-687-0487
Assembling your Ever-E-Day
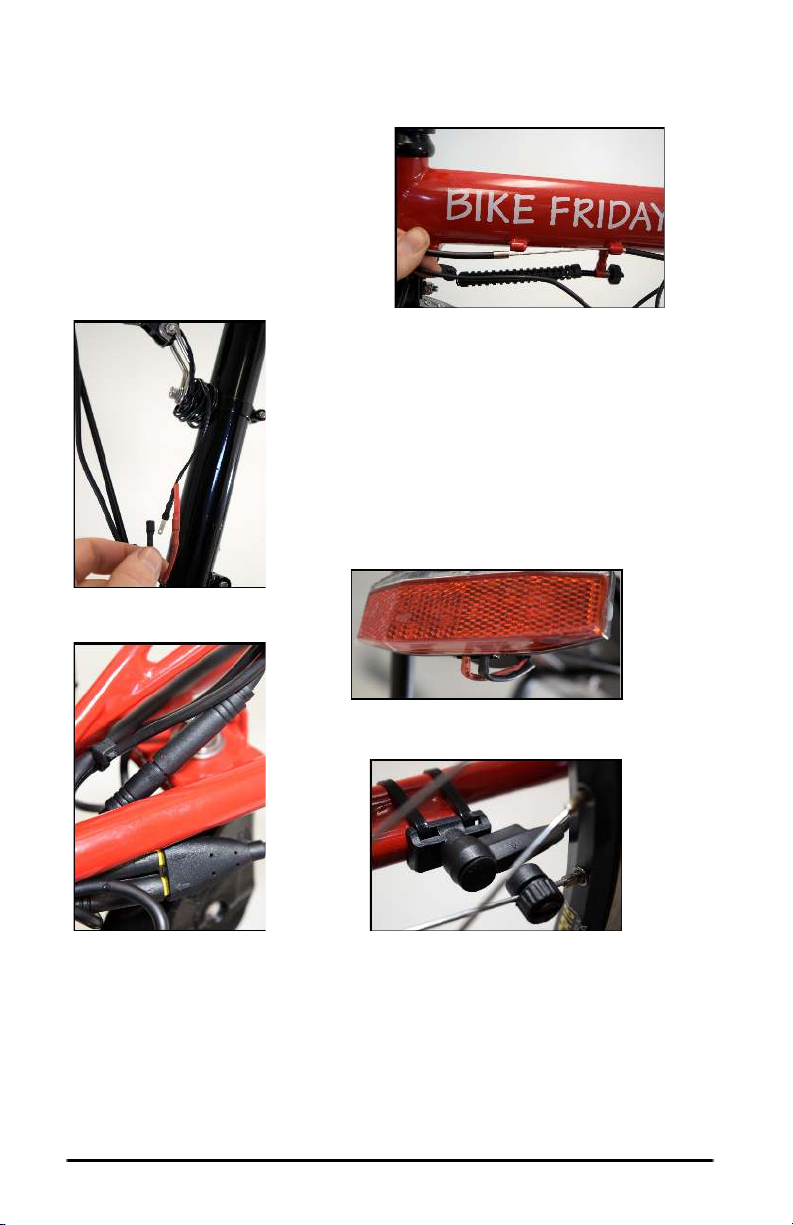
Installing wiring, housing, and cabling
Seat cable housing for rear brake
into rear cable stop and pull
front section of housing into front
cable stop. Repeat this process
for the rear derailleur.
[Fig. 14]
Fig. 14 Seat housing in stops
Integrated front and rear LED lights come
standard on the Ever-E-Day. Connect red to
red, black to black for the front light. If you
get the order incorrect don’t worry, the light
just won’t turn on. Flip the order and try
again. [Fig. 15] The rear light wiring
connects red to “+” and black to “-” [Fig. 16]
Fig. 15 Front Light
Fig. 16 Rear Light
Fig. 17 Wiring Detail Fig. 18 Speed Sensor
Wiring connections behind the bottom bracket shell are tested at the
factory. [Fig. 17] Small arrow/triangle on speed sensor should align
with magnet on rear wheel. [Fig. 18]
9www.bikefriday.com 800-777-0258 •+1-541-687-0487
Indice
Altri manuali Bike Friday Bicicletta

Bike Friday
Bike Friday Hub Motor E-assist Manuale utente

Bike Friday
Bike Friday SAT R DAY Manuale utente

Bike Friday
Bike Friday Haul-a-Day Manuale utente

Bike Friday
Bike Friday Pocket Rocket Manuale utente

Bike Friday
Bike Friday Haul-a-day Elite Manuale utente

Bike Friday
Bike Friday Silk Manuale utente

Bike Friday
Bike Friday Pocket Rocket Manuale utente

Bike Friday
Bike Friday All-Packa Guida

Bike Friday
Bike Friday pakiT Manuale utente

Bike Friday
Bike Friday tikit Manuale utente


