Billow XMINI Manuale utente

USER GUIDE
XMINI
INTRODUCTION AND PRODUCT DESCRIPTION
Thank you for purchasing the Mini PC, Billow’s XMINI.
The XMINI is a MINI PC with Intel processor, 64GB internal memory, 4GB DDR3 RAM,
Bluetooth 4.0,Wi-Fi Dual band, hard disk compartment, 2 USB 3.0 ports, etc..
Elegant, reduced and minimalist design. Full expression.The XMINI has been designed
to combine design and functionality.Your VESA support allows you to place it behind
your monitor.
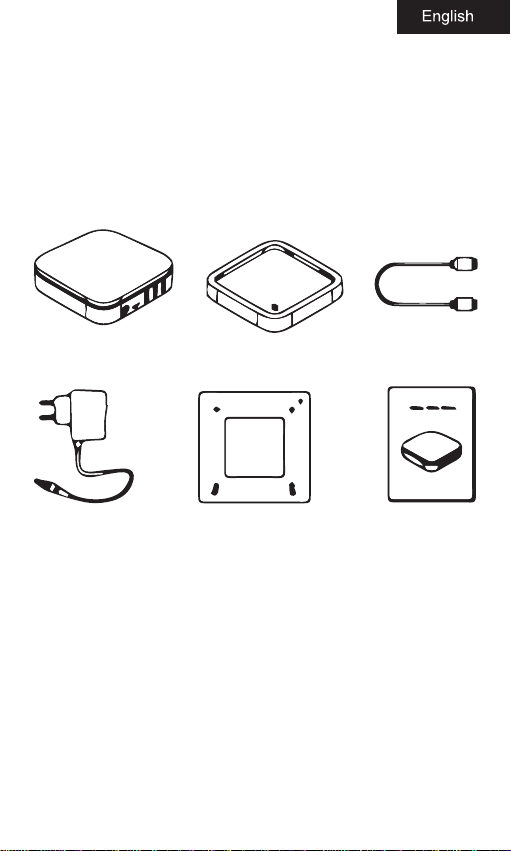
PACKAGE CONTENTS
XMINI Base HDMI Cable
Power Adaptor VESA Support User guide
Security Instructions
1. Read these instructions completely before using the equipment.
2. Keep these instructions in a safe place. Avoiding the wet place or
in high temperature.
3. Pay attention to all warnings in this guide and follow all
instructions.
4. Do not use this equipment near water. To reduce the risk of re
or electric shock, do not expose this apparatus to rain, liquids or
moisture. This product is not waterproof or oil proof.
5. Clean the equipment with a soft, dry cloth.

6. Do not block any ventilation openings. Install the equipment
according to the manufacturer’s instructions.
7. Do not install near any heat sources such as radiators, heat
registers, stoves, or other devices (including ampliers) that
produce heat.
8. Always power the device by the supplied 12VDC / 2.5A power
adapter
9. Protect the power cord from being pinched or pinched, especially
at the plug, and the point where it emerges from the equipment.
Make sure the power outlet is located near the equipment so that
it is easily accessible.
10. Use only accessories / accessories specied by the manufacturer.
11. Use only the media specied by the manufacturer, or sold with
the equipment. When used, use it with care to avoid damage.
12. Disconnect this equipment when it is not used for long periods
of time.
13. For problems with the device, contact the authorized technical
service.
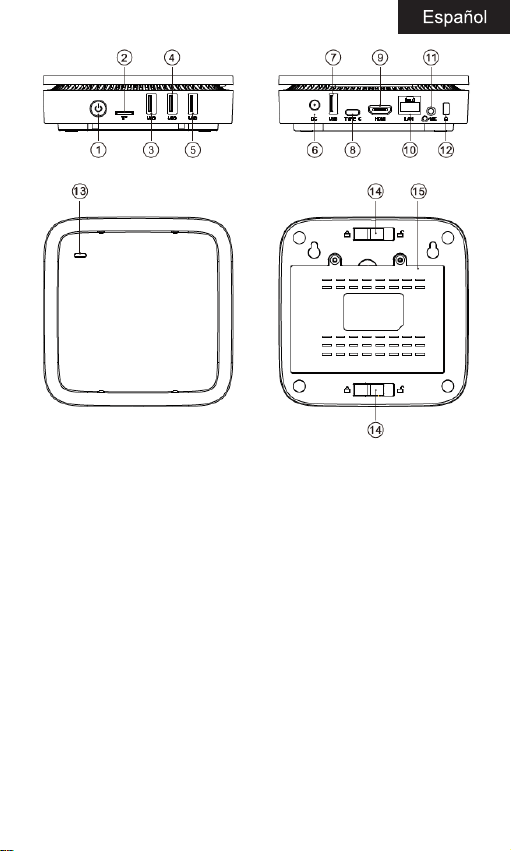
Parts Description
1. ON / OFF button
2. Micro SD slot
3. Usb 3.0 Port
4. Usb 3.0 Port
5. Usb 2.0 port
6. DC connector
7. Usb 2.0 connector
8. Type C connector
9. HDMI input
10. Ethernet input
11. Audio Output / Microphone Input
12. Security hole
13. Type C connector (base)
14. Base lock button
15. Section HDD

Installation and first launching
Connect a monitor to the HDMI input of the XMINI via the supplied
HDMI cable.
Connect a mouse and keyboard to the USB ports of the XMINI.
Connect other peripherals if necessary.
Connect an Ethernet cable between the Ethernet input of the
XMINI and the Ethernet output of your router if you are going to
make a wired LAN connection.
Connect the supplied power adapter between the DC input of the
XMINI and a household power outlet.
Press the ON / OFF button to turn on the XMINI.
Parts Description

Hard Disk Installation
If you want to expand the capacity of the XMINI you can connect a
2.5“SATA Hard Disk up to 2TB.

1. Remove the rear cover of the hard disk compartment.
2. Connect the hard drive to the SATA connector of the XMINI.
3. Close and re-screw the back cover.
Operative System Installation
The XMINI does not have an operating system installed, you must
acquire an Operating System in Pendrive format and perform
the installation of it following the steps of the operating system
assistant, make sure you have selected the pendrive unit in the
BIOS to start the installation from it.
To access the Bios press F2 or Delete repeatedly to access after
turning on the XMINI.
Problem Solving
My XMINI does not start.
Verify that the XMINI is connected to a household power outlet
through the supplied power adapter and that it is turned on.

Verify that the power cord and all cables are properly connected.
When I turn on my computer, the message “Operating system not
found”appears or Windows does not start
Remember that the operating system is not included.
Check if there is a pendrive that is not boot connected to one of its
USB ports. If there is one, remove it and then restart the XMINI
Make sure in the BIOS that the boot unit conguration is correct.
My monitor shows nothing
Check the power of your monitor and power on it.
Verify that the XMINI is properly connected to your monitor through
the supplied HDMI cable. Verify that the XMINI is not in standby
mode. Press any key to activate the screen.
My XMINI does not turn off
Try turning o the XMINI with the Shutdown command. The use of
other methods, including those listed here, may result in the loss of
unsaved data. If the Shutdown command does not work correctly,
follow these steps:
Restart the computer by pressing Ctrl + Alt + Delete.
Press the power button until the XMINI turns o.
Disconnect the XMINI from the power adapter.
Technical Support
Please for more information about the installation and conguration
of this product go to our website www.billowtechnology.com
Recycled: AEE REI-RAEE 5548 In this manual, the container (bin) symbol
indicates that the product is subject to the European directive 2002/96 /
EC, electrical and electronic products, batteries, and batteries and other
accessories must necessarily be subject to a selective collection.
At the end of the life of the device, make use of the recycling bins.This gesture
will help reduce the health risks and preserve the environment.
Municipalities and distributors, will provide essential details on recycling
your old device.This device carries an internal battery must be removed and
deposited separately for proper management.

Introducción
Gracias por adquirir el Mini PC, XMINI de Billow.
El XMINI es un MINI PC con procesador Intel, 64GB de memoria
interna, 4GB DDR3 de RAM, Bluetooth 4.0, Wi-Fi de Doble banda,
habitáculo para disco duro, 2 puertos USB 3.0, etc.
Diseño elegante, reducido y minimalista. Máxima expresión. El
XMINI ha sido diseñado para combinar diseño y funcionalidad. Su
soporte VESA le permite ubicarlo detrás de su monitor.
Contenido
XMINI Base Cable HDMI
Adaptador de Corriente Soporte VESA Guía de Usuario
Instrucciones de Seguridad
1. Lea estas instrucciones completamente antes de usar el equipo.
2. Guarde estas instrucciones en un lugar seguro. Evitando el lugar
mojado o en alta temperatura.
3. Preste atención a todas las advertencias que aparecen en esta
guía y siga todas las instrucciones.
4. No use este equipo cerca del agua. Para reducir el riesgo de
incendio o descarga eléctrica, no exponga este aparato a la lluvia,
líquidos o humedad. Este producto no es a prueba de agua ni a
prueba de aceite.

Adaptador de Corriente Soporte VESA Guía de Usuario
5. Limpie el equipo con un paño suave y seco.
6. No bloquee ninguna abertura de ventilación. Instale el equipo de
acuerdo con las instrucciones del fabricante.
7. No lo instale cerca de fuentes de calor como radiadores, registros
de calor, estufas u otros dispositivos (incluidos amplicadores) que
produzcan calor.
8. Alimente el dispositivo siempre por el adaptador de corriente
suministrado de 12VDC/2.5A
9. Proteja el cable de alimentación contra pisadas o pellizcos,
especialmente en el enchufe, y el punto donde emerge del equipo.
Asegúrese de que la toma de corriente esté ubicada cerca del
equipo para que sea de fácil acceso.
10. Utilice únicamente accesorios / accesorios especicados por el
fabricante.
11. Use solo el soporte especicado por el fabricante, o vendidos
con el equipo. Cuando se use, úselo con cuidado para evitar daños.
12. Desconecte este equipo cuando no se use durante largos
períodos de tiempo.
13. Para problemas con el dispositivo contacte con el servicio
técnico autorizado.
Descripción de las Partes
1. Botón ON/OFF
2. Ranura Micro SD
3. Puerto Usb 3.0
4. Puerto Usb 3.0
5. Puerto Usb 2.0
6. Conector DC
7. Conector Usb 2.0
8. Conector Tipo C
9. Entrada HDMI
10. Entrada Ethernet
11. Salida Audio / Entrada Micrófono
12. Oricio de seguridad
13. Conector Tipo C (base)
14. Pulsador bloqueo Base
15. Habitáculo HDD
Instalación y primera puesta en marcha.
Conecte un monitor a la entrada HDMI del XMINI a través del cable
HDMI suministrado.
Conecte un ratón y teclado a los puertos USB del XMINI.
Conecte otros periféricos si es necesario.
Conecte un cable Ethernet entre la entrada Ethernet del XMINI y la
salida Ethernet de su router si va a realizar una conexión LAN por
cable.
Conecte el adaptador de corriente suministrado entre la entrada
DC del XMINI y una toma de red eléctrica del hogar.
Presione el botón ON/OFF para encender el XMINI.
Indice
Lingue:


