Black olive PELLET GRILL Manuale utente

OWNER’S MANUAL
50-2615
A mAjor cAuse of fires is fAilure
to mAintAin required cleArAnces
(Air spAces) to combustible
mAteriAls. it is of utmost
importAnce thAt this product
be instAlled only in AccordAnce
with these instructions
WARRANTY REGISTRATION
blackolivegrill.com/registration
OWNER’S MANUAL
4001609


3
Safety Precautions
Please read this entire manual before installation and use of
this Pellet fuel-burning aPPliance. failure to follow these
instructions could result in ProPerty damage, bodily injury or
even death.
Contact local building or re ofcials about restrictions and installation inspection
requirements in your area
Your pellet grill lights DIFFERENTLY from other grills
You must follow the included lighting instructions (pg.8) in order to prevent damage to your grill
and achieve desired lighting results.
When opening your grill at high temperature (400OF), it is important to lift the lid slowly preventing
any hot smoke from burning your hand. Always use protective heat resistant gloves.
When handling hot ceramics or cooking surfaces, use appropriate protection to avoid burning
injuries. Always use caution when setting hot items on other surfaces.
Keep your pellets DRY
Do not use wet pellets. Keep your spare pellets in a dry environment where they won’t absorb
excess moisture.
After rst use, INSPECT all fasteners for tightness
The metal band on the Black Olive is designed to keep the top of your grill secure. Due to
temperature changes causing expansion and contraction, checking the tightness of these ttings
after the rst few uses is highly recommended.
DO NOT use water to clean the inside of your grill
The ceramics are porous and will absorb the water. Your grill is self-cleaning. Simply close the
lid after use, allowing any food residue to burn off and carbonize. At the beginning of your next
cook, scrape off the carbon remnants from the cooking surface with a wire brush.
Disposal of ashes
Ashes should be placed in a metal container with a tight-tting lid. The closed container of ashes
should be placed on a non-combustible oor or on the ground, well away from all combustible
materials, pending nal disposal. When the ashes are disposed of by burial in soil or otherwise
locally dispersed, they should be retained in the closed container until all cinders have thoroughly
cooled.
DO NOT use accessories not specied for use with this appliance

Safety Precautions
Follow these guidelines to prevent this colourless, odourless gas from poisoning you,
your family or others.
• Know the symptoms of carbon monoxide poisoning: headache, dizziness, weakness, nausea,
vomiting, sleepiness, and confusion. Carbon monoxide reduces the blood’s ability to carry
oxygen. Low blood oxygen levels can result in loss of conciousness and death.
• See a doctor if you or others develop cold or u-like symptoms while cooking or in the vicinity
of this appliance. Carbon Monoxide poisoning, which can easily be mistaken for a cold or u,
is often detected too late
• Alcohol consumption and drug use increases the effects of carbon monoxide poisoning
Carbon monoxide is especially toxic to mother and child during pregnancy, infants,
the elderly, smokers, and people with blood circulatory system problems, such as
anemia, or heart disease.
Save these instructions for future reference

5
Safety Precautions .................................................................................. 3
Table of Contents ..................................................................................... 5
Specications .......................................................................................... 6
Contents ................................................................................................. 7
Uncrating ................................................................................................ 8
Assembly ............................................................................................... 10
Installation Instructions .......................................................................... 14
Lighting Instructions ............................................................................... 15
Operating Instructions ............................................................................ 16
Smoking Times and Temperatures ............................................................ 17
Grilling Times and Temperatures .............................................................. 18
Maintenance and Service ......................................................................... 19
Black Olive Accessories ............................................................................20
Parts Diagram .........................................................................................21
Parts List ................................................................................................23
Troubleshooting ......................................................................................25
Technical Specications ...........................................................................28
Warranty ................................................................................................29
Table of Contents

6
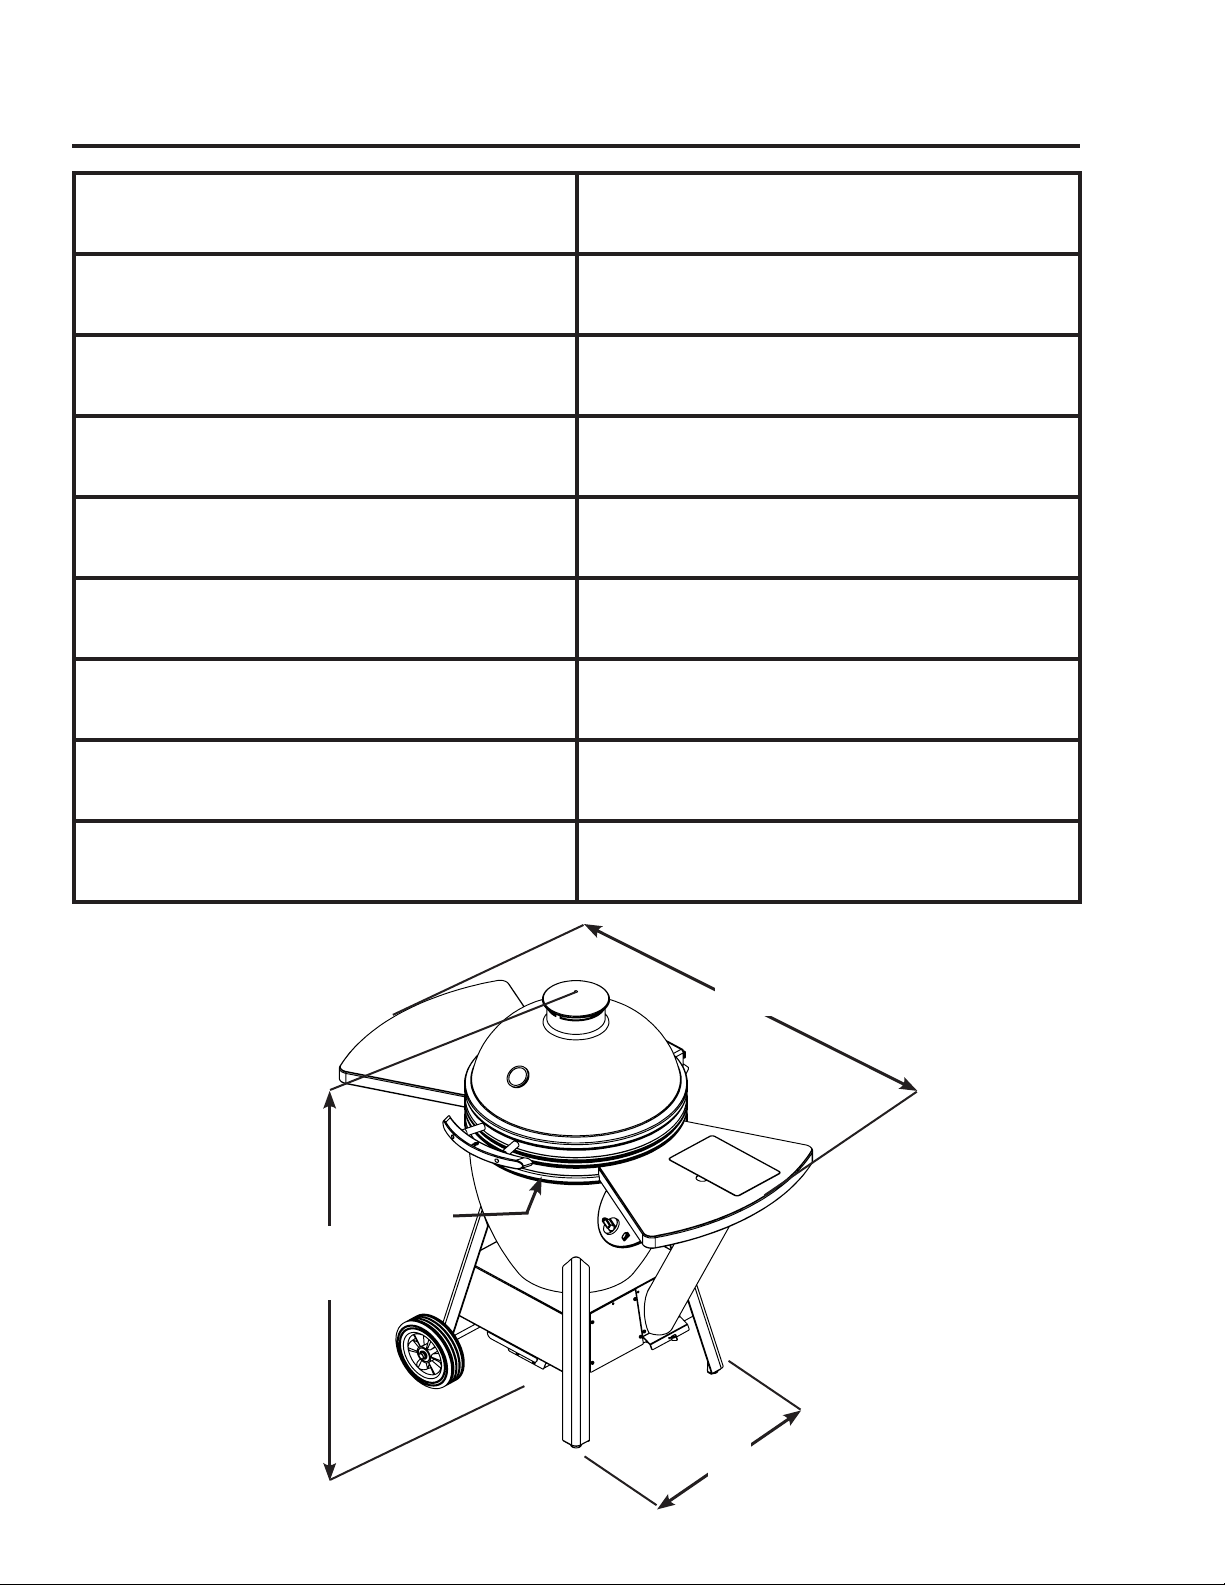
SPECIFICATIONS
Grilling Area 19 3/8” ( 290 sq in )
Maximum BTU 50,000 *
Minimum BTU 2,000 *
Hopper Size 11 lbs
Ignition Time 2 minutes *
Grill Temp Max 650 °F *
Electrical Requirements 120 Volts 3.5 Amps
Unit Dimensions H 49” W 49.5” D 26”
Fuel: Food Grade Pellets 1/4” - 5/16” Diameter x 1” Long
* dePending on Pellet tyPe and size
(see Page 27 for desired fuel size)
Figure 1
26”
49”
22” dia.
49.5”

7
CONTENTS
Congratulations on your purchase of the Black Olive Grill, the world’s FIRST Pellet
Kamado Grill
The following instructions will walk you step-by-step through the correct assembly
process of your new Black Olive Grill:
For your safety two people are required to lift and assemble the Black Olive Grill.
Your crated Black Olive Grill come partially assembled with the remainder of the parts in a
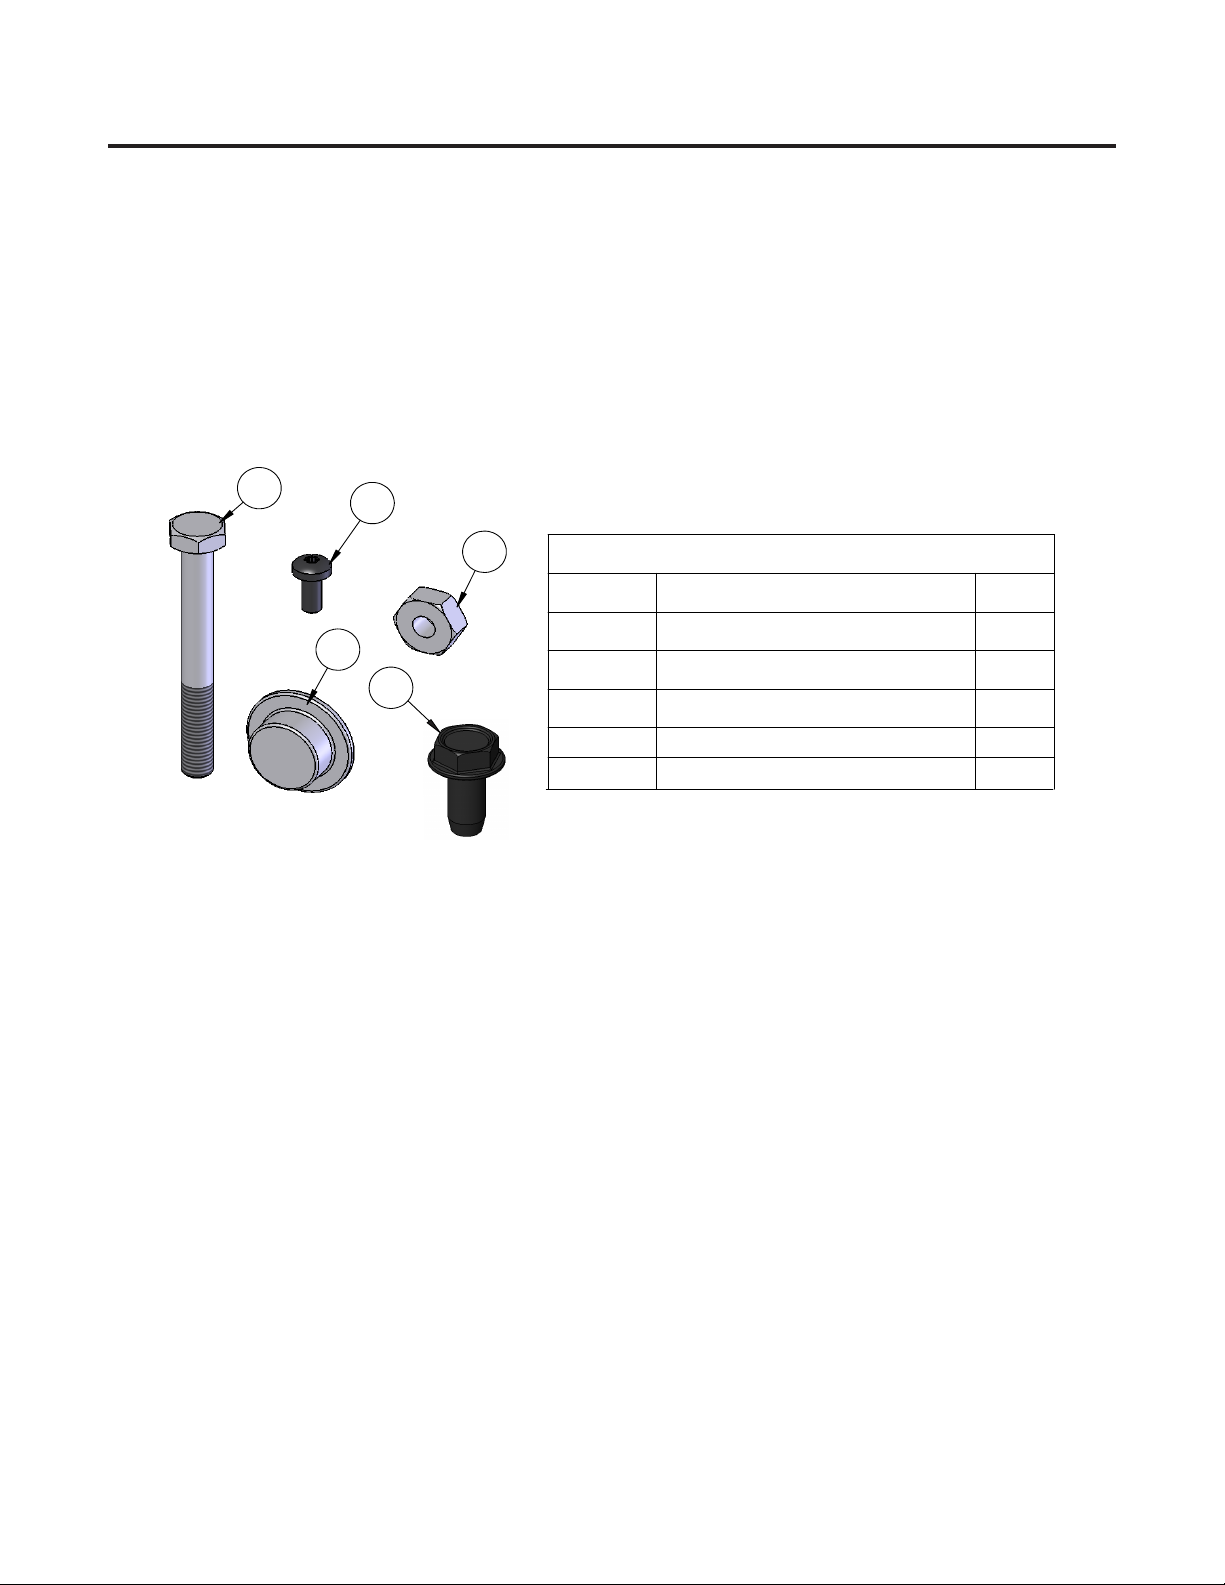
seperate box. Reference the Bill of Materials below to insure you have all the correct components
and fasteners.
12
3
4
Included Hardware
ITEM NO.
DESCRIPTION
QTY.
1
8-32 x 3/8" Screw, Black
10
2
1/4"-20 Hex Nut, Plated
4
3
1/4" - 20 x 2.25" Base Bolt
6
.5” Plated Push Nut
4
4
5
1/4"-20 x .625” Shelf Bolt
1
5
Crate Contents:
• Assembled Ceramic Shell (complete with hinge, bands, handle, thermometer & vent cap)
• Stainless Steel Heat Deector
• Stainless Steel Cooking Grill Support
Component Box Contents:
• Grill Base Assembly with Ash Pan
• Hopper Tube Assembly
• Control Panel (wired to Hopper Tube Assembly)
• Left Side Shelf
• Right Side Shelf with Hopper Lid
• Axle Shaft with 1 push nut installed
• Base Wheels (x2)
• Stainless Steel Flame Diffuser
• Stainless Steel Shell Bottom Mount
Flange w/ Air Diffuser & Ceramic
Blanket
• Cast Iron Cooking Grill
• Grill Cover
• Grill Gripper Tool
• Shelf Support
• Hardware Bag
Tools Required for Assembly (not included):
• 7/16” wrench or socket Rubber mallet or hammer
•
}Inside Shell
• 5/16” socket or at screwdriver
• Torx T20 screwdriver
• 3/8” socket or wrench

8
UNCRATING
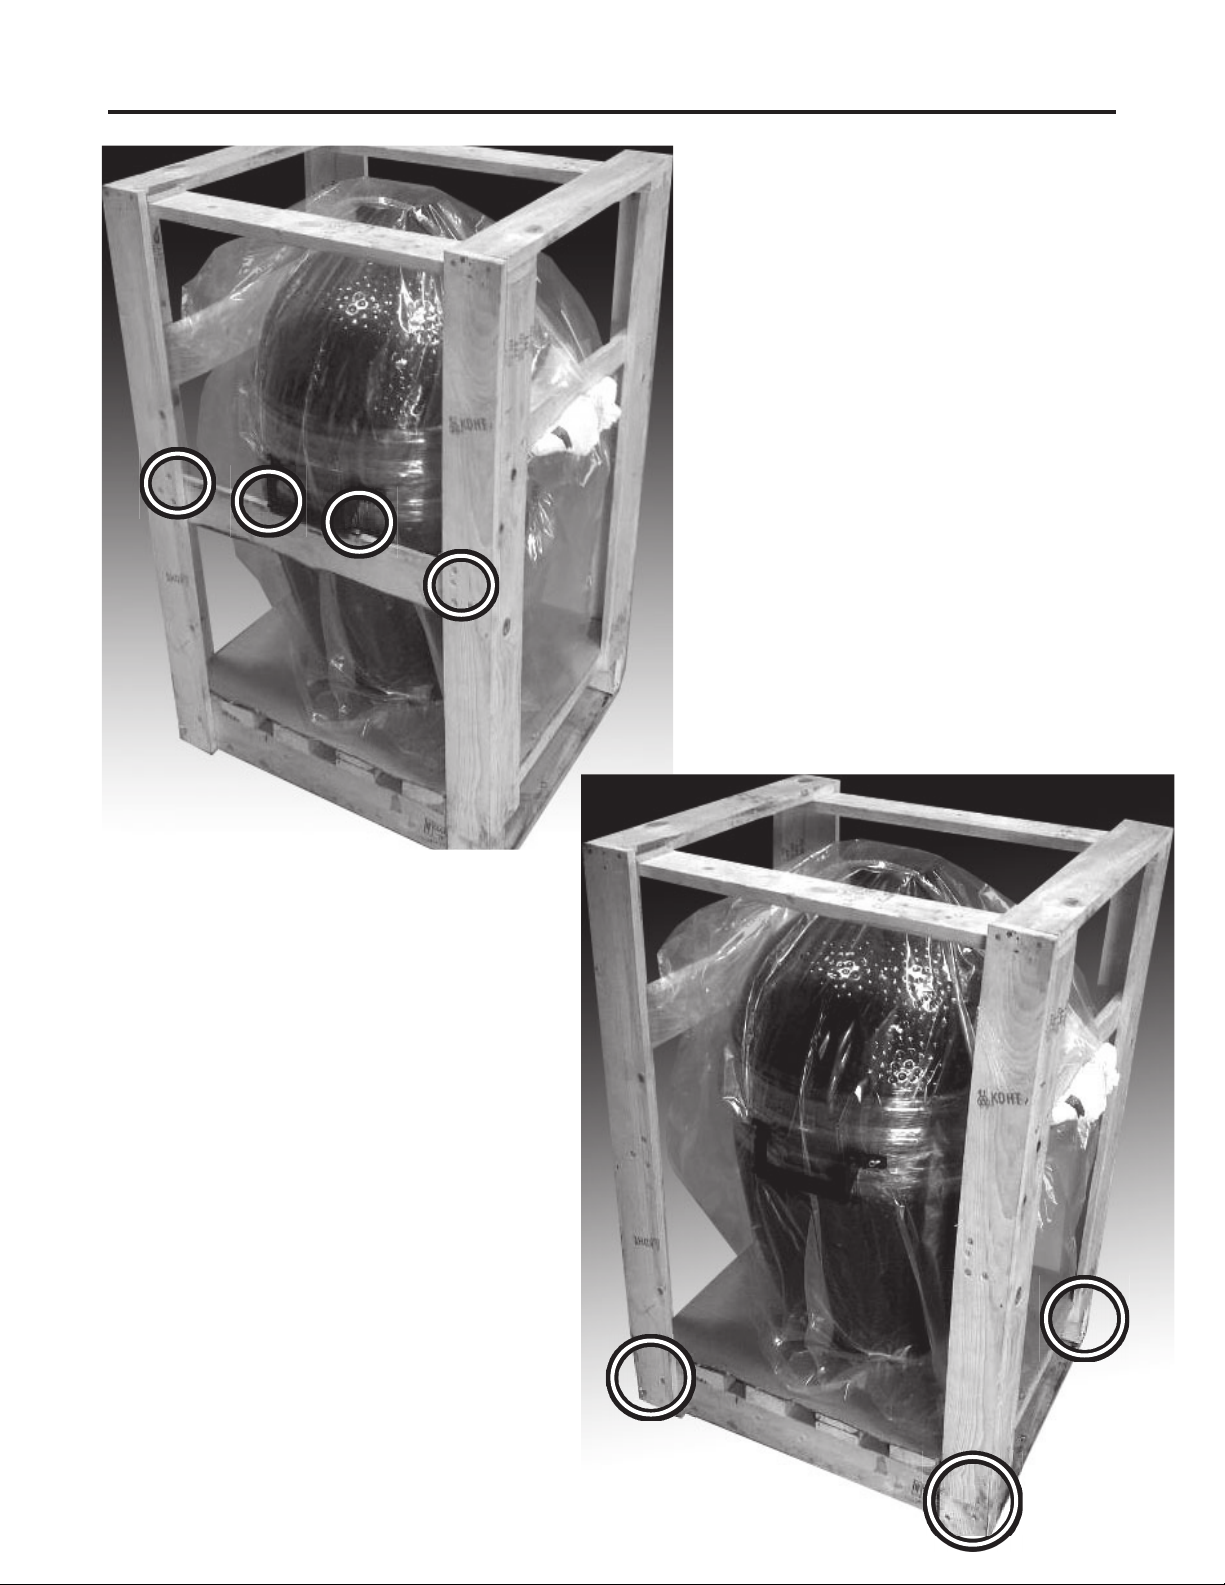
Step 1: Remove the crate box. Next,
using a 5/16” socket or at screwdriver,
remove the screws in the highlighted
areas shown (see Figure 2) on both sides
of the crate. Both side cross members
can now be removed from the crate (See
Figure 3). DO NOT remove the red side
handles.
Figure 2
Figure 3
Step 2: Remove all of the screws at the
bottom of the crate using a 5/16” socket
(see Figure 3). There are three screws
per corner. DO NOT attempt to remove
the crate yet.

9
UNCRATING
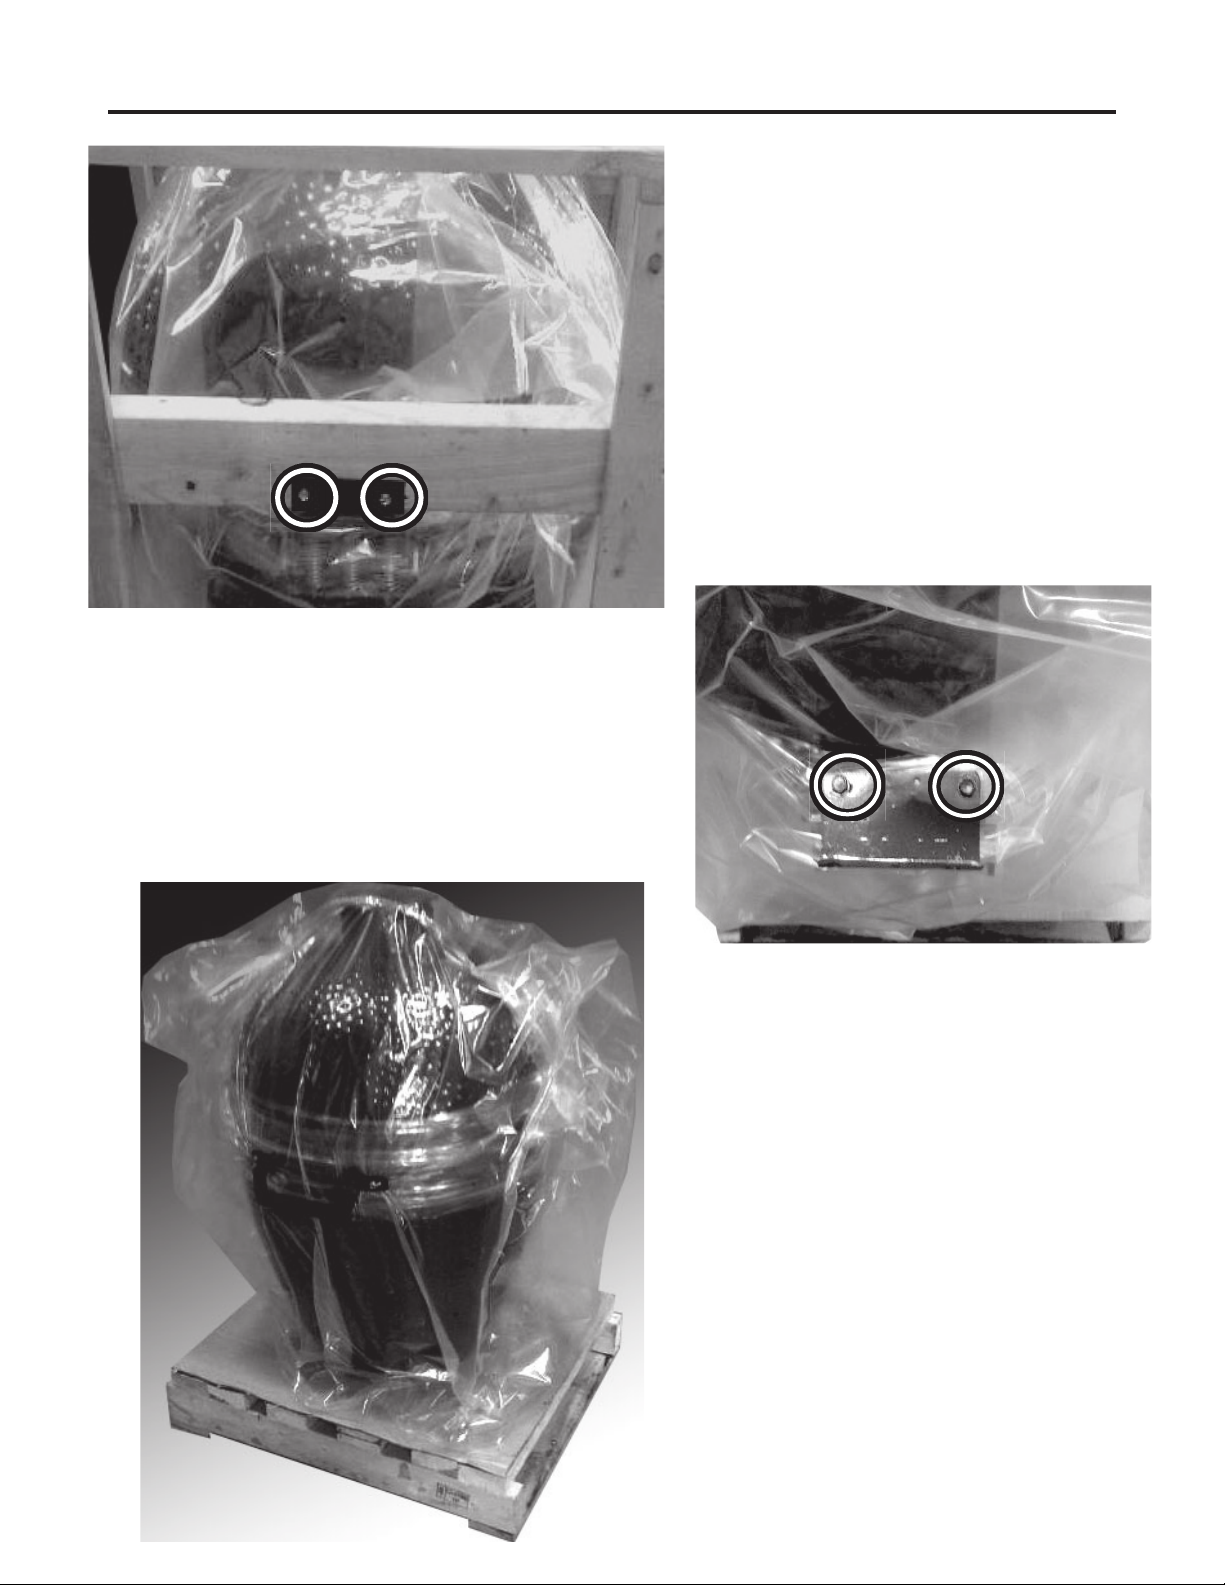
Figure 4
Figure 5
Figure 6
Step 3: Remove the two screws shown
(see Figure 4) from the rear packaging
brace using a 5/16” socket. The crate can
now be removed from the pallet and shell
assembly.
Note: The shell assembly is now
unsupported, be careful not to knock it
over
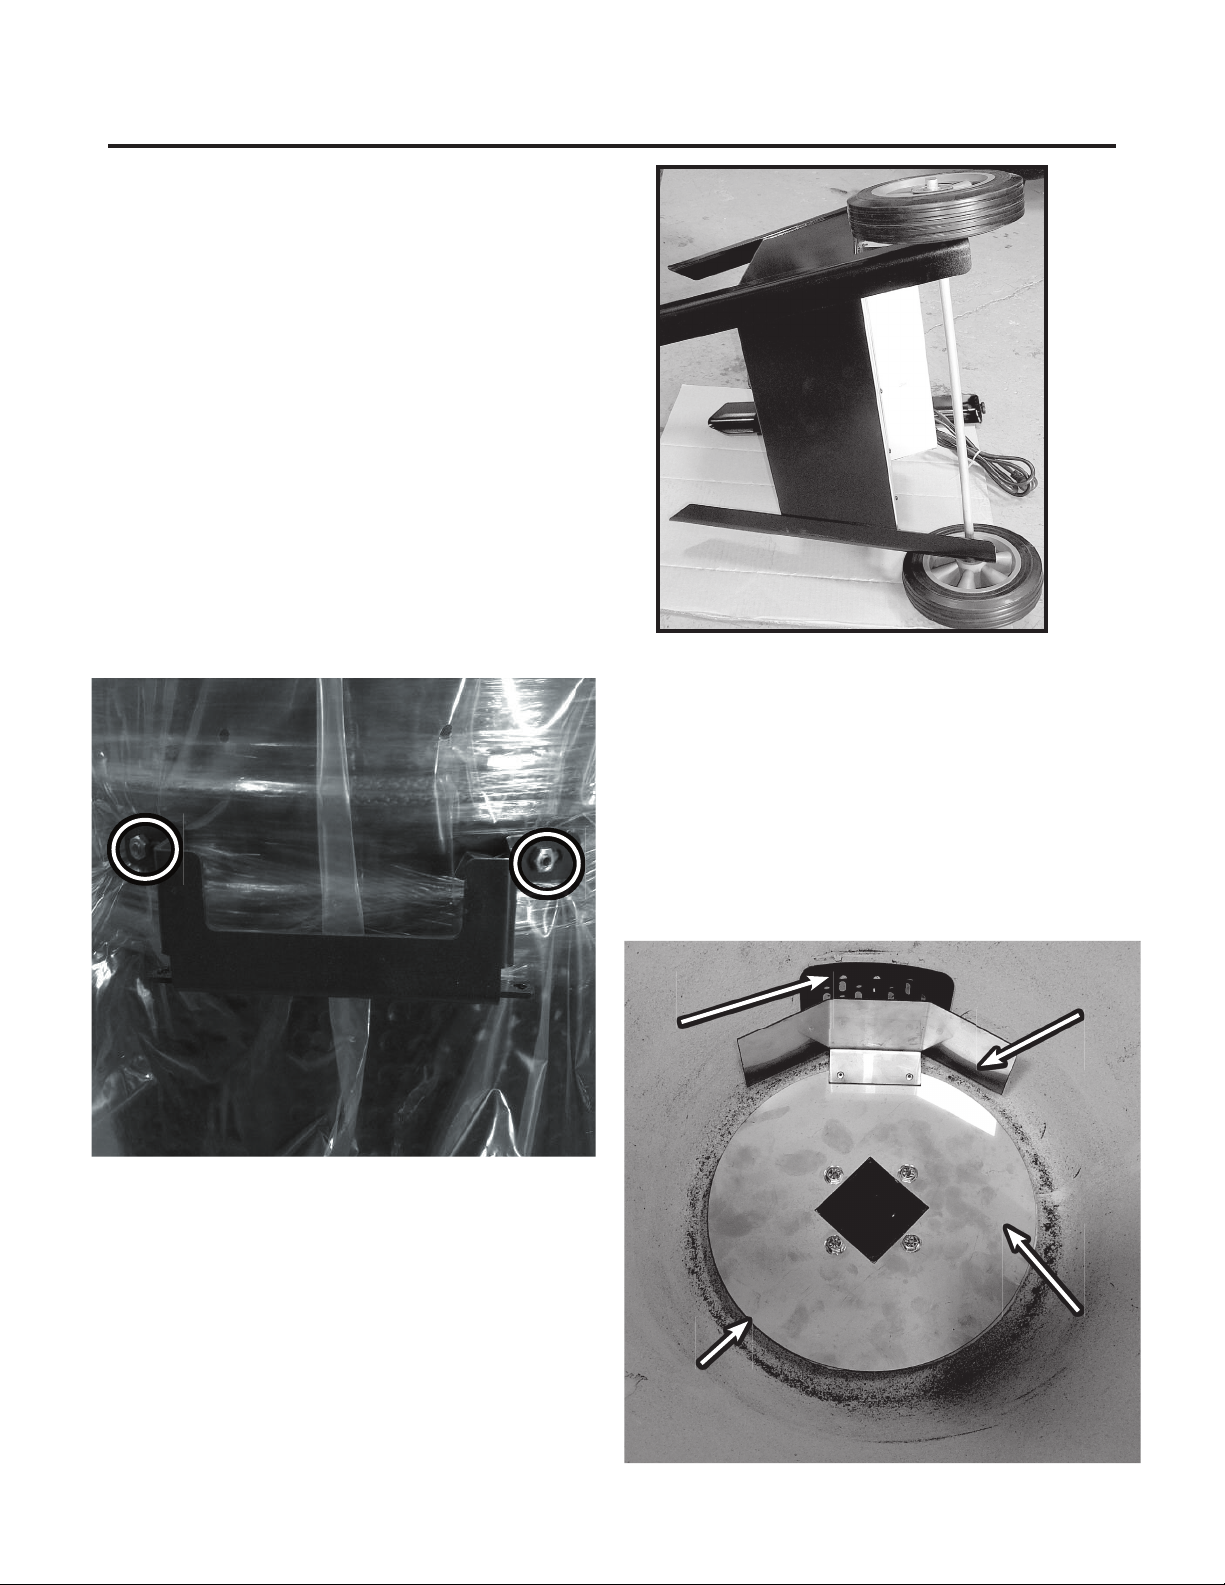
Step 4: Next, remove the two bolts on the rear
packaging brace (see Figure 5) using a 3/8” socket.
The rear packaging brace can now be removed and
recycled.
Note: The bolts may be re-installed after the plastic
bag and shrink wrap has been removed.
Step 5: The shell assembly is now ready to
be installed onto the base assembly.

10
ASSEMBLY
Step 1: Install the wheels and axle shaft
onto the grill base assembly by resting
the base assembly on its side as shown in
Figure 7. Use a rubber mallet or hammer to
install the supplied push nut onto the free
end of the axle shaft. After installing the
wheels, right the base assembly and adjust
the leveling legs until it is level.
Step 2: With the help of a friend, lift the assembled
shell onto the base assembly using the red side
handles. Make sure the bottom vent hole is at the
back as shown in Figure 9. The red side handles
can now be removed (see Figure 8), using a 7/16”
wrench or socket, and recycled. Remove the plastic
bag and shrink wrap. Open the shell assembly
and remove the stainless steel heat de ector
and cooking grill support from the shell bottom.
Figure 7
Figure 8
Figure 9
front of grill
air
diffuser
vent
hole
mount
flange
Next, place the round ceramic blanket in the
shell bottom and install the stainless steel
mount ange, with attached air diffuser, on top.
Make sure the air diffuser is in front of the vent
hole (see Figure 9). Thread the four 1/4”-20 x
2.25” base bolts through the mount ange and
ceramic blanket and into the corresponding
holes on the base assembly. Tighten the bolts
using a 7/16” wrench or socket.
ceramic
blanket
(underneath)
Indice
Altri manuali Black olive Griglia