Blue Robotics BlueROV2 Manuale utente

5/20/2019 BlueROV2 Heavy Configuration Retrofit Kit Installation - Blue Robotics
https://www.bluerobotics.com/learn/bluerov2-heavy-configuration-retrofit-kit-installation/ 1/28
Home (https://www.bluerobotics.com)/Guide (https://www.bluerobotics.com/learn/)/BlueROV2 Heavy Conguration Retrot Kit
Installation
BlueROV2 Heavy Conguration Retrot Kit Installation
Introduction
The BlueROV2 Heavy Conguration Retrot Kit provides the components needed to upgrade your ROV to have four
vertical thrusters, external thruster guards, and additional buoyancy. With that upgrade, you’ll gain 6 degree-of-
freedom control and active stabilization in roll and pitch making the BlueROV2 Heavy the most stable but
maneuverable mini ROV on the market.
Parts and Tools
You Will Need
BlueROV2 Heavy Conguration Retrot Kit
$599.00
(https://www.bluerobotics.com/store/rov/bluerov2-
upgrade-kits/brov2-heavy-retrot-r1-rp/)
Add to Cart (/learn/bluerov2-heavy-
conguration-retrot-kit-installation/?add-to-
cart=19948)
Privacy - Terms

5/20/2019 BlueROV2 Heavy Configuration Retrofit Kit Installation - Blue Robotics
https://www.bluerobotics.com/learn/bluerov2-heavy-configuration-retrofit-kit-installation/ 2/28
You will also need:
1 x #1 Phillips head screwdriver (
BlueROV2
kit)
1 x #2 Phillips head screwdriver (not included)
1 x Bottle of Threadlocker (not included)
BlueROV2 Partial Disassembly
To partially disassemble your BlueROV2, you will need the following tools:
1 x 2.5 mm hex driver
1 x #1 Phillips head screwdriver
1 x Wire cutters or scissors
1 x Penetrator wrench
Optional: 1x Roll of masking tape and marker
1. To ensure your ROV is completely powered o, please remove the battery completely from the 3” enclosure and
place to the side.
BlueROV2
$2,784.00 – $4,563.00
(https://www.bluerobotics.com/store/rov/bluerov2/bluerov2/)
Add to Cart
(https://www.bluerobotics.com/store/rov/bluerov2/bluerov2/)
BlueROV2 Heavy
Conguration Retrot Kit
$599.00
(https://www.bluerobotics.com/store/rov/bluerov2-
upgrade-kits/brov2-heavy-
retrot-r1-rp/)
Add to Cart
(/learn/bluerov2-
heavy-conguration-
retrot-kit-
installation/?add-to-
cart=19948)
Hex Key Set
$6.00
(https://www.bluerobotics.com/store/watertight-
enclosures/enclosure-tools-
supplies/tool-hex-set-r1/)
Add to Cart
(/learn/bluerov2-
heavy-conguration-
retrot-kit-
installation/?add-to-
cart=1098)
Penetrator Wrench
$12.00
(https://www.bluerobotics.com/store
connectors/tools/tool-
penetrator-wrench-r1/)
Add to Cart
(/learn/bluerov2-
heavy-conguration-
retrot-kit-
installation/?add-to-
cart=9971)
Privacy - Terms

5/20/2019 BlueROV2 Heavy Configuration Retrofit Kit Installation - Blue Robotics
https://www.bluerobotics.com/learn/bluerov2-heavy-configuration-retrofit-kit-installation/ 3/28
(https://www.bluerobotics.com/wp-content/uploads/2019/03/heavy-tutorial-1.jpg?x62571)
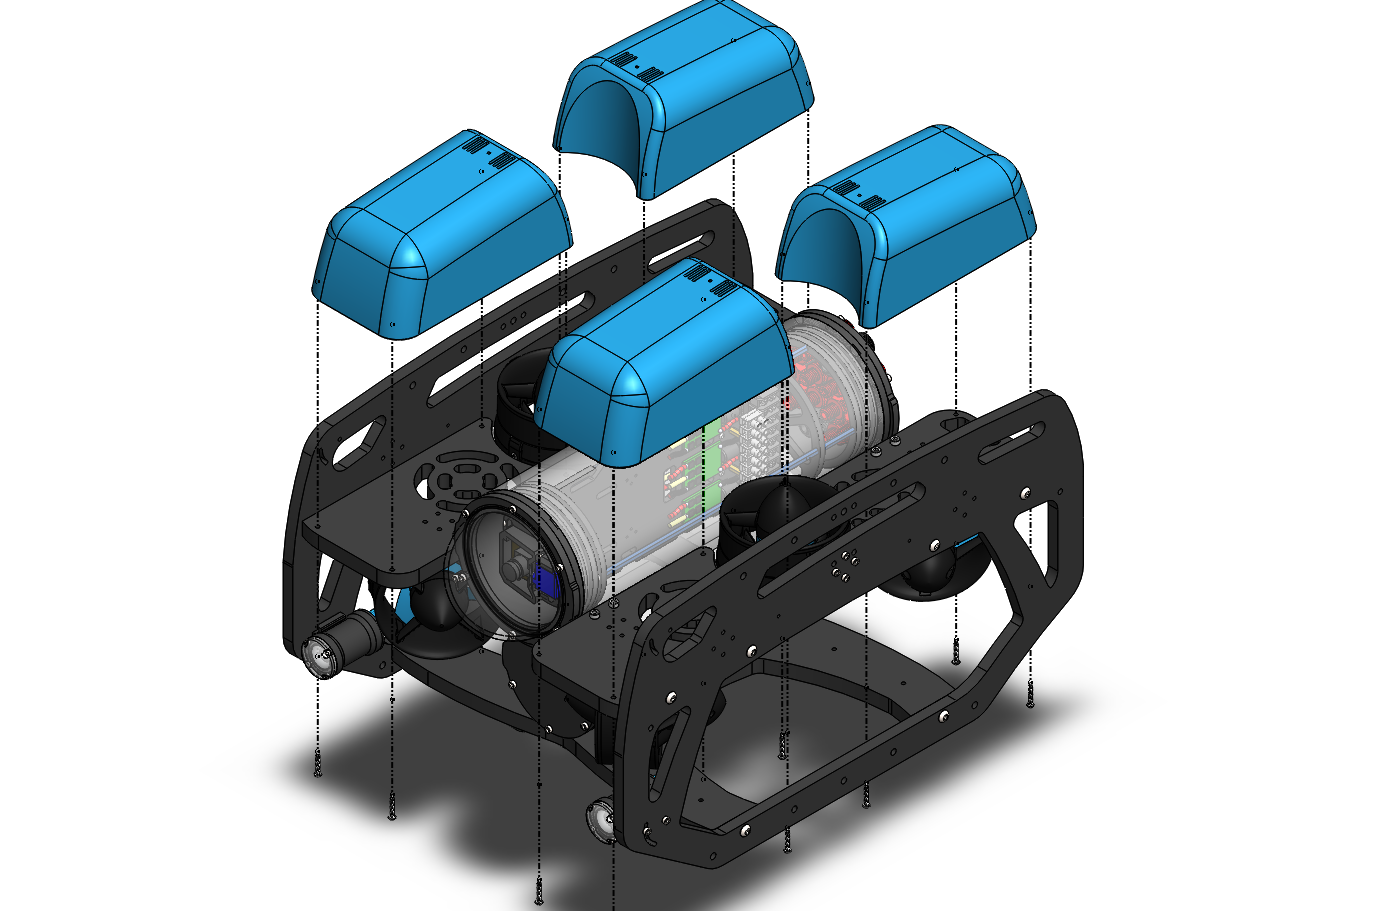
2. Remove the fairings and buoyancy blocks by removing the self-tapping screws that hold the fairings to the frame.
(https://www.bluerobotics.com/wp-content/uploads/2019/03/heavy-step-3.png?x62571)
Privacy - Terms

5/20/2019 BlueROV2 Heavy Configuration Retrofit Kit Installation - Blue Robotics
https://www.bluerobotics.com/learn/bluerov2-heavy-configuration-retrofit-kit-installation/ 4/28
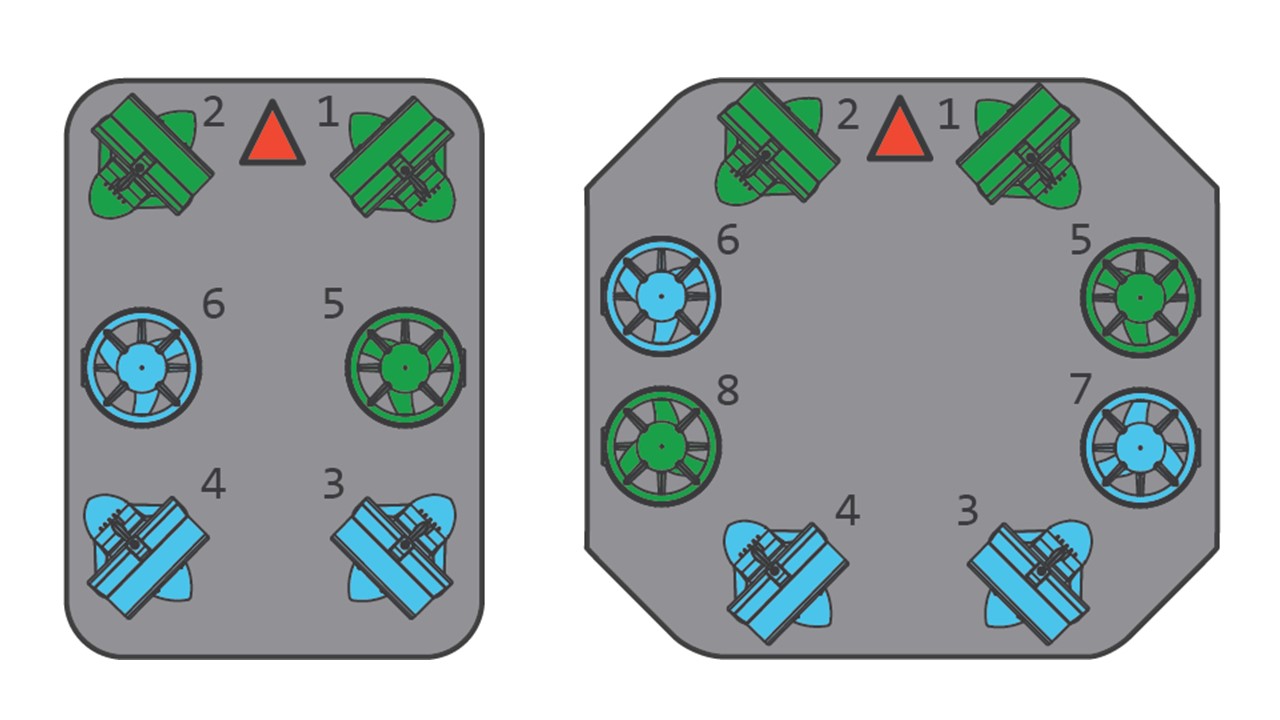
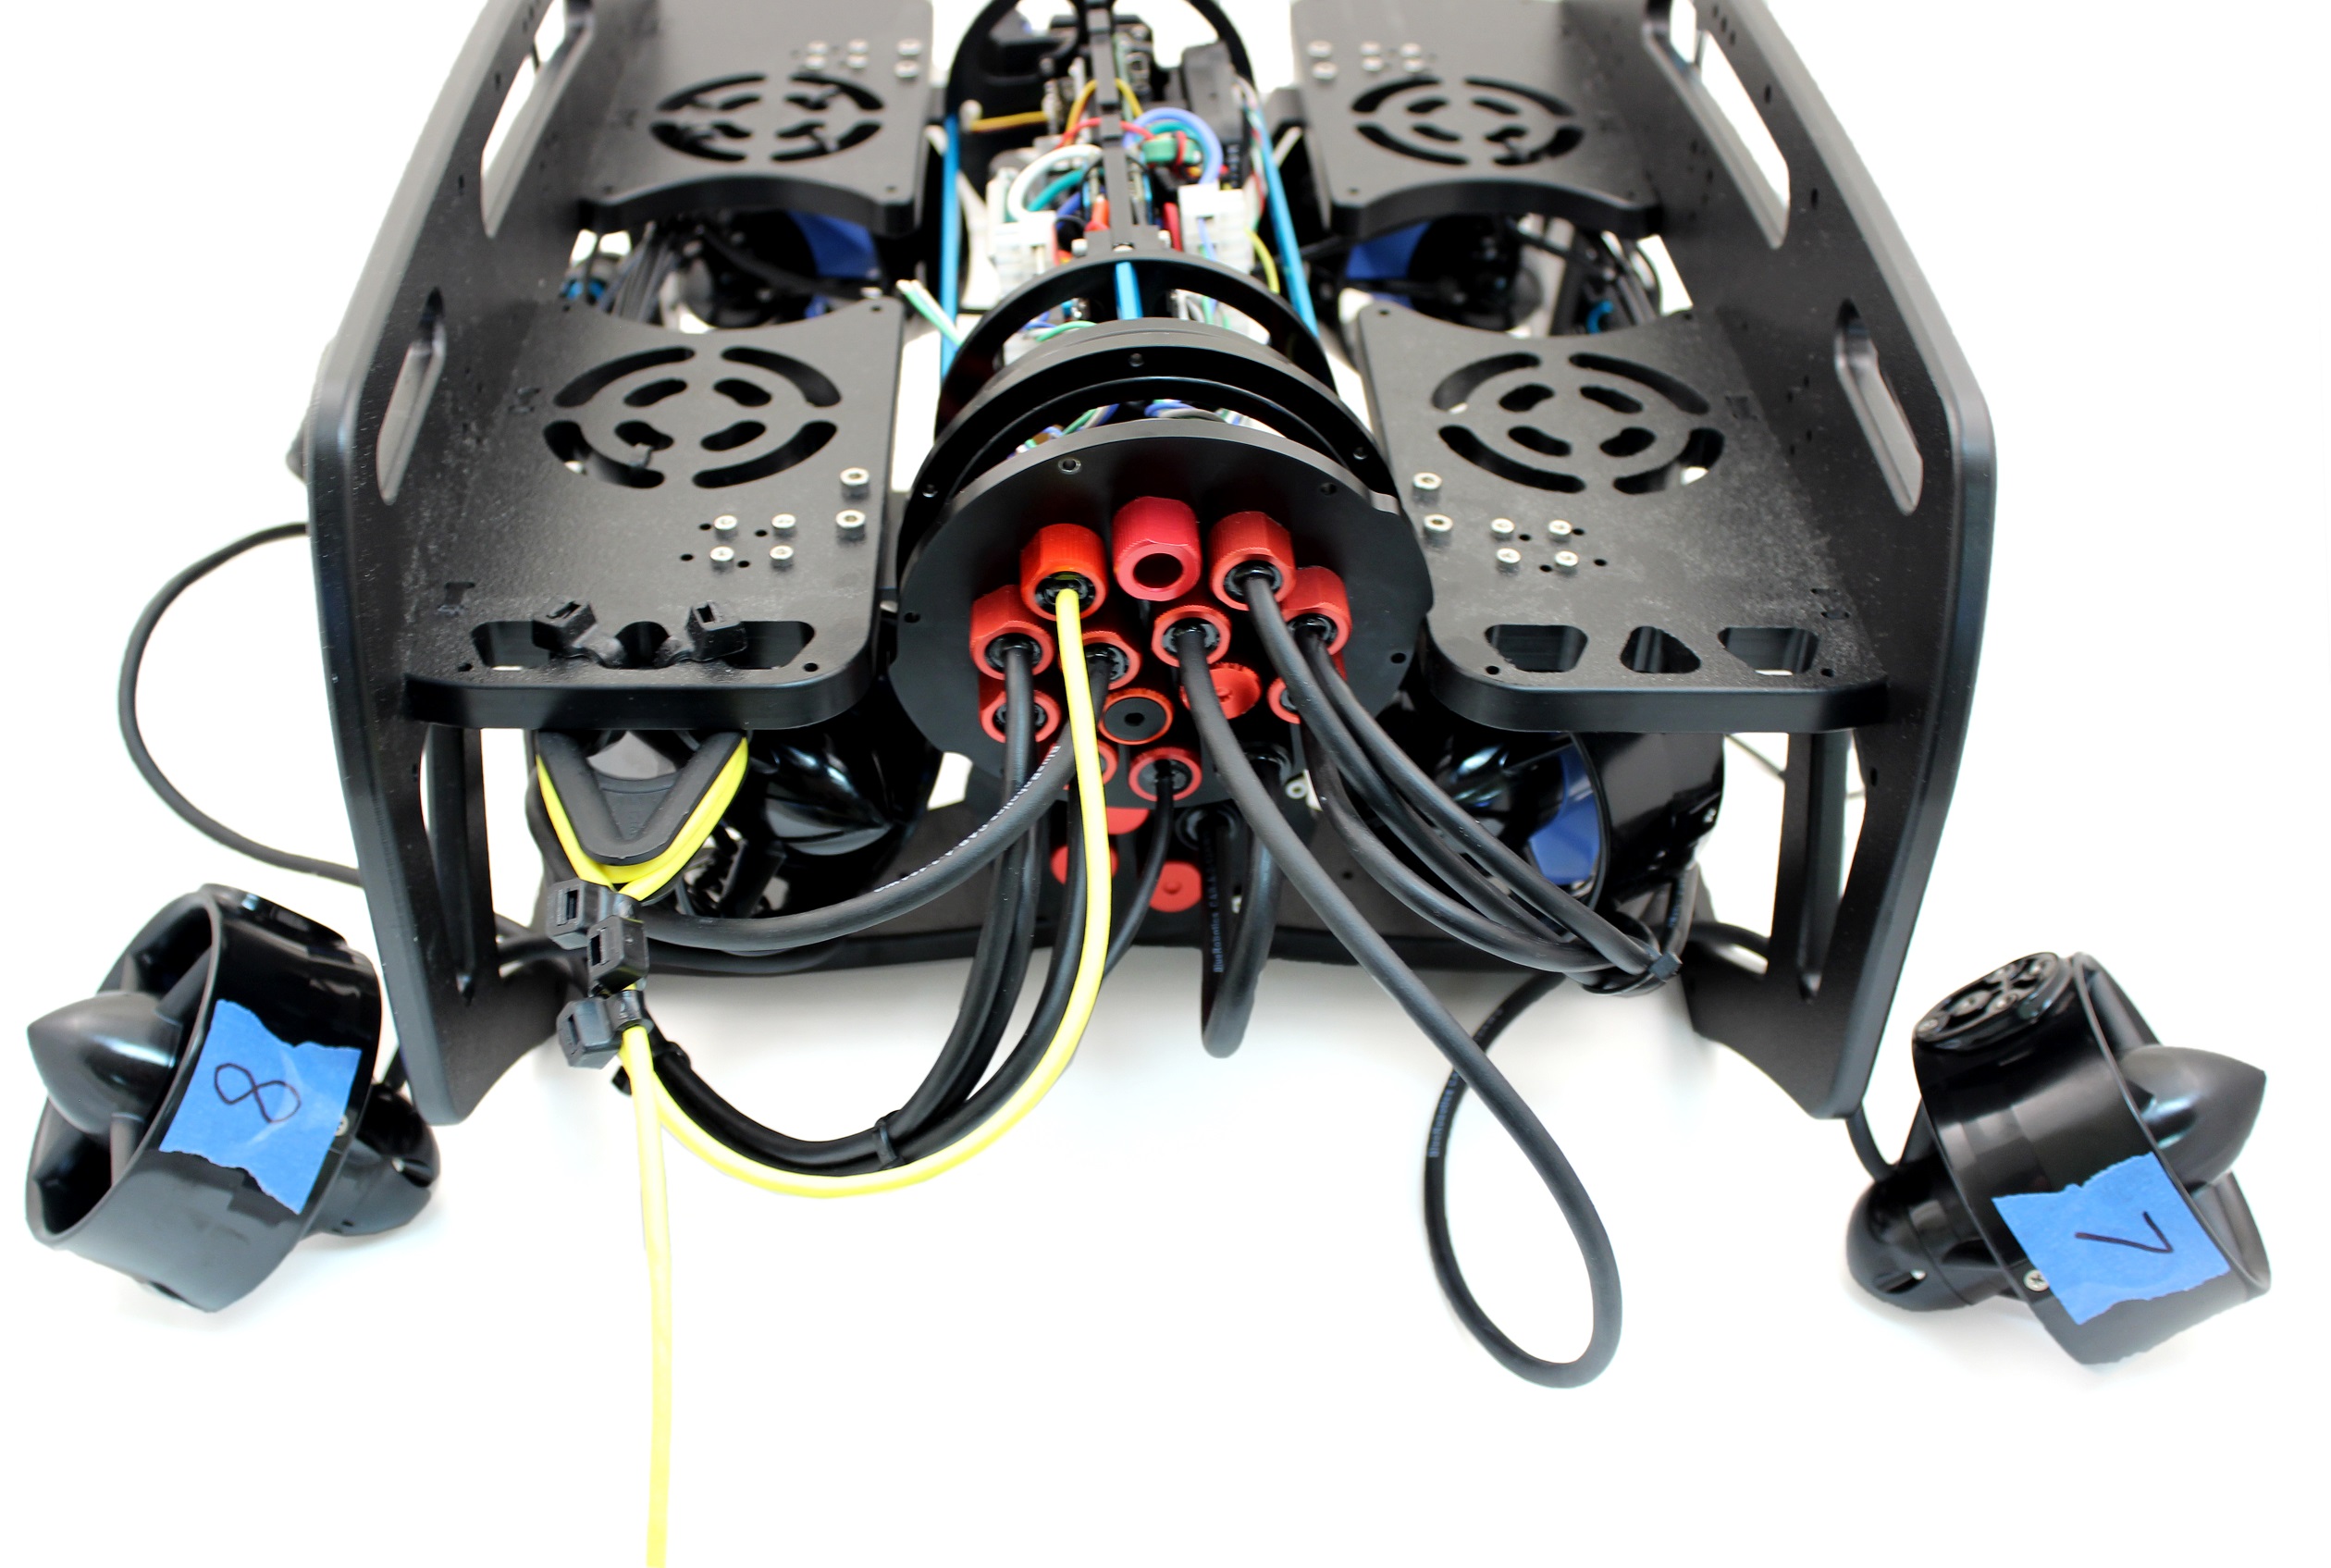
3. Optional: In order to ensure thruster mounting is not mixed up, it is recommended to apply short strips of masking
tape to the outside of the thruster ducts and labeling them 5,6,7 and 8 respectively according to the thruster
diagrams.
Thruster 5 (CCW propeller) with red penetrator nut.
Thruster 6 (CW propeller) with red penetrator nut.
Thruster 7 (CW propeller) with red penetrator nut.
Thruster 8 (CCW propeller) with red penetrator nut.
(https://www.bluerobotics.com/wp-content/uploads/2019/03/frame-numberings.jpg?x62571)
Privacy - Terms

5/20/2019 BlueROV2 Heavy Configuration Retrofit Kit Installation - Blue Robotics
https://www.bluerobotics.com/learn/bluerov2-heavy-configuration-retrofit-kit-installation/ 5/28
(https://www.bluerobotics.com/wp-content/uploads/2019/03/heavy-tutorial-2.jpg?x62571)
4. Remove the M3x12 screws holding Thrusters 5 and 6 to the side panels and place the screws to the side.
(https://www.bluerobotics.com/wp-content/uploads/2019/03/heavy-tutorial-3.jpg?x62571)
Privacy - Terms

5/20/2019 BlueROV2 Heavy Configuration Retrofit Kit Installation - Blue Robotics
https://www.bluerobotics.com/learn/bluerov2-heavy-configuration-retrofit-kit-installation/ 6/28
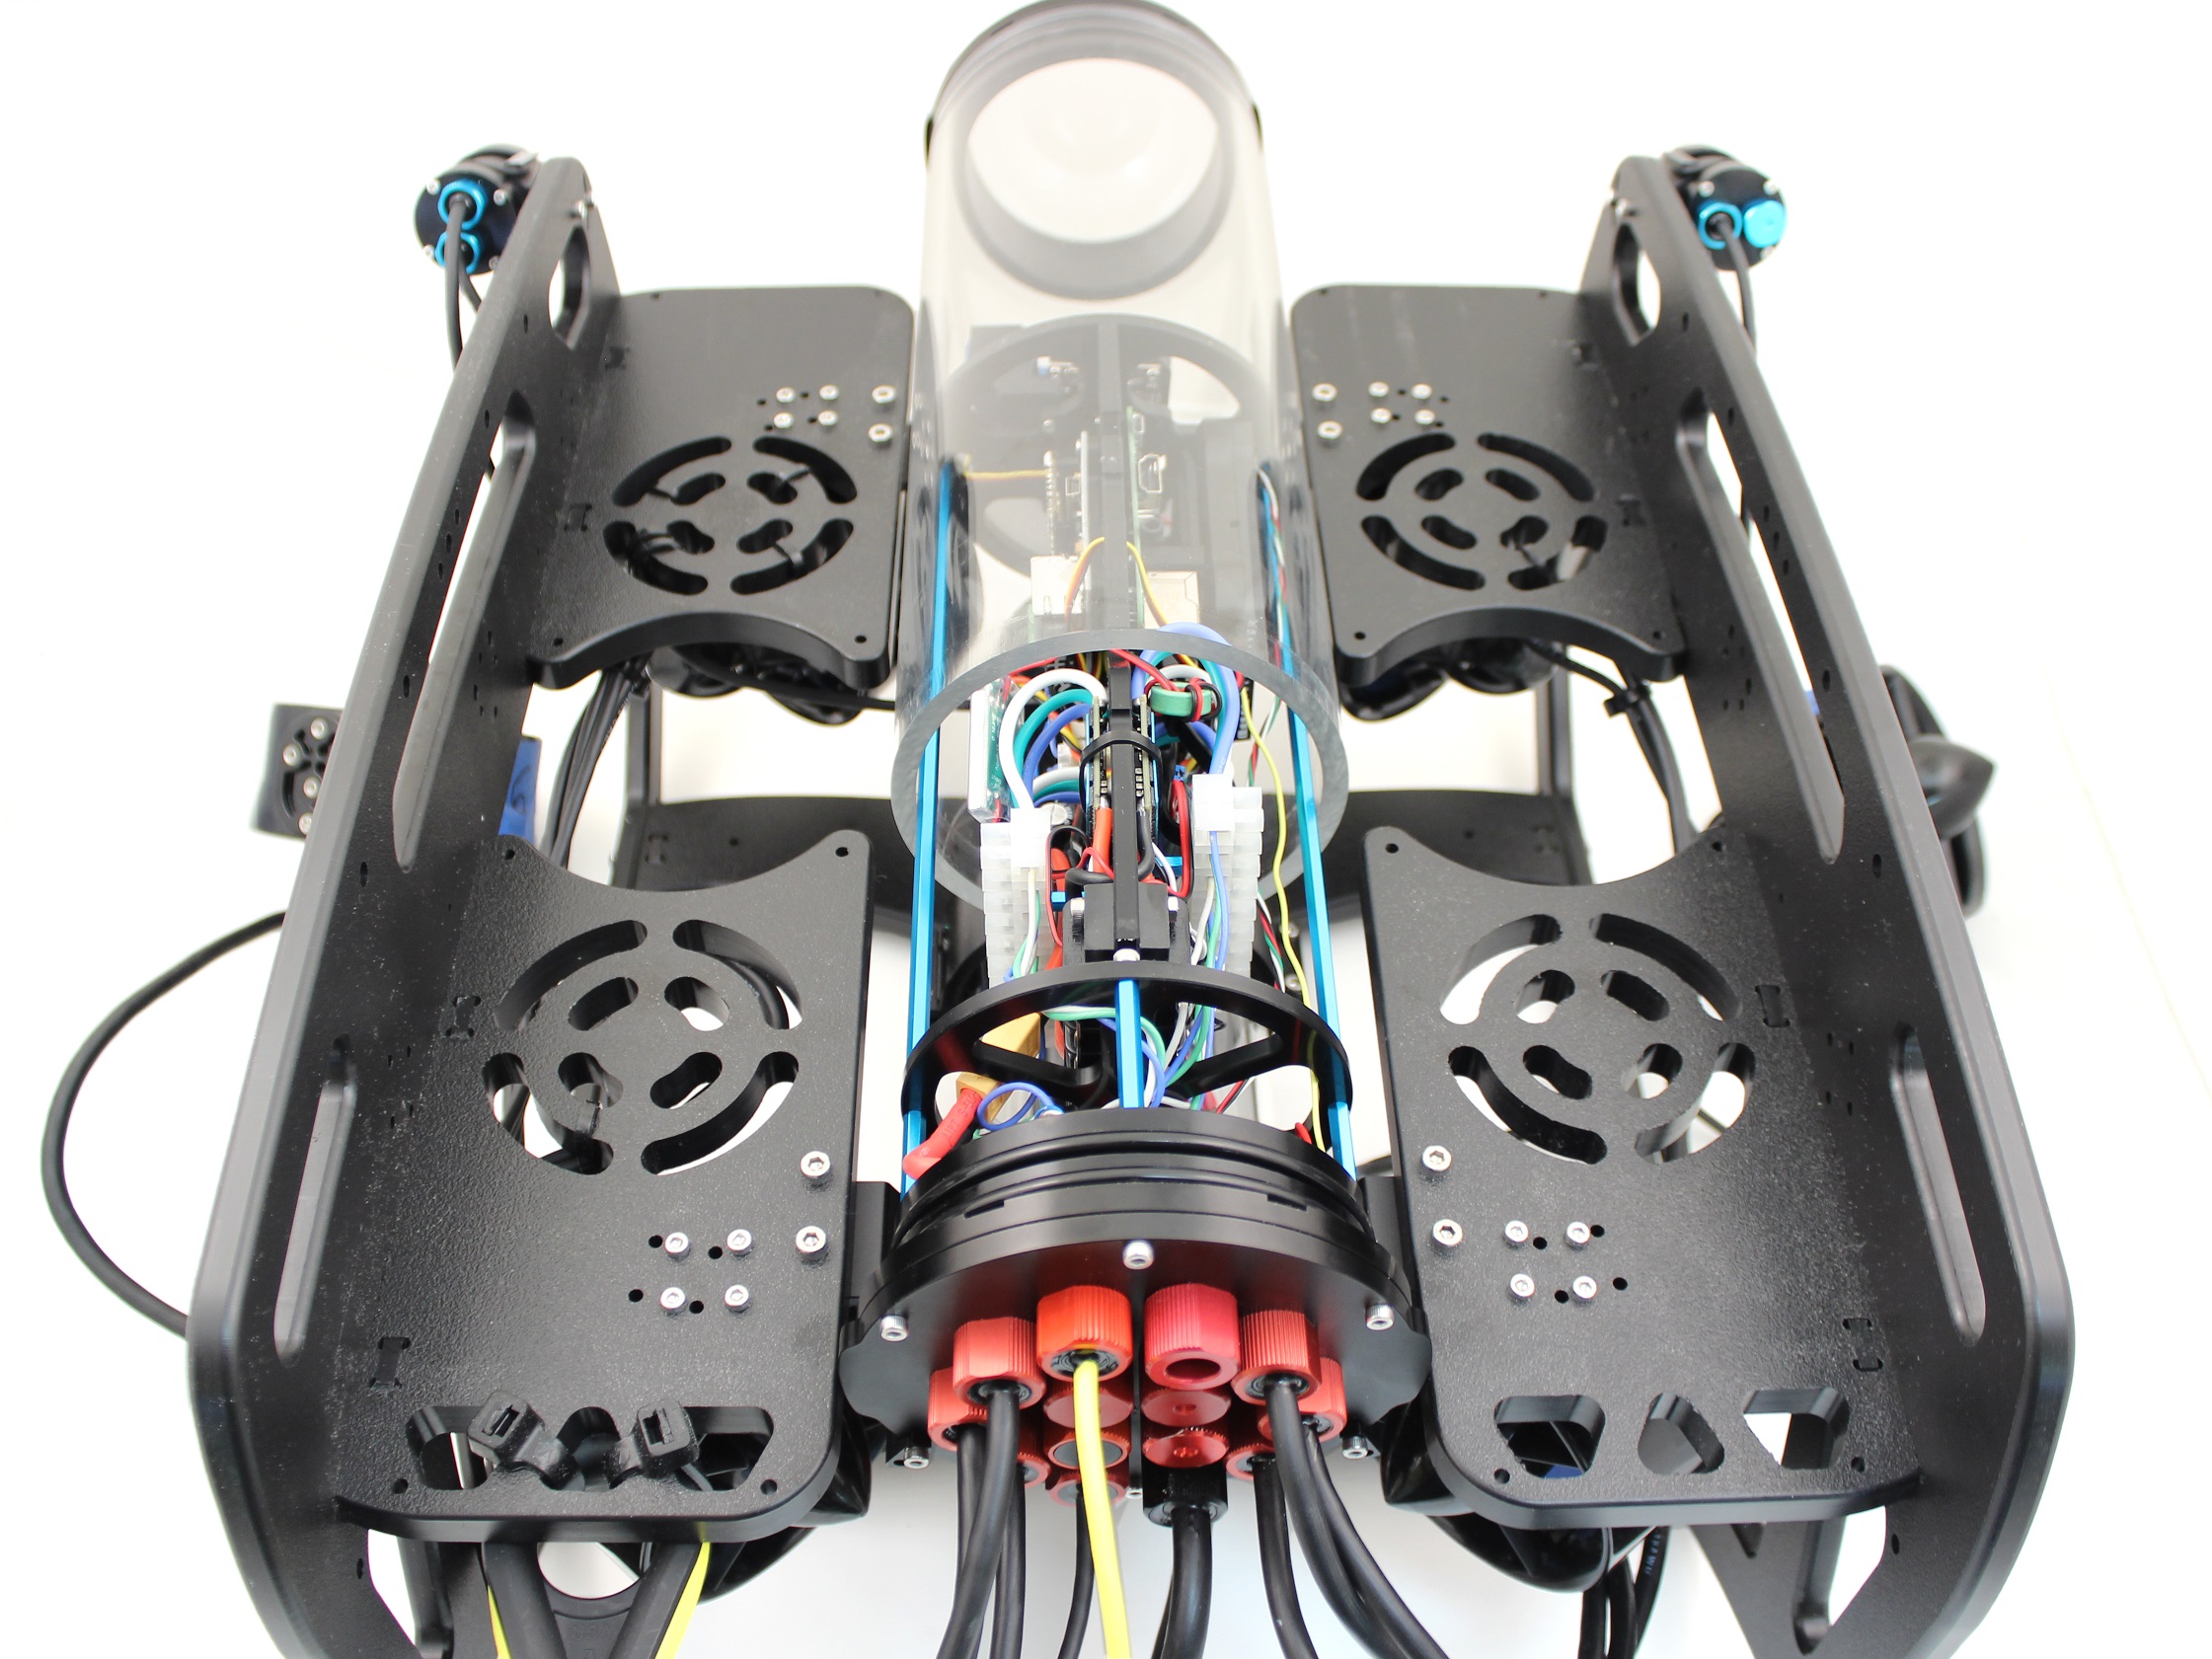
5. Cut and remove any zipties holding the motor wires for Thrusters 5 and 6 to the frame.
(https://www.bluerobotics.com/wp-content/uploads/2019/03/heavy-tutorial-4.jpg?x62571)
6. Remove the 4” Electronics enclosure from the ROV by removing the M3x16 screws that mount the enclosure to the
ROV cradle.
Privacy - Terms

5/20/2019 BlueROV2 Heavy Configuration Retrofit Kit Installation - Blue Robotics
https://www.bluerobotics.com/learn/bluerov2-heavy-configuration-retrofit-kit-installation/ 7/28
(https://www.bluerobotics.com/wp-content/uploads/2019/03/heavy-tutorial-5.jpg?x62571)
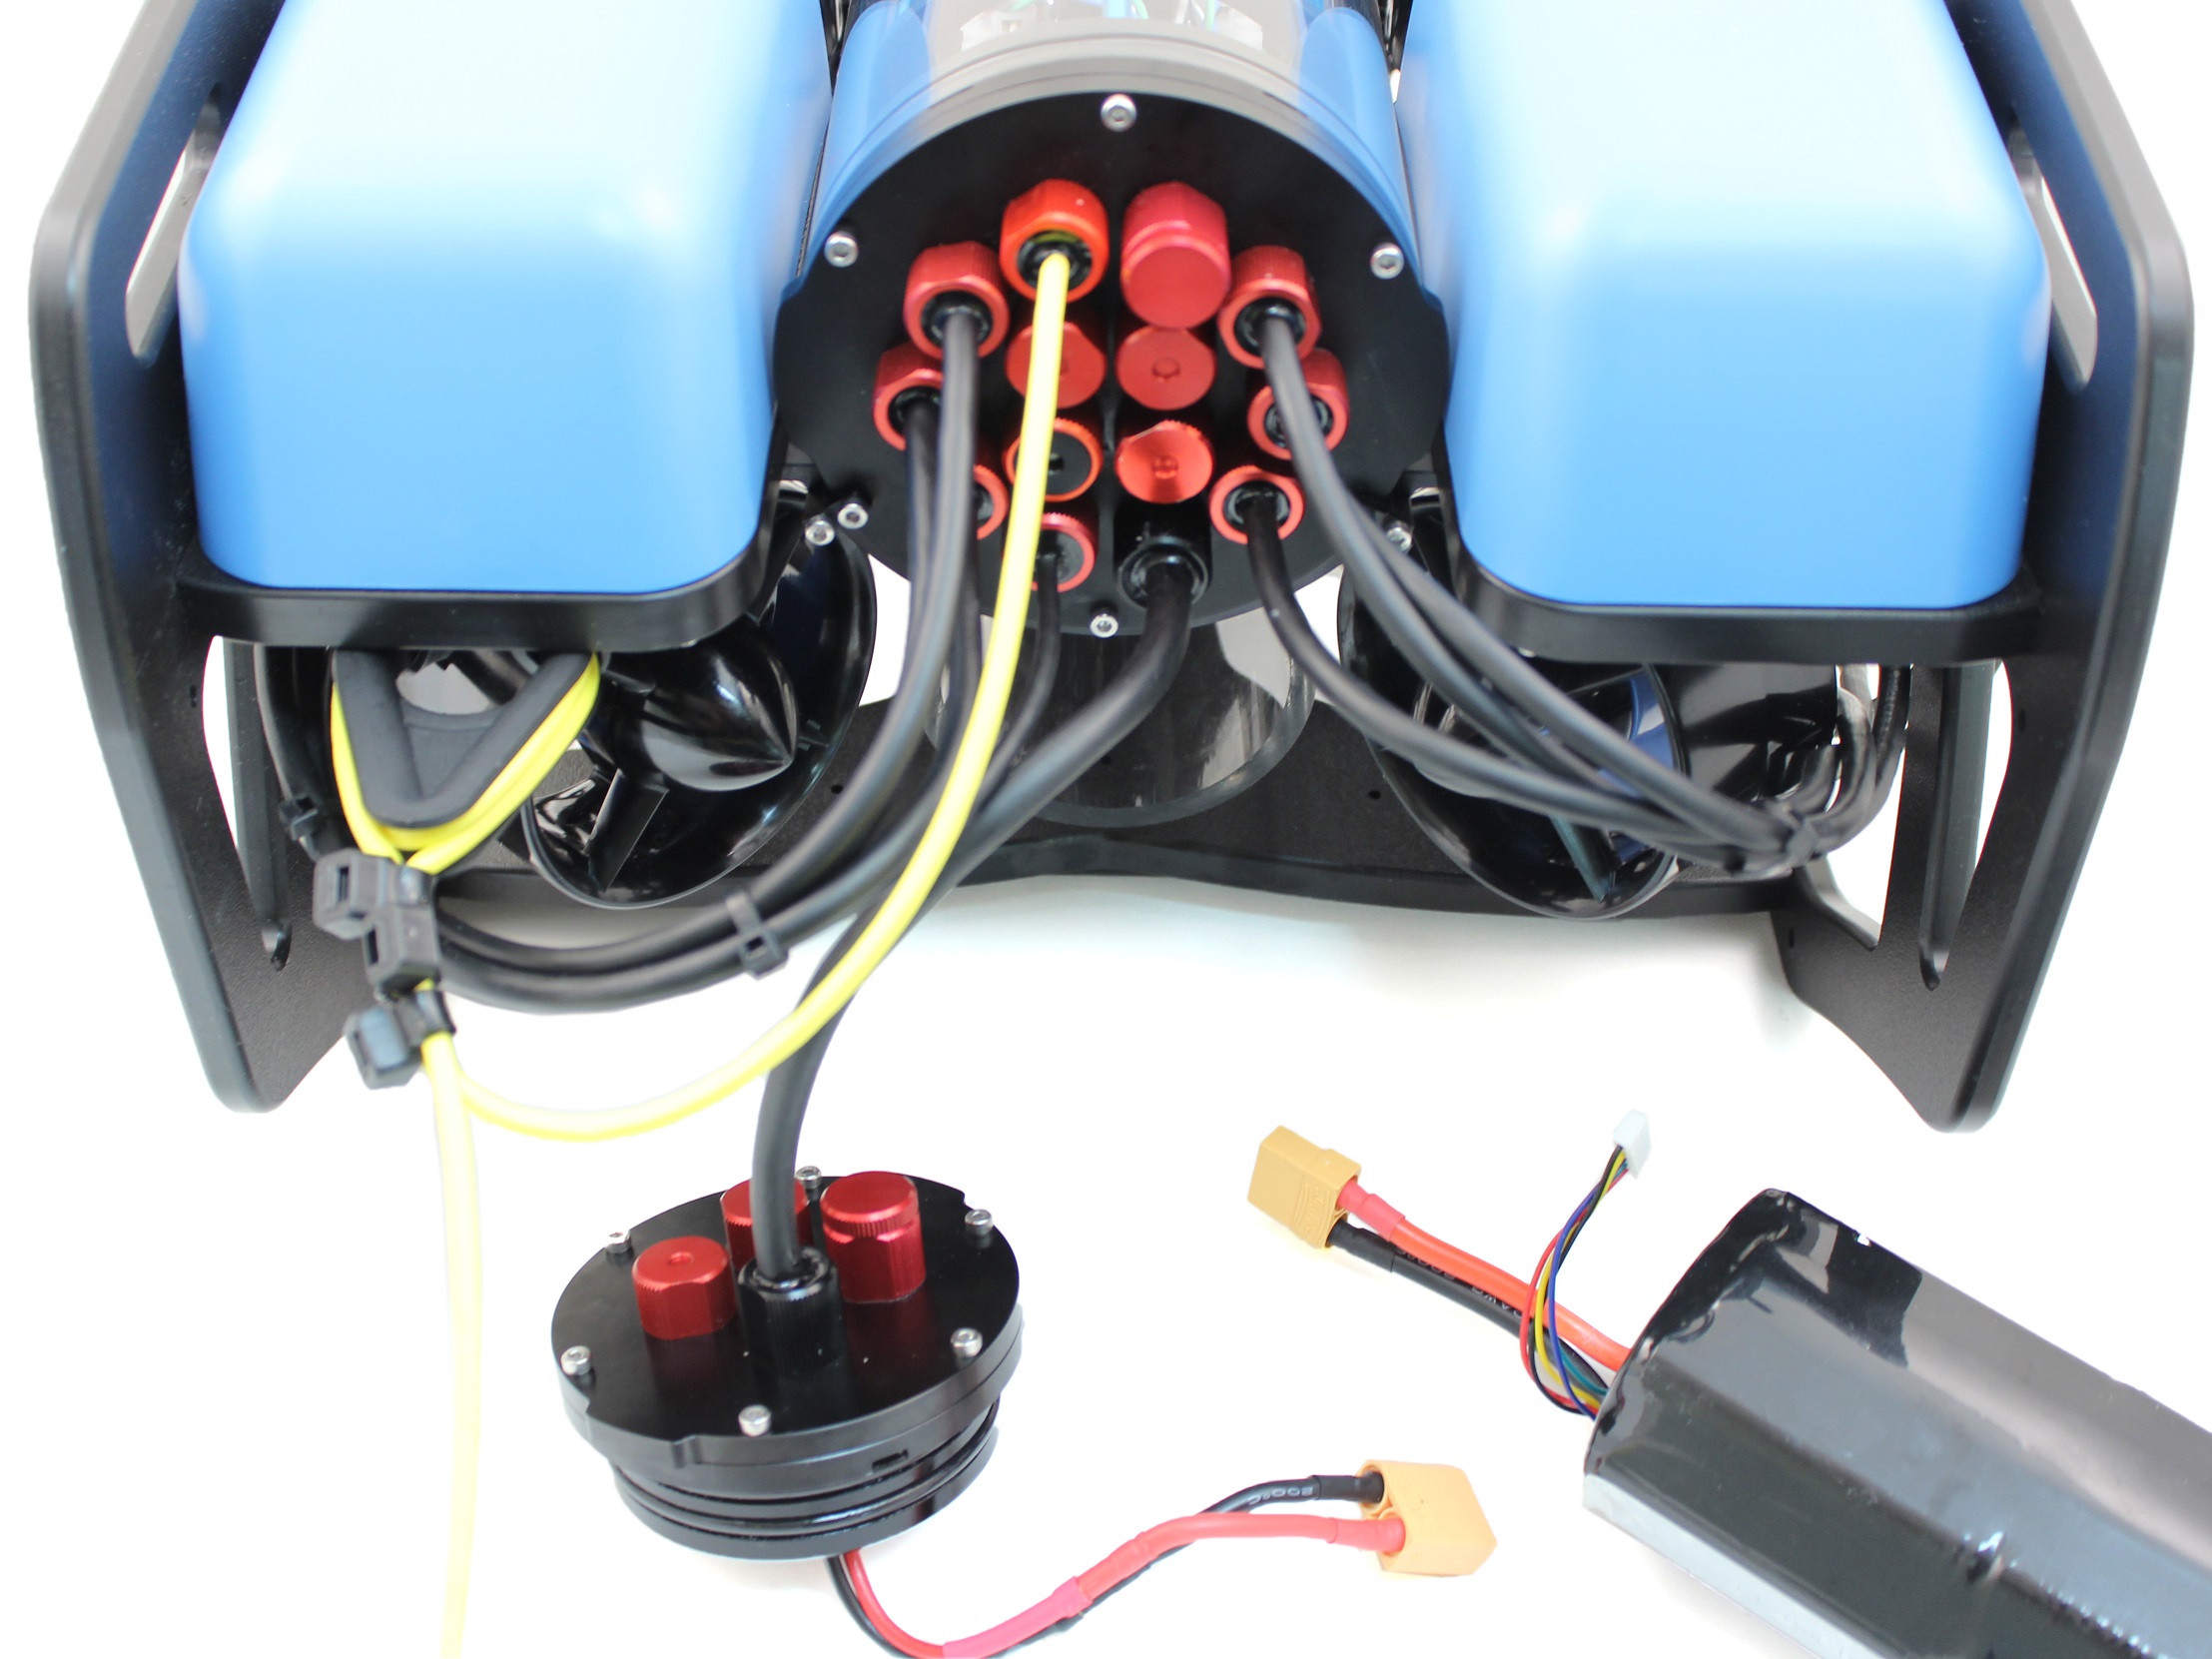
7. Remove the Vent Plug from the Vent Penetrator Bolt on the electronics enclosure.
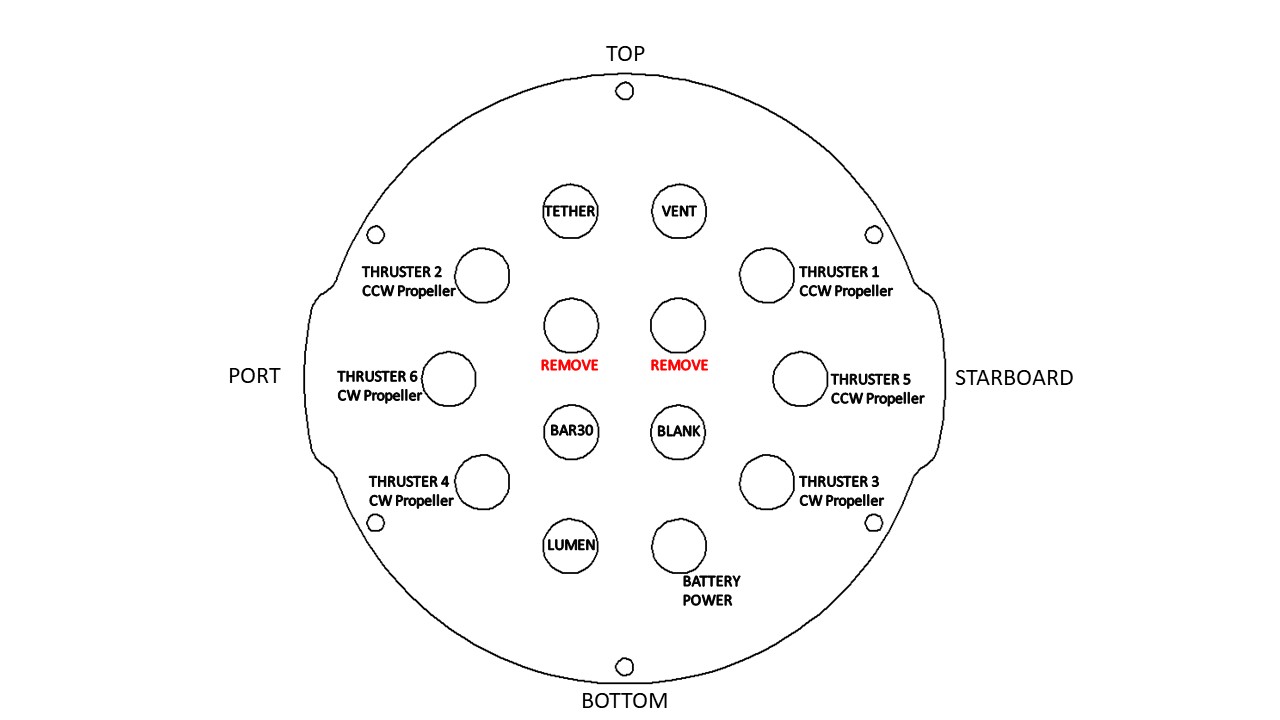
8. Remove the Aluminum End Cap with 14 Holes by removing the six M3x12 screws using the M2.5 hex driver. Place
the M3x12 screws, clips (small L-shaped parts) in a safe place.
Privacy - Terms

5/20/2019 BlueROV2 Heavy Configuration Retrofit Kit Installation - Blue Robotics
https://www.bluerobotics.com/learn/bluerov2-heavy-configuration-retrofit-kit-installation/ 8/28
(https://www.bluerobotics.com/wp-content/uploads/2019/03/heavy-tutorial-6.jpg?x62571)
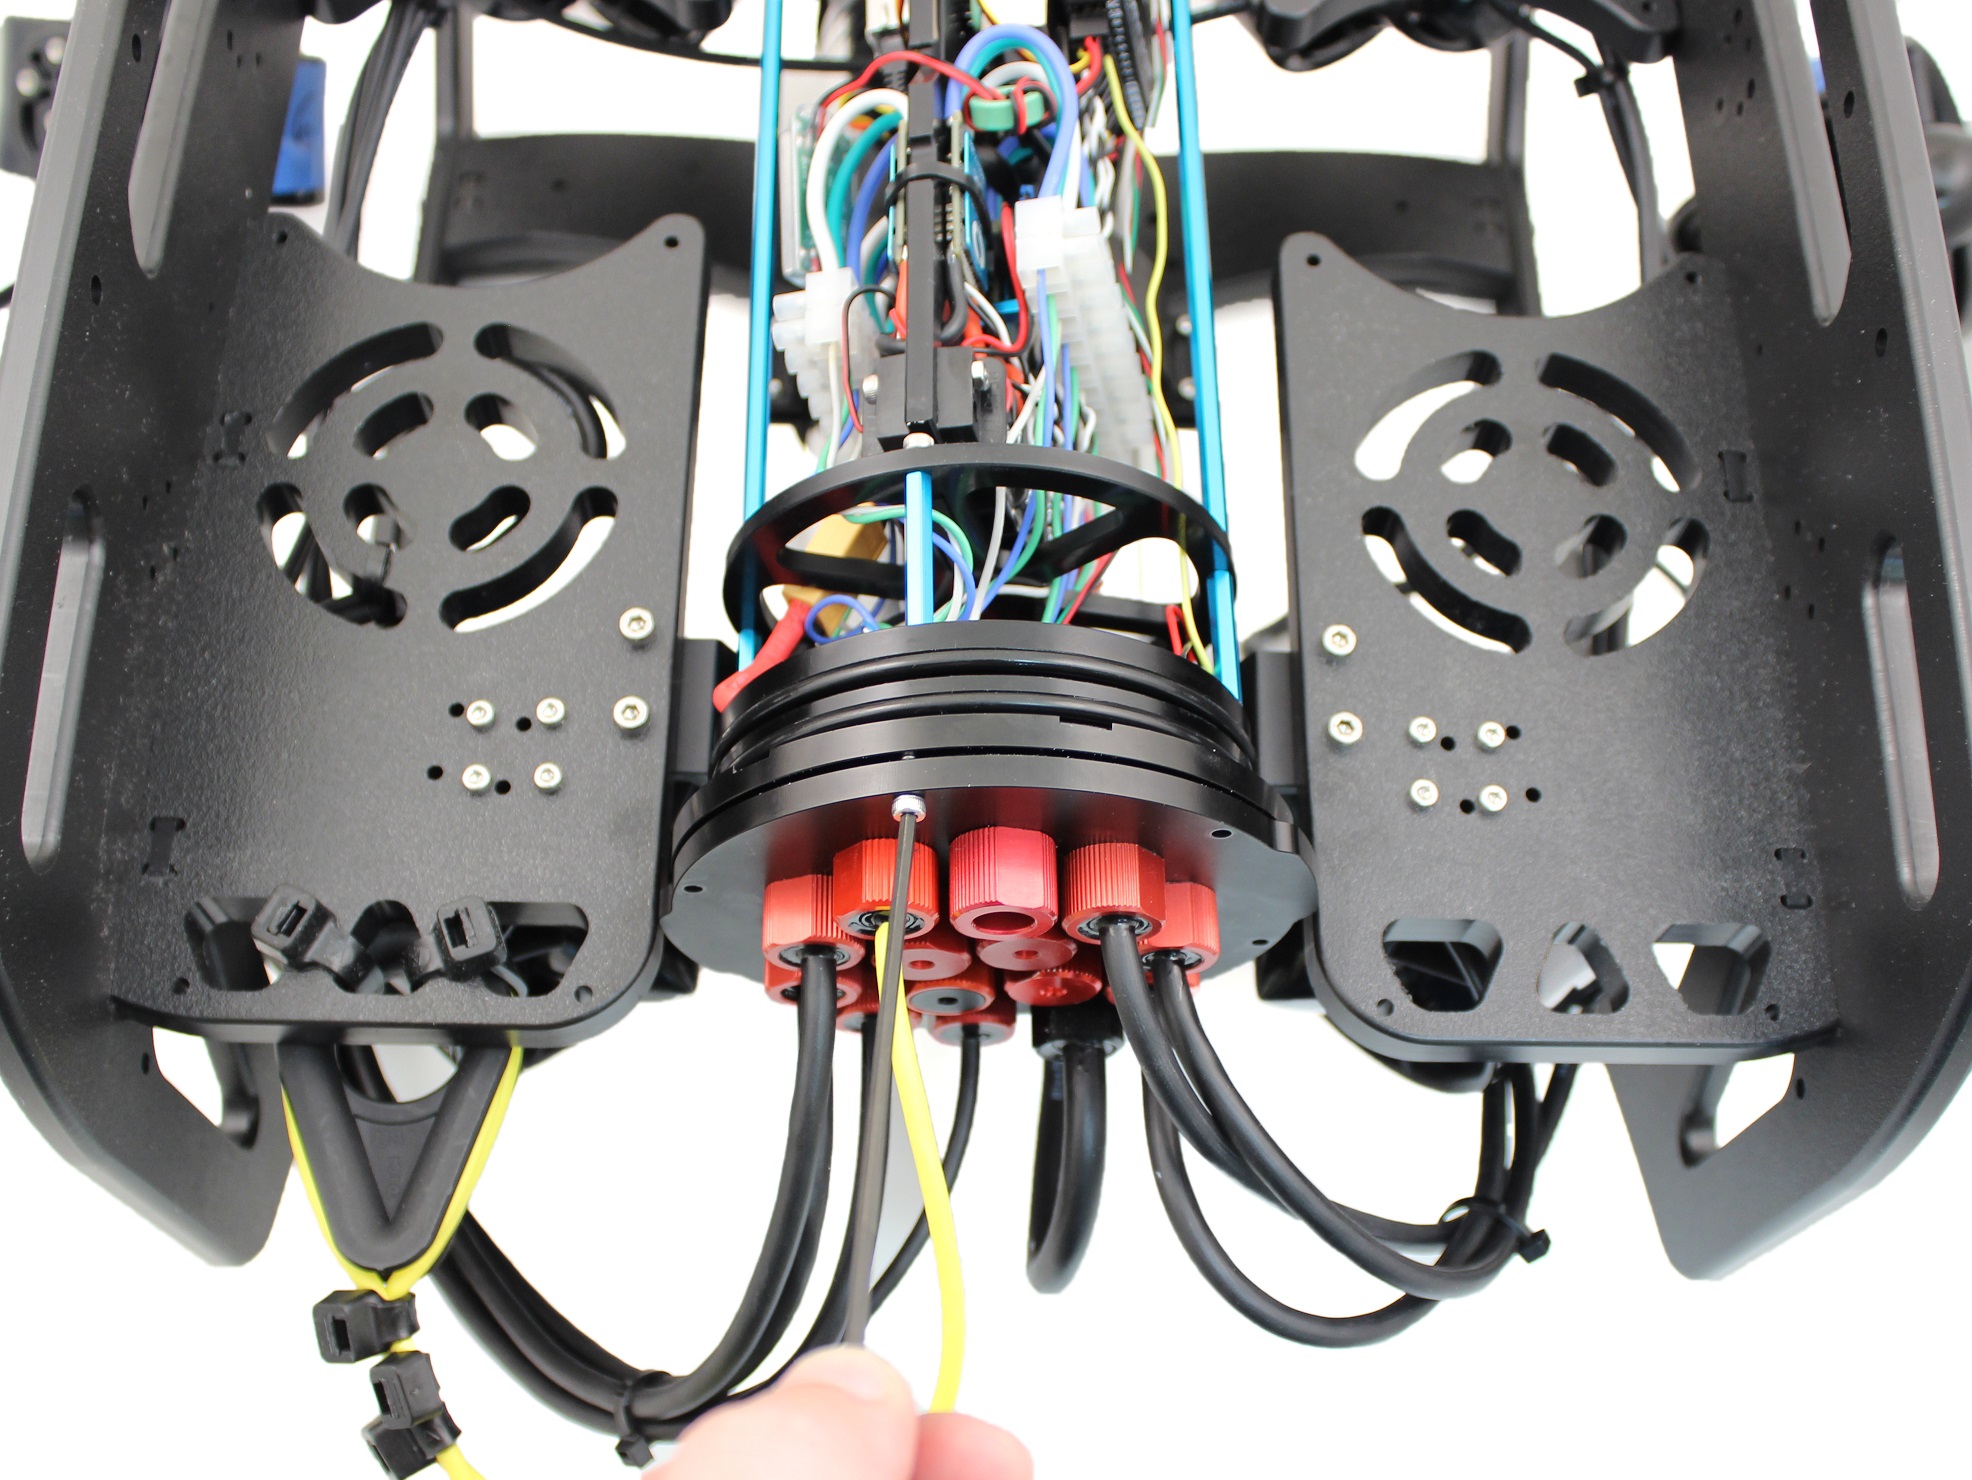
9. Remove the two blank penetrators as pictured from the 4” End Cap with the penetrator wrench that came with the
BlueROV2 kit.
(https://www.bluerobotics.com/wp-content/uploads/2019/03/end-cap-remove.jpg?x62571)
Privacy - Terms

5/20/2019 BlueROV2 Heavy Configuration Retrofit Kit Installation - Blue Robotics
https://www.bluerobotics.com/learn/bluerov2-heavy-configuration-retrofit-kit-installation/ 9/28
Install New Thrusters
To Install the new thrusters, you will need the following parts and tools:
1 x T200 with counter-clockwise propeller
1 x T200 with clockwise propeller
1 x Bag with 8 M3x12 screws
8 x M3x12 screws you had set aside from removing Thrusters 5 and 6
1 x Silicone Grease – 10g Tube
1 x Threadlocker
1 x Penetrator wrench
1 x 2.5 mm hex driver
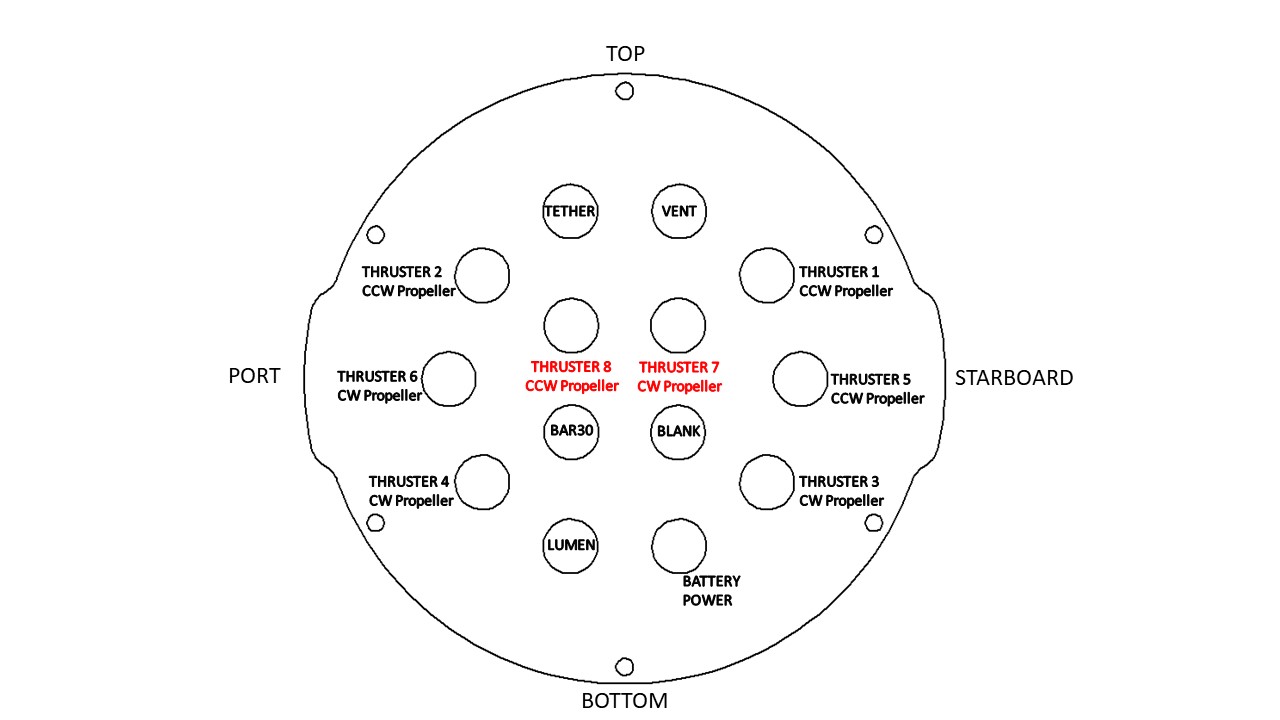
1. Install Thrusters 7 and 8 into the respective empty penetrator holes. Tighten to nger tight, then use the provided
wrench to tighten them an additional ~1/16 of a turn. If you can’t loosen them with your ngers, they are tight
enough.
Thruster 7 (CW propeller) with red penetrator nut.
Thruster 8 (CCW propeller) with red penetrator nut.
(https://www.bluerobotics.com/wp-content/uploads/2019/03/end-cap-new-thrusters.jpg?x62571)
Privacy - Terms

5/20/2019 BlueROV2 Heavy Configuration Retrofit Kit Installation - Blue Robotics
https://www.bluerobotics.com/learn/bluerov2-heavy-configuration-retrofit-kit-installation/ 10/28
(https://www.bluerobotics.com/wp-content/uploads/2019/03/heavy-tutorial-7.jpg?x62571)
2. Reinstall the 4” Aluminum End Cap with the following steps:
Clean the O-ring and make sure that it is free of any debris or damage.
Clean the O-Ring Flange (4” Series) and make sure that the O-ring groove is free of any debris or damage.
Apply Silicone grease to the O-ring.
Install face seal O-ring onto the O-Ring Flange (4” Series).
Apply one drop of threadlocker to each of the M3x12 screws. Roll the screws around on a paper towel to evenly spread
the threadlocker and to remove excess threadlocker.
Install Aluminum End Cap with 14 Holes with all Cable Penetrators and Blank Penetrators installed onto the O-Ring
Flange (4” Series). Do not fully tighten any screws when rst installing them; it may cause the O-ring to slip out of its
groove. The end cap’s orientation when installed should match the image below. Make sure that the clips are oriented
correctly. One should be just right of the Thruster 3 penetrator, and the other should be just left of the Thruster 4
penetrator.
3. Install thrusters 5, 6, 7 and 8, using the M3x12 screws on the outside of the side panels. Tighten the screws so that
they indent the frame slightly.
DO NOT use threadlocker unless you have threadlocker rated for use with polycarbonate.
Privacy - Terms
Altri manuali per BlueROV2
2
Indice
Altri manuali Blue Robotics Robotica


