Bona Edge XL Istruzioni operative

SERVICE INSTRUCTIONS
Bona Service Kit for Bona Edge XL
Bona.com
EN
DE
FR
ES

TABLE OF CONTENTS
HOW TO CHANGE THE COAL EDGE ................................................................... 3
HOW TO REPLACE THE COGGED BELT .............................................................. 7
HOW TO ATTACH THE DUSTBAG ...................................................................... 12
HOW TO CHANGE THE VELCRO DISC .............................................................. 13
HOW TO CHANGE THE WHEELS ....................................................................... 15
Watch the instruction
videos here!
3| BONA SERVICE KIT - SERVICE INSTRUCTIONS
HOW TO CHANGE THE COAL EDGE
STEP 1
EN
DE
FR
ES
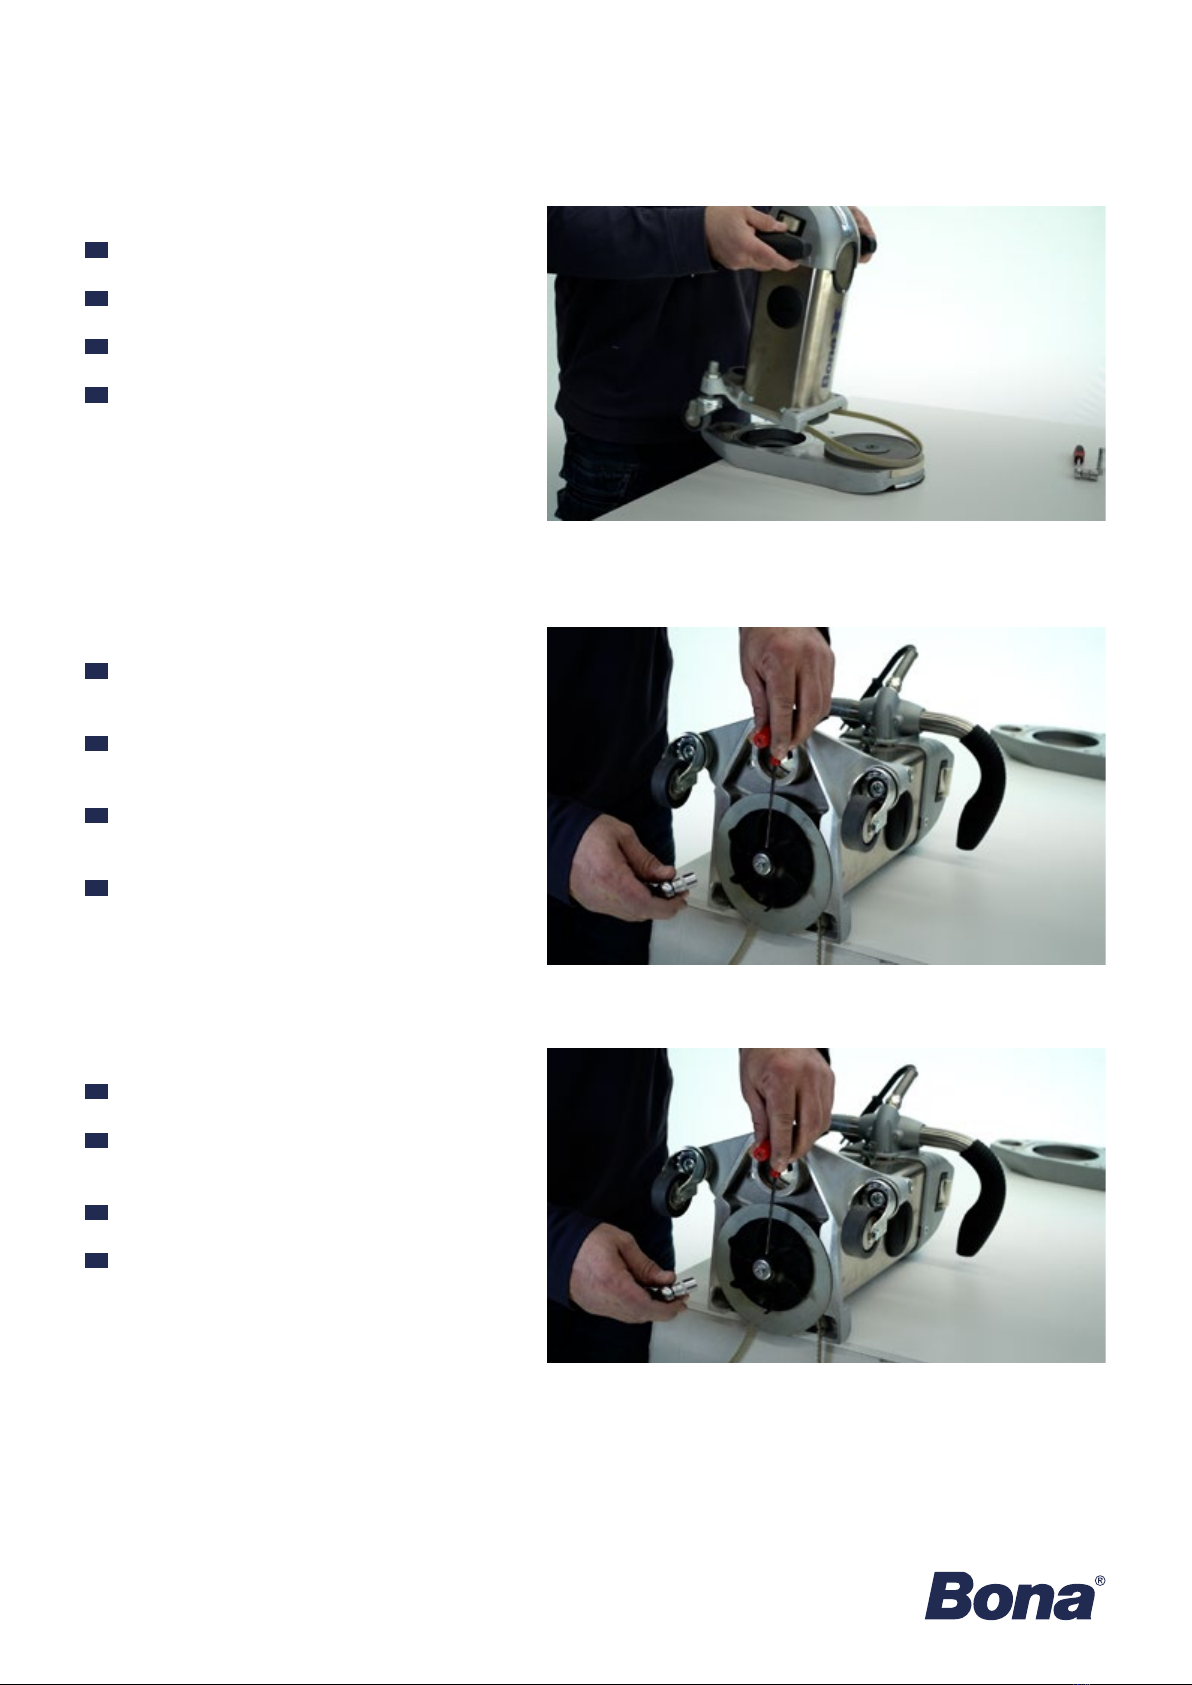
Place the machine on its side.
Die Maschine auf die Seite legen.
Placez la machine sur le côté.
Apoye la máquina sobre el lateral.
STEP 2
EN
DE
FR
ES
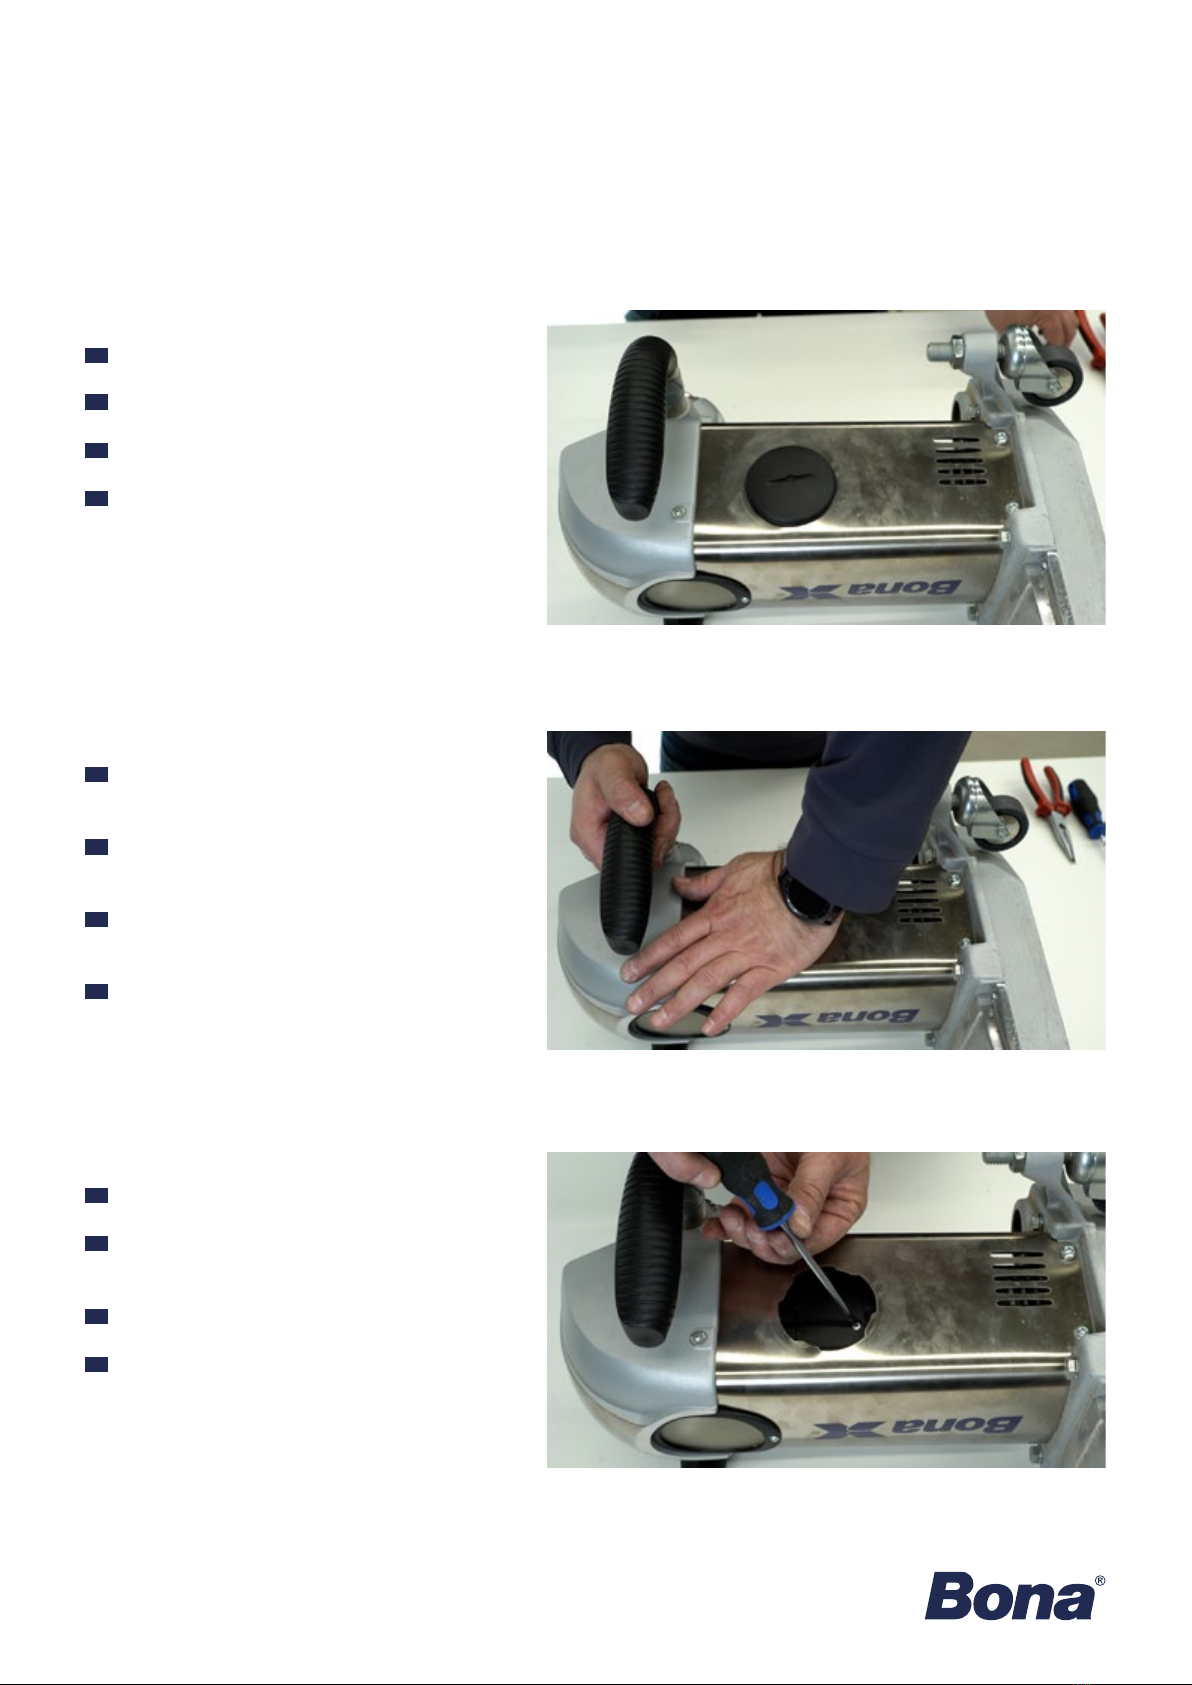
Remove the black cover by turning it counterclock-
wise.
Die schwarze Abdeckung abnehmen, wofür sie
gegen den Uhrzeigersinn gedreht wird.
Retirez le cache noir en la faisant tourner dans le
sens inverse des aiguilles d’une montre.
Retire la cubierta negra girándola en el sentido
contrario a las agujas del reloj.
Tools you need: Allen Key, Philips Screw driver
Before starting, make sure that the machine is switched off and the power cord disconnected from the socket.
STEP 3
EN
DE
FR
ES
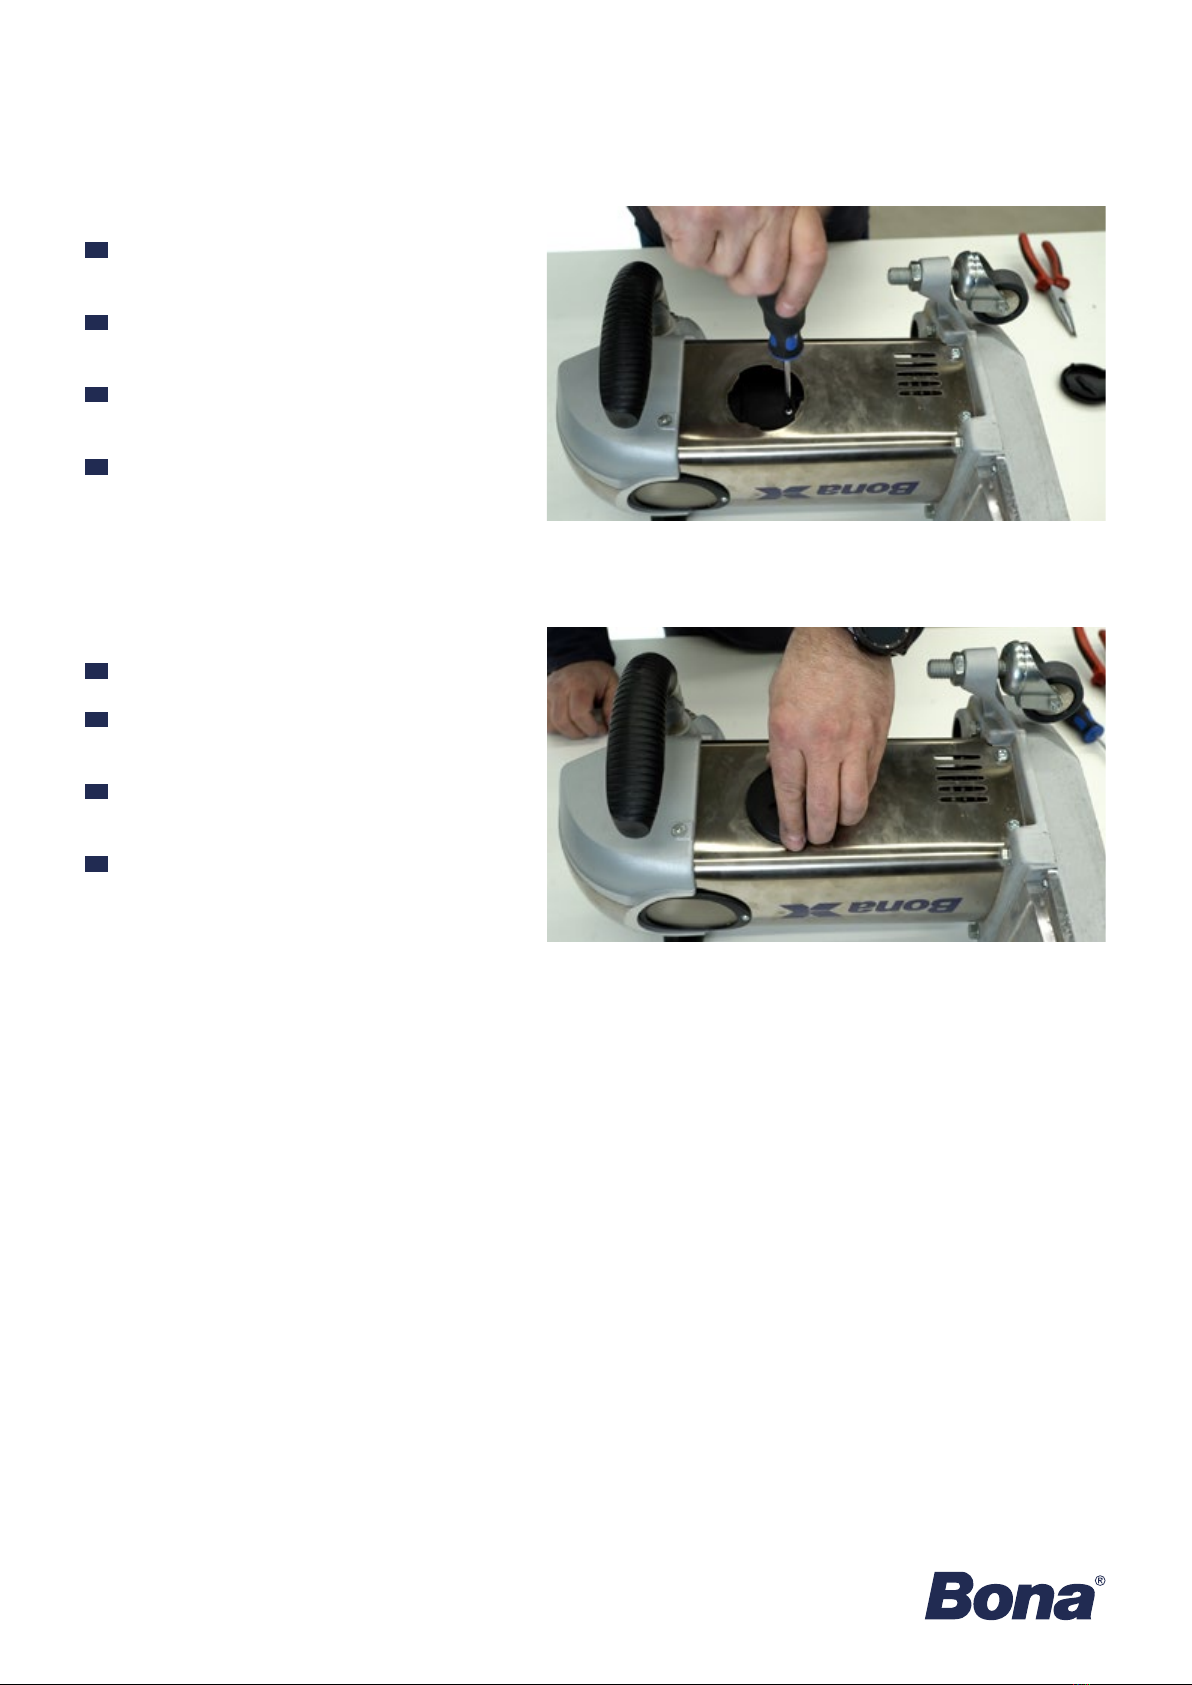
Remove the screw and then remove the lid.
Zuerst die Schraube und dann den Deckel ent-
fernen.
Retirez la vis, puis le couvercle.
Retire el tornillo y después la tapa.
4| BONA SERVICE KIT - SERVICE INSTRUCTIONS
STEP 4
EN
DE
FR
ES
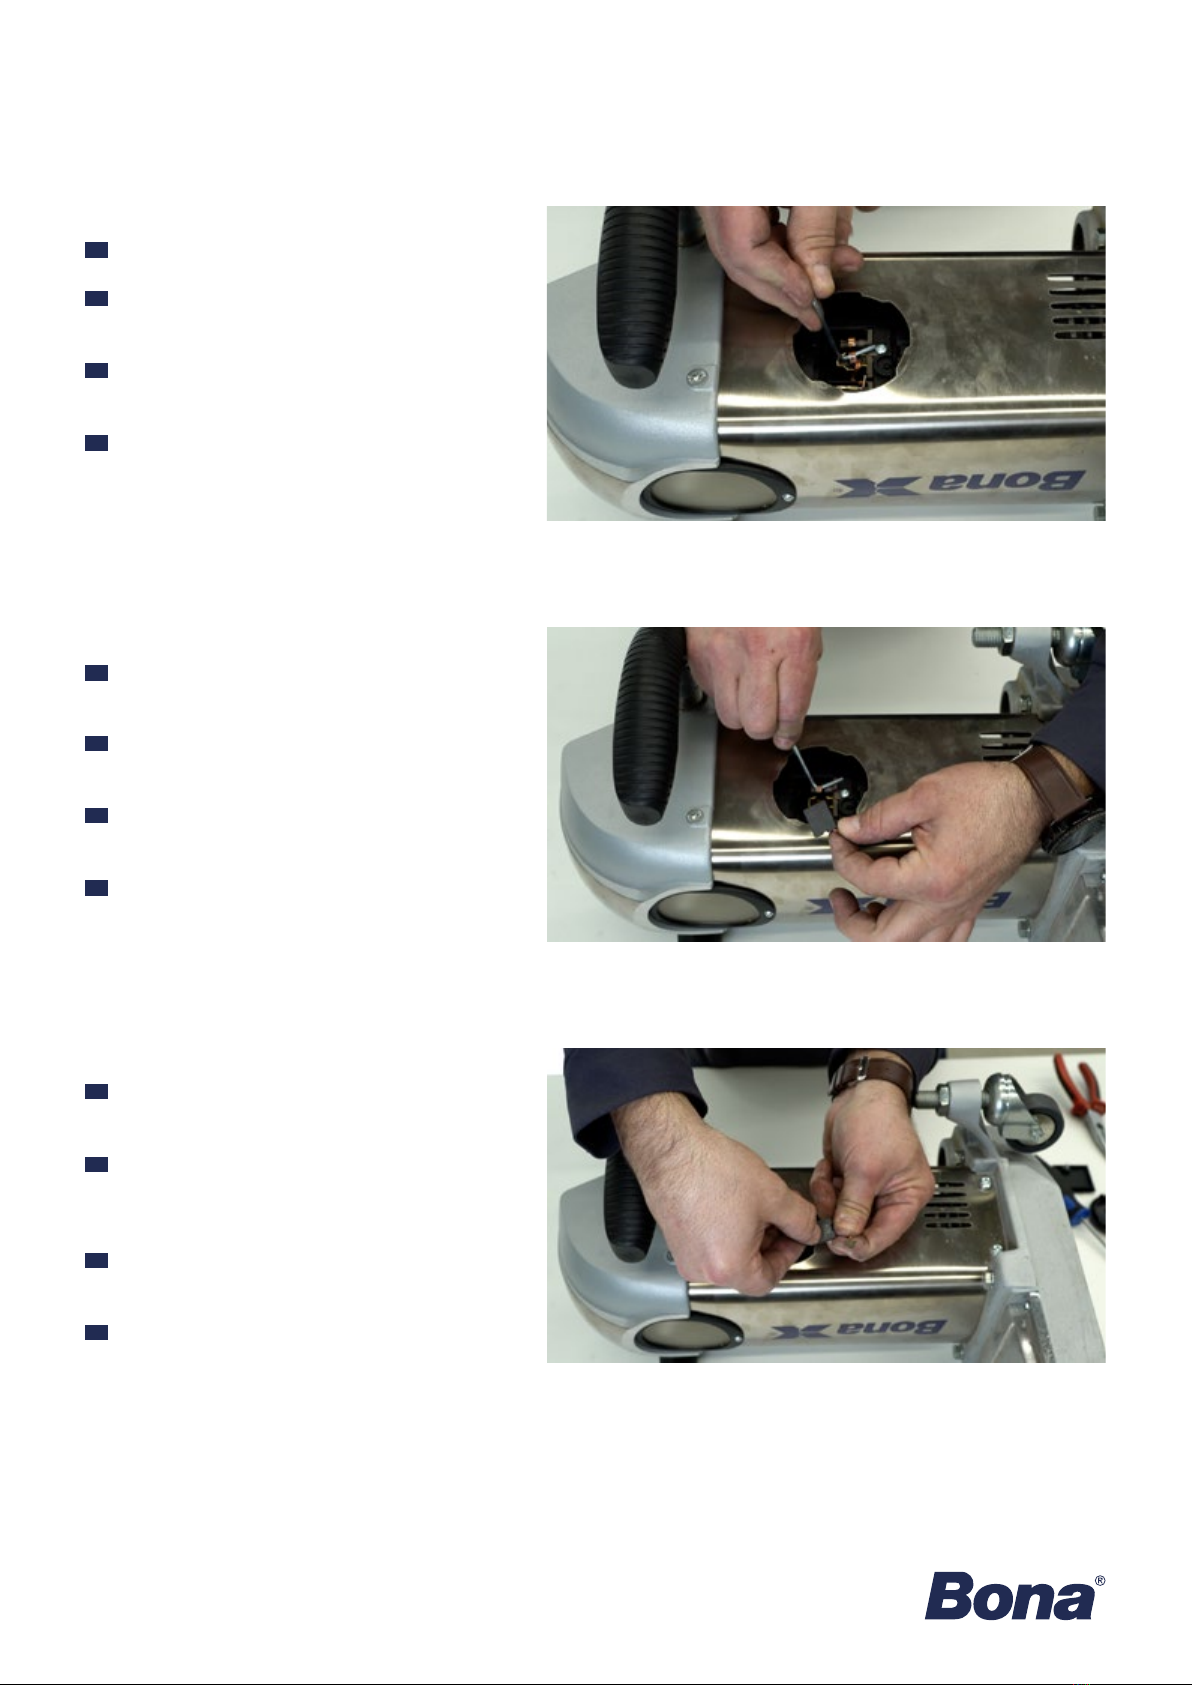
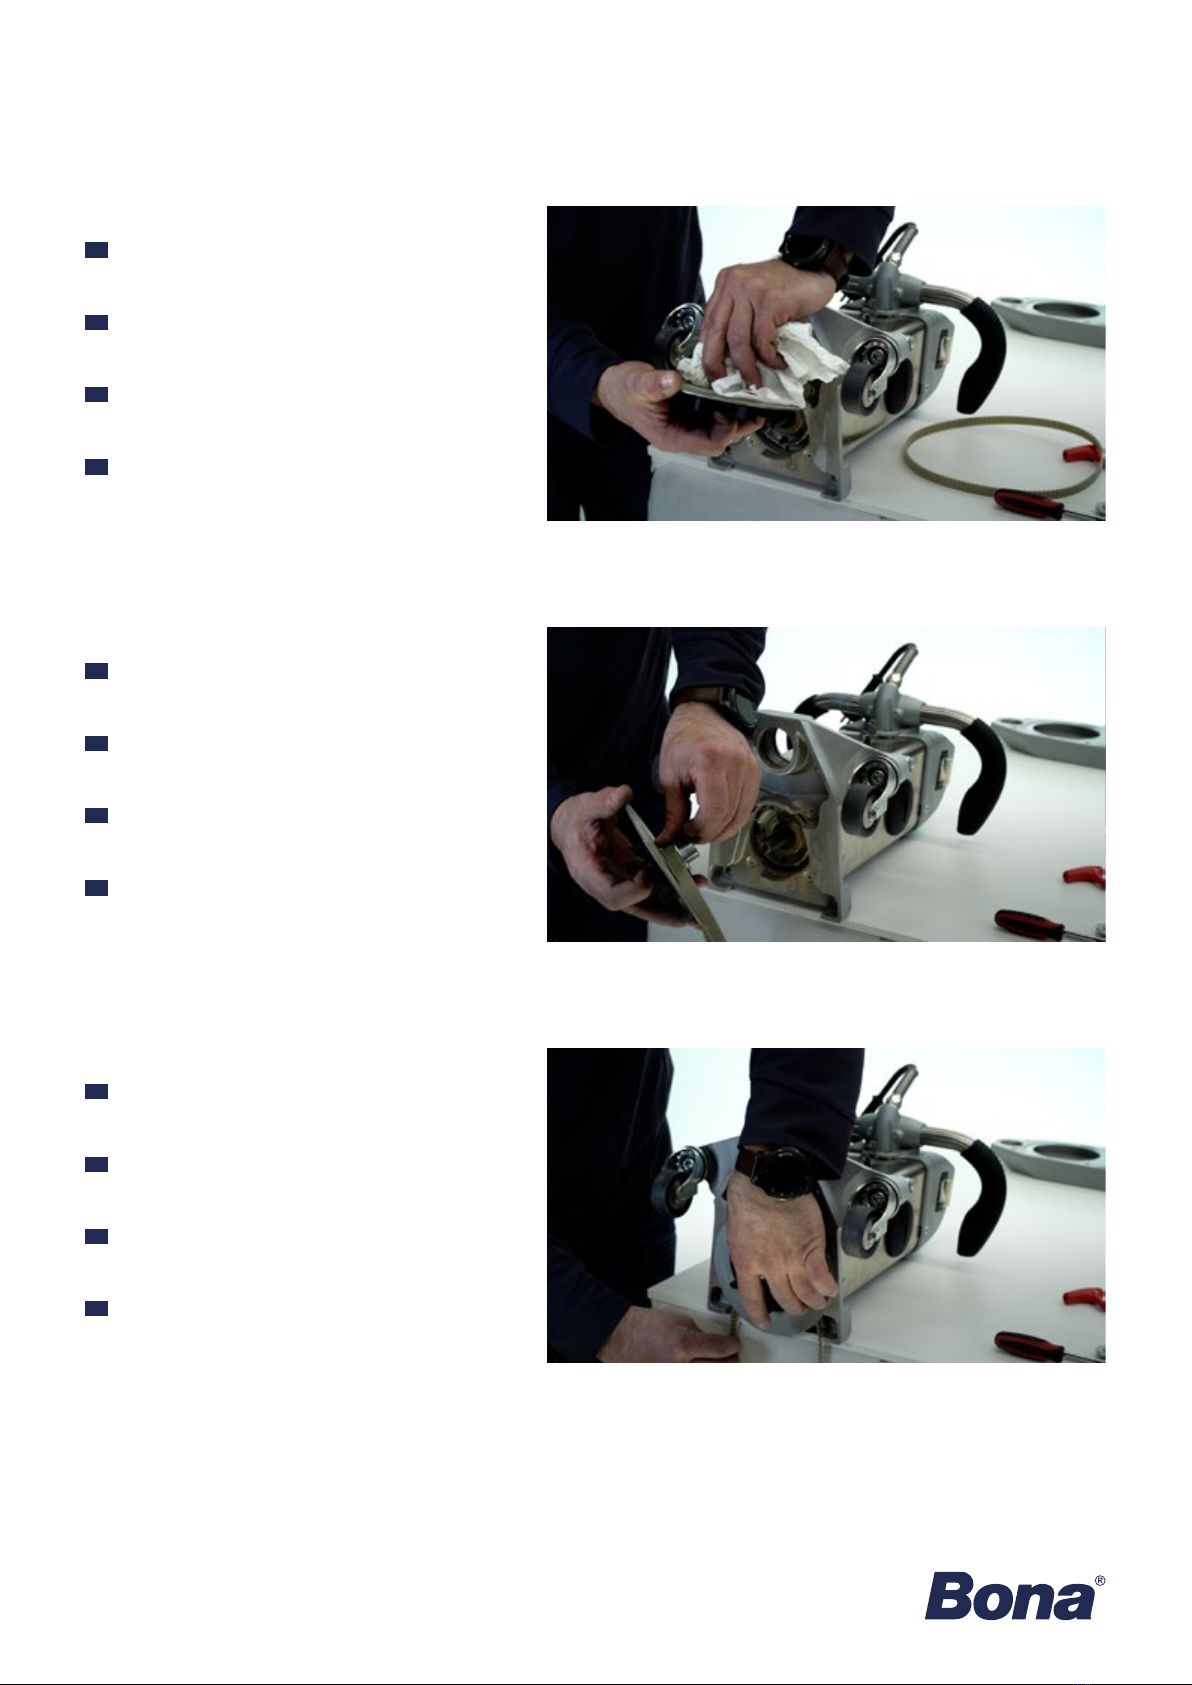
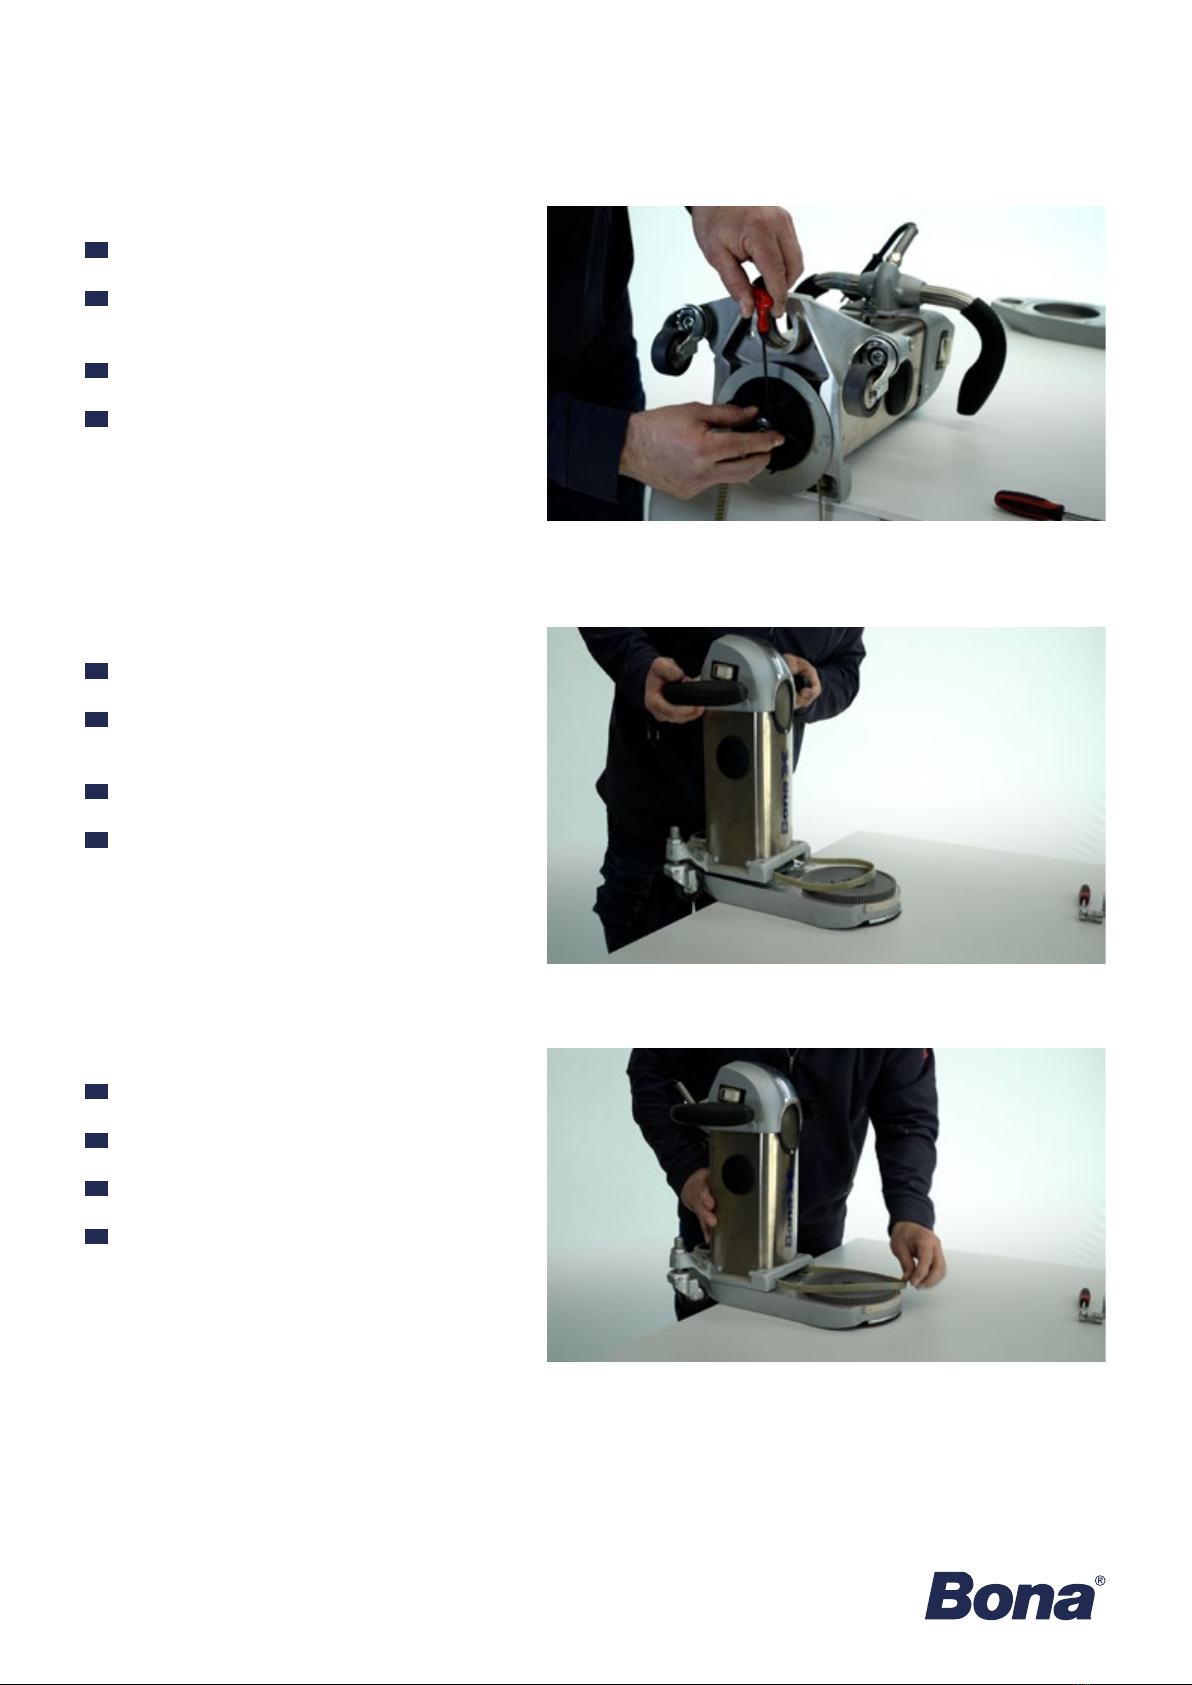
Lift the coal edge holder using an allen key.
Mit einem Inbusschlüssel die Kohlebürstenhalter-
ung anheben.
Soulevez le support du charbon à l’aide d’une clé
Allen.
Levante el soporte del cabezal de carbón con
una llave allen.
STEP 5
EN
DE
FR
ES
Carefully pull out the coal edge and disconnect it
from the machine.
Die Kohlebürste vorsichtig herausziehen und von
der Maschine trennen.
Sortez le charbon et déconnectez-le de la ma-
chine.
Saque cuidadosamente el cabezal de carbón y
desconéctelo de la máquina.
STEP 6
EN
DE
FR
ES
Look for the white line. If it is close to the line or if
the line is gone, replace the carbon brush.
Nach der weißen Linie suchen. Sollte der Abstand
sehr klein oder die Linie nicht mehr zu sehen sein,
muss die Kohlebürste ausgetauscht werden.
Localisez le repère blanc. S’il est pratiquement
atteint ou s’il a disparu, remplacez le charbon.
Busque la línea blanca. Si está cerca de la línea
o si la línea ya no está, sustituya la escobilla de
carbón.

5| BONA SERVICE KIT - SERVICE INSTRUCTIONS
STEP 7
EN
DE
FR
ES
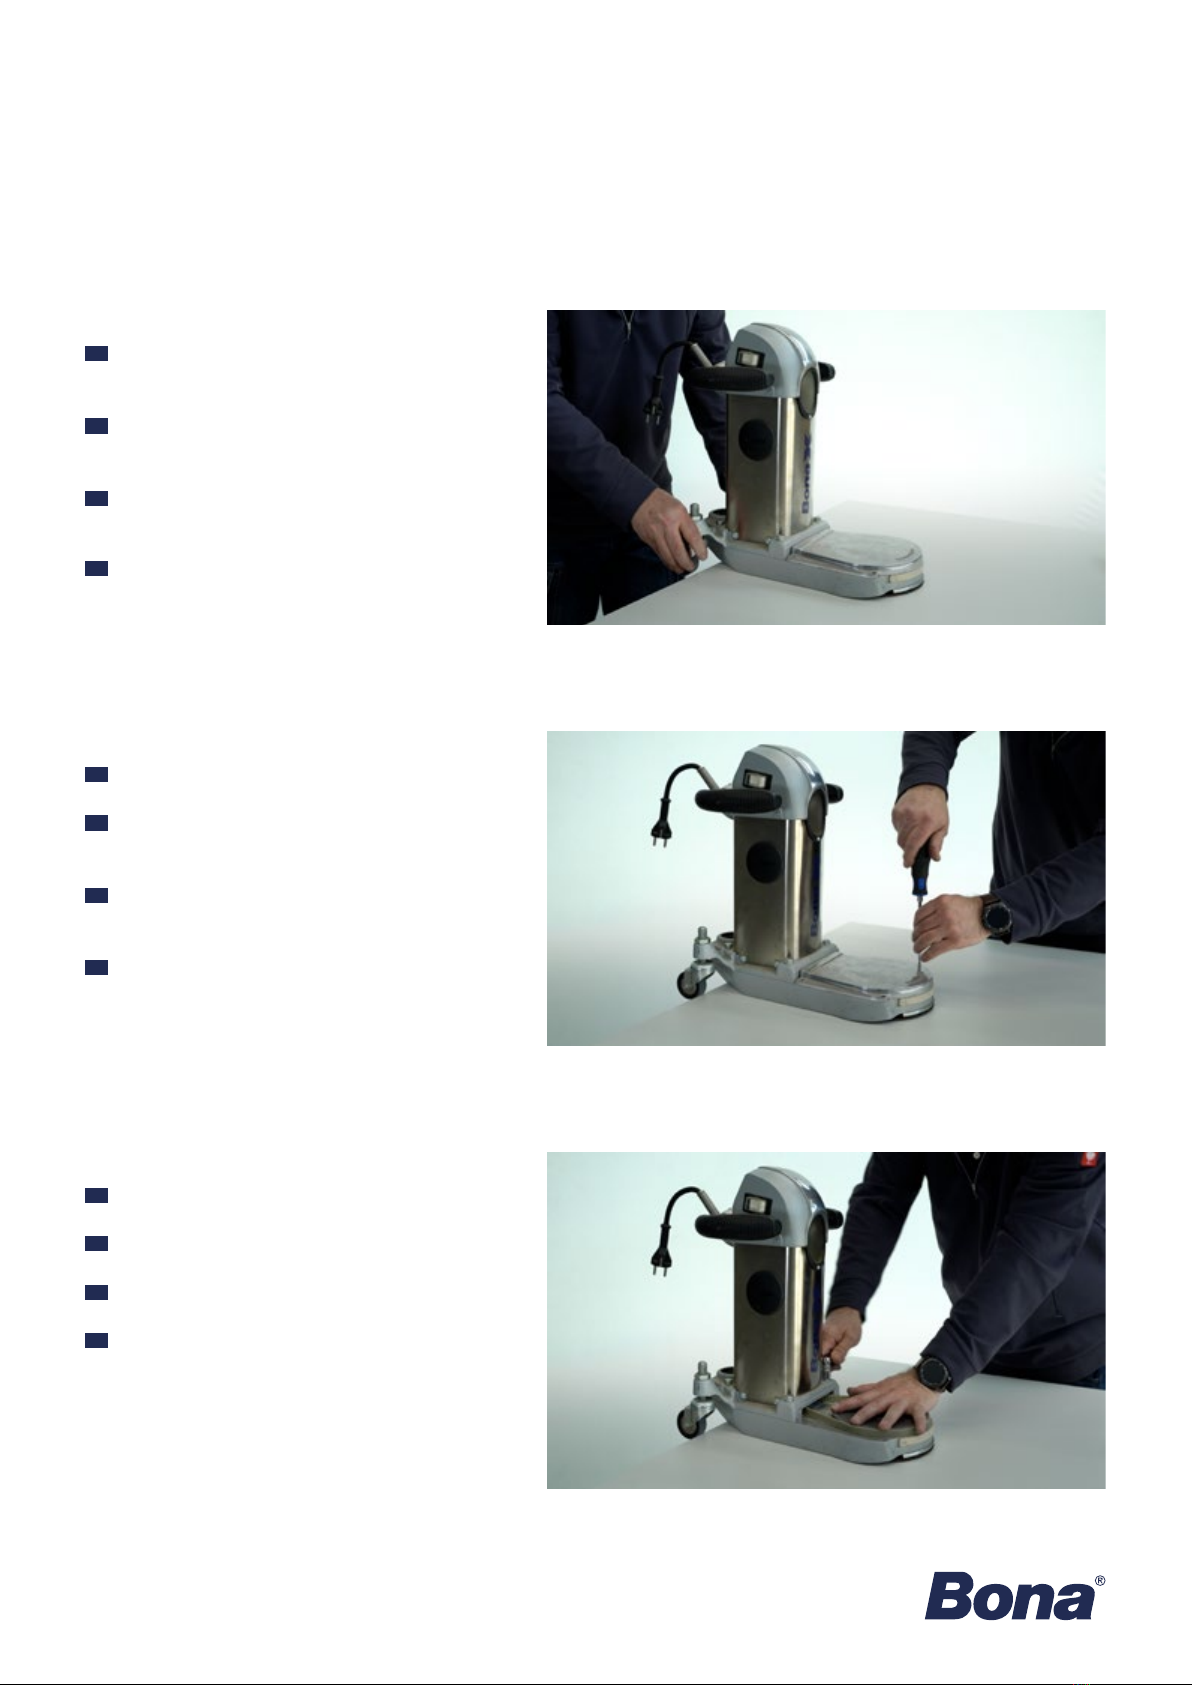
Connect the new coal edge to the machine.
Die neue Kohlebürste an die Maschine an-
schließen.
Connectez le nouveau charbon à la machine.
Conecte el nuevo bastidor de carbón a la máquina.
STEP 8
EN
DE
FR
ES
Put the carbon brush back in place and and secure
it with the brush holder.
Die Kohlebürste wieder einsetzen und mit der
Bürstenhalterung sichern.
Remettez le charbon en place et xez-le à l’aide du
support correspondant.
Vuelva a poner la escobilla de carbón en su sitio y
asegúrela con su soporte.
STEP 9
EN
DE
FR
ES
Make sure the cable connector is secured by
placing it in the cavity next to the coal edge.
Es ist darauf zu achten, dass der Kabelstecker ge-
sichert ist, indem er in die Aussparung neben der
Kohlebürste eingelegt wird.
Assurez-vous que le connecteur du câble est bien
xé en le plaçant dans l’espace situé à côté du
charbon.
Asegúrese de que el conector del cable está bien
jado colocándolo en la cavidad junto al bastidor
de carbón.
6| BONA SERVICE KIT - SERVICE INSTRUCTIONS
STEP 10
EN
DE
FR
ES
Put the lid back in place and use the screw to
secure it.
Den Deckel wieder aufsetzen und mit der Schraube
sichern.
Remettez le couvercle en place et xez-le à l’aide
de la vis.
Vuelva a poner la tapa en su sitio y fíjela con el
tornillo.
STEP 11
EN
DE
FR
ES
Put the cover back on and turn it clockwise.
Die Abdeckung wieder aufsetzen und im Uhrzei-
gersinn drehen.
Remettez le cache en place et faites-le tourner
dans le sens des aiguilles d’une montre.
Vuelva a poner la cubierta y gírela en el sentido
de las agujas del reloj.
7| BONA SERVICE KIT - SERVICE INSTRUCTIONS
HOW TO REPLACE THE COGGED BELT
Tools you need: Wrench, Philips Screw driver, Allen Key
STEP 1
EN
DE
FR
ES
Place the machine on the work table with the
wheels positioned outside of the table.
Die Maschine auf den Arbeitstisch stellen, wobei
die Räder am Tischrand frei hängen sollten.
Placez la machine sur le plan de travail en orientant
les roulettes vers l’extérieur.
Coloque la máquina sobre la mesa de trabajo con
las ruedas fuera de la mesa.
STEP 2
EN
DE
FR
ES
Open the top cover by removing the 4 screws.
Die obere Abdeckung nach dem Lösen der 4
Schrauben abnehmen.
Ouvrez le couvercle supérieur en retirant les quatre
vis.
Abra la cubierta superior retirando los 4 tornillos.
STEP 3
EN
DE
FR
ES
Remove the 4 screws from the housing.
Die 4 Schrauben vom Gehäuse entfernen.
Retirez les quatre vis du boîtier.
Retire los 4 tornillos del alojamiento.
Before starting, make sure that the machine is switched off and the power cord disconnected from the socket.
8| BONA SERVICE KIT - SERVICE INSTRUCTIONS
STEP 4
EN
DE
FR
ES
Remove the housing from the arm.
Das Gehäuse vom Maschinenvorsatz abnehmen.
Retirez le boîtier du bras.
Retire el alojamiento del brazo.
STEP 5
EN
DE
FR
ES
Place the housing on the edge of the table to
prevent the belt from being squeezed.
Das Gehäuse so an der Tischkante ablegen, dass
der Riemen nicht gequetscht wird.
Placez le boîtier sur le bord du plan de travail an
de ne pas coincer la courroie.
Coloque el alojamiento sobre el borde de la mesa
para evitar que la correa quede apretada.
STEP 6
EN
DE
FR
ES
Remove the centre screw to remove the pulley.
Die mittlere Schraube entfernen, um die Riemen-
scheibe abnehmen zu können.
Retirez la vis centrale pour retirer la poulie.
Retire el tornillo central para quitar la polea.
9| BONA SERVICE KIT - SERVICE INSTRUCTIONS
STEP 7
EN
DE
FR
ES
Clean the pulley and the housing before installing
the new belt.
Riemenscheibe und Gehäuse vor dem Einsetzen
eines neuen Riemens reinigen.
Nettoyez la poulie et le boîtier avant d’installer la
nouvelle courroie.
Limpie la polea y el alojamiento antes de instalar la
correa nueva.
STEP 8
EN
DE
FR
ES
Place the new belt on the pulley and mount it back
on the housing.
Den neuen Riemen um die Riemenscheibe legen
und diese wieder am Gerät anbringen.
Placez la nouvelle courroie sur la poulie et remont-
ez-la sur le boîtier.
Coloque la correa nueva sobre la polea y vuelva a
montarla en el alojamiento.
STEP 9
EN
DE
FR
ES
Make sure that the cover plate ts properly before
tightening the screw.
Vor dem Anziehen der Schrauben darauf achten,
dass die Abdeckplatte richtig sitzt.
Assurez-vous que la plaque de protection est cor-
rectement positionnée avant de serrer la vis.
Asegúrese de que la placa de cubierta encaja cor-
rectamente antes de apretar el tornillo.
10 | BONA SERVICE KIT - SERVICE INSTRUCTIONS
STEP 10
EN
DE
FR
ES
Put the center screw back to secure the pulley.
Die mittlere Schraube wieder eindrehen, um die
Riemenscheibe zu sichern.
Remettez la vis centrale pour xer la poulie.
Vuelva a colocar el tornillo central para asegurar
la polea.
STEP 11
EN
DE
FR
ES
Put the housing back on the arm.
Das Gehäuse wieder auf den Maschinenvorsatz
setzen.
Remettez le boîtier en place sur le bras.
Vuelva a colocar el alojamiento en el brazo.
STEP 12
EN
DE
FR
ES
Fit the belt around the pulley.
Den Riemen um die Riemenscheibe führen.
Placez la courroie autour de la poulie.
Coloque la correa alrededor de la polea.
Altri manuali per Edge XL
1
Indice
Altri manuali Bona Accessori per fotocamere


