Boogie Board SYNC 9.7 Manuale utente
USER MANUAL
25204B

2BOOGIE BOARD SYNC 9.7 EWRITER USER MANUAL
ABOUT THIS MANUAL
Thank you for getting the Boogie Board™ Sync 9.7 LCD eWriter. This manual will help you with the Boogie Board Sync
eWriter hardware. Improv Electronics welcomes your feedback on the Boogie Board Sync eWriter and on this user
manual. Please send comments, questions and suggestions to:
improv.support@kentdisplays.com
For support, software downloads, and to register your Boogie Board Sync eWriter, go to:
http://improvelectronics.com/support
The Boogie Board Sync eWriter continues to improve. Therefore, some changes and features may not be covered in
this manual.

3BOOGIE BOARD SYNC 9.7 EWRITER USER MANUAL
TABLE OF CONTENTS
ABOUT YOUR BOOGIE BOARD SYNC 9.7 LCD EWRITER
5Welcome
5System Requirements
5What’s In The Box
6Product Features
6Accessories
7Technical Specications
USING YOUR BOOGIE BOARD SYNC 9.7 LCD EWRITER
9Setting Up
9Charging
10 Turning Your Boogie Board Sync eWriter On and O
10 Pairing Your Boogie Board Sync eWriter to a Bluetooth Device
10 Writing and Drawing on Your Boogie Board Sync eWriter
11 Saving and Erasing
12 Transferring Saved Files to a Computer
13 Digitizer Mode
13 Care and Maintenance
SUPPORT
15 Troubleshooting
15 Returns and Warranty Information
16 Indicator Light Chart
APPENDIX
19 Terminology
20 Attributions

ABOUT YOUR BOOGIE BOARD
SYNC 9.7 LCD EWRITER

5BOOGIE BOARD SYNC 9.7 EWRITER USER MANUAL
WELCOME
SYSTEM REQUIREMENTS
WHAT’S IN THE BOX
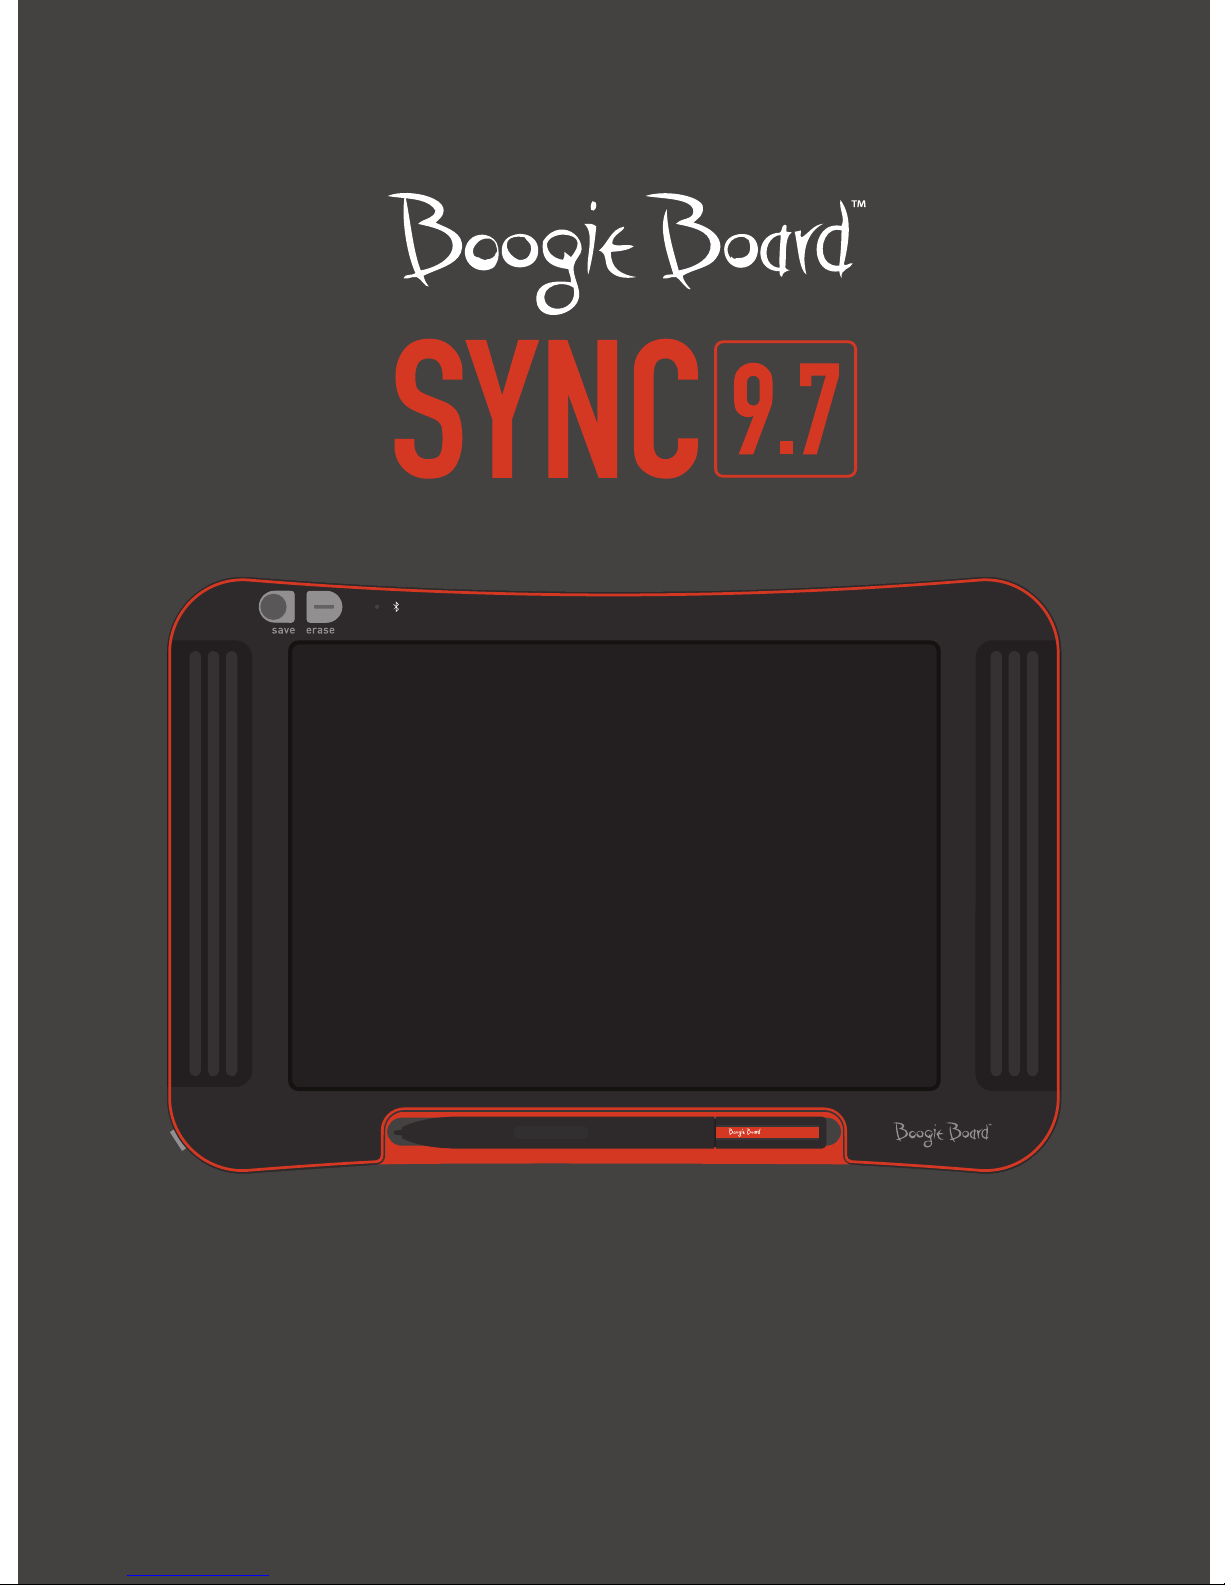
Welcome to your Boogie Board Sync 9.7 eWriter (Model WT13106), the latest evolution in eWriter technology.
Now you can digitally create page after page of notes and drawings without sacricing the writing experience.
The Boogie Board Sync 9.7 eWriter saves your images and transfers the information through your computer’s
USB port or wirelessly through Bluetooth to your phone, tablet or computer. And that’s just the beginning.
Please take a moment to visit our Product Registration website to register the warranty for your Boogie Board
Sync 9.7 eWriter: http://improvelectronics.com/support/boogie-board-product-registration.html
A computer with a USB port and one of the following two operating systems:
• Mac OSX 10.8 or higher
• Windows (Vista, 7, 8)
ABoogie Board Sync 9.7 eWriter
BSync Stylus
CMicro USB Cable
DQuick Start Guide

6BOOGIE BOARD SYNC 9.7 EWRITER USER MANUAL
PRODUCT FEATURES
ACCESSORIES
A9.7" LCD screen with
pressure-sensitive digitizer
BBluetooth Indicator
CStatus Indicator
DErase Button
ESave Button
FStylus
GMouse Mode Function*
*for use in digitizer mode, see page 13
HPower Button
ICharging Indicator
JMicro USB Port
(cable included)
Carry and protect your Boogie Board Sync eWriter in style with the Sync
Folio. The Sync Folio protects your Boogie Board Sync eWriter and eliminates
accidental screen marks. The stylish design is perfect for the oce, classroom,
or around town.

7BOOGIE BOARD SYNC 9.7 EWRITER USER MANUAL
TECHNICAL SPECIFICATIONS
Dimensions
Product Size: 283mm x 190 x 11 (11.1in x 7.5 x 0.4)
LCD Size: 241mm (9.5in)
Weight
Product Weight: 312g (11oz)
On-Board Memory
Capacity: ~1000 PDF les
Connectivity
Bluetooth 2.1+ EDR
• Airplane mode: Power on while holding erase button
• Bluetooth® Pairing mode: Power on while holding save button
Micro-USB Port
Power
On/O Button
Up to one week of typical use on a single charge
Sleep mode: after 1 hour of inactivity
Color
Black with orange accents
Compatibility
Mac OSX 10.8 or higher
Windows (Vista, 7, 8)
Android and iOS (mobile app)
Storage
Storage Temperature: Store between -10° C to 65° C (15° F and 145° F)
Operating Temperature: Operate between 10° C and 40° C (50° F and 100° F)

USING YOUR BOOGIE BOARD
SYNC 9.7 LCD EWRITER

9BOOGIE BOARD SYNC 9.7 EWRITER USER MANUAL
SETTING UP
Charging
IMPORTANT:
Charge your Boogie Board Sync eWriter for four hours before rst use. A full charge will last approximately
one week under normal use.
1. Remove the Boogie Board Sync eWriter and micro USB cable.
2. Connect the micro end of the USB cable to the micro USB
port on the bottom of your Boogie Board Sync eWriter.
3. Connect the USB A (larger) end of the micro USB cable into an
available USB port on a properly charged external device (tablet
or computer).
4. When the Boogie Board Sync eWriter is connected and charging,
you will see two lights:
• The charging indicator light next to the micro USB port on the
Boogie Board Sync eWriter will appear RED. This light will turn
OFF when the Sync is fully charged.
• The status indicator light next to the erase button on the front
of the Boogie Board Sync eWriter will appear RED. This indicates
that the Boogie Board Sync eWriter is not recording onto the
Boogie Board Sync eWriter’s internal memory.
5. Disconnect the micro USB cable from your external device and
Boogie Board Sync eWriter. Your Boogie Board Sync eWriter is now
ready to use.
It is suggested to charge your Boogie Board Sync eWriter when the
Status Indicator light appears yellow or red. See page 16 for an indicator
light chart.
Boogie Board
Sync eWriter
External
Device
Status Indicator
Charging Indicator
10BOOGIE BOARD SYNC 9.7 EWRITER USER MANUAL
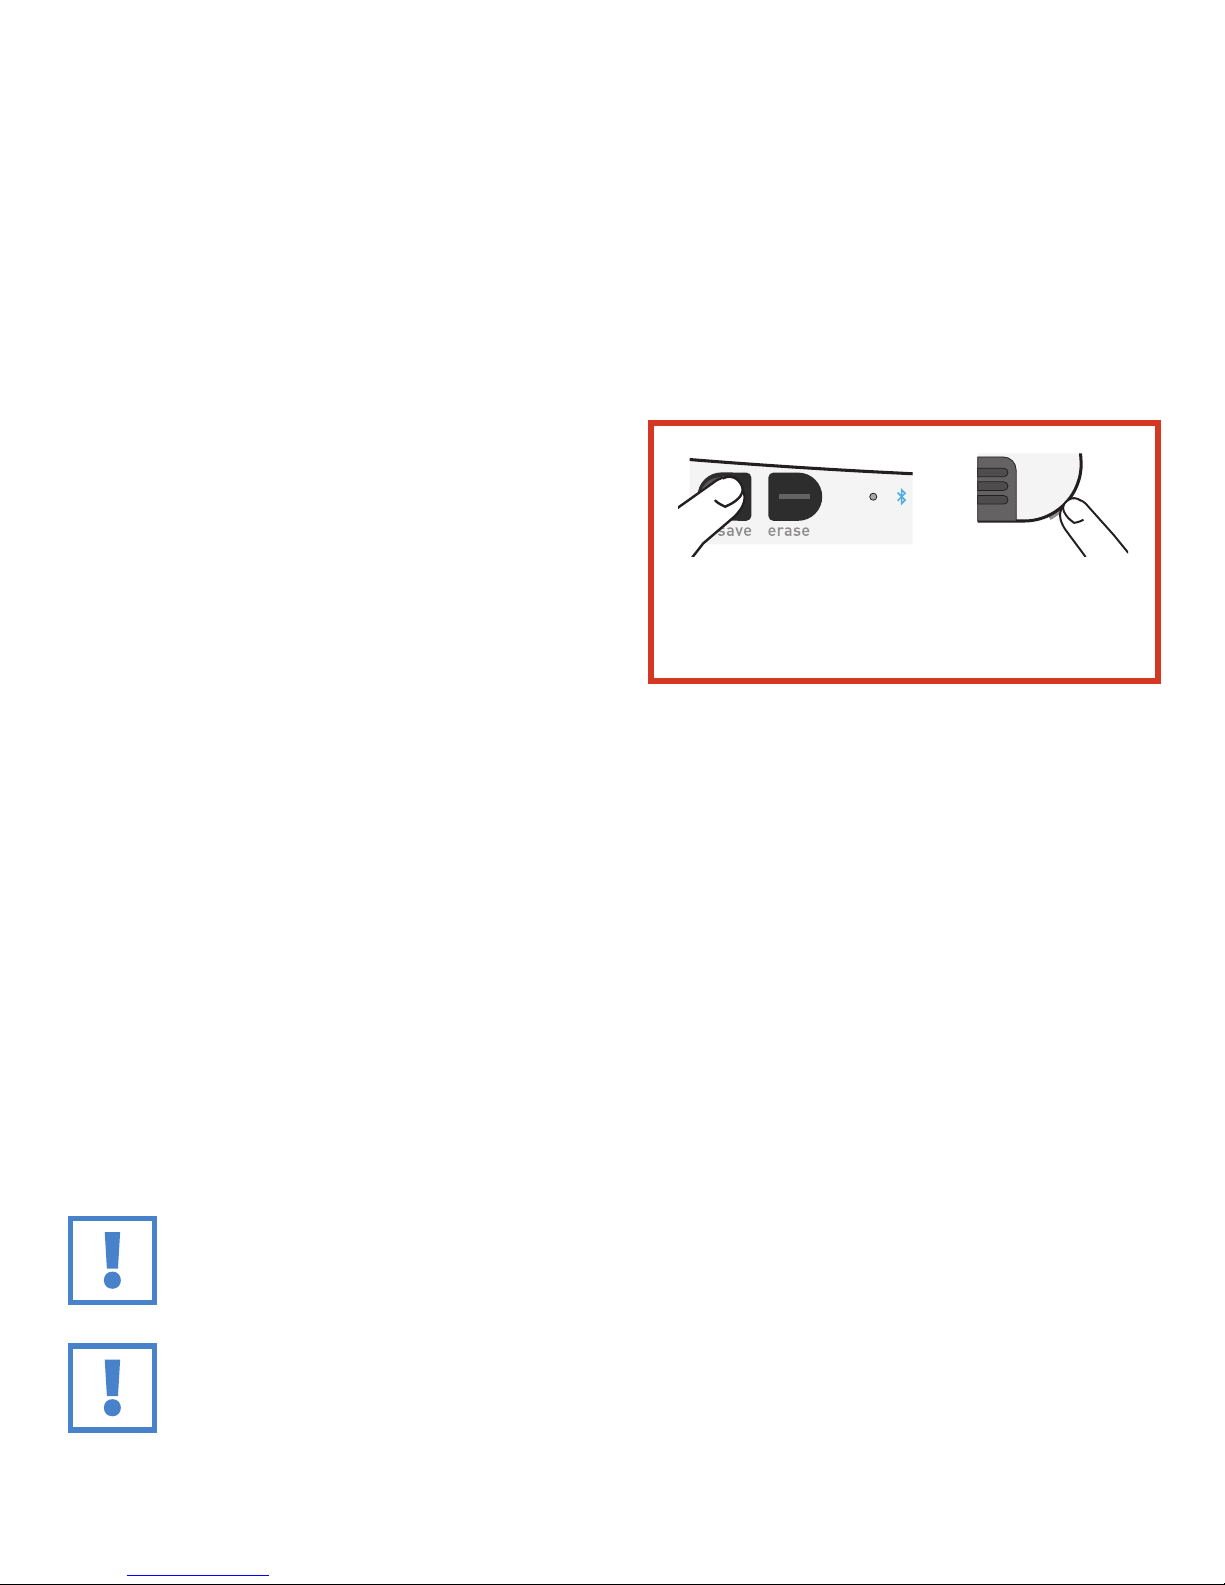
Pairing Your Boogie Board Sync eWriter to a Bluetooth Device
1. Turn on your Bluetooth-enabled external device
(e.g., smartphone, laptop, tablet, etc.) and go to the
device’s Bluetooth settings.
2. Make sure your Boogie Board Sync eWriter is turned o.
While the Boogie Board Sync eWriter is o, rst press the
SAVE button and then simultaneously press the POWER
button. This causes the Boogie Board Sync eWriter to
enter pairing mode and become discoverable.
3. Once your Bluetooth-enabled device discovers the Boogie Board Sync eWriter, you can pair to the Boogie Board
Sync eWriter. The Boogie Board Sync eWriter Bluetooth indicator will ash BLUE three times when it is paired and
connected with your Bluetooth device.
To disable Bluetooth connectivity: Turn o the Boogie Board Sync eWriter, and then press the ERASE button while
simultaneously pressing the POWER button. Bluetooth may need to be disabled on airplanes and other environments
(e.g., hospitals).
Turning Your Boogie Board Sync eWriter On and O
1. To turn on your Boogie Board Sync eWriter, press the POWER button. The status indicator will light up GREEN, RED
or YELLOW based on your Boogie Board Sync eWriter’s current battery life. See page 16 for the indicator light chart.
2. To turn o your Boogie Board Sync eWriter, press the power button. The status indicator will turn RED, then turn o.
After one hour of inactivity, the Boogie Board Sync eWriter will save your data and then turn o.
Writing and Drawing on Your Boogie Board Sync eWriter
1. To write or draw, use the Sync Stylus just as you would use pen on paper. The status indicator blinks once to
indicate that the Boogie Board Sync eWriter’s digitizer recognizes the Sync Stylus. Additional writing and drawing
features are available with the free Sync Virtual Desktop Companion (VDC) software at:
http://improvelectronics.com/support/downloads/
IMPORTANT:
Only use the Sync Stylus to write or draw on your Boogie Board Sync eWriter. You do not need to be
connected to a computer or Bluetooth device while using the Boogie Board Sync eWriter for it to function.
IMPORTANT:
DO NOT use the Boogie Board Sync eWriter near a magnet, as the magnet can interfere with digitizer
functioning. The magnet WILL NOT aect the Boogie Board Sync eWriter memory, so les saved on the
Boogie Board Sync eWriter won’t get erased if you place your Boogie Board Sync eWriter near a magnet.
Save button
Press both buttons simultaneously
to enter Bluetooth pairing mode
Power button
Altri manuali per SYNC 9.7
1
Indice


