Bull 94008 Manuale utente

ASSEMBLY & OPERATING INSTRUCTIONS
MODEL #94008 SEARING STATION STAINLESS STEEL, BUILT-IN, L.P. (PROPANE)
MODEL #94009 SEARING STATION STAINLESS STEEL, BUILT-IN, N.G. (NATURAL GAS)

TABLE OF CONTENTS PAGE #
SAFETY INSTRUCTIONS……………………...…………………………………………………….………………………..………………………...2
THE LOCATION FOR YOUR SEARINGSTATION…….…….………….…….….……………………….....……….…………………........2
CHECKING FOR GAS LEAKS………………………………………………………………………………………...…..……………………..2
NATURAL GAS SAFETY…………………………………….……………………….……..………………….……………….…..…….……...3
PROPANE GAS SAFETY…………………………………………………………………………………………………….….………………..4
INSTALLATION INSTRUCTIONS…………………………………………………………………………………………..………………….…….....5
SPECIFICATIONS FOR SEARING STATION STRUCTURE…………….…….….…………………………...………..……………………5
CONNECTING TO GAS SOURCE…………………………………………………..………………...…………………………………….......5
NATURAL GAS CONNECTIONS……………………………………………..….………….….….….……….…….……………………….….5
PROPANE GAS CONNECTIONS………………………………………...….……..…..….…….………….…….…...…….…….…….….......5
OUTDOOR NATURAL GAS SEARING STATION INSTALLATION SPECIFICATIONS……………….….….…..…………………..……6
OUTDOOR PROPANE GASSEARING STATION INSTALLATION SPECIFICATIONS…………………….……………..…..………….7
INSPECTING / CLEANING BURNER AND GAS VALVE ORIFICE…….…….…..…..……..…….………………..………..………...….…….…8
BURNER CLEANING.................................................................................................................................................................................8
BURNER REPLACEMENT INTO INSERT……………….…….….…….…….…….…….….…………..…...…..…...…..….….…....………9
IGNITOR / ELECTRODE CHECK…………………………………………………………………….…….……..….………….………...…….9
BURNER OPERATION CHECK………………………….………………….….….….….….….….….…..…..…..…….……….…….….……9
COOKING COMPONENT………………………………………………………………………….….…...……….……….….….…………….10
LIGHTING & OPERATING INSTRUCTIONS……………………….….…….………………...…….....….………………....…...…………..……..11
LIGHTING PROCEDURES……………………………………………………….……………..…...….….…..…......…......….…............…...11
OPERATING PROCEDURE…………………………………………………….…………..….….……………………….…….…..…...….….11
COOKING TEMPERATURES…………………………………………….…..….…..……..…….…….…..……...……………..….………….11
CLEANING & MAINTENANCE…………………………………………………………………………………………..……………..………………12
TROUBLESHOOTING………………………………...........................................................................................................................................14
IF SEARING STATION FAILS TO OPERATE PROPERLY....................................................................................................................14
FLASH BACK............................................................................................................................................................................................14
PARTS LIST………………………………………………………………………………………………………………………………......................15
EXPLODED ILLUSTRATION………………………………………………………………………….……….…….…………….….….……………16
LIMITED WARRANTY…………………………………….………….…….……….……………….…………….………...….…..…..…...…………17
- READ THE FOLLOWING INSTRUCTIONS CAREFULLY AND BE SURE YOUR SEARING STATIONIS PROPERLYINSTALLED,
ASSEMBLED AND CARED FOR. FAILURE TO FOLLOW THESEINSTRUCTIONS MAY RESULT IN SERIOUS BODILY INJURY AND/OR
PROPERTY DAMAGE. IF YOU HAVE QUESTIONS CONCERNING ASSEMBLY OR OPERATION, CONSULT YOUR DEALER, GAS
APPLIANCE SERVICE REPRESENTATIVE OR YOUR GAS COMPANY.
- NOTE TO INSTALLER:
LEAVE THESE INSTRUCTIONS WITH THE CONSUMER AFTER INSTALLATION.
- NOTE TO THE CONSUMER:
RETAIN THESE INSTRUCTIONS FOR FUTURE REFERENCE.
- THIS OUTDOOR COOKING GAS APPLIANCE IS NOT INTENDED TO BE INSTALLED IN OR ON RECREATIONAL VEHICLESAND/OR
BOATS.
*FOR WARRANTY PURPOSES, PLEASE RECORD YOUR MODEL NUMBER, SERIAL NUMBER, DATE OF PURCHASE & A COPY OF YOUR
RECEIPT OR INVOICEIN THE BACK OF YOUR MANUAL ON PAGE 17.
1

SAFETY INSTRUCTIONS
This searing station must be installed in accordance with local codes or, if in an area without local codes, with the latest edition of the National Fuel
Gas Code ANSI Z223.1. In Canada, installation must conform to the standard CAN/ CGA 1-b149.1 and/or .2 (Installation Code for Gas Burning
Appliances and Equipment) and any local codes.
WARNING: Fuels used in gas or oil-fired appliances and the products of combustion of such fuels, contain chemicals known to the State of
California to cause cancer, birth defects and/or reproductive harm. This warning is issued pursuant to California Health & Safety Code Sec.
25249.6.
THE LOCATION FOR YOUR SEARING STATION
DO NOT use your searing station in garages, porches, breezeways, sheds or other enclosed areas. Your searing station is to be used
OUTDOORS ONLY, with at least 21 inches clearance from the back and side of any combustible surface. The station should not be placed under
or on top of any surface that will burn. Do not obstruct the flow of combustion and ventilation air around the housing.
PROTECT CHILDREN: Keep children away from the station during use and until the station has cooled after you are finished. Do not allow
children to operate the searing station.
CHECKING FOR GAS LEAKS
NEVER TEST FOR GAS LEAKS WHILE THE STATION IS LIT! Prior to the first use and at the beginning of each new season (or, if using LP,
whenever gas cylinder is changed),it is a must thatyou check for gas leaks. Follow these steps:
1. Make a soap solution by mixing one part liquid detergent and one part water.
2. Turn off heat control valve, and then turn on gas at source.
3. Apply the soap solution to all gas connections: bubbles will appear in the soap solution if connections are not properly sealed. Tighten or repair
as necessary.
4. If you have a gas leak that you cannot repair, turn off the gas at the source, disconnect fuel line from the station and immediately callyour dealer
and gas supplier for professional assistance.
2
FOR YOUR SAFETY...
DO NOT store or use gasoline or other flammable vapors and liquids in the vicinity of this or any other appliance.
DO NOT store empty or full spare gas cylinders and/or chemicals under or near this or any other appliance.
Keep the fuel hose away from hot surfaces. Protect the fuel hose from dripping grease. Avoid unnecessary twisting of the hose.
Visuallyinspect the hose prior to each use for cuts, cracks excessive wear or other damage and replace if necessary.
NEVER test for gas leaks with a lighted match or open flame.
NEVER light station with lid on or before checking to ensure burner tube is fully seated over gas valve orifice.
NEVER lean over cooking surface while lighting station. Use barbecue tools with wood handles and good quality insulated oven
mitts when operating station.
IF YOU SMELL GAS...
1. Shutoff gas to the appliance at its source.
2. Extinguish any open flame.
3. Remove station lid to release any accumulation of fumes.
4. If gas odor persists, immediately contact your gas supplier.
READ CAREFULLY BEFORE ASSEMBLY AND OPERATION OF YOUR SEARING STATION

SAFETY INSTRUCTIONS (CONT.)
NATURAL GAS SAFETY
Your natural gas searing station is designed to operate on natural gas ONLY, at a pressure of 4” water column (W.C.) regulated at the natural gas
regulator attached at the back of the station. Check with your gas utility for local gas pressure and with your local municipality for building code
requirements.
Check with your gas utility or with local building codes for instructions to install gas supply line, or call a licensed and knowledgeable installer.
It is recommended that an “ON-OFF” shutoff valve be installed at the gas supply source:
- Outdoors after gas line piping exits outside wall and before quick-disconnect or before gas line piping enters ground.
- Indoors in the branch fuel line in an accessible location near the supply line.
Pipe sealing compound or pipe thread tape of the type resistant to the action of natural gas must be used on all male pipe thread. Apply
compound or tape to at least the first three threads when making the connection.
Disconnect your station from the fuel source when the gas supply is being tested at high pressures. This appliance and its individual shutoff valve
must be disconnected from the gas supply piping system during any pressure testing of that system at pressures in excess of 1/2 psig (3.5 kPa).
Turn off your station when the gas supply is being tested at low pressures. This appliance must be isolated from the gas supply piping system by
closing its individual valve.
WARNING: The gas valve is preset at the factory to operate on LP or natural gas. If you wish to convert to a different gas type, be sure to contact
your station dealer, licensed plumber or authorized service center for further details. Conversion kits are not sold to the general public and require
a professional to perform service. Failure to properly convert a unit can cause serious injury to yourself and/or others, irreparable damage to your
searing station and void of warranty.
3
SAFETY! BEWARE OF SPIDERS
CAUTION: BURNER MUST BE INSPECTED AND CLEANED BEFORE FIRST USE.
Spiders and small insects occasionally spin webs or make nests in the burner during warehousing, transit and/or after long periods of non-use.
These webs can lead to a gas flow obstruction, which could result in a fire in and around the burner tube. This type of fire is known as “FLASH-
BACK” and can cause serious damage to your station and create an unsafe operating condition for the user. Although an obstructed burner tube
is not the only cause of “FLASH BACK” it is the most common cause, and frequent inspection and cleaning of the burner is necessary.

SAFETY INSTRUCTIONS (CONT.)
PROPANE GAS SAFETY
Your propane searing station is designed to operate on propane gas ONLY, at a pressure regulated at 11” water column (W.C.) when equipped
with the correct propane orifice on the valve and a propane regulator on the supply line regulated at the residential meter.
Your propane searing station is designed to be used with a standard 20 lb gas cylinder and must be constructed and marked in accordance with
specifications of the US Departmentof Transportation for Propane Gas Cylinders.
Always keep cylinder securely fastened in an upright position.
Never connect an unregulated propane gas cylinder to the searing station.
Do not subject propane cylinders to excessive heat.
CAUTION: Never store a propane gas cylinder inside a building or in the vicinity of any gas-burning appliance.
WARNING: The gas valve is preset at the factory to operate on LP or natural gas. If you wish to convert to a different gas type, be sure to contact
your station dealer, licensed plumber or authorized service center for further details. Conversion kits are not sold to the general public and require
a professional to perform service. Failure to properly convert a unit can cause serious injury to yourself and/or others, irreparable damage to your
searing station and void of warranty.
4
SAFETY! BEWARE OF SPIDERS
CAUTION: BURNER MUST BE INSPECTED AND CLEANED BEFORE FIRST USE.
Spiders and small insects occasionally spin webs or make nests in the burner during warehousing, transit and/or after long periods of non-use.
These webs can lead to a gas flow obstruction, which could result in a fire in and around the burner tube. This type of fire is known as “FLASH-
BACK” and can cause serious damage to your station and create an unsafe operating condition for the user. Although an obstructed burner tube
is not the only cause of “FLASH BACK” it is the most common cause, and frequent inspection and cleaning of the burner is necessary.
WARNING
•Do not store a spare or disconnected liquid propane cylinder under or near
this searing station.
•A dented or rusty liquid propane cylinder may be hazardous and should be
check by your liquid propane provider.
•Do not use a liquid propane cylinder with a damaged valve.

INSTALLATION INSTRUCTIONS
Your built-in searing station comes to you fully assembled. We strongly recommend professional installation and hookup of the searing station.
These instructions will provide you with the measurements necessary for you or your builder to construct a masonry structure to house your
outdoor searing station.
NOTE TO INSTALLER: Leave these instructions with the consumer for future reference. The searing station must be installed in accordance with
all local building codes.
SPECIFICATIONS FOR SEARING STATION STRUCTURE
1. Your choice of masonry can be used for cabinet construction for the built-in station; however it must be non-combustible material. Keep in mind
when choosing a location for your station that it should NOT be located under any overhead combustible construction. Upper and ground level
vents must be provided for combustion air on both sides of built-in cabinet. Vents on station insert must remain unobstructed to allow for
combustion air and ventilation.
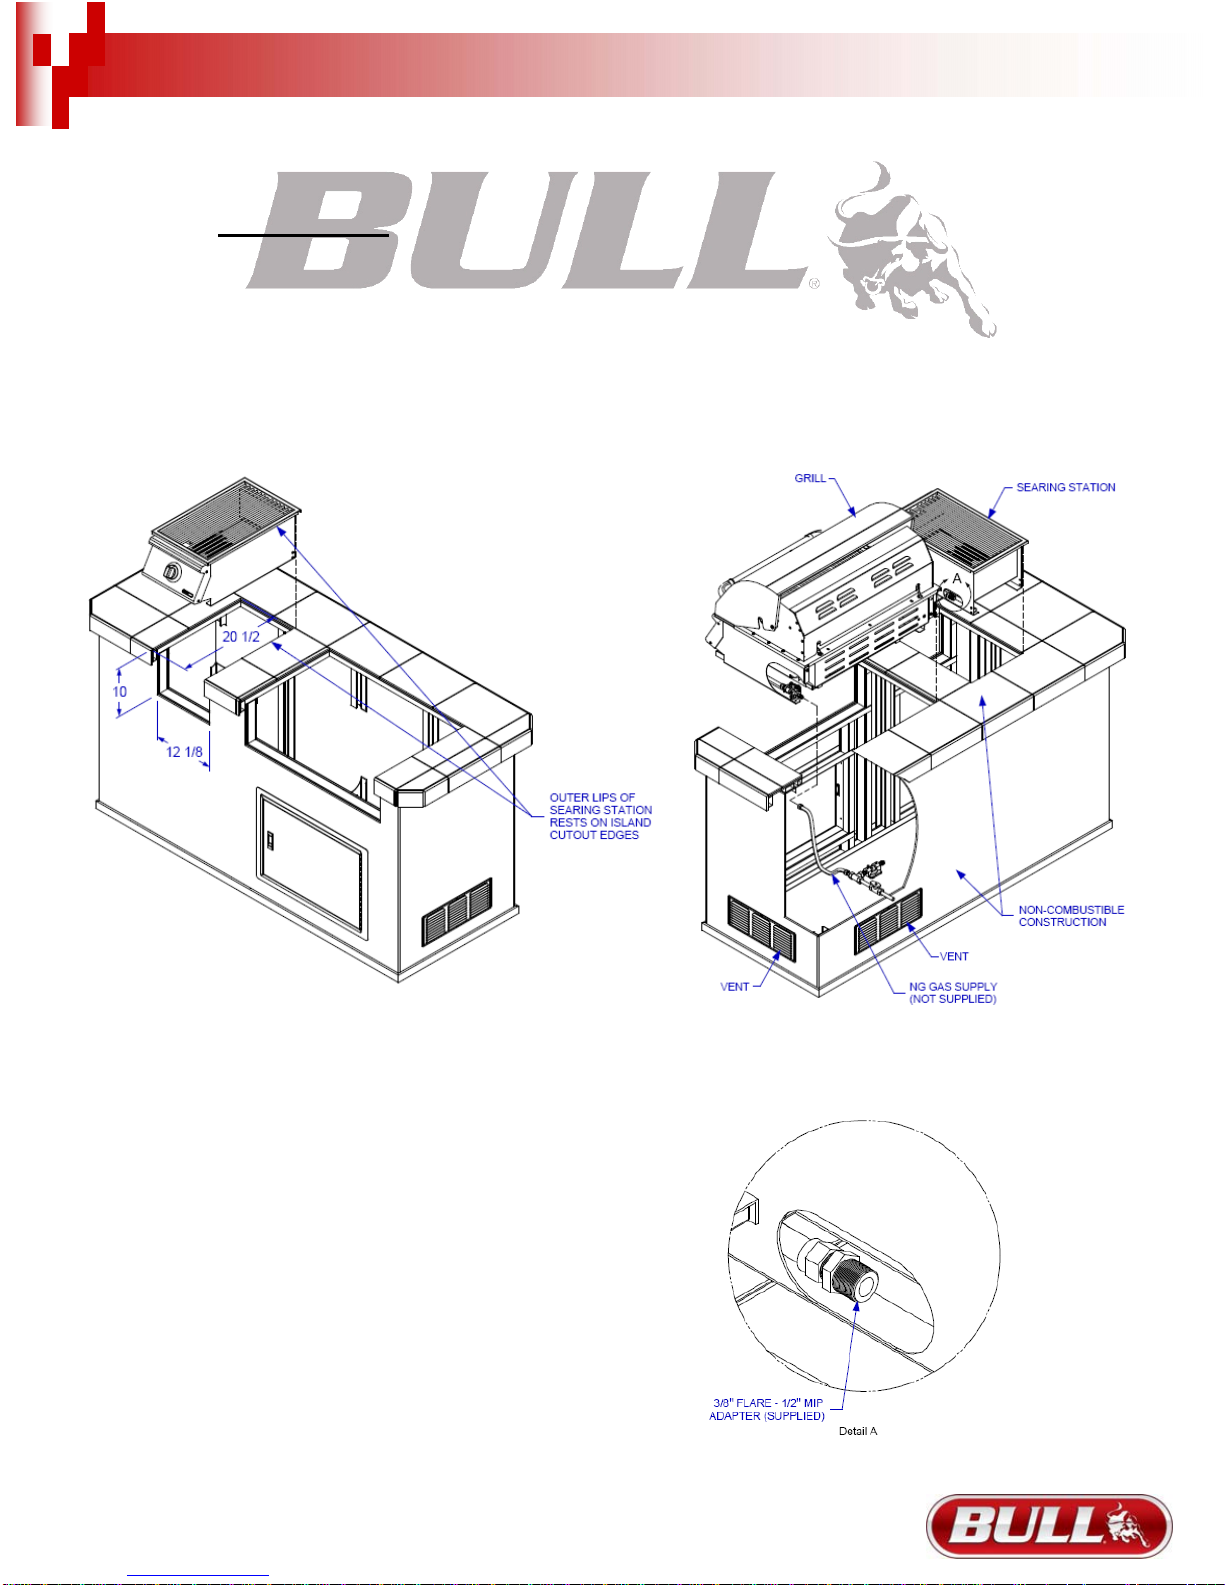
2. The searing station requires a wall opening of the following dimensions: See PAGES 6 & 7 for different models.
3. Place station assembly into wall opening as shown in illustration on pages 6 & 7. The station rests on side and back edges of the station insert.
4. For propane gas LP TANK STORAGE AREA MUST BE ISOLATED FROM SEARING STATION AND VENTED.
5. Do not use any combustible materials for this construction. Minimum horizontal clearance to adjacent combustible surface from side and back of
the station must be 21 inches. A 6 inch clearance is required behind station to allow for ventilation purposes.
CONNECTING TO GAS SOURCE
Refer to the following instructions and illustrations for typical gas supply connections. We strongly suggest professional installation and hook-up of
the searing station.
IMPORTANT: Before connecting station to gas source, make sure the station control knob is in the “OFF” position.
5
NATURAL GAS CONNECTIONS
IMPORTANT: Bull Outdoor Products does not recommend the use of
any quick connect fittings or lines to the unit. Use of these types of
fittings or lines could cause low gas flow and greatly reduce the
performance of the unit.
- Pipe sealing compound or pipe thread tape of the type resistant to the
action of natural gas must be used on all male pipe thread.
- Apply compound or tape to at least the first three threads when making
the connection.
- Remove plastic cap from regulator.
- Attach stainless steel flex line 3/8” flare-female end to the regulator.
- Attached the other end of flex line to shut-off valve through a nipple.
- Attach a shut-off valve to gas supply pipe.
PERFORM GAS LEAK CHECK – REFER TO PAGE 2
PROPANE GAS CONNECTIONS
- The LP gas pressure regulator and hose assembly supplied with this unit must be used
without alteration. If this assembly needs to be replaced, use only the type 1 specified in
the parts list supplied with this unit. Use a LP tank with a type 1 cylinder valve.
- Make sure the tank is firmly secured in an upright position.
- Turn the black coupling nut of the hose and regulator assembly in a clockwise direction.
- Make sure it is completely threaded onto the cylinder valve before turning gas supply on.
PERFORM GAS LEAK CHECK – REFER TO PAGE 2
READ CAREFULLY BEFORE ASSEMBLY AND OPERATION OF YOUR SEARING STATION

INSTALLATION INSTRUCTIONS (CONT.)
OUTDOOR NATURAL GAS SEARING STATION INSTALLATION SPECIFICATIONS
NOTE:
- Vents must be provided for combustion air and ventilation on both sides of built-in cabinet.
- When choosing a location for your station keep in mind that it should never be located under any overhead combustible construction.
- The sides and back of the station should not be any closer than 21 inches to combustible construction.
-DO NOT store empty or full spare tanks under or near this or any other appliance.
- There must be a minimum of 6” counter space behind the station in order to allow for ventilation purposes.
- A 1/2” hard pipe is required connecting to the searing station NG regulator.
6

INSTALLATION INSTRUCTIONS (CONT.)
OUTDOOR PROPANE GAS SEARING STATION INSTALLATION SPECIFICATIONS
NOTE:
- Vents must be provided for combustion air and ventilation on both sides of built-in cabinet.
- When choosing a location for your station keep in mind that it should never be located under any overhead combustible construction.
- The sides and back of the station should not be any closer than 21 inches to combustible construction.
-DO NOT store empty or full spare tanks under or near this or any other appliance.
- There must be a minimum of 6” counter space behind the station in order to allow for ventilation purposes.
7

INSPECTING I CLEANING BURNER AND GAS
VALVE ORIFICE
By following these cleaning procedures on a timely basis, your station will be kept clean and working properly with minimum effort.
CAUTION – Always turn off the gas supply prior to clearing your searing station.
BURNER CLEANING
1. Remove burner from the station insert (See drawing below).
2. Using a narrow bottlebrush with a flexible handle, run itthrough the burner tube several times.
3. Inspect the burner assembly for any openings caused by corrosion.
8

INSPECTING / CLEANING BURNER AND GAS
VALVE ORIFICE (CONT.)
BURNER REPLACEMENT INTO INSERT
CAUTION – Always turn off the gas supply prior to clearing your searing station.
1. Replace burner back into the station insert. There is no need to replace the wing nut back into the cast peg, it is for shipping purposes only.
2. Check the burner for proper location after replacing. Make sure the orifice is inside of the burner tube (see drawing below). If the orifice
does not fit inside the burner tube, lighting the burner may cause explosion and/or fire.
IGNITER I ELECTRODE CHECK
With the control knob set to “OFF”, check the igniter for presence of spark at electrode. Push control knob in fully and turn slowly about a 1/4 turn to
the left (counter-clockwise) until a click is heard; the trigger hitting the strike block should produce a blue spark at the electrode tip. Return control
knob to “OFF”.
BURNER OPERATION CHECK
NOTE: Upon first assembly the gas lines and burner will be full of air. In order for the burner to light properly the lines must fill with gas. It may
require several attempts at lighting the burner before you are successful.
1. With the searing station control knob in the “OFF” position, turn on the Gas supply.
9
Questo manuale è adatto per i seguenti modelli
1
Indice
Altri manuali Bull Bruciatore