CasaCam VS2104 Manuale utente

VS2104
8 Channel Wireless NVR with
10.1’’ LCD Monitor and 4 1296P Cameras
User Manual

2
Table of Contents
1. SAFETY INSTRUCTION............................................................................................................................................. 3
2. WHAT’S IN THE BOX?.............................................................................................................................................. 3
3. AT A GLANCE........................................................................................................................................................... 4
3.1 NVR (receiver)...................................................................................................................................................4
3.2 CAMERA............................................................................................................................................................ 6
3.2.1 Night Vision Camera.............................................................................................................................. 6
3.2.2 Floodlight Camera..................................................................................................................................7
4. SET UP THE HARDWARE..........................................................................................................................................8
4.1 NVR....................................................................................................................................................................8
4.2 Camera.............................................................................................................................................................. 8
4.3 Set the Antenna Extension............................................................................................................................... 9
5. SYSTEM OPERATION................................................................................................................................................9
5.1 Setup Wizard.....................................................................................................................................................9
5.2 NVR SCREEN....................................................................................................................................................12
5.2.1 Live View Screen..................................................................................................................................13
5.2.2 Log In & Password................................................................................................................................14
5.2.3 Main Menu Toolbar......................................................................................................................15
6. FUNCTIONS........................................................................................................................................................... 15
7.1 Camera & Display............................................................................................................................................16
7.2 Record............................................................................................................................................................. 18
7.3 Playback.......................................................................................................................................................... 19
7.4 Light Setting.................................................................................................................................................... 21
7.5 Motion & Alarm.............................................................................................................................................. 22
7.6 Hard Drive....................................................................................................................................................... 23
7.7 System.............................................................................................................................................................23
7.8 Advanced........................................................................................................................................................ 24
7. REMOTE FROM APP.............................................................................................................................................. 24
8.1 Get the App.....................................................................................................................................................24
8.2 APP Remote.................................................................................................................................................... 25
8.2.1 Add camera..........................................................................................................................................25
8.2.2 Operating the App............................................................................................................................... 26
8. SPECIFICATIONS.................................................................................................................................................... 28
9. TROUBLE SHOOTING.............................................................................................................................................30
10. FCC REGULATIONS................................................................................................................................................ 31

3
Please read carefully before using this equipment.
1. SAFETY INSTRUCTION
1Install the NVR in sufficiently ventilated spaces to prevent plug vents.
2Install the NVR on a flat wall or other flat surfaces, avoid mounting in a severe vibration environment.
3Only use the power adapter plug contained in the material supplied since other power adapter plugs
could damage the devices. Ensure access to the power adapter plug is not obstructed by
furniture or such. Pay attention that the plug and cable are in perfect condition. Kinked or worn cable
represents the risk of a fatal accident!
4Unauthorized modification or reconstruction is not permitted. Under no circumstances open the
devices or complete any repair work yourself. Observe all local directives and regulations.
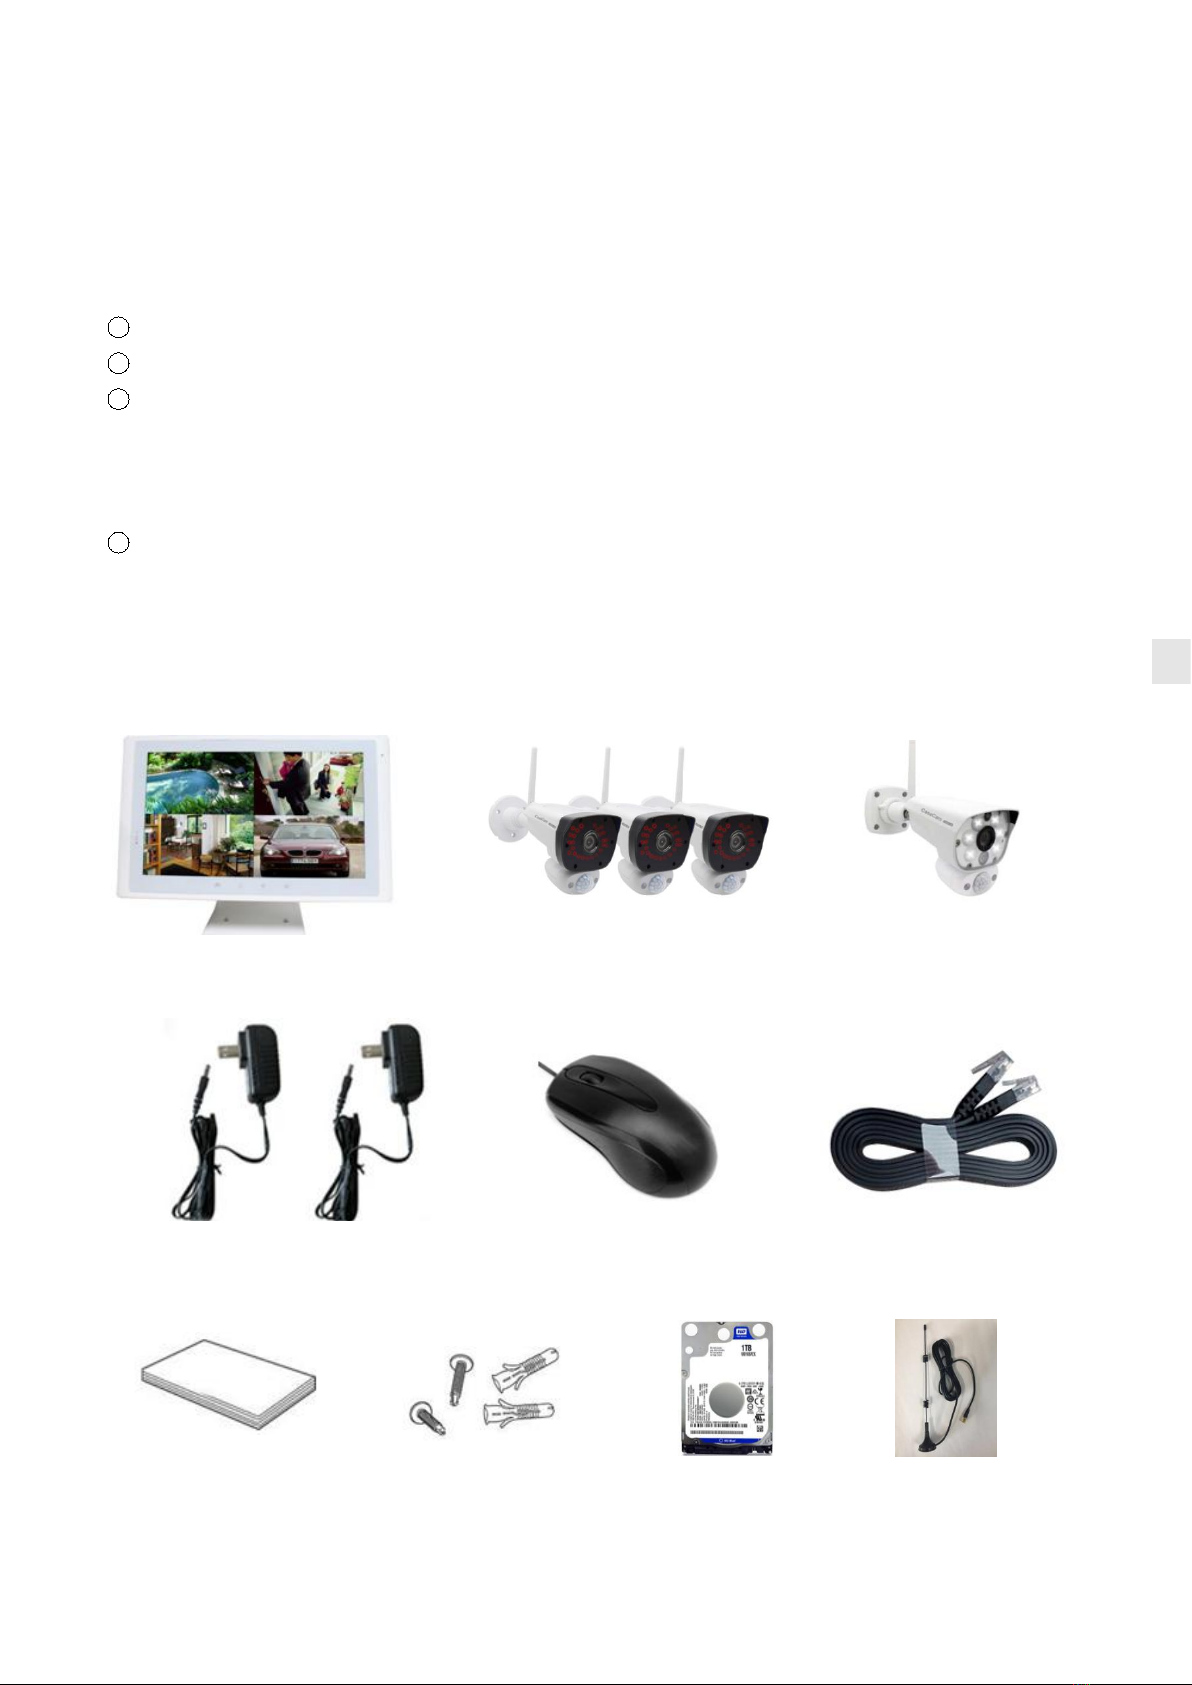
2. WHAT’S IN THE BOX?
10.1 Inch NVR
Mouse
Adapters
(4pc for camera, 1pc for NVR)
Ethernet Cable
User Manual &
Quick Start
Guide
Screws and Anchors
kit
1TB HDD
(pre-installed)
Antenna Extension
(With Magnetic
Stand Base)
VC2000
Night Vision Camera*3pcs
VC2000L
Floodlight Camera*1pcs

4
3. AT A GLANCE
3.1 NVR (receiver)

5
Item
What it is
What it does
1
NVR Screen
10.1” LCD panel
2
Microphone
Captures the sound on monitor and transmits the sound from
monitor to camera. (Intercom)
3
Power Indicator
The indicator LED will turn on when NVR is powered
4
HDD Indicator
The indicator LED will turn on when HDD is installed
5
NVR Antenna
Transmitting wireless signal with wireless camera.
6
HDMI port
Connect the HDMI cable
7
USB port
Connect the mouse to control the NVR or connect to USB storage
for back up.
8
RJ-45 port
Connect the Ethernet cable to get access to enable
Smartphone/tablet connectivity.
9
Power port
DC 12V power port. Connect to a local power outlet using te
included 12V power adapter.
10
Speaker
Produces the sound transmitted from cameras.
11
Screen ON/OFF &
Auto Config Button
* Press the button to turn ON/OFF the screen (enter/exit power
save mode, with only audio on)
* Press and Hold the button to use the AUTO CONFIG setting.
When you adjust the display resolution, displayed picture may not
in the center of the screen. In this case, you can use auto config to
adjust the picture to central position.
12
NVR Stand
Stand the NVR on table or other flat surfaces. You can also mount
the stand to the wall.
13
HDD compartment
Open up the cover to install the HDD (2.5"). Close the cover after
installation

6
3.2 CAMERA
3.2.1 Night Vision Camera
Item
What it is
What it does
1
Microphone
Captures the sound on camera side and transmits the sound from
camera to monitor.
2
Lens
Catches the video in front of the lens and transmits video from
camera to Monitor.
3
Working Indicator
Indicates the working status of camera. (Green LED)
Flashing rapidly——Ready to pair/ pairing mode
Solid green——Paired / working
4
Light sensor
Sensing light and give order to the IR cut to switch between
daytime and night vision mode.
5
PIR sensor
Detects motion in front of the lens and emits detection signal to
transmitter.
6
Speaker
Produces the sound transmitted from the monitor.
7
IR LED
Infrared LEDs provide viewing in no/low light conditions.
8
Bracket
Use the bracket to mount the camera on a wall or other flat
surfaces.
9
Camera antenna
Receives & Sends signals to or from the Monitor.
10
Reset button
The reset button is located on the back of the camera. Press and
hold the reset button (until the indicator LED flashes) to reset the
camera.

7
3.2.2 Floodlight Camera
Item
What it is
What it does
1
Microphone
Captures the sound on camera side and transmits the sound from
camera to monitor.
2
Lens
Catches the video in front of the lens and transmits video from
camera to Monitor.
3
Working Indicator
Indicates the working status of camera. (Green LED)
Flashing rapidly——Ready to pair/ pairing mode
Solid green——Paird / working
4
IR LED
Infrared LEDs provide viewing in no/low light conditions.
5
Light sensor
Sensing light and give order to the IR cut to switch between
daytime and night vision mode.
6
PIR sensor
Detects motion in front of the lens and emits detection signal to
transmitter.
7
Speaker
Produces the sound transmitted from the monitor.
8
Floodlight
White LED floodlight.
9
Bracket
Use the bracket to mount the camera on a wall or other flat
surfaces.
10
Camera antenna
Receives & Sends signals to or from the Monitor.
11
Reset button
The reset button is located on the back of the camera. Press and
hold the reset button (until the indicator LED flashes) to reset the
camera.

8
4. SET UP THE HARDWARE
4.1 NVR
1Place the stand on the back of the NVR on a table or install to other flat surfaces, position the
antenna.
2Connect the mouse to the mouse port on the back of the NVR.
3Connect an AC adaptor to the power input on the back of the NVR. Connect the other end of the
adapter to a standard indoor power outlet. The NVR will power on automatically and start initialize,
Please wait until initialization is completed.
4The screen of NVR remains dark until the cameras are powered on.
4.2 Camera
General
The camera included with your monitor is weatherproof and have an IP66 rating. Water can be sprayed
on them and they will still work; however, the cameras cannot be submerged.
Although the cameras can be exposed directly to the rain, it is recommended that, if they are used
outdoors, they should be mounted under some type of cover like a patio overhang or eave. As rainwater
drops start to dry on the camera glass, it can create spots that will reflect the light from the infrared LEDs
used for night vision, thus causing lower quality video.
Also, as dust, grime, and cobwebs accumulate on the camera glass, they can reflect light from the
infrared LED and might lower video quality. Periodically clean the lens glass with a soft cloth.
Placement Considerations
Consider the following when placing cameras:
• The clearest line-of-sight between the camera and NVR is best.
- Walls, especially brick and concrete, shorten the transmission distance.
- Placement next to windows allows better transmission.
• Optimized motion detection range is 6~30 feet for the camera. The farther away an object is, the less
accurate the motion detection.
• Avoid having a direct light source in the view of the camera, including street lights, ceiling or floor lamps,
spotlights in the driveway, etc.
• Rainfall, pool water ripples/reflections, tree/shrub leaves blowing in the wind – and the shadows they
create can generate motion detection false alarms.
• When you are positioning the camera, bring the monitor along; it’s much easier to get the camera into
the right position when you have the display handy.

9
Install the Camera(s)
1Position the camera where you want it, plug it into power, and check video on the NVR. Move the
camera if the view is not what you want.
2Hold the base of the camera stand where you want to mount it and mark the location of the screw
holes.
3Use the included screws and anchors to attach the base to the wall or ceiling.
4Tug gently on the stand to make sure it is securely in place.
4.3 Set the Antenna Extension
The included antenna extension is supplied to extend the transmitting distance between the camera and
NVR and provide a better signal.
You can use the included Antenna Extension cable
if your setup requires the signal be transmitted
through an obstacle that severely weakens it.
Simply replace the camera antenna with the
Antenna Extension cable and mount it on the
opposing side of the obstacle.
5. SYSTEM OPERATION
5.1 Setup Wizard
Before using the system, please follow the setup wizard to set your system.
NOTE: Among this section, for each step, on the bottom will display a notification to let you
select/unselect.
Default value: select.
Select means next time you reboot/turn on the NVR, system will remember your previous setting and skip
the setup wizard surface to enter the live view section directly.
Unselect means you have to follow the setup wizard every time reboot/turn on the NVR.

10
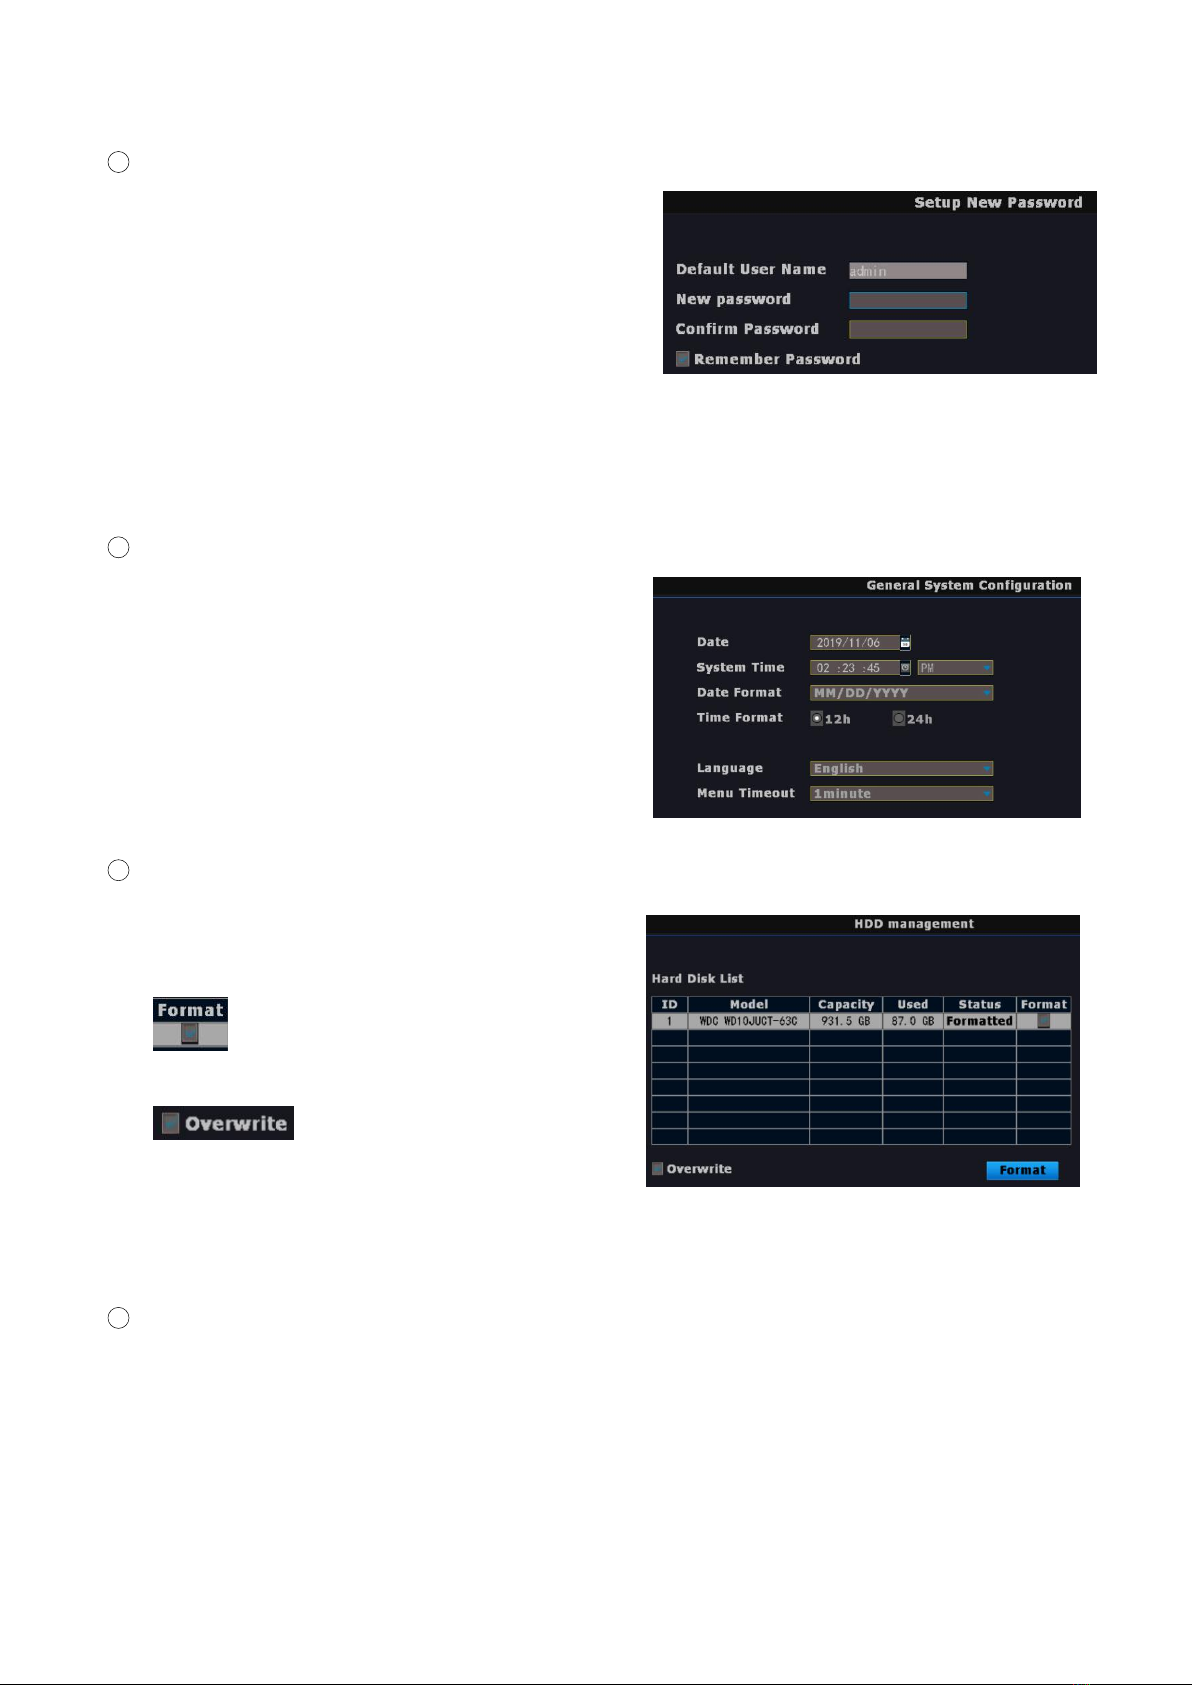
1Setup New Password
The default user name is “admin”.
Please enter your new password and confirm the new
password.
Select Remember Password, the system will remember
the password you have set.
After confirm the new password, click Next to enter the
next step.
Note: Password should be 4~10 digits. The password can be letter(s) and/or
number(s). Do not use symbols or space in password.
2General System Configuration
This step allows you to set below items:
Date
System Time
Date Format
Time Format (12h or 24h)
Language
Menu Timeout
Confirm above then click Next to enter the next step.
3HDD management
This section display the hard disk list, you can check the
basic information of your HDD (model/capacity/used
space/status).
Select here then click Formate to format
the HDD.
Select here to enable the overwrite
function.
Overwrite on: system will overwrite earliest recorded files when HDD is full.
Confirm above then click Next to enter the next step.
4Record Schedule
Channel
Select the Channel you want to set.
Copy To
Select here copy the same setting to any channel or all channels.
Select the type of recording you’d like to activate
Indice
Altri manuali CasaCam Macchina fotografica digitale