Catchbox Catchbox Plus Manuale utente

Catchbox Plus
User Manual
Copyright 2022 Catchbox SIA version 1.0
Cube Cover with ViralO™ Hub Receiver
Cube Transmitter
Cube Wireless Charger Clip Transmitter
1. Safety instructions
2. Product description
2.1. Overview
2.2. DECT Wireless Standard
3. System products
3.1. Hub Receiver
3.2. Cube Transmitter
3.3. Clip Transmitter
4. Troubleshooting
5. Maintenance, storage and disposal
6. Certication
Contents
2
4
5
15
16
18

Notice
Warning
Caution
1. Safety instructions
Before using the product, read and understand the user manual and inform others of proper usage.
Not heeding these warnings may lead to serious injury or property damage.
Magnets produce a far-reaching, strong magnetic eld. Keep magnets away from
devices and objects that could be damaged by strong magnetic elds,
like laptops and other electrical equipment.
The use of other antennas than those provided by the manufacturer is strictly prohibited.
This product contains magnets which could aect the functioning of pacemakers and other
electronic implants. These could stop working or switch into test mode, causing illness.
If you wear these devices keep sucient distance to magnets. Warn others who wear
these devices from getting too close to magnets.
Operating or storing this product at temperatures above 50 degrees Celsius or 122 degrees
Fahrenheit will cause the locking mechanism to fail permanently.
Do not throw the Cube in long passes (>5 m / 16 ft) or hard passes.
Do not place the product near heat sources such as heating ducts or radiators and do not expose
it to direct sunlight, excessive dust, moisture, rain, mechanical vibrations or shock.
Avoid excessive volume. Do not exceed 70dBa for airborne noise.
Operate the equipment only with the included power supply.
Clean the equipment with a moistened (not wet) cloth only.
Be sure to disconnect the equipment from the power outlet before cleaning the equipment.
Unplug the apparatus during lightning storms or when not in use.
Protect the power supply cord from being walked on or pinched.
The equipment should be opened, serviced, and repaired by qualied service personnel only.
Do not attempt to modify this product or its accessories and use only accessories
and attachments, like antennas and power supply, specied by the manufacturer.
Changes or modications to the equipment not expressly approved by manufacturer can void
the warranty and user’s authority to operate the equipment.
Wireless Charger uses strong electromagnetic eld to operate. Keep the equipment away
from metallic objects as those can heat up and cause injury or property damage.
Do not use near water. Use equipment indoors only. If the equipment comes into
contact with a liquid, turn o the product, shut down the sound system and disconnect
the power cable from the power outlet immediately.
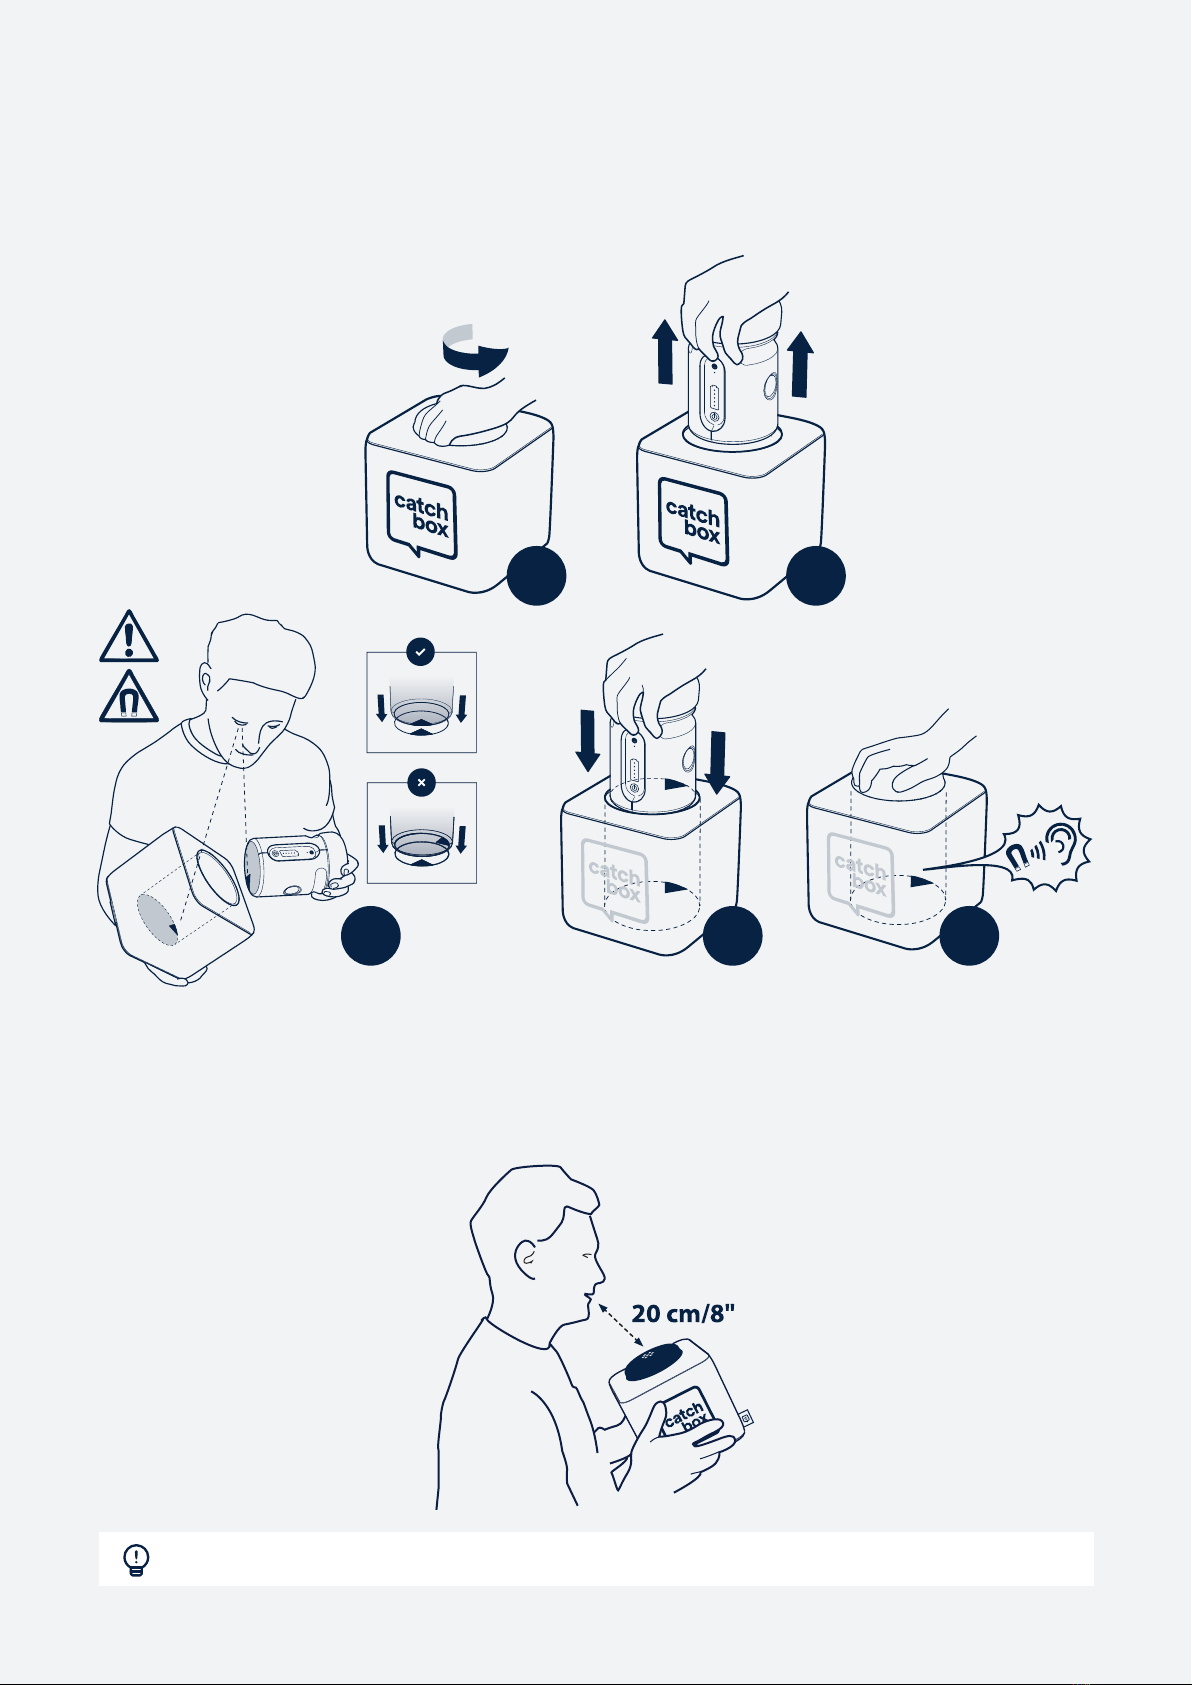
Properly lock the into the Cover before use. Always use the Cover and the
foam cap on the Cube Transmitter, when using the product.
Do not use in situations with fragile objects, hot liquids,
or people susceptible to injury, like the very young or old.
Do not throw the Cube at peoples’ heads and always make sure everyone
is aware of the situation before throwing.
Follow all warnings and instructions on the product and in this manual.
Keep this user manual and always include it when passing the equipment on to third parties.
2

Throwing the Cube
To throw the Cube microphone, nd someone in the audience who wants to ask a question or make
a comment. Make sure that the person and those around them are aware of the situation and are
prepared to catch.
Short, underhand passes of up to 5 m / 16 ft distance are recommended.
If someone farther away has a question, try to get the entire audience involved by
having members pass the Cube short distances to the person who wants it.
This is a great way to activate the crowd.
Improper throwing and use of the device can lead to serious injury and/or property
damage. Do not throw at peoples’ heads and always make sure everyone is aware
of the situation before throwing. Do not use in situations with fragile objects,
liquids, or people susceptible to injury. Do not kick or hit the Cube.
3

2.1. Overview
The Plus is Catchbox's agship wireless microphone system that is designed for simple hybrid
meetings to large and complex multi-room installations.
Please check the front page to see the full list of the Plus system components.
Catchbox Cube is equipped with unique patented Automute technology turns o the audio signal
when the microphone is being thrown ensuring the system doesn’t make any unwanted noises when
passed around (US Patent: US9936319B2).
All Cube Covers and Foam caps are treated with Polygiene ViralO technology. ViralO is an
antimicrobial technology that reduces over 99% of microbes present on fabric. The treated fabrics
are skin-friendly and do not interfere with the natural bacterial ora of the skin. ViralO is always
on and thus ensures your Cube mic is always ready for use.
2.2. DECT wireless standard overview
DECT is an acronym for Digital Enhanced Cordless Telecommunications. DECT standard uses a
distributed Dynamic Channel Allocation (DCA) algorithm to automatically and dynamically (during
the use of the product) select the transmission frequency from the designated frequency band.
It helps to avoid potential interference with other DECT-enabled devices. However, other
DECT-enabled devices such as cordless phones or translation systems may cause interference if
used close to the Catchbox Plus system. The wireless range of Catchbox Plus product is 100 m /
330 ft under ideal working conditions (Line of Sight). However, indoor obstacles like walls, furniture
and people may reduce the eective range.
DECT standard uses the following frequency bands:
1.880 to 1.900 GHz in Europe
1.920 to 1.930 GHz (DECT 6.0) in the United States and Canada
1.893 to 1.906 GHz (J-DECT) in Japan
Other regions in the world may use dierent spectrum allocations. Please check the actual
frequency band with your local authority.
Improving wireless signal strength
Users can improve the performance of the system through the following measures:
Ensure that there are no objects or walls between the Transmitter and the Receiver
Decrease the distance between the Transmitter and the Receiver
Don’t place the Transmitter and the Receiver in dierent rooms
Don’t place the Receiver in a closed area, like inside a cupboard (especially metallic).
2. Product description
4

3.1. Hub Receiver
The Hub is a two-channel microphone receiver at the heart of the Plus system.
Manage your mics through the intuitive graphical UI, connect and monitor your systems
via API or utilize built-in Dante™ audio over IP
3.1.1. Hub operating elements and connections
1. Status LED
2. Display
3. System menu
4. Back button
5. Navigation buttons
6. Press to open or to conrm
7. USB-C Power, Audio In/Out
8. 3.5mm Auxiliary input
9. XLR Mic 2 Balanced audio output
10. XLR Mic 1 Balanced audio output
11. RCA Mixed Unbalanced audio output
3. System products
7 8 9 10 11
1 2 3 4 5 6
5

3.1.2. Hub connectivity
Turning on the Hub
Depending on your setup the Receiver will be powered by the included Power supply or by the
computer’s USB port. LED on the top surface will light up indicating the device is on.
Connecting the Hub to mixer, speakers or computer
For using each wireless channel separately use Balanced audio outputs Mic 1 and Mic 2.
For using Mixed audio output use Unbalanced audio output RCA OUT. Mixed audio output mixes
both wireless channels, Auxiliary-in and USB-In if the Catchbox Hub is selected as a Output device
on your computer.
For using USB digital audio output use USB Audio Out output. Plug the USB data cable to the com-
puter's USB port and on your computing device select Catchbox USB audio device as the input.
USB out mixes both wireless channels and Auxiliary in channel.
3.1.3. Hub status LED behaviour
O
Green
Amber
Amber blinking
Not powered
Power on, Transmitters paired to Hub
Power on, No transmitters connected to Hub
In pairing mode
6

3.1.4. Hub displays
Output screen
The Output screen appears when the Hub is switched-on or after a long press of Back button.
Hub screen displays are structured into Output and Input screens. Output screen gives an easy
access to control volume levels for all of the outputs of the Hub and Input screen allows to manage
wireless channel gain level and channel settings as well as gives an overview of other inputs
1. Audio level for a specic channel
2. Selected output
3. Selected output volume, press Conrm to Mute
4. Mute Icon
5. Audio level display
OUTPUT
1 CUBE
2 CLIP
AUX-IN
USB-IN
master
usb out
xlr out
rca out
1 2 4
3
5
7

Input screen
The Input screen is default view for all of the possible inputs to the Hub.
3.1.5. Hub menu Settings
CUBE
5
1
2
3 6 7 8 9
OUTPUT
1 CUBE
2 CLIP
AUX-IN
USB-IN
4
8
5. 5-step display for the RF signal level
6. Name of selected Input channel
7. Gain for selected Input channel
8. Audio level display
9. Settings of selected Input channel
1. Name of the paired transmitter
2. Appears if USB-IN in used with computer
3. Appears if Auxiliary in jack is used
4. Expected remaining battery life of the connected transmitter
Initiate pairing
Select the Wireless channel in which you want to pair a new Catchbox transmitter. Go into the
channel setting, choose "Pairing" and activate it by selecting "Start".
Mute function
To activate Mute for any input or output channel select the desired channel and press Conrm
button. To deactivate Mute on the selected channel, press Conrm once more.
Volume control
To control any input or output channel navigate to the desired channel and select the volume meter.
For volume up press the Navigation button up and for volume down press the Navigation button
down.
Stealth mode
To activate Stealth mode (disables buttons and display) press the System menu button, select
System settings, Stealth mode, and conrm Activate. To disable the Stealth mode, press and hold
the up and down Navigation buttons simultaneously.

3.2. Cube Transmitter
Make sure everyone can be heard and all participants can contribute to the conversation. The
throwable cube microphone makes it easy to 'mic the whole room' in a dynamic, enjoyable and
cost-eective way.
3.2.1. Cube operating elements and connections
3.2.2. Cube Status LED behaviour
1. Pairing button - long press to initiate pairing
2. Link LED
3. Battery status LED's
4. Power button - long press for to turn transmitter on/o, short press for Battery life
5. Microphone element
6. Power jack (USB-C)
5
6
O
Green
Amber
Amber blinking
Not powered
Power on, Transmitters paired to Hub
Power on, No transmitters connected to Hub
In pairing mode
9
1
2
3
4

3.2.3. Cube locking mechanism
The locking mechanism is composed of two magnets that attract each other when correctly aligned.
Remove the Transmitter from the outer Cover by twisting it 90 degrees and pulling upwards. This
motion will misalign the internal magnets and allow for easy removal of the Transmitter unit.
3.2.4. Using Cube
To use the Cube, simply speak into the foam cap located on top of the Transmitter. An optimal
distance of 20 cm / 8 in will provide the clearest sound while not blocking the face of the person
speaking.
1 2
345
Avoid using the Cube near louspeakers as this can cause audio feedback.
10
Altri manuali per Catchbox Plus
1
Questo manuale è adatto per i seguenti modelli
6
Indice
Altri manuali Catchbox Sistema microfonico
Manuali Sistema microfonico popolari di altre marche

Sennheiser
Sennheiser Evolution Wireless Digital EW-DX EM 2 Manuale utente

Alpha Technologies
Alpha Technologies RBMS Manuale utente

SWIT Electronics Co.,LTD.
SWIT Electronics Co.,LTD. CW-S150 Manuale utente

Shure
Shure UA844 Manuale utente

Panasonic
Panasonic SHFX70 - DVD HOME THEATER WIRELESS SYSTEM Manuale utente

Pyle
Pyle PDWM5000 Manuale utente


