Cedarshed Bayside B124DD Manuale utente

Cedarshed Products are made of Western Red Cedar,
a beautiful, decorative and durable wood that will enhance your leisure
space and provide you with years of enjoyment.
When exposed to the elements, natural unfinished Western Red Cedar
will weather to a beautiful silvery grey.
If you prefer to maintain the natural wood colors, ask your Authorized
Cedarshed Dealer to recommend a quality stain to apply after assembly.
Cedarshed Industries
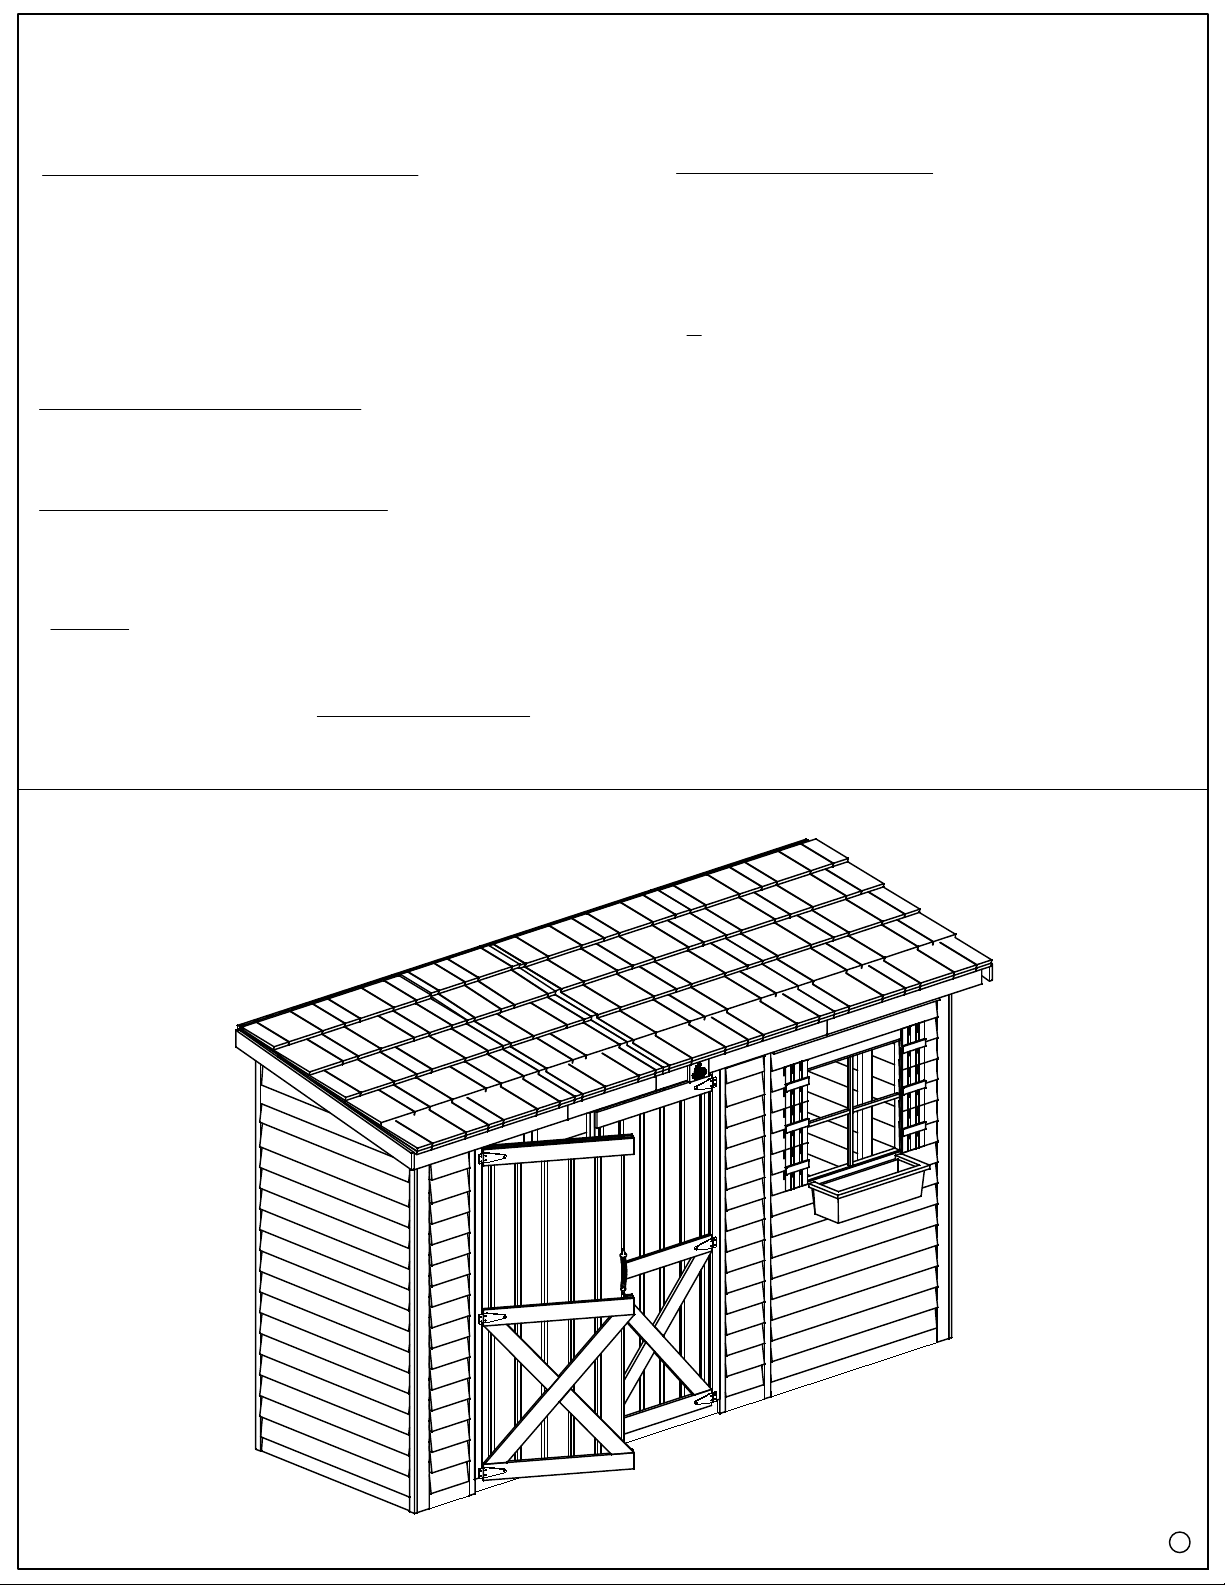
'The 12ft x 4ft Bayside'
B124DD
Issue 01 1-Jan-22
2
MATERIALS REQUIRED:
TOOLS YOU NEED:
ASSEMBLY INSTRUCTIONS:
12 foundation or concrete foundation pads
ASSISTANCE REQUIRED:
A minimum of two people will be required to construct the Garden Shed,
a third person will be helpful when working on the roof structure.
Assembly of building will require the use of power tools and a ladder. Please take precautions at all times.
Obtaining necessary permits is the sole responsibilty of the purchaser.
Please visit our website at www.cedarshed.com for additional safety tips and other considerations to
promote safe and enjoyable usage of your Cedarshed Product for years to come.
NOTE
Garden tools for foundation leveling work
Power drill & drill bits
4 Step ladders (8' Min.)
36" carpenters Level
Hammer, saw, tape measure, pencil etc.
1
16" drill bit
'The 12 x 4 Bayside'
B124DD
1 tube of outdoor rated latex caulking
1. Foundation Preparation......................page...7 to 8
2. Floor Assembly...................................page...9 to 12
3. Wall Assembly....................................page...13 to 16
4. Roof Assembly....................................page...17 to 18
5. Trim......................................................page...19 to 23
6. Hardware..............................................page...24 to 26
Issue 01 1-Jan-22

3
any liability for improper installation, maintenance and repair of any Cedarshed product.
Customers agree to hold Cedarshed Industries (1992) Inc. and any Authorized Dealers free of
your experience may differ from those presented in this manual, in our catalogue or on our website.
construction abilities and other factors may affect the construction of any Cedarshed product, so it is possible that
Our customers love telling us their Cedarshed stories and we are proud to hear them. Local conditions, personal
with knowledge on properly preparing a foundation.
Please review the information in this Assembly Manual or our web site or alternatively, consult with a professional
It is important to properly prepare the foundation to ensure the proper construction of Cedarshed products.
if this is the intended use.
In some geographical regions, our products are not rated for human occupancy. Please check with local authorities
ready for adverse weather conditions.
Have a regular maintenance plan to ensure floors, walls, doors, windows, roofing members etc. are secure and
structure securely grounded
In high or gusty wind conditions it is advisable not to use the structure, and it may be advisable to keep the
should be abided by.
If the structure is elevated above ground, local Building Code requirements are solely the owners responsibility, and
snow off the roof.
Roof Snow Load Ratings vary by geographical location. If a heavy or wet snowfall occurs, it is advisable to clear the
Some Safety Tips to Consider Include:
reference for future maintenance.
residential use. Please follow the Assembly Manual when building the structure, and keep this manual as a
many years to come. Our products are built for use based on proper installation on level ground and normal
As a proud owner of a Cedarshed gazebo, garden shed or outdoor furnishing(s), we want you to safely enjoy it for
Safety Points and Other Considerations
2" x 3" size. Wall and corner posts consist of 2" x 3"s. Floor framing 2" x 4".
All Cedarshed products are constructed of Western Red Cedar. All framing components are a nominal
recommended by the manufacturer. Always use appropriate safety equipment, including eye protection.
When using power tools, ladders or any other tool, observe all safety precautions
Obtaining necessary permits is the sole responsibility of the purchaser.
do not require building permits. If a permit is required, your local permit office will have an application form.
Check with your local permit office for the regulations for your area. Generally, structures under 100 square feet
6.
5.
4.
3.
2.
1.
Do I Need A Building Permit?
'The 12 x 4 Bayside'
B124DD
Issue 01 1-Jan-22

Metal Flashing
H-MFLASS
4
WWW.CEDARSHED.COM
Exploded View of 'The 12 x 4 Bayside'
Cedarshed
Plaque
P-H-PLAQL
B124DD
Issue 01 1-Jan-22
Floor System
Wall
BW-001
Shutters
P-SH-001
Flower Box
P-FW-001
Double Door
DR-001
Fascia
P-1442
Door Skirting
P-1467
Bttm Skirting
P-B-G612C
Bttm Skirting
P-B-G612C
Bttm Skirting
P-B-G645
Skirting
P-B-G645
Skirting
P-B-G645
Skirting
P-B-G645
Skirting
P-B-G645
Sofit
P-G437
Sofit
P-G424
Sofit
P-B-G446G
Sofit
P-G437
Top Skirting
P-B-G412C
Top Skirting
P-B-G412C
Top Skirting
P-B-G645
Top Plate
P-2341G
Wall
BW-003
Wall
BW-003
Wall
BW-001
Top Plate
P-2371K
Top Plate
P-2326C
Top Plate
P-2346G
Top Plate
P-2346G
Top Plate
P-2326C
Top Plate
P-2371K
Window
Wall
WW-003
Wall
BW-003
Wall
BW-003
Wall
BW-003
Header
P-2346G Header
P-2346G
Header
P-2346G
Header
P-2346G
Gabel Panel
GW-008
Gabel
Fascia
P-1445Yg
Gabel Panel
GW-008
Gabel Fascia
P-1445Yg
Header
P-2313K
Header
P-2313K
Header
P-2346G
Header
P-2346G
Door Frame
C-DF-012
Door Frame
C-DF-008
Door Frame
C-DF-008
Fascia
P-1424
Fascia
P-1446G
Fascia
P-1442
Infill Wall
IW-001
Infill Wall
IW-001
Infill Wall
IW-001
Top Plate
P-2341G
Roof Panel
C-RF-019
Roof Panel
C-RF-018
Roof Panel
C-RF-032
Roof Panel
C-RF-019 Top Skirting
P-B-G645 (3)
Top Skirting
P-B-G445 (3)
Fascia P-1442
Fascia P-1446G
Fascia P-1424
Fascia P-1442
Trim
P-1280G
Trim P-13C79C
Trim P-1280G
Trim P-1280G
Trim P-11K79C
Trim P-13C79C
Trim P-1280G
Trim P-1289G
Trim P-13C89G
Trim P-1289G
Trim
P-1289G
Trim P-1289G
Trim P-13C89G
Bttm Skirting
P-B-G645
Bttm Skirting
P-B-G645
Bttm Skirting
P-B-G645
Top Door Trim
P-1367
Door stop
P-1262G
Door stop
P-1271I
Door stop
P-1271I
Door stop
P-1371C

5
FRONT VIEW
C
B
A
Measurements for Bayside B83
Weight
Dimension
Door
Your Cedarshed Product is constructed of Western Red Cedar Exterior.
Wall and Roof framing is 2 x 3 SPF, Floor is 2 x 4 Cedar with 5
8" plywood.
A
C
B
SIDE VIEW
D
Area 46.5 Sq. Ft.
144"
31 1/16" x 71 3/4"
46 1/2"
Specifications for 'The 12 x 4 Bayside'
B124DD
1018 lbs.
84"
94 3/4"
Issue 01 1-Jan-22
D

6
ACCESSORIES AND HARDWARE
Cedarshed Plaque
Door Handle
1 3
4"
Nails
2"
Screws
3"
Screws
Description Size or Type # of Pcs.Part Number
Cedershed plaque
Metal roof flashing 3" x 12"
2" Screws Bag
1 ¾" Finishing nails Bag
Door
Hasp
Door handle
1P-H-PLAQL
15P-H-MFLASS
75P-H-SC2
260P-H-NL 1.75
2
1P-H-HASP
2P-H-DHAND
* Door trim-narrow to be used when door is located on 12ft side / wide to be used when door is located on 4ft side.
ACCESSORIES
FASTENERS
DOOR HARDWARE
B124DD
Barrel bolt
To confirm you have received all materials, sort them according to this list. Call or e-mail us if you are
missing any items and we will courier or ship as soon as possible.
Toll Free Customer Support Line: 1-800-830-8033
E-mail: [email protected]
Protect your building materials from wet weather by covering them when necessary.
3" Green/Brown screws for floor joist Bag 250P-H-SC3
DR-001
Instruction manual, questionaire and driver bit
1P-H-BBL4
Issue 01 1-Jan-22
Window Shutters 2P-SH-001
Flower Box 1P-FW-001
Door hinge 4P-H-THING6
Metal Roof Flashing Window Shutters
Flower Box Doors Hasp
Door Hinge Barrel Bolt
1LH, 1RH
Door Stops
Horizontal Door Stop
P-1262G
Vertical Door Stop
P-1271I
Vertical Door Stop
P-1371C
1
2
1
1 x 2 x 62 1/2"
1 x 2 x 71 5/8"
1 x 3 x 71 1/4"

Concrete Patio Stone
Concrete Slab Foundation
(Option 2)
Foundation Options
Concrete Slab Foundation (Option 2)
Typically a slab 3"-4" thick laid over a subbase of 4" of gravel or crushed rock is sufficient but may vary (consult
your local Cedarshed supplier). Either mix your own concrete or have it delivered to your site. A 10' x 10' x 4" slab
will require approximately 1 cubic yard of concrete. In any case, make sure you excavate the slab area to a depth
of 6", use 4" of gravel as your subbase, Welded Wire Mesh as reinforcing (optional) and 4" of concrete (trowel to
allow for drainage away from the center high point).
WHAT TYPE OF FOUNDATION SHOULD I USE?
Concrete Patio Stone Foundation (Option 1):
If the ground is stable and has sufficient drainage, you can set patio stones directly on firm compacted soil. If not, lay
the Patio Stones on gravel or crushed rock. Place the Patio Stones at the load bearing points of the floor and under
each doorway post. You may wish to slide the exterior Patio Stones a few inches under the Floor Joist System to
reduce a tripping hazard.
WHAT SHOULD I DO TO PREPARE THE SITE?
Before you begin assembly, clear the construction area. Remove all debris; roots, grass, rocks etc. Make sure the
ground slopes away from the site at least 10 feet in all directions. If necessary, build up the soil in the center of the
site and slope away from the high point to provide drainage. Fill in any low spots within the perimeter of the site.
GRADE A SLOPE OF 1/8" PER FOOT, enough to prevent water accumulation. We recommend excavating the
site 4" deep and laying gravel or crushed rock where drainage may be a concern.
With all of the Patio Stones in place, you are now ready to level the Patio Stone Foundation.
Using a shovel, add or remove soil beneath each Patio Stone to adjust the level. Use a carpenters level on a long
straight piece of lumber on end to level from one Patio Stone to another for all the Patio Stones. Remember to
compact (soil/sand/gravel) as much as possible under each Patio Stone. It is recommended that you level the
outside Patio Stones first and then work your way inward.
THE CONSTRUCTION OF 'THE GARDEN SHED' MUST BE DONE ON A LEVEL FOUNDATION AND BE IN ITS FINAL
LOCATION. PLACE ADDITIONAL FOUNDATION PADS AS YOU FEEL NECESSARY TO STABILIZE THE FLOOR
SYSTEM. YOU MUST HAVE A LEVELED FOUNDATION BEFORE PROCEEDING TO LAY FLOOR ASSEMBLY.
Refer to the following sheets for dimensions
Foundation (Option 1)
Floor Decking not shown
Foundation Preparation for 'The 12 x 4 Bayside'
B124DD

Place 1ea Concrete
Patio Stone under
Door Post
Foundation Plan
Concrete Patio Stone
Foundation (Option 1)
(12" x 12" [305 x 305])
[Metric Dimensions shown in brackets]
Foundation Preparation
B124DD
Floor Joist System
Concrete Slab Foundation
(Option 2)
(46-1/2" x 144-1/2" [1181 x 3670])
Under Floor Joist System

Joist Box Assembly
Lay the joist parts out as per Fig P-9-1 Using 2 - 3" screws per joist. Assembly the joist box together as per Fig P-9-2
The completed joist box is pictured in Fig. P9-3.
46 1/2" x 46 1/2" Joist Box - P9
FIG. P9-1
9
FIG. P9-3
FIG. P9-2
3" Screw
Can Be
Brown /
Green
B124DD
Floor Assembly
Issue 01 1-Jan-22
P-2443G
P-2446G
Part Number Description Size or Type # of Pcs. CODE
FLOOR PARTS
P-2423 Floor Joist 2 x 4 x 23" 4 P-2423
P-2443G 2 x 4 x 43 1/2" 4 P-2443G
P-2446G 2 x 4 x 46 1/2" 6 P-2446G
P-2469 2 x 4 x 69" 4 P-2469
P-PL-I2446G Plywood Sheet 5/8 x 24 x 46 1/2" 3 P-PL-I2446G
P-PL-I2646G Plywood Sheet 5/8 x 26 x 46 1/2" 1 P-PL-I2646G
P-PL-I46G46G Plywood Sheet 5/8 x 46 1/2 x 46 1/2" 1 P-PL-I46G46G
Floor Joist
Floor Joist
Floor Joist

Joist Box Assembly
Lay the joist parts out as per Fig P-10-1 Using 2 - 3" screws per joist. Assembly the joist box together as per Fig P-10-2
The completed joist box is pictured in Fig. P10-3.
46 1/2" x 26" Joist Box - P10
FIG. P10-1
10
FIG. P10-3
FIG. P10-2
3" Screw
Can Be
Brown /
Green
B124DD
Floor Assembly
Issue 01 1-Jan-22
P-2423
P-2446G
Indice
Altri manuali Cedarshed Deposito all'aperto


