Chasing PING 360 SONAR KI Manuale utente
www.chasing.com
CHASING PING 360
SONAR KIT(M2 PRO MAX)
User Manual
用户手册
ユーザーマニュアル
사용 설명서
Bruksanvisning
Manual de Usuario
Руководство пользователя
V1.0

Contents
User Manual
用户手册
ユーザーマニュアル
사용 설명서
Bruksanvisning
Manual de Usuario
Руководство пользователя
01
09
17
25
33
41
49
EN
CN
JP
KR
SE
RU
ES
EN EN
CHASING PING 360 SONAR
KIT (M2 PRO MAX)
User Manual
V1.0
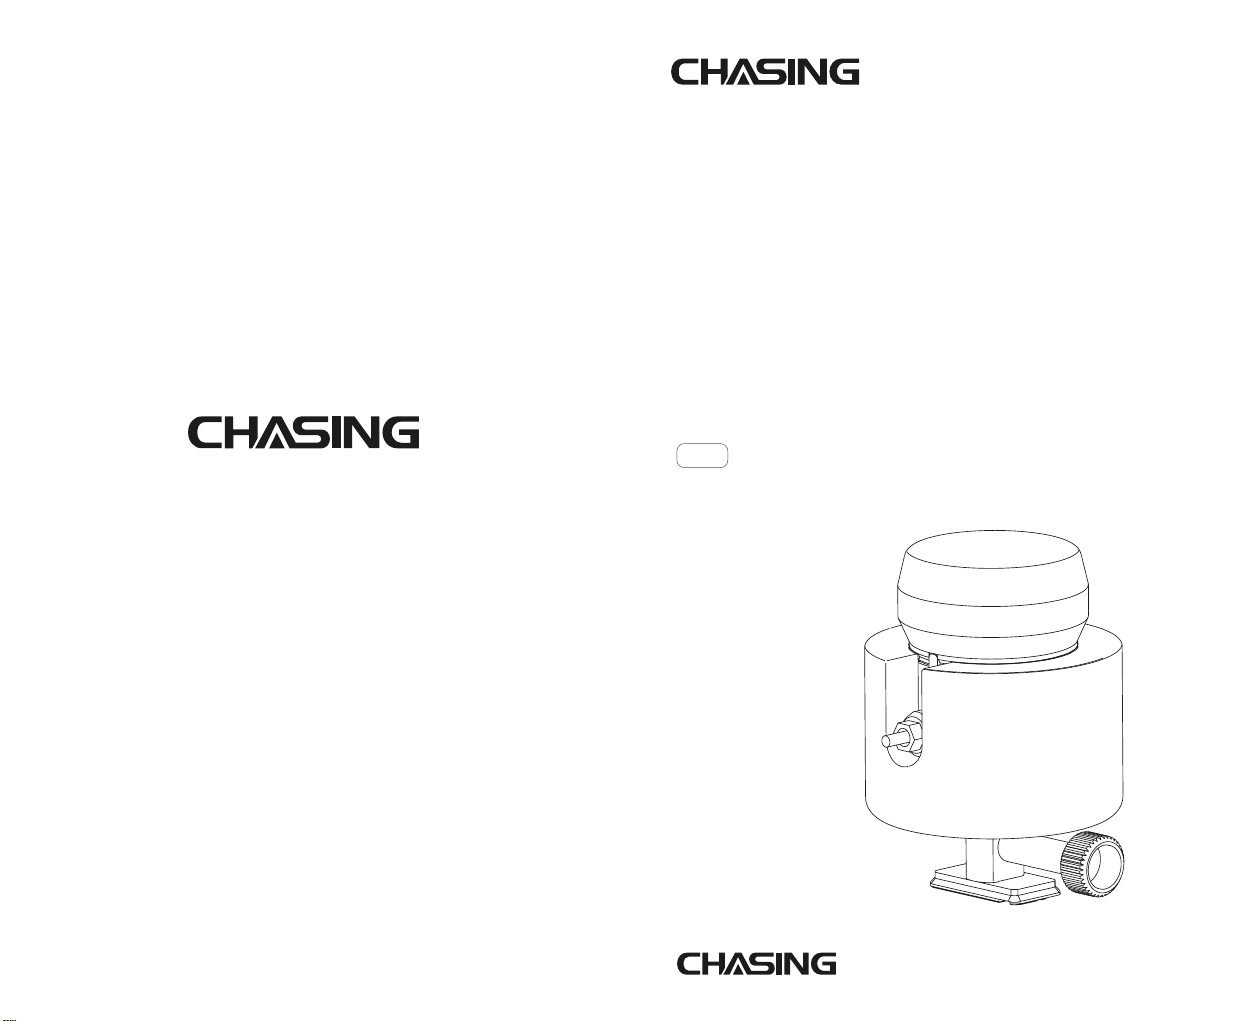
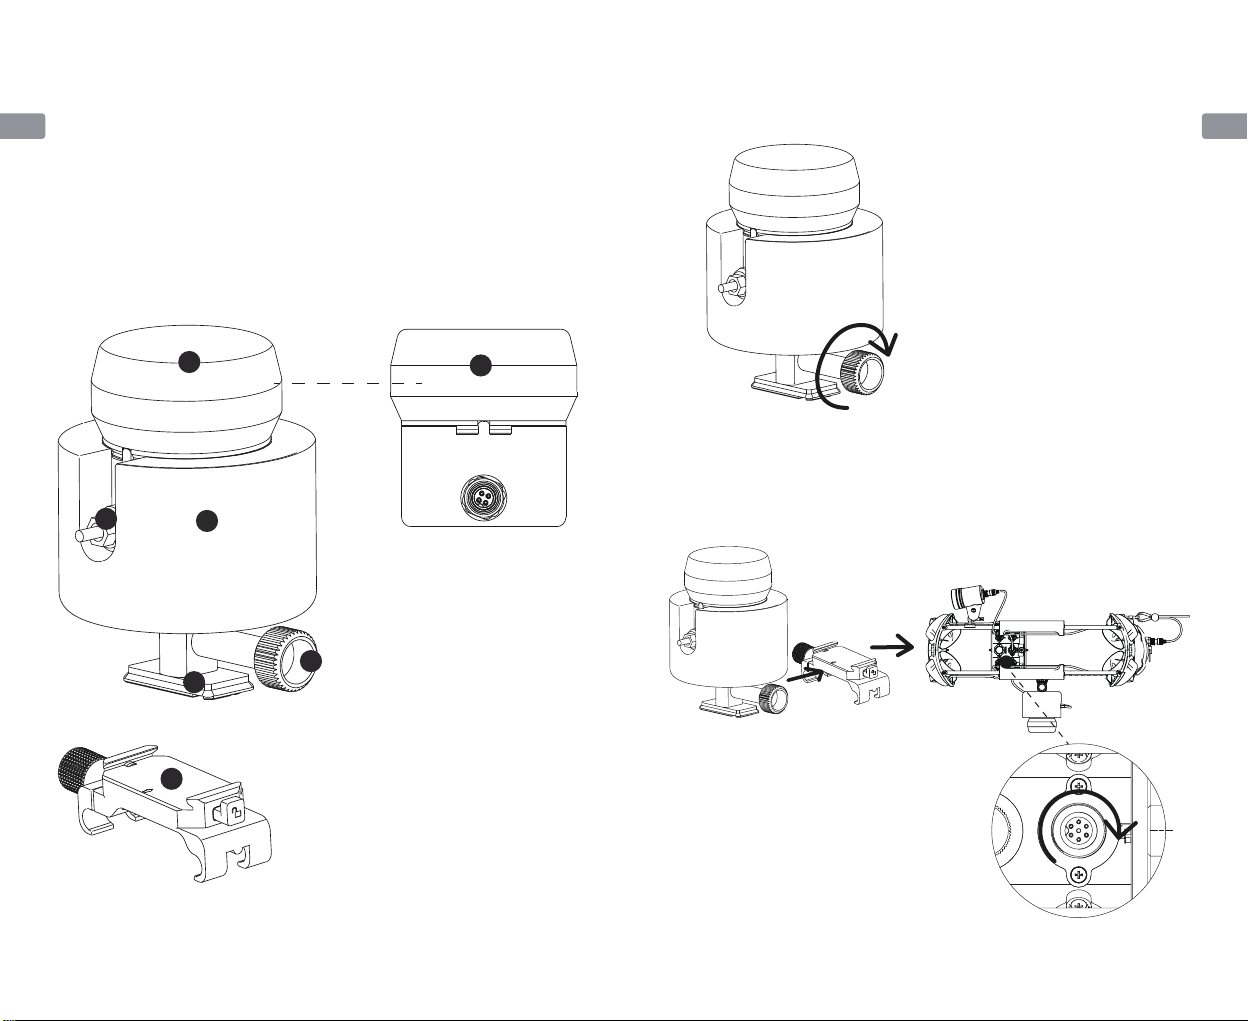
1. Ping360 main body
2. Tether module
3. Connection cable joint
4. Screw
5. Mounting support (M2 PRO MAX)
6. CHASING quick release holder
CHASING PING 360 sonar kit, consisting of BlueRobotics Ping360 and mounting
kit customized and developed by CHASING Innovation, can be mounted on
CHASING M2 PRO and CHASING M2 PRO MAX for use. Ping360 main body is a
mechanical scanning sonar used for navigation and imaging, with a range of 50m
(165 feet), a depth level of 300m (984 feet), and open source software interface.
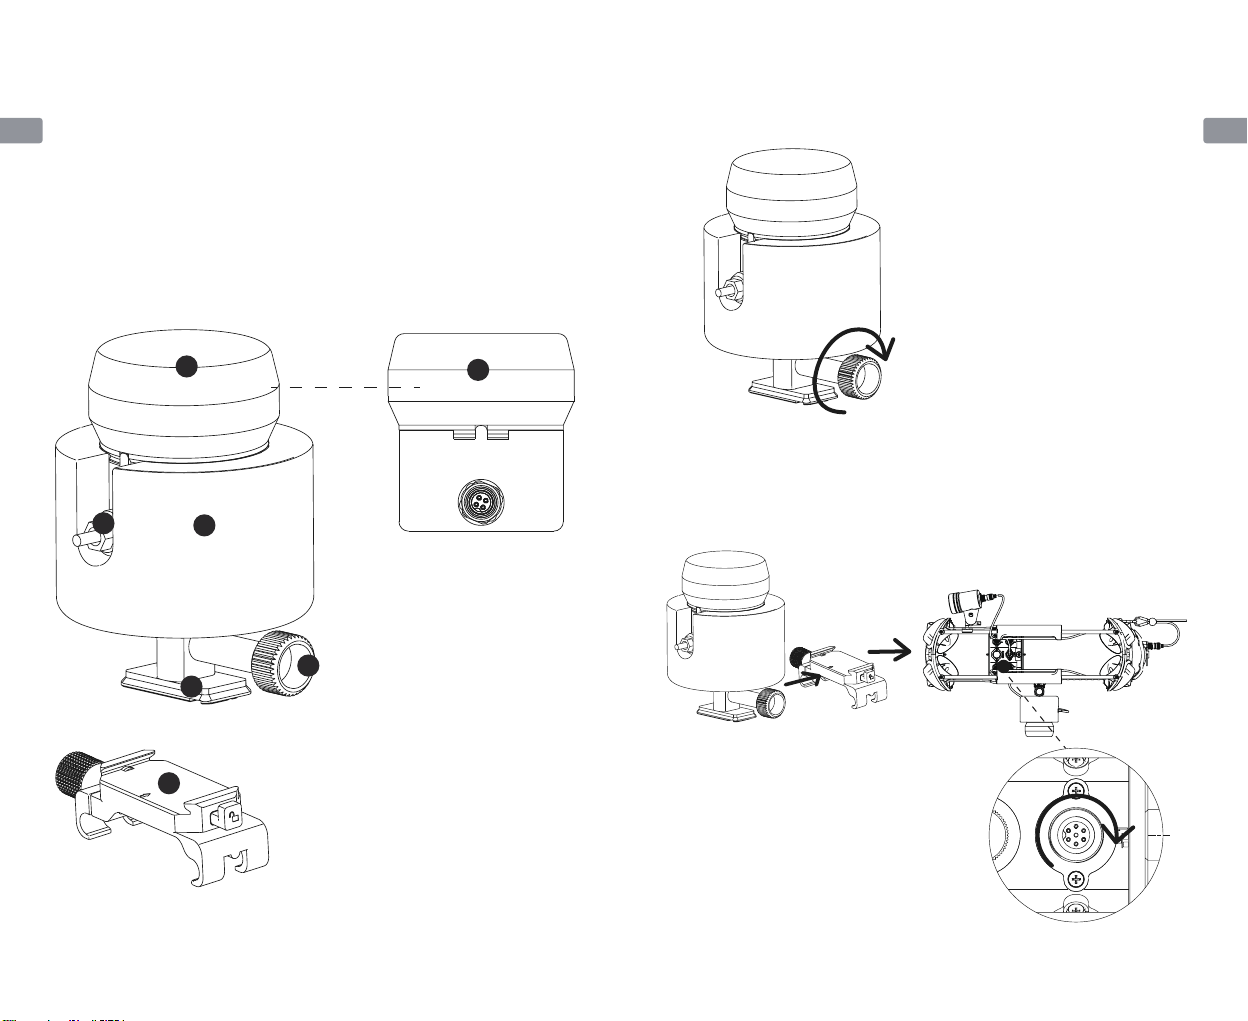
Mounting and connection
1. Fix the mounting support (M2 PRO MAX) and CHASING PING 360 (including
tether module) by screws.
2. Fix the CHASING quick release holder above / below the ROV, slide the entire
unit assembled in step 1 from the direction of the platform arrow onto the
holder, insert the other end of the connection cable into the ethernet of the
ROV, and tighten screws.
11
2
3
4
5
6
01 02
EN EN
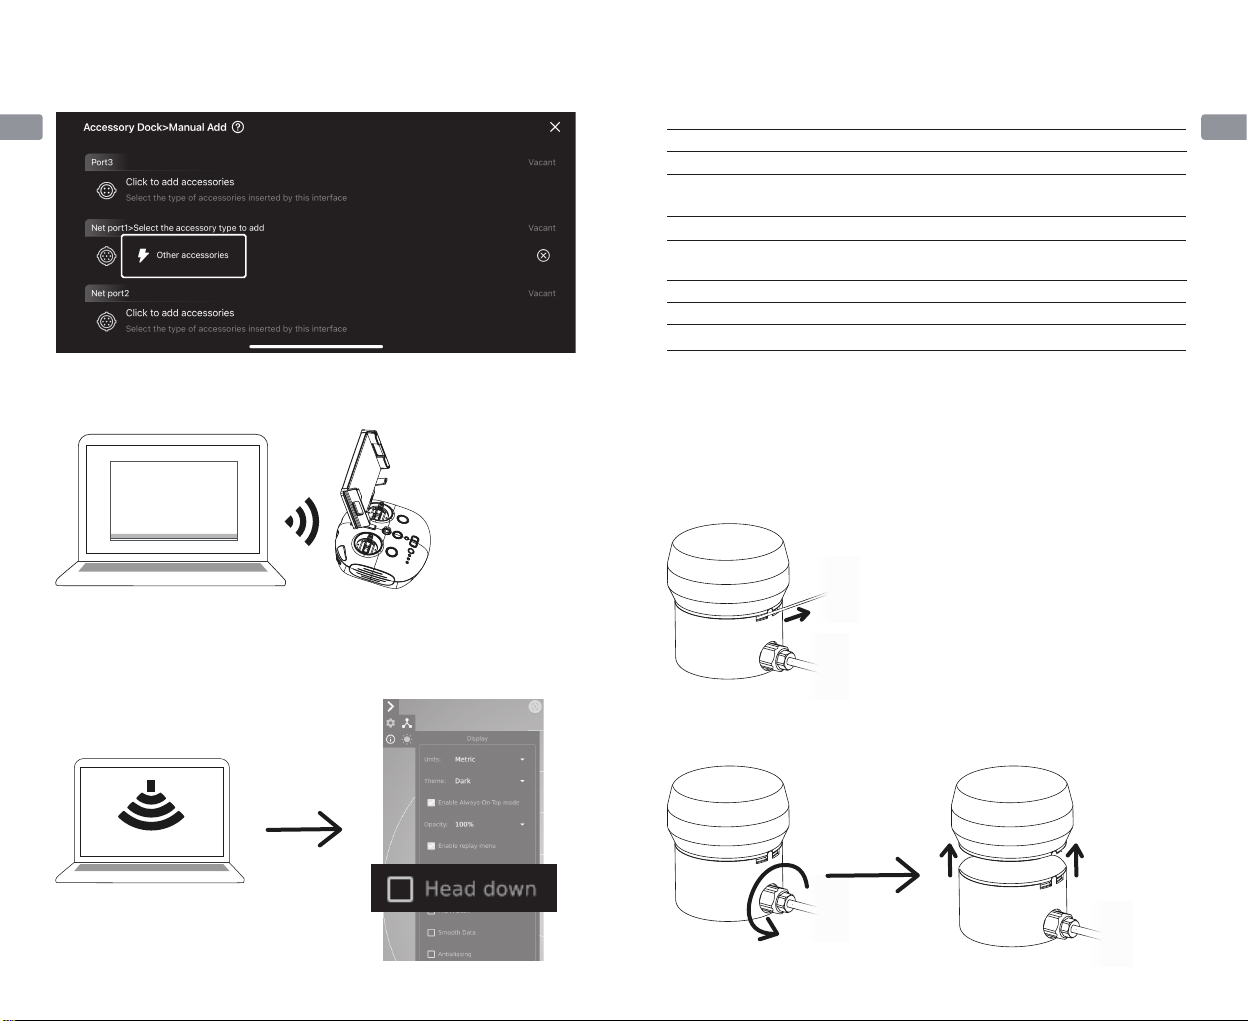
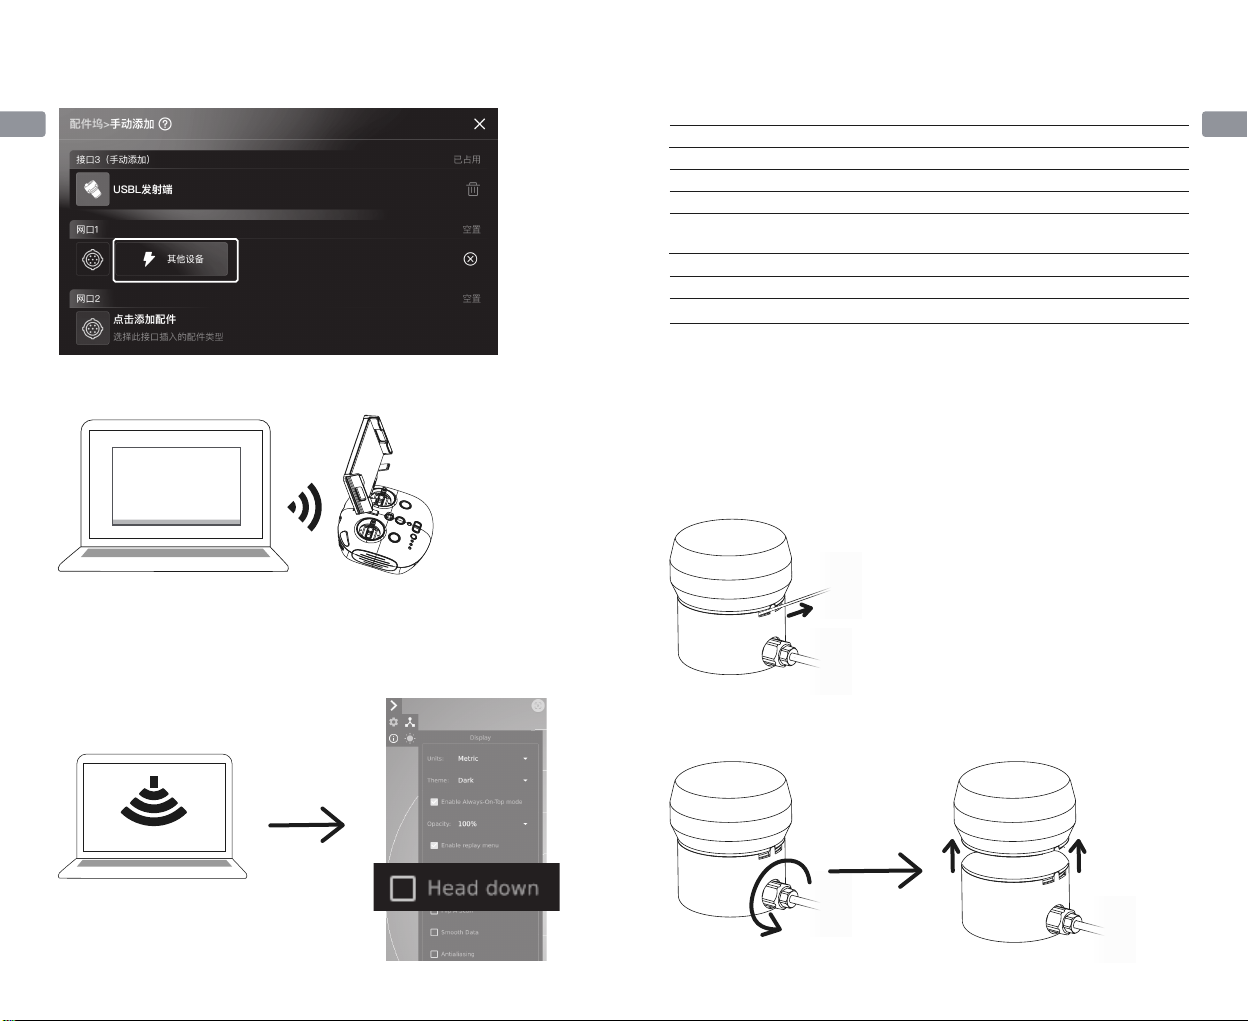
3. After mounting, power on the ROV, open the GO1 APP on the mobile phone,
expand the docking station, and click the "Other Devices" option on the
corresponding ethernet to configure it.
4. Turn on the computer and connect to the Wi-Fi of the CHASING remote
controller (password: 12345678).
5. Open the PC software "Ping-Viewer" to view the sonar image (if the sonar is
mounted below the M2 PRO MAX, click the "Head Down" option on the
"Ping-Viewer" to flip the image, so that actual image can be viewed)
Mounting assembly
Ping360 main body
Specification Parameters
Dimension
Weight
Structural material
Pressure withstand depth
Temperature range
Scan range
Pressure withstand depth
124*104*167mm
763.3g
Aluminium alloy + foamed PVC
tether materials
300m
0-30℃
0.75m—50m
300m
Ping-Viewer
Ping-Viewer
1. Pull out the limit rope from one side.
1. Please modify the sonar manually before performing above mounting and
connection steps:
2. Use a spanner to loosen the connection cable, and slowly open the rear end of
the Ping360 sonar.
For users purchasing "self-assembly kit"
Pull out
03 04
EN EN
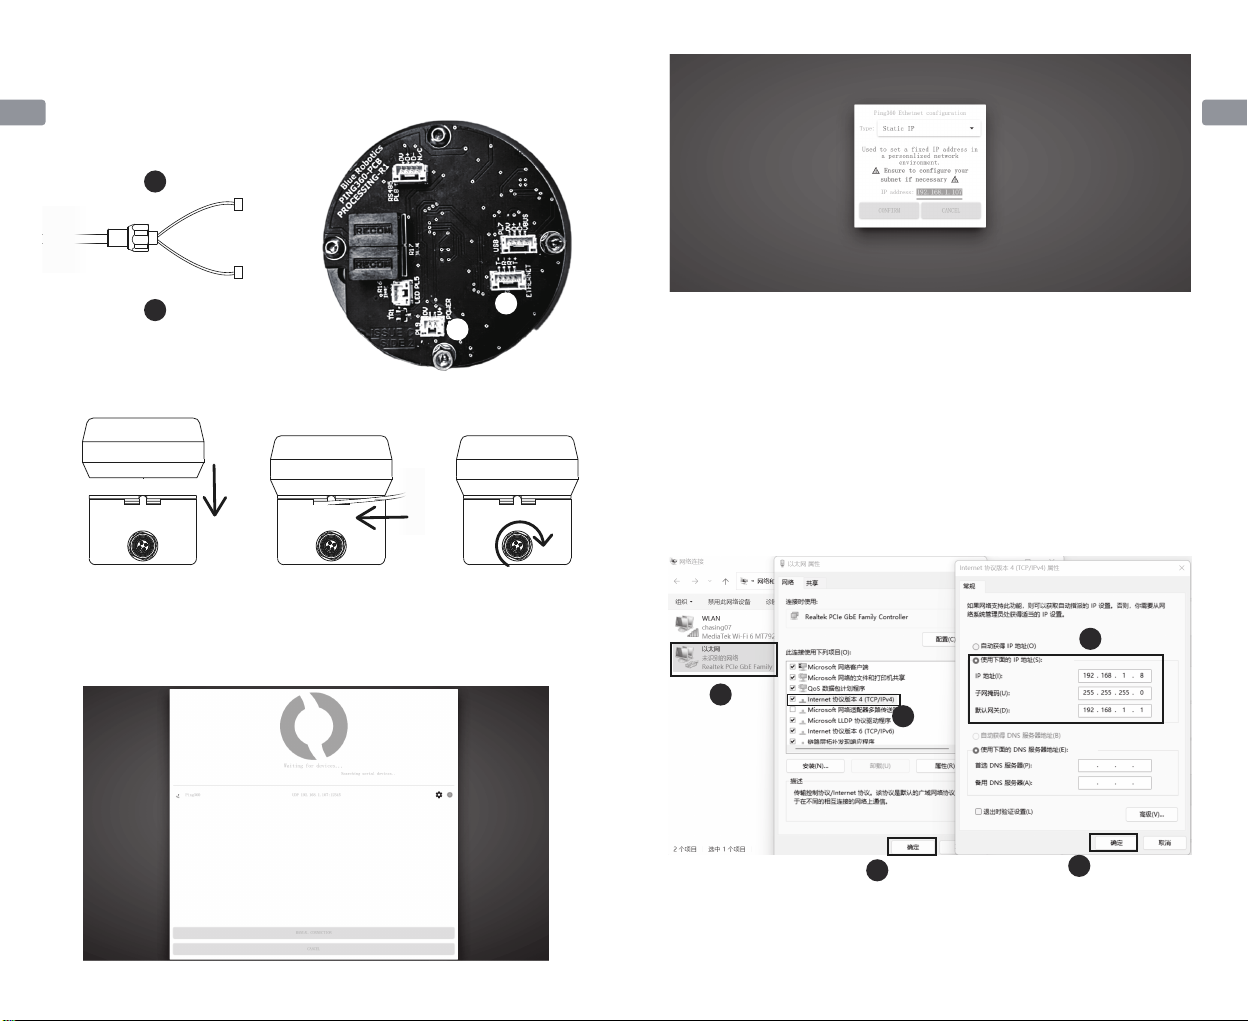
4. Align the gap, close the Ping360 main body, mount the limit rope, and tighten
the connection cable interface with a spanner;
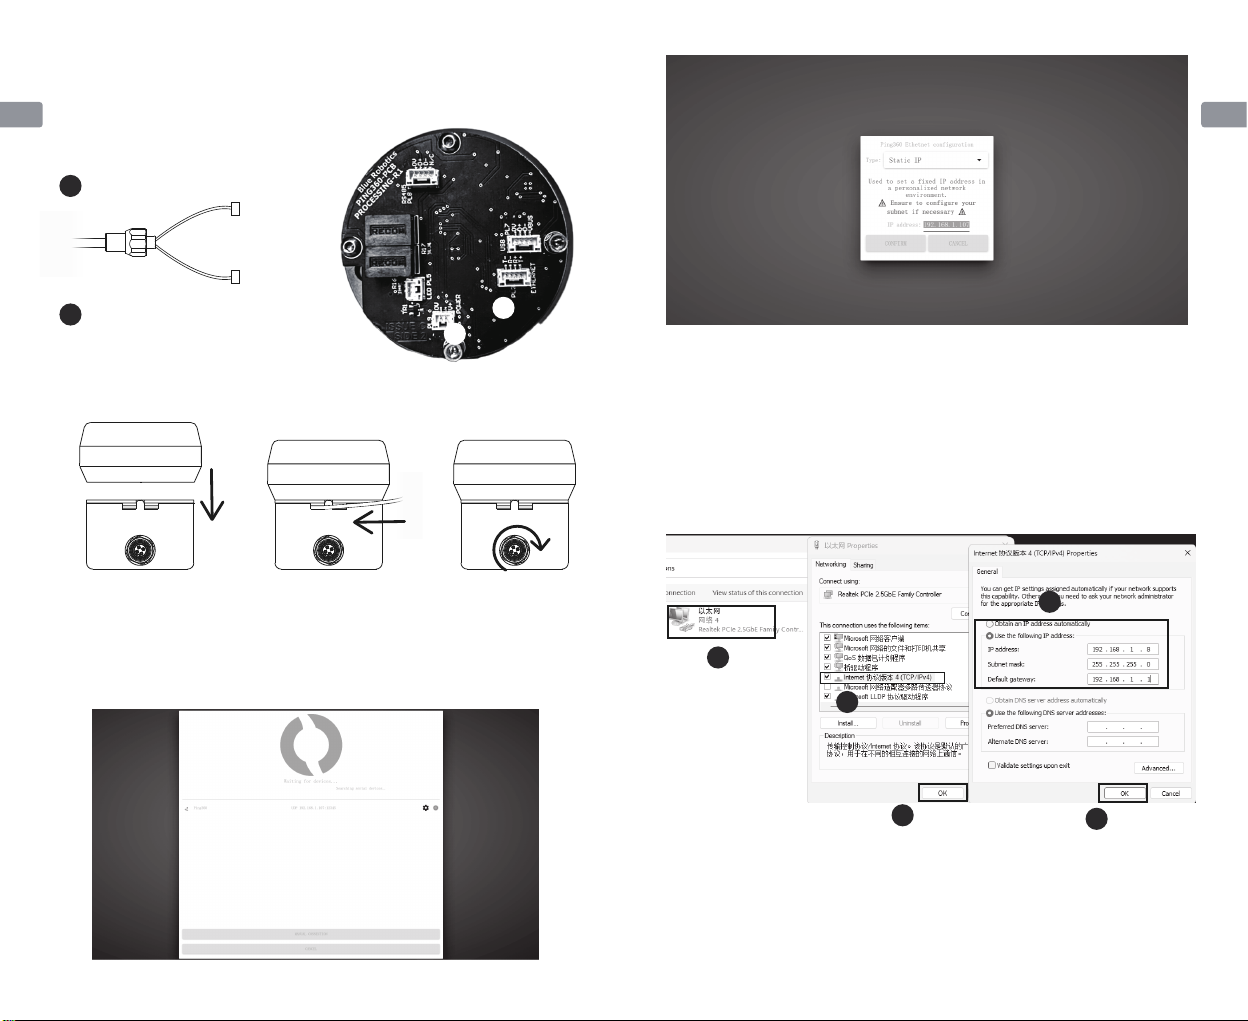
5. Perform the steps from "III. Mounting and Connection of CHASING M2 PRO
MAX" to Step 4 above, turn on the computer, and connect the Wi-Fi of the
CHASING yellow remote controller RC3. Open the Ping-Viewer app on the PC -
click (Icon Settings) - Static IP - IP address: 192.168.1.107, and change the IP
address to 192.168.1.107 to save.
Close the Ping360 main body Mount the limit rope Tighten the interface
with a spanner
1. If CHASING Ping360 is applied together with the CHASING waterproof remote
controller with screen, please connect the computer and the waterproof
remote controller with screen with a network cable and configure the static IP
address of the computer, as shown in the figure below. (after using the sonar,
please remember to change back to "automatically obtain IP address" on the
computer)
2. If it still cannot be used after performing above steps, try to connect a patch
panel inside (gift). For specific operating steps, please scan the QR code on the
"Teaching Card" to check the "Patch panel mounting" section of the
"Connection cable replacement tutorial of CHASING Ping360 sonar".
Note
1
2
3
4
5
Click
Click Click
Double click
Fill as in the figure
3. Replace with a new connection cable. Check the O-ring before mounting,
screw it to the remaining 2-3mm space, connect the 4P leadwire to the
"ETHERNET", and connect the 2P leadwire to the "POWER";
1
2
2
1
2P power cord (reddish black)
4P communication cable (Orange Green)
05 06

EN EN
Support
For any questions or technical problems, please contact us by the Email of
CHASING After-Sales Department or the customer service hotline on the official
website.After-sales Service Hotline: 400-667-6959
After-sales Email: [email protected]
support02@chasing-inno vation.com--Asia & Oceania
support03@chasing-inno vation.com--North and South Americas & Africa
This Manual is subject to updating without prior notice.
The latest version is available on CHASING official
website: https://www.chasing.com
1. Details of download of BlueRobotics Ping360 imaging sonar related software
and sonar specification parameters are available on the BlueRobotics official
website: https://bluerobotics.com/store/sensors-sonars-cameras/so-
nar/ping360-sonar-r1-rp/
2. Please mount and connect the imaging sonar when the ROV is powered off,
and make sure that the connection cable plug is well plugged and nuts are
tightened before launching for use;
3. Check the machine for damage or missing of components before use; if
damage or missing of components occurs, please replace them in a timely
manner;
4. Check and keep the machine body interface dry and clean before use. Salt and
moisture may corrode the port. In case of water droplet entering the port,
please rinse the socket with fresh water, and absorb the water in the socket
with paper towel or cotton ball.
5. When using, it is necessary to observe the orientation of the CHASING Ping360
sonar kit in the water to avoid being blocked by the ROV, which may affect the
transmission of acoustic signals.
6. If users tend to assemble and disassemble the sonar by themselves, they shall
operate in strictly accordance with the User Manual. Damage caused by
non-standard assembly and disassembly is not covered by the warranty.
Precaution
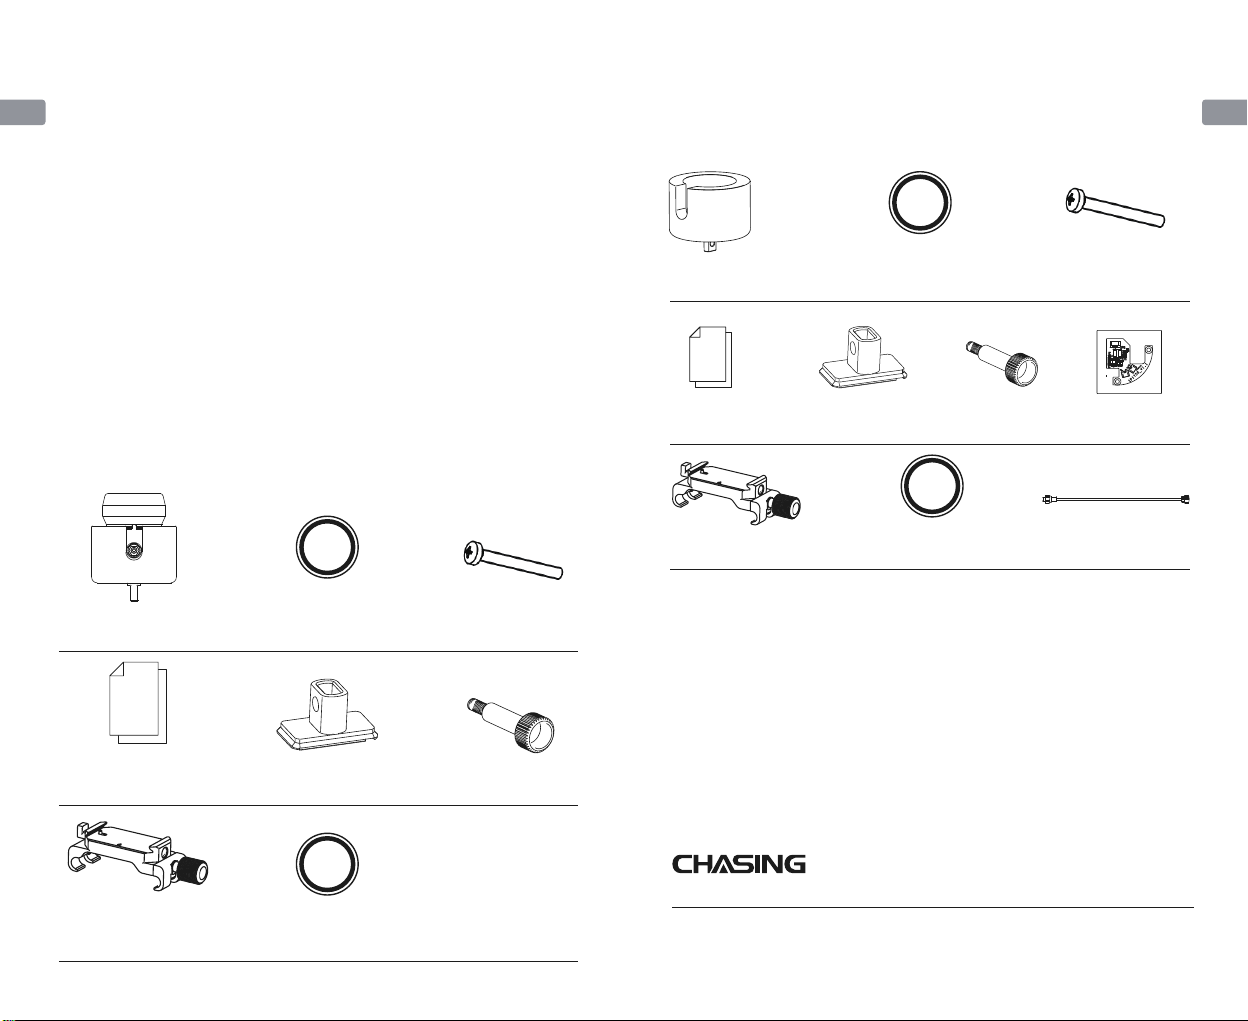
Packing List
CHASING PING 360 SONAR KIT
(M2 PRO MAX)
CHASING Ping360 (including
tether module) *1
12.5*1.8 O-ring *2
CHASING Ping360 sonar
mounting sonar *1 Screw *1
Accessory mounting
platform assembly *1 10.82*1.78 O-ring *1
M3*25 cross
recessed pan head
screw *4
M3*25 cross recessed
pan head screw *8
Datagram *1
12.5*1.8 O-ring *2
10.82*1.78 O-ring *1Accessory mounting
platform assembly *1
CHASING PING 360 M2 PRO MAX
Self-assembly kit (excluding sonar)
Tether module
assembly *1
CHASING Ping360 sonar
mounting sonar *1 Screw *1
PING360 connection cable *1
Sonar reform
package (gift) *1
Datagram *1
07 08
CN CN
潜行PING 360声纳套件(P200 PRO)
用户手册
V1.0
1.Ping360主体
2.浮力模块
3.连接线接头
4.螺杆
5.安装支架(P200 PRO)
6.潜行快拆底座
潜行Ping360声纳套件由BlueRobotics Ping360和潜行定制开发的安装套件组成,可
安装在潜鲛P200和潜鲛P200 PRO上使用,Ping360主体是一款用于导航和成像的机
械扫描声纳,具有50米(165英尺)的范围,300米(984英尺)的深度等级,以及开
源软件界面。
安装与连接
1. 将安装支架(P200 PRO)与潜行Ping360(包含浮力模块)通过螺杆固定到一起。
2. 将潜行快拆底座固定到潜航器上方/下方,再将步骤1中组成的整体从平台箭头方向
滑入潜行快拆底座上,把连接线的另一端插入潜航器的网口并拧紧螺母。
11
2
3
4
5
6
09 10
CN CN
3. 安装完成后将潜航器开机,打开手机上的GO1 APP,展开扩展坞,点击对应网口的
“其他设备”选项进行配置。
4. 打开电脑,连接潜行遥控器的Wi-Fi,密码12345678。
5. 打开PC端软件“Ping-Viewer”则可查看声纳图像(如果将声纳安装在P200 PRO
下方则需要点击“Ping-Viewer”上的“Head Down”选项进行镜像翻转,方可看
到实际的图像)
安装组件
Ping360主体
规格参数
尺寸
重量
结构材质
耐压深度
温度范围
扫描范围
耐压深度
124*104*167mm
763.3g
铝合金+发泡PVC浮力材料
300m
0°-30°度
0.75m—50m
300m
Ping-Viewer
Ping-Viewer
1. 将限位绳从一侧抽出。
在执行上述安装与连接步骤前,需要先对声纳手动进行改装:
2. 借助扳手拧松连接线,将Ping360声纳后端慢慢打开。
对于购买“自行组装套件”的用户
抽出
11 12
CN CN
4. 对齐缺口,将Ping360主体合上,安上限位绳,借助扳手拧紧连接线接口;
5. 执行上述“三、P200 PRO安装和连接使用”至步骤4,打开电脑,连接潜行黄色
遥控器RC3的Wi-Fi。在PC端打开Ping-Viewer应用程序—点击(设置图标)—
Static IP —IP address:192.168.1.107 , 将IP改成192.168.1.107保存即可。
将Ping360主体合上 安上限位绳 用扳手拧紧接口
1. 如果潜行Ping360配合潜行防水带屏遥控器使用,请用网线连接电脑和防水带屏遥
控,配置电脑的固定IP,如下图。(使用完声呐后记得在电脑上改回“自动获得IP
地址”)
2. 如果按照上述操作流程仍然无法使用,可以尝试内接转接板(赠品)。具体操作步
骤请扫描“教学卡片”上的二维码查看“潜行Ping360声纳更换连接线教程”中“
加装转接板”部分。”
注意
3. 换上新的连接线。装上之前检查O型圈,然后拧至余留2-3mm的空间,将4P端子
线接在网口”ETHERNET”上,2P端子线接在电源”POWER”上;
1
2
2
1
2P电源线(红黑色)
4P通讯线(橙绿色)
12
3
4
5
点击
点击 点击
双击
如图填写
13 14
CN CN
支持
有任何疑问或者技术问题请发送邮件至潜行售后或通过官网客户热线联系我们。
售后客服热线:400-667-6959
售后邮箱地址:[email protected]欧洲
support02@chasing-inno vation.com --亚洲&大洋洲
support03@chasing-inno vation.com-- 南北美洲&非洲
本指南如有更新,恕不另行通知。
您可以进入潜行官网查询最新版本:https://www.chasing.com
潜 行 创 新
1.BlueRobotics Ping360图像声纳相关软件下载和声纳规格参数详见BlueRobotics
官网:https://bluerobotics.com/store/sensors-sonars-cameras/so-
nar/ping360-sonar-r1-rp/
2.请务必在潜航器断电的情况下进行图像声纳的安装和连接,确保连接线插头插好并
拧紧螺母后再下水使用;
3.使用前检查机器是否破损或者零件有缺失,如有缺失或破损请及时更换;
4.使用前检查并保持机身接口干燥、清洁。盐分以及湿气可能导致接口腐蚀,如果接
口进入水渍请务必用淡水冲洗插口,用纸巾或者棉球吸干插口内水分。
5.使用时需要观察潜行Ping360声纳套件在水中的朝向,避免受到潜航器遮挡导致影
响声波信号的传输。
6.自行拆装声纳的用户需严格按照用户手册操作步骤来进行操作,由于拆装不规范导
致的损坏不在保修范围之内。
注意事项
物品清单
潜行PING 360声纳套件(P200 PRO)
潜行Ping360(包含浮力模块)*1 12.5*1.8 O型圈*2
潜行Ping360声纳支架*1 螺杆*1
配件安装平台组件*1 10.82*1.78 O型圈*1
M3*25十字盘头螺钉*4
M3*25十字盘头螺钉*8
资料包*1
12.5*1.8 O型圈*2
10.82*1.78 O型圈*1配件安装平台组件*1
潜行PING 360 P200 PRO
自行组装套件(不含声纳)
浮力模块组件*1
潜行Ping360声纳支架*1 螺杆*1
PING360连接线*1
声纳改制包(赠品)*1资料包*1
15 16
Questo manuale è adatto per i seguenti modelli
1
Indice
Lingue:
Altri manuali Chasing Sonar


