chekoh HERCULES Manuale utente

support@chekoh.net
1
User Manual
Security Camera
User Manual
Security Camera

01
Contents
Part 1 – Product Details 03
Part 2 – Notice Before Using The Camera 04
Part 3 – Starting Using The Camera 05
3.1 Connect The Power 05
3.2 Download The "Chekoh" App 05
3.3 Account Sign Up (On Chekoh App) 06
3.4 Add Device 06
3.5 How To Use The App 07
3.6 Install The Camera On The Wall 10
Part 4 – Camera Management 11
4.1 Add New Camera 11
4.2 Editing The Camera Information 14
4.3 Delete Camera 15
4.4 Reset Camera 15
4.5 Image Flip 16
Part 5 – Live Viewing 17
5.1 Manually Adjust The Camera Monitoring Area 18
5.2 Two-way Audio 18
5.3 Video Quality 19
5.4 Record Live Video/Take Pictures 20
5.5 Multi-person Sharing 22
Part 6 – Playback 23
6.1 How To View Video Playback 23
6.2 Set Recording Video Quality 24

02
Part 7 – Alarm Setting 25
7.1 How To Turn On The Alarm 25
7.2 Motion Alarm 26
7.3 Flood Light 26
7.4 Camera Alarm Area Setting 27
7.5 Motion Sensitivity 28
7.6 Disable/Enable Push Notification 29
Part 8 – Video Lock 30
Part 9 – SD Card 32
9.1 Local Storage 32
9.2 SD Card Statue In Setting 32
9.3 About Micro SD Card 32
Part 10 – PC Software 33
Part 11 – Specification 35
Part 12 – Maintenance And Cleaning 35
Part 13 – Safety Instruction 35
Part 14 – FAQ 37
Part 15 – FCC Statement 39
Part 16 – Warranty & Technical Support 40
03
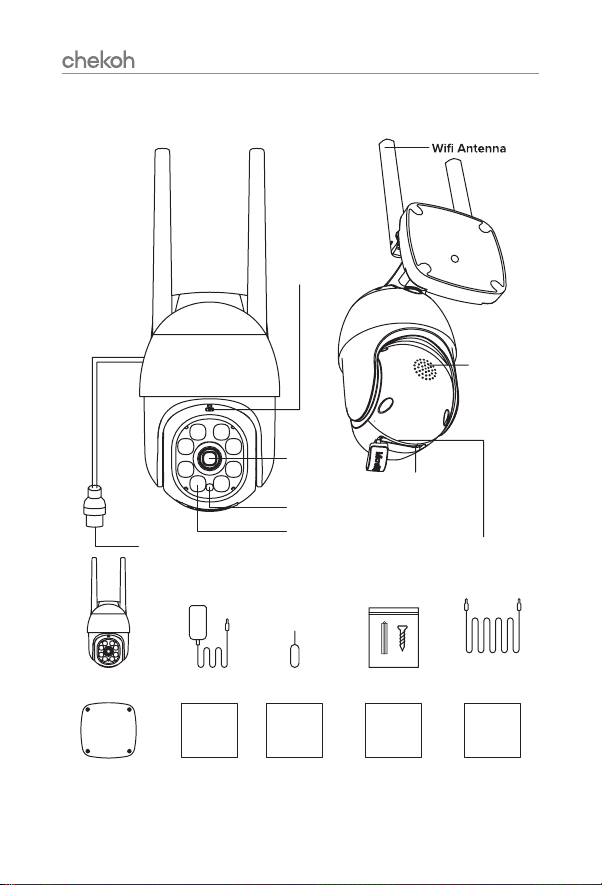
Part 1 – Product Details
Micro SD Card SlotPower Port
Microphone
Night Vision Switch Sensor
Night Vision IR Led
Lens
Reset
Speaker
Chekoh Camera Power Adapter Reset Needle Pack of Screws
Punch Positioning
Sticker
User
Manual
User
Quick Guide
NRRR
Card
Video Guide
Card
5m Power
Extension Cable
User
Quick Guide
User
Manual
Video Guide
Card
NRRR
Card
04
Part 2 – Notice Before Using The
Camera
NOTICE Before Starting Using Chekoh Hercules!
⊲ When start to add the camera to the Wi-Fi network, please make sure it’s under a full
Wi-Fi signal. (You can test with your smartphone)
⊲ Make sure connect the device to your smartphone (successfully monitored on app)
before installing on the wall.
⊲ This camera only supports 2.4GHz Wi-Fi router. Please make sure you are using 2.4GHz
Wi-Fi router (the same as the smartphone).
⊲ Wi-Fi password does not support special characters (Eg. * / @ $). Please reset the Wi-
Fi password only with English letters and numbers if the original password has special
characters.
⊲ Please install the camera under a stable Wi-Fi coverage area. If the Wi-Fi signal is
unstable in the place where you install it, we suggest purchasing an additional Wi-Fi
If you need any help when installing or using the camera, here are the ways to follow:
1. Read this quick guide or our manual.
2. View the installing video guide
at chekoh.net/videoguide
3. Consult our customer service by
starting a live chat at chekoh.net
(Mon-Fri 8:00 am - 5:00 pm pst )
4. Download the Full User Manual
at chekoh.net/manual
5. Consult our customer service by
emailing us at support@chekoh.net
(reply in 12 working hours).
05
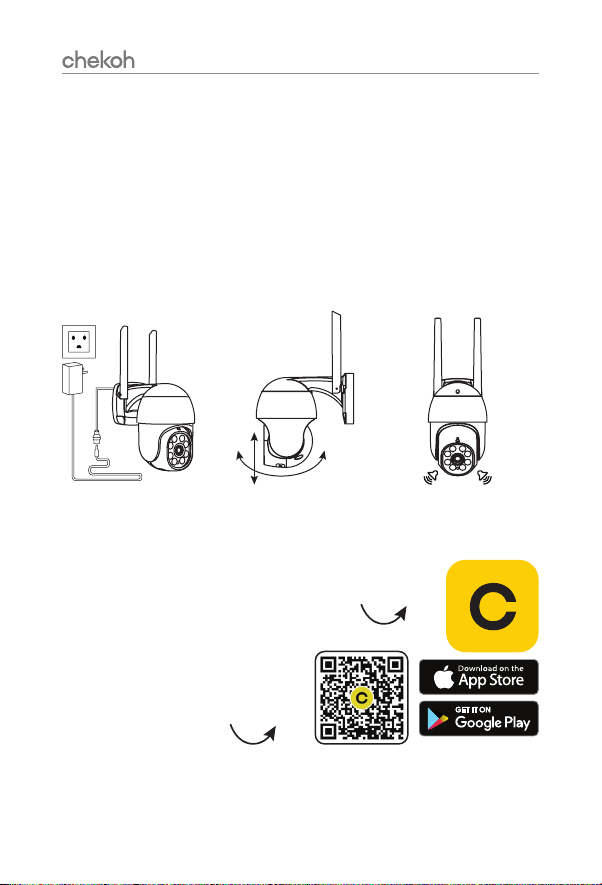
Part 3 – Starting Using The Camera
Now Let Start Using the Chekoh Hercules!
3.1 Connect The Power
1. It takes 30 seconds to get ready after connecting the power. The camera will stay silent
during this 30 seconds.
2. When the camera is starting, it will turn up and down, right and left for 3-5 seconds. We
suggest holding the camera when it's starting.
3. When the camera turns to silent again, a voice will remind us start to connect the
smartphone!
Stay silent
for 30 seconds
Turn around for
5 seconds when starting
Start
to connect
3.2 Download The "Chekoh" App
1. Search "Chekoh" on Apple Store (iOS)
or Google Play (Android) to download the app.
2. Use the phone camera to scan the
following QR code to download
the "Chekoh" app.*
* Only support iOS 8.0 or higher version for iOS, Android 10.0 or higher version for
Android.
06
3. For New user, Please Select 'Agree' To The Tips Pop-Up
1). Allow Chekoh to access mobile cellular data and wireless LAN, otherwise you cannot
add camera.
2). Allow Chekoh to receive pushed messages, otherwise the phone will not receive an
alarm push message.
3). Allow Chekoh to use the microphone when you want to use 2 way audio function.
3.3 Account Sign Up (On Chekoh App)
1. Open the app and click Sign up.
2. Enter your email or phone number, click send verification code.
3. Get the verification code from your email or message, input it and set up the password
4. Sign in with the account and password.
3.4 Add Device
Before Adding the Device:
1. Connect your phone to 2. 4G Wi-Fi (5G is not supported)
2. Wi-Fi password does not support special characters (Eg. * / @ $). Please reset the Wi-Fi
password only with English letters and numbers.
3. Make sure the Wi-Fi signal is full.
Adding the Device
1. Tap 'Add Device' or '+.
2. Connect the power and the camera is boosting, Please wait for 30 seconds, the
camera will start to move around. Follow the prompts on the screen. Click here to
confirm the camera status, click 'Next'.
3. Enter the Wi-Fi password, and click 'Next'. Confirm the Wi-Fi Information.
4. A QR code will show up on the smartphone, Use the camera to scan the QR code.
Please follow the advice in the app.
5. A voice will sound after the QR code is scanned successfully. And then the camera will
start the auto binding and configuration.
6. Wait for 10-120 seconds during the configuration. If the binding is successful, you will
hear 'binding successful'. Then the app will automatically jump to the camera list page.
* Tip: If you do not hear a voice saying "binding successful", it means the binding is
failed. Please try to reset the camera and bind again.
07
Use the reset needle (can be found in the package) to hold the reset button for several
seconds, until you hear deng~deng~deng~ prompt voice means the camera has been
reset successfully.
If you still can’t bind the camera, please contact us for more advises.
3.5 How To Use The App
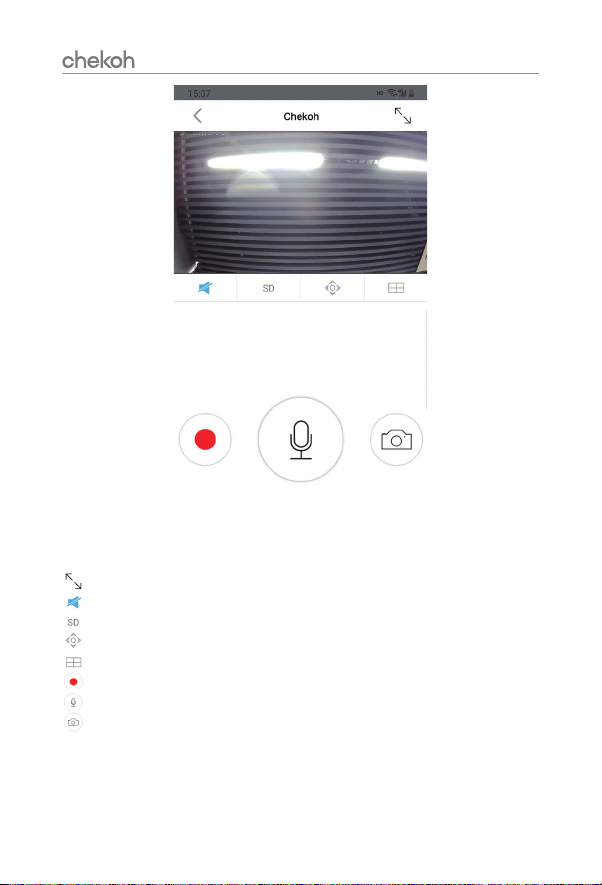
Press anywhere on the camera screen to enter the Live View.
08
Tap this icon to enter the full-screen mode.
Tap this icon to enable or disable audio.
Tap this icon to modify the image quality.
Tap this icon to adjust the monitoring area.
Tap this icon to enter the 1/4windows division menu.
Tap this icon to record live video.
Long press this icon to start a conversation.
Tap this icon to take a photo of the live view.
Please read the manual to learn more about how to use our product.
09
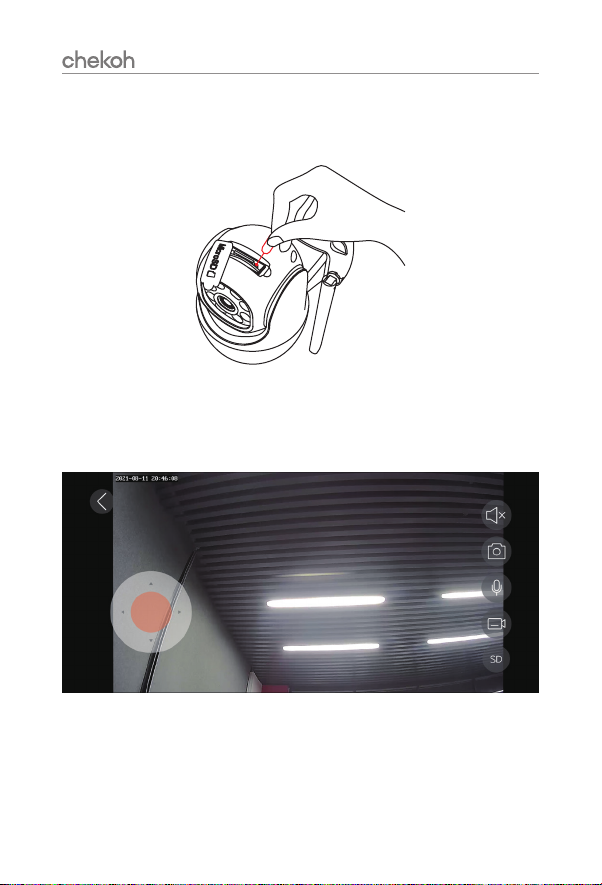
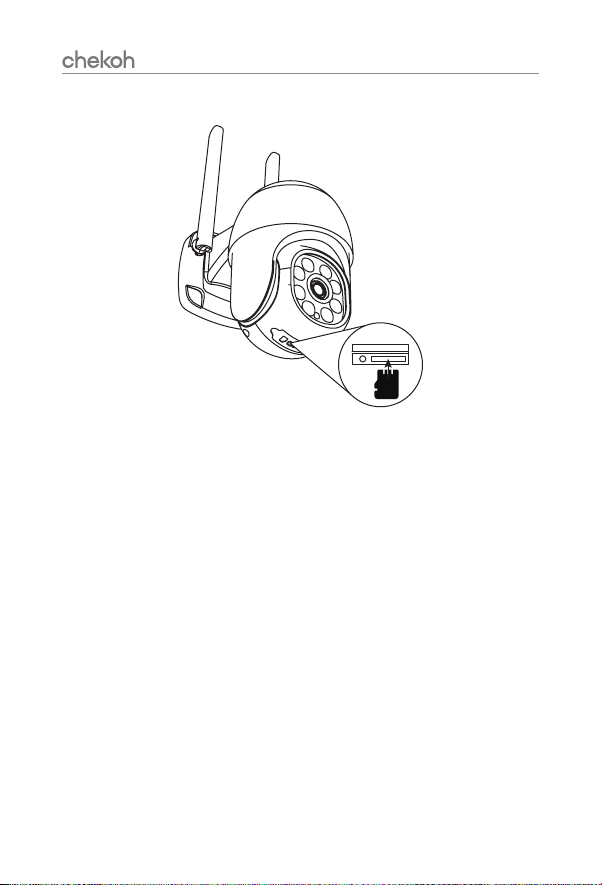
* Insert Micro SD Card (not included)
Tip: Video playback function requires a micro SD card inserted.
Open the bottom micro SD Card slot cover. Insert a micro SD card 8G, 16G and 32G
micro SD cards, the format must be FAT32.
64G, 128G micro SD cards, the format must be exFAT format.
Note: Please power off the camera when inserting the micro SD card.
Questo manuale è adatto per i seguenti modelli
2
Indice


