Cirrus IR Sentinel Manuale

Page | 1
IR Sentinel
User Manual and Setup
Guide

Page | 2
1 Contents
2 Overview .............................................................................................................................................. 3
2.1 Introduction ................................................................................................................................. 3
3 Assembly ............................................................................................................................................... 4
3.1 Desk top stand assembly .............................................................................................................. 4
3.2 Pedestal Assembly ........................................................................................................................ 6
4 Set Up .................................................................................................................................................... 9
4.1 Device Information .................................................................................................................... 11
4.2 Device Management .................................................................................................................. 12
4.2.1 Facial Recognition .............................................................................................................. 12
4.2.2 Temperature ....................................................................................................................... 17
4.2.3 System settings ................................................................................................................... 17
4.3 Face Database ............................................................................................................................. 24
4.4 Local Time and Date Settings .................................................................................................... 25

Page | 3
2 Overview
2.1 Introduction
Welcome to the IR Sentinel, Cirrus Solutions’ new touchless, innovative access control device with
advanced facial recognition and fever detection.
The IR Sentinel is supplied with the following parts as standard:
• Access control device with integrated Infra-red fever detection module
• Powers supply
• Small Allen key
• Desktop stand

Page | 4
3 Assembly
3.1 Desk top stand assembly
Complete the following steps to assemble the IR sentinel with desktop stand.
1. Unscrew and remove black collar from mounting column pole as shown below, ensure large
vinyl washer remains on the mounting column.
2. Thread the captive cables through the base aperture.

Page | 5
3. Fit the mounting column to the base.
4. Thread cables through black threaded collar and thread collar onto the mounting column.
5. Tighten clamping column and base together – ensure base is orientated such that the cable
entry is to the rear.
6. Position the IR Sentry ensuring the cables exit the base from the cable entry at the rear of the
stand.

Page | 6
7. Remove any protective wrapping and connect the power supply cable
8. Your IR Sentinel is now assembled and ready for use.
3.2 Pedestal Assembly
The pedestal stand is supplied in two boxes
1. Box A contains the polished steel column.
2. Box B Contains:
a. Polished steel base
b. Screw pack with
i. 6 x dome cross head bolts
ii. 5 x cross head countersunk bolts
c. Polished steel top plate with pre-drilled and countersunk holes
Complete the following steps to assemble the IR Sentinel with the pedestal stand.
1. Remove the pole, base, screw pack and top plate from the packaging.
2. Remove the outer protective bubble wrap from the pole.
3. For added protection the pole is wrapped in a protective film wrap, remove enough protective
wrap to expose each end of the pole.
4. Unwrap base plate and remove the protective film around the central aperture.
5. Invert the base and place on the pole end with 6 pre-drilled and tapped holes –Insert the 6
dome cross headed bolts a couple of turns as shown below.

Page | 7
6. Tighten with a cross head/ Phillips screwdriver – tighten opposites in order.
7. lay the assembled pole and base down and thread the power cord from bottom to top.
8. Stand the pole the up on its base.
9. Unscrew and remove black collar from mounting column as shown below.
10. Thread the captive cables through the polished steel top plate-ensure the polished side is
upward facing.
11. Thread the captive cables through the black mounting collar, thread the black collar back
onto the mounting column, tighten but not fully.
12. Connect power, contact closure and network cables.
13. Place the assembly on top of the pillar, line up predrilled holes of the polished steel top plate
with the pedestal mounting holes-check alignment of the IR Sentinel. When satisfied with
alignment fully tighten the black collar
14. Insert countersunk screws and tighten.
15. Remove any remaining protective film from the pedestal and base.

Page | 8
16. The IR Sentinel is now ready for use.

Page | 9
4 Set Up
When first powered on the IR Sentinel will display the following usage statement:
1. The working environment of the infrared thermal sensor is recommended to be used indoors.
Optimum room temperature is 15 to 30 deg C. Avoid facing high temperature objects such as
windows, air conditioners, radiators and fluorescent lamps. Outdoor use will be affected by many
adverse environments, such as, sunshine, rain, cold, hot air, snow, cold and heat source objects, etc.
2. The infrared thermal sensor works in a stable state after 5 minutes of start up and operation.
3. The product is a non-medical device. The temperature measurement function of this
equipment is only to assist rapid self-help rapid body screening. Once the abnormal body
temperature shows, it is recommended to use medical temperature measurement equipment to
measure and confirm again.
4. The circle button under the screen is the ultrasonic module, which is used to detect the most
effective temperature measurement distance of 50cm. when using, please make sure there is no
obstruction object within 1.5m in front of the screen. DO NOT touch or press with your hand or
fingers.” Tap “confirm” if this is understood and accepted. The IR Sentinel will then display the
default screen.
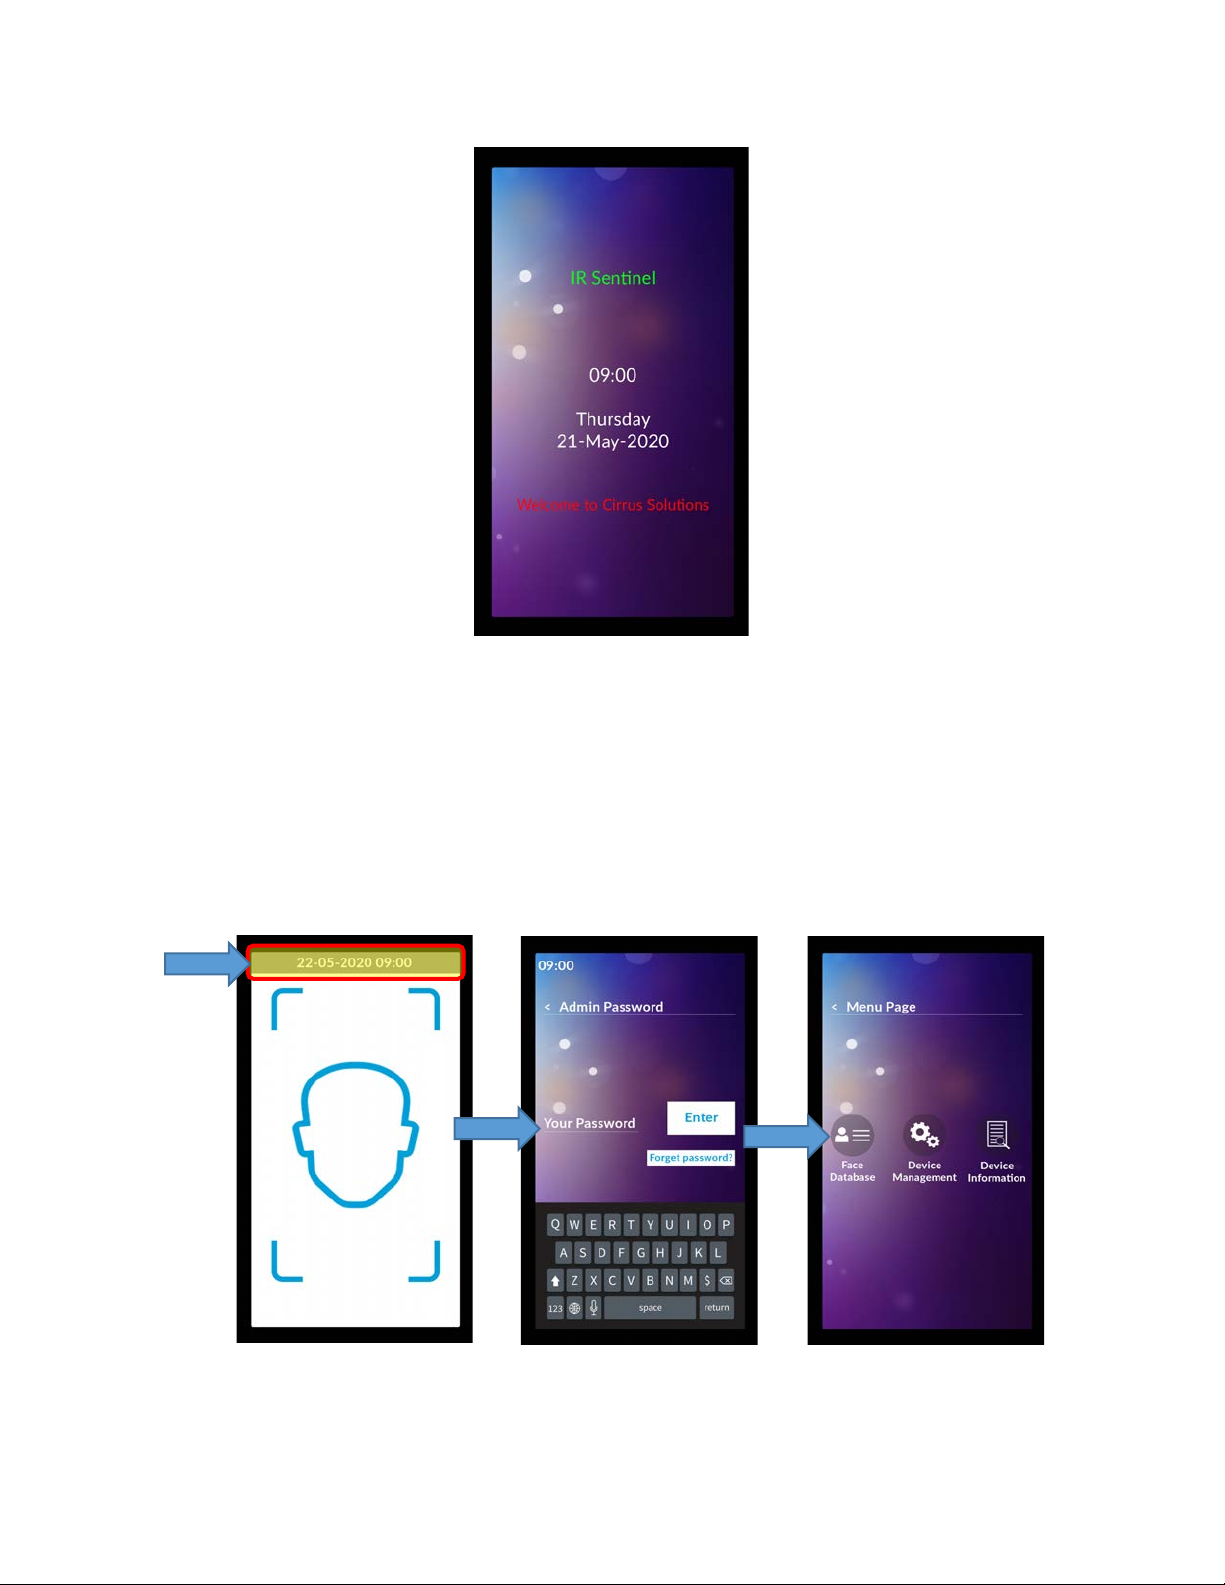
Page | 10
This screen may be customized to display organization specific messages, see section 4.2.3.8 of this
guide.
The following sections descried the various settings and customization options of the IR Sentinel.
To access the IR Sentinel’s top-level settings menu, tap the date and time bar at the top of the screen,
highlighted below.
Enter the admin password, then tap enter. The default password is 6666. This should be changed
during set up procedure, see section 4.2.3.5 of this guide.
Indice


