
CIRTEX T-RECS Foglio di istruzioni
T-RECS
INSTALLATION GUIDELINES
EROSION PROTECTION APPLICATIONS
1800 012 681 | WWW.CIRTEX.COM.AU
ISO: G 062 002 | DATE: MAY 2020 | VERSION 2
FOR FURTHER INFORMATION VISIT
WWW.CIRTEX.COM.AU
CHANNEL
INSTALLATION
DETAIL
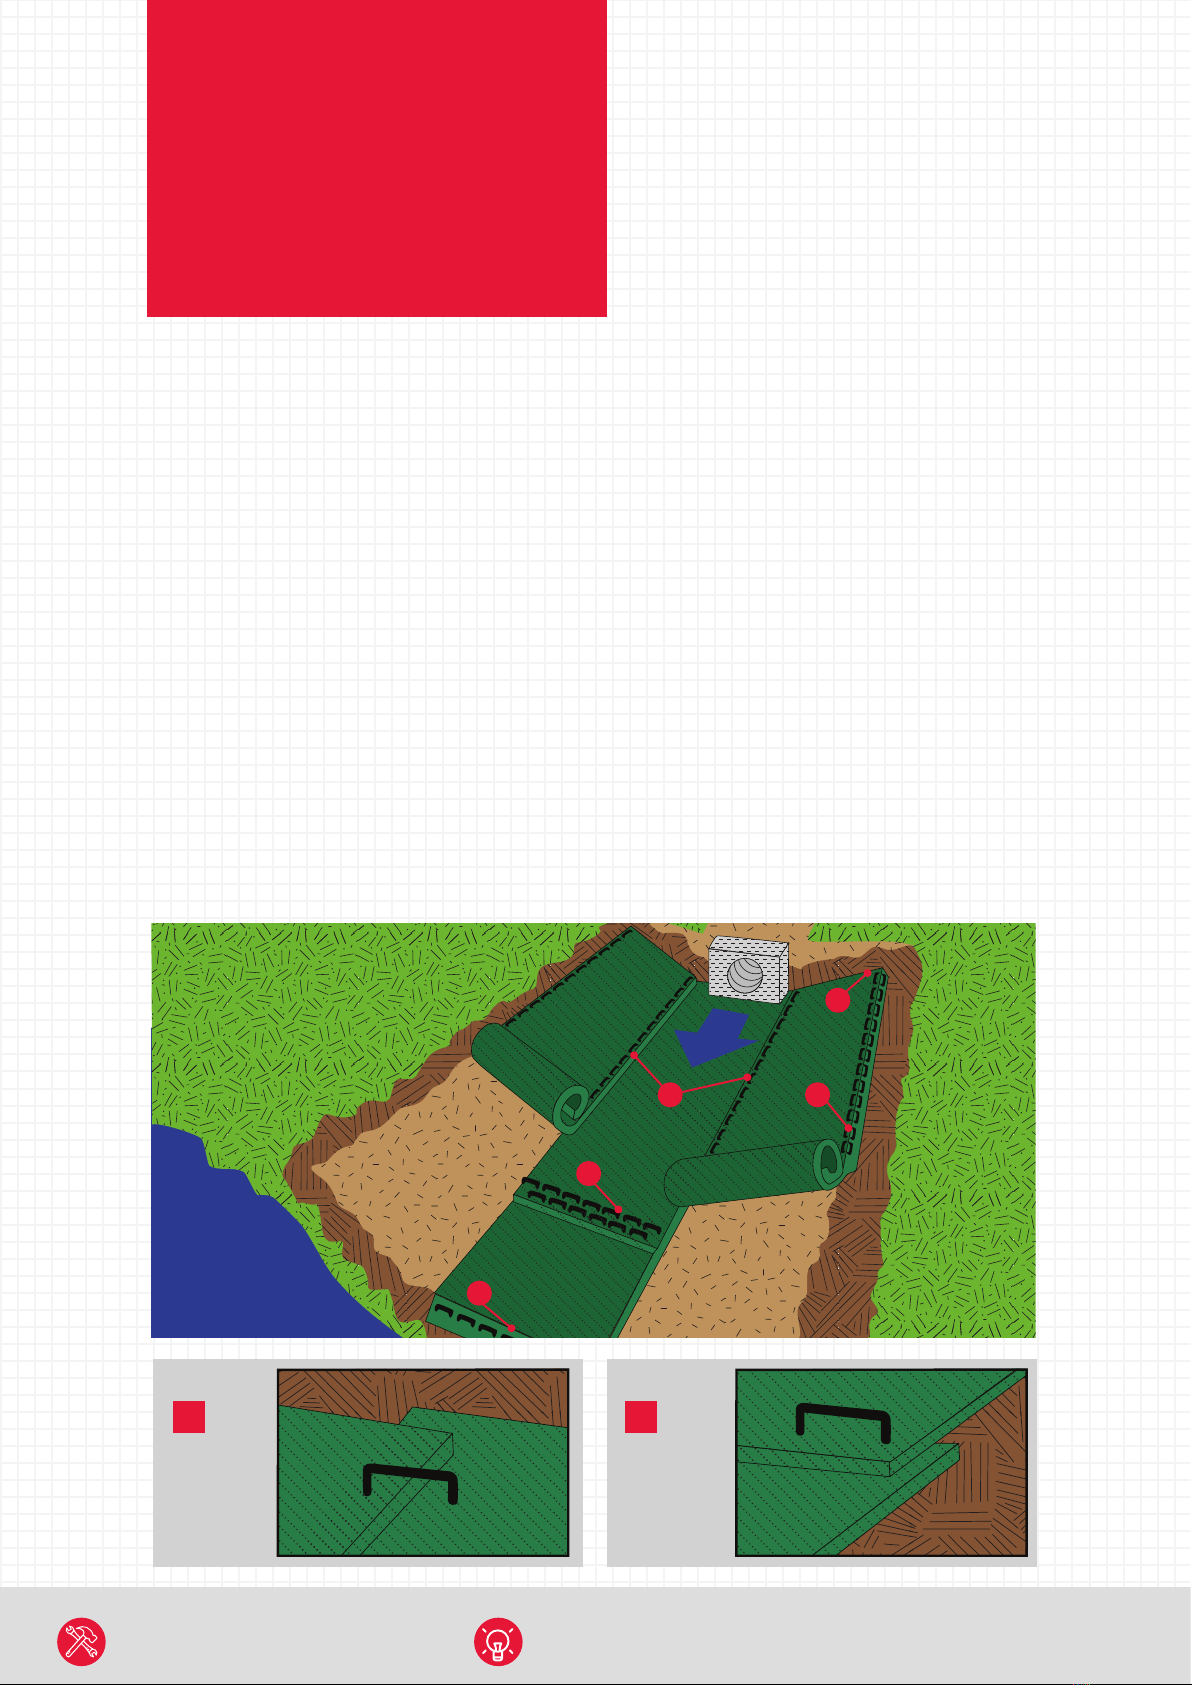
1. Dig a 150mm by 150mm trench both up-slope, down-slope, and along the top side of the
channel. Prepare the slope soil surface (raking, seeding and fertilising). Note, if used with
stormwater discharge, place the up-slope trench at the face of the discharge structure footer.
2. Begin by placing the centre blanket a minimum of 300mm down-slope of the up-slope trench.
Secure the blanket at the bottom of the trench with staples placed 300mm apart. Backll and
compact the trench. Apply seed, and fold the blanket over the soil, secure with a row of staples
placed 300mm apart across the width of the blanket (See Diagram A).
3. Roll the blanket vertically down the slope. Secure using the appropriate staple pattern below,
specied by slope. (See staple patterns).
4. Continue placing blankets up the slopes on both sides, with a minimum 100mm overlapping
(Diagram B), and securing each blanket in the beginning trench (Diagram A).
5. Additional horizontal blankets can be joined using a minimum 100mm overlapping or shingle
style in the direction of water ow. Connect the blankets by placing staples approximately
100mm apart across the width of the blankets (Diagram C).
6. For maximum performance a check slot should be placed at 8m-12m intervals. Place a row of
staples 100mm apart along the entire width of the channel. A second row should be placed
below in a staggered pattern (Diagram D).
7. The end of the blanket must be secured in a 150mm by 150mm trench by a row of staples placed
at 300mm intervals (Diagram E).
8. At the top edge of the side slope, fasten the blanket in a 150mm by 150mm trench with staples
placed at 300mm intervals. Install an additional row of staples 300mm down slope of the trench
along the width of the fabric (Diagram F).
C
F
A
FLOW
B C
DIAGRAM DIAGRAM
B
E
These guidelines are
recommendations only.
When hydroseed hydrosoil is to be used, we recommend to apply
this directly into the growing media rst, then apply the T-Recs.
TIP

TO ORDER CALL US ON
1800 012 681
1. Dig a 150mm by 150mm trench both up-slope and down-slope of the area the matting is to be
applied. Prepare the slope soil surface (raking, seeding and fertilising).
2. Begin by placing the blanket a minimum of 300mm down-slope of the up-slope trench. Secure
the blanket at the bottom of the trench with staples placed 300mm apart. Backll and compact
the trench. Apply seed, and fold the blanket over soil, secure with a row of staples placed 300mm
apart across the width of the blanket (See Diagram A).
3. Roll the blanket vertically down the slope. Secure using the appropriate staple pattern below,
specied by slope (See staple patterns).
4. Parallel blankets must be overlapped by a minimum of 100mm and secured with a row of staples
approximately 1m apart (See Diagram B).
5. Additional vertical blankets can be joined using a minimum 100mm overlapping or shingle
style (See diagrams C) in the direction of the water ow. Connect the blankets by placing staples
approximately 300mm apart across the width of the blankets.
6. For maximum performance a check slot should be placed at 8m-12m intervals. Place a row of
staples 100mm apart along the entire width of the slope. A second row should be placed 100mm
below in a staggered pattern. Then continue with general installation (See diagrams D).
7. The end of blanket must be secured in a 150mm by 150mm trench with a row of staples placed at
300mm intervals (Diagram E).
SLOPE
INSTALLATION
DETAIL
FLOW
D F
DIAGRAM DIAGRAM
B
A
D
C
D
These guidelines are
recommendations only.
Installations on steep slopes will
require the correct safety gear.
WARNING
FOR FURTHER INFORMATION VISIT
WWW.CIRTEX.COM.AU
T-RECS
MATTING
T-RECS
MATTING
COMPACTED
BACKFILL
15.24cm x
15.24cm
TRENCH
STEP 1. STEP 2.
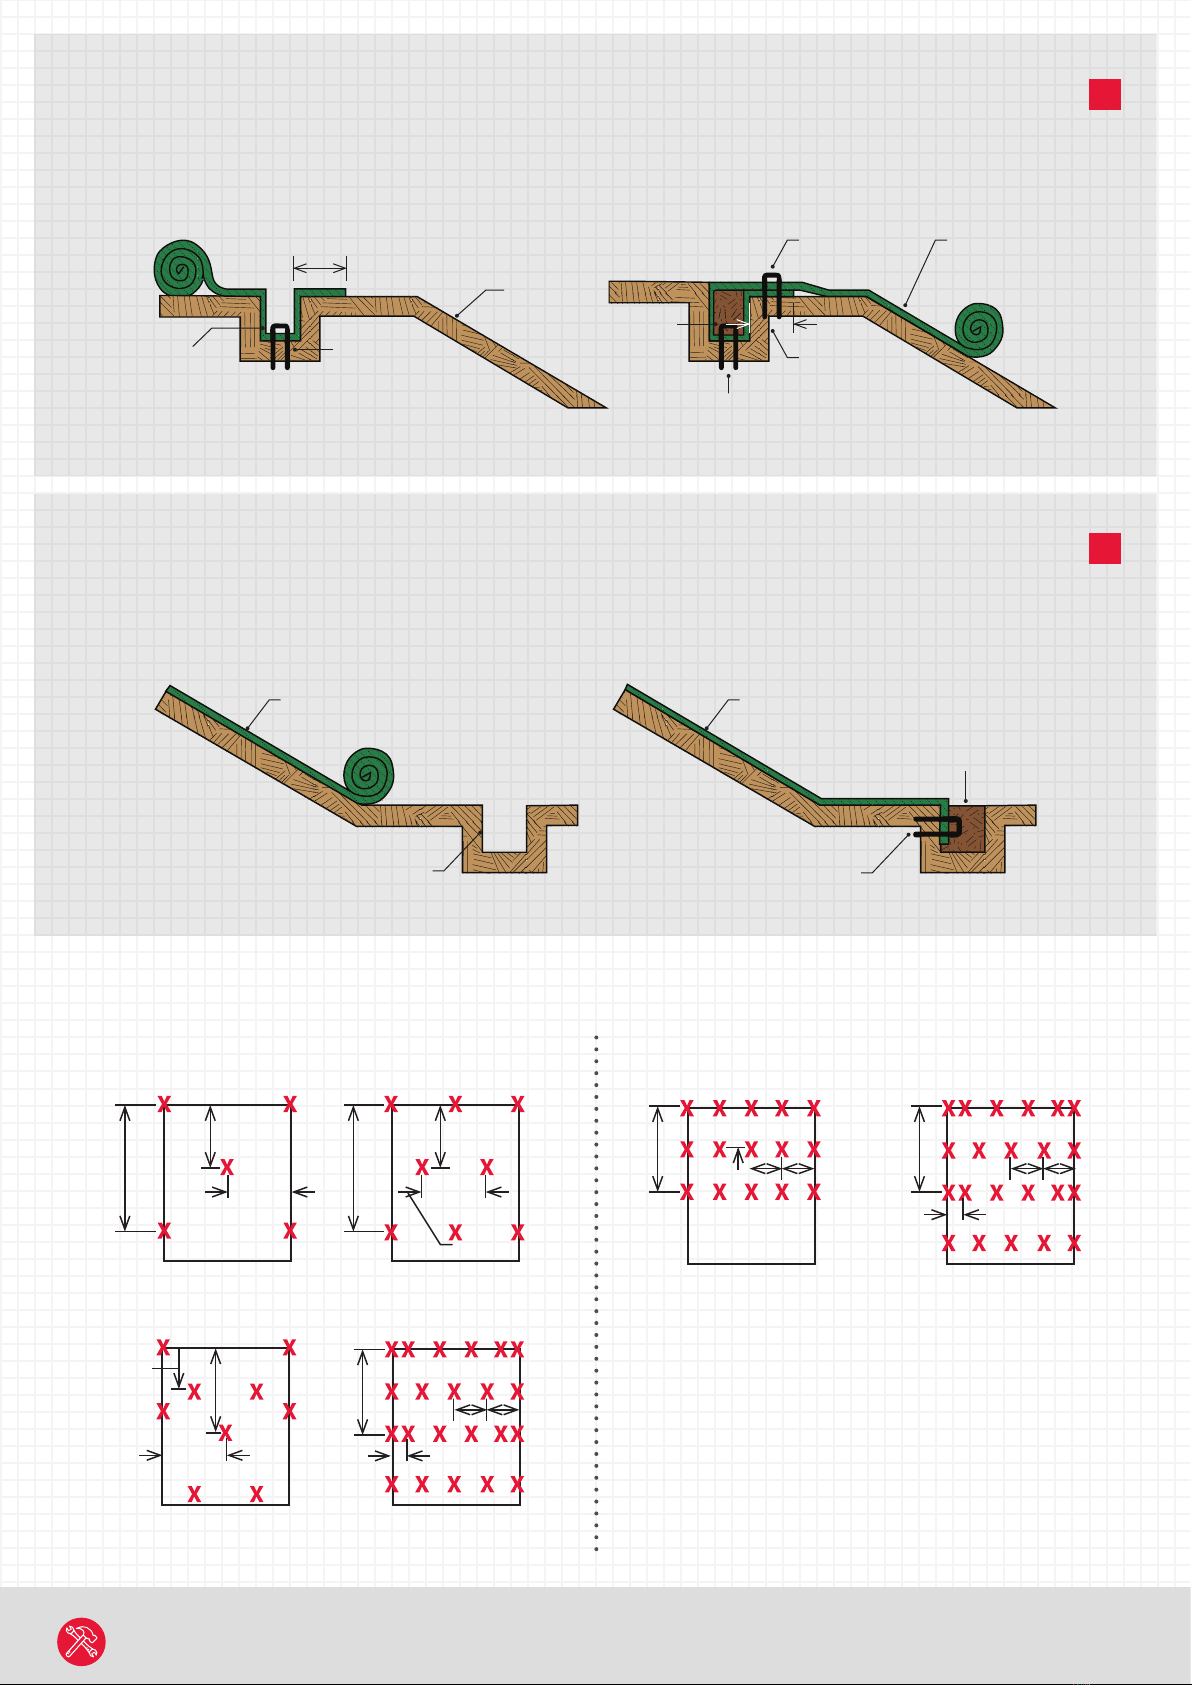
DOWN-SLOPE TRENCH INSTALLATION DETAIL
STAPLE PATTERNS
SLOPES CHANNELS
150mm x
150mm
TRENCH
300mm MINIMUM OVERLAP
GRADED
DISTURBED
SLOPE
STAPLES TO BE
PLACED 300mm
ON CENTRE
STAPLES TO BE
PLACED 300mm
ON CENTRE
STAPLES TO BE
PLACED 300mm
ON CENTRE
300mm
MINIMUM
OVERLAP
COMPACTED
BACKFILL
T-RECS
MATTING
UP-SLOPE TRENCH INSTALLATION DETAIL
STEP 1. STEP 2.
STAPLES TO BE
PLACED 30.48cm
ON CENTRE
1.46 staple ⁄ m
2:1 SLOPES
914mm
610mm
1.22m
0.58 staple ⁄ m
4:1 SLOPES
914mm
914mm
1.83m
3.2 staple ⁄ m
1:1 SLOPES
254mm
508mm
1.22m
2.93 staple ⁄ m
MED to HIGH FLOW
CHANNELS
508mm
610mm
1.22m
3.18 staple ⁄ m
HIGH FLOW CHANNELS
254mm
508mm
1.22m
1.0 staple ⁄ m
3:1 SLOPES
914mm
457mm
914mm
1.83m
A
DIAGRAM
E
DIAGRAM

Head Office
100 Silverwater Rd, Silverwater NSW
2128, Australia
Postal Address
PO Box 7138, Silverwater NSW 1811,
Australia
1800 012 681
WWW.CIRTEX.COM.AU
CIRTEX INDUSTRIES PTY LTD
DISCLAIMER
All information provided in this document is correct to
the best knowledge Cirtex Industries Pty Ltd (“Cirtex”)
and is given out in good faith. While every eort has
been made to ensure the accuracy of the information
in this catalogue, Cirtex assumes no responsibility
for errors or omissions or for any consequences of
reliance on this catalogue. The information presented
herein is intended only as a general guide to the use
of such products and no responsibility or liability is
accepted by Cirtex for any loss or damage however
arising, which results either directly or indirectly
from use of such information. Cirtex has a policy of
continuous development therefore information and
product specications may change without notice.This
document is subject to copyright in its entirety. The
contents may not be reproduced in any form, either
in whole or in part, without written permission from
Cirtex. Copyright 2021. All rights reserved.
Indice
Altri manuali CIRTEX Attrezzature agricole


