Clarke MD1000 Guida alla risoluzione dei problemi
OPERATION & MAINTENANCE
INSTRUCTIONS
05/08
METAL DETECTOR
MODEL NO: MD1000
PART NO: 4501200

2
INTRODUCTION
Thank you for purchasing this CLARKE Metal Detector.
Before you try to use this product, read this manual and follow the instructions
carefully. In doing so you will ensure your safety and the safety of others
around you.
You can also look forward to a purchase that gives you long and satisfactory
service.
GUARANTEE
This product is guaranteed against faulty manufacture for a period of 12
months from the date of purchase. Please keep your receipt which will be
required as proof of purchase.
This guarantee is invalid if the product is found to have been abused or
tampered with in any way, or not used for the purpose for which it was
intended.
Faulty goods should be returned to their place of purchase, no product can
be returned to us without prior permission.
This guarantee does not effect your statutory rights.
IN THE BOX
• 1 x Instruction Manual
• 1 x Control Unit
• 1 x Search Coil
SPECIFICATIONS
Model Number .............................................. MD1000
Power Supply: ................................................ 6 x AA Batteries
Detection: ...................................................... All metal / Discrimination
Sensitivity, Max Depth: .................................. <100 mm

3
CODE OF ETHICS
When metal detecting, here are some basic rules that you should follow.
• Always get consent of the landowner before you search any site.
• Respect the rights and property of others.
• Observe all national and local laws when you use the metal
detector.
• Do not destroy historical and archaeological treasures. If you do not
know what you have found, contact your local museum or historical
society.
• Fill any holes that you have made and leave the land as you found
it.
• Only use the metal detector where safe to do so.
• Dispose of any rubbish that you find in a safe area, do not leave it for
somebody else to find.
• Always follow procedures relating to finds as laid down in the
Treasure Act 1996.

4
OVERVIEW
stem locking nut
Headphones socket
Control panel and
Search coil
Handle
Battery compartment
meter
Search coil
adjustment nut
5
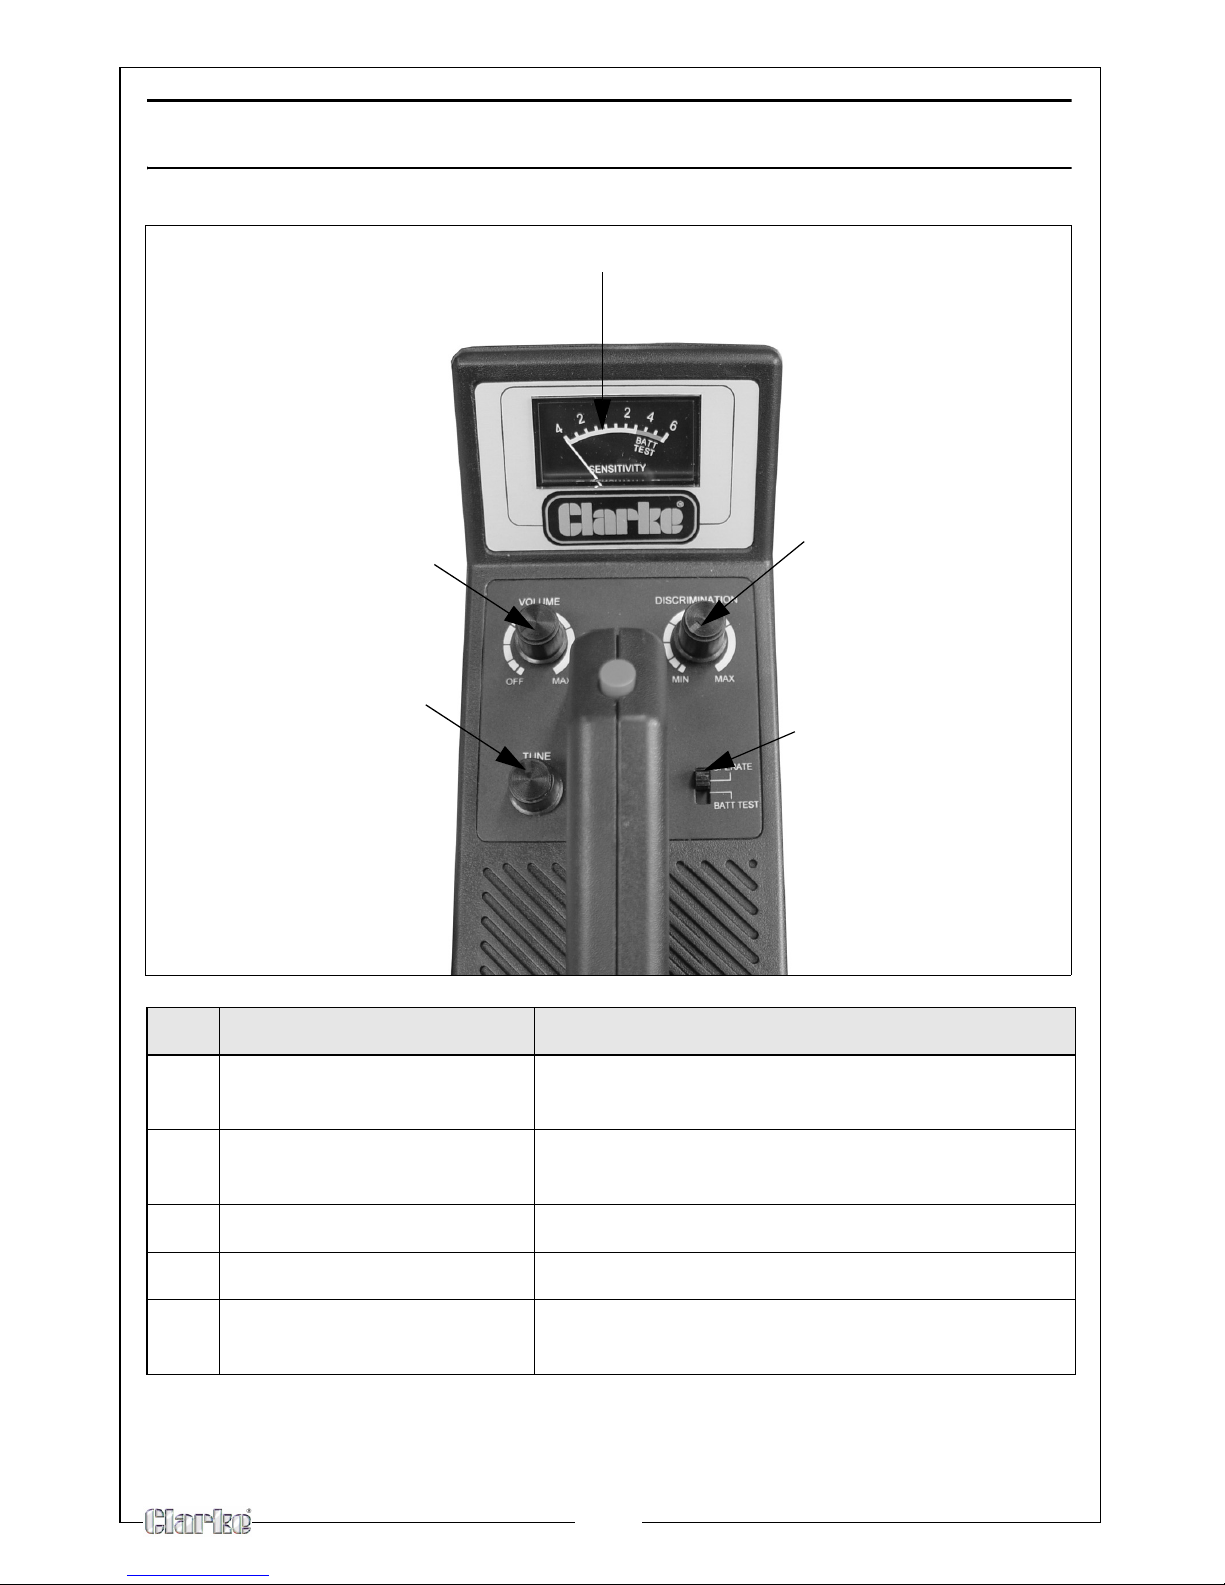
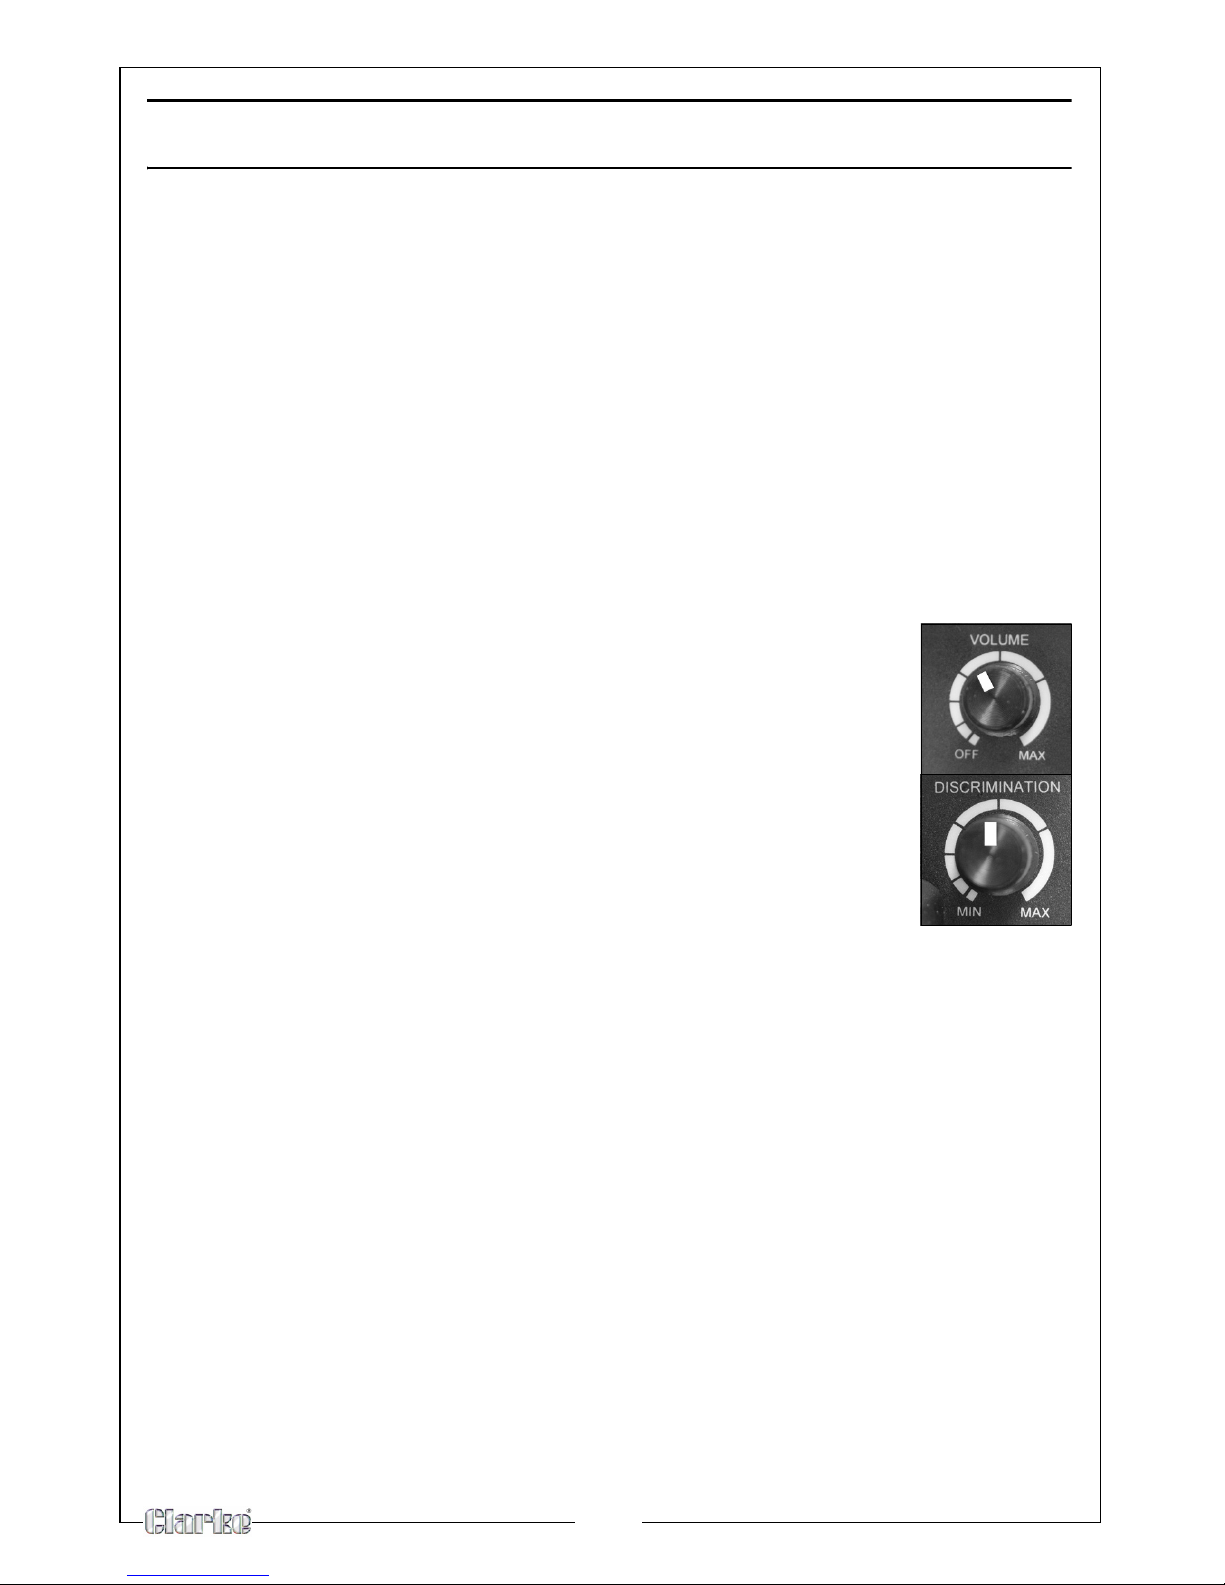
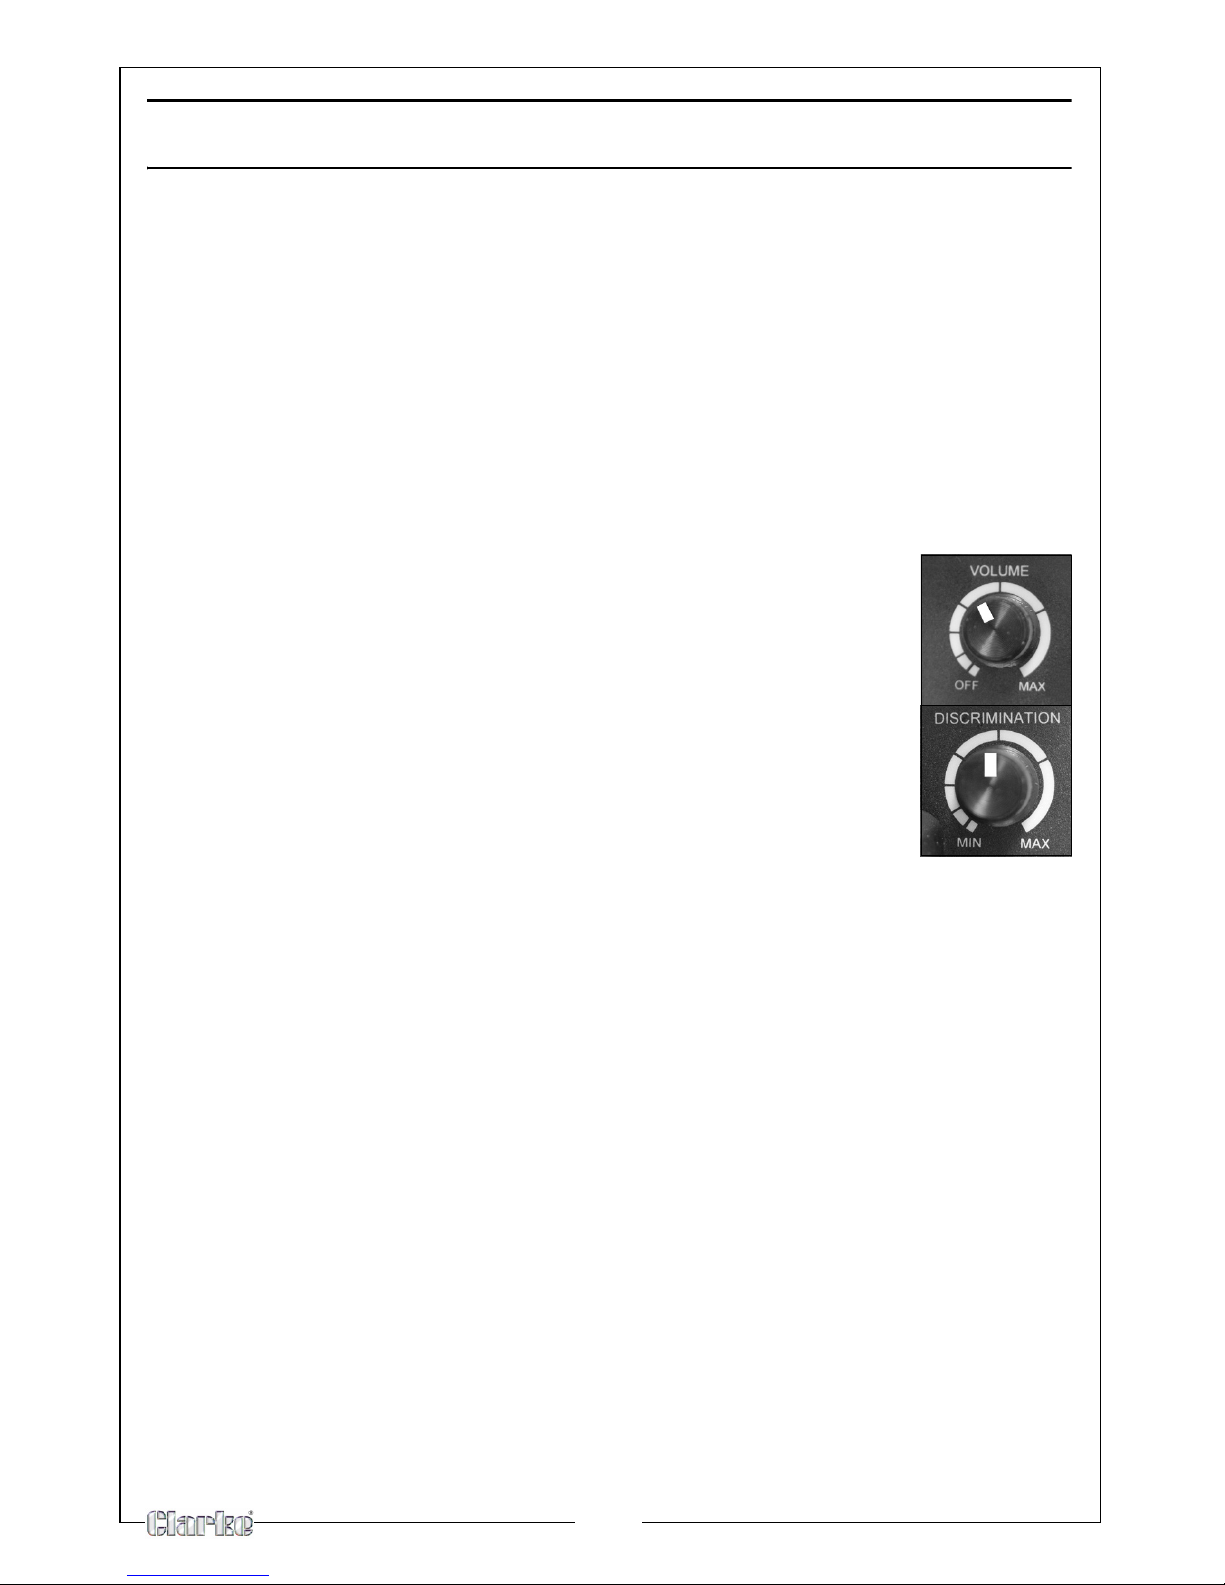
THE CONTROL PANEL
NO NAME DESCRIPTION
1 View meter and pointer Shows the probable type of metal being
detected
2 Discrimination Allows you to adjust the detectors ability to
distinguish between different types of metal
3 Control switch Select from Operate and Battery Test
4 Tuning Allows you to tune the detector
5 Volume Used to adjust the volume level
1
2
3
4
5
6
PREPARATION
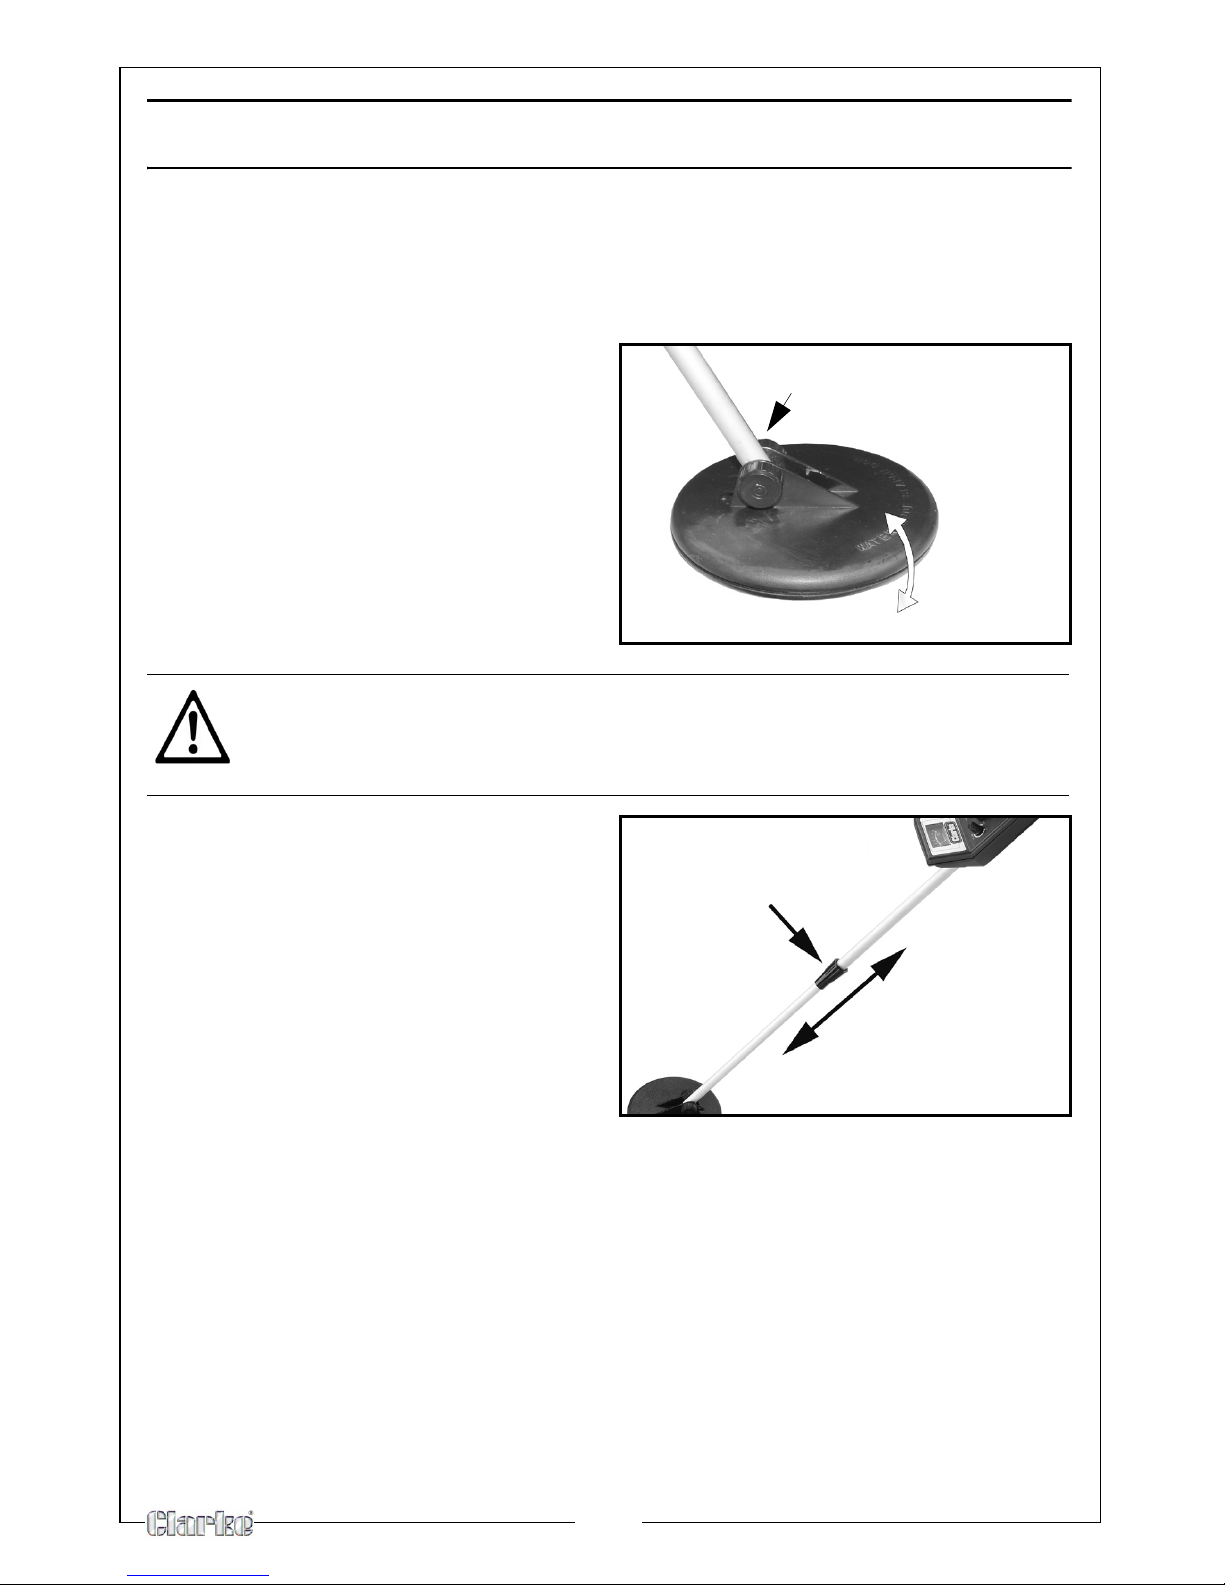
ASSEMBLING THE METAL DETECTOR
Assembling your detector is easy and requires no special tools. Just follow
these steps.
1. Loosen the search coil adjustment
nut.
2. Adjust the search coil to the
desired angle.
• The search coil should be
parallel with the ground.
3. Tighten the search coil adjustment
nut.
4. Turn the stem locking nut
clockwise until it loosens.
5. Lengthen or shorten the stem so
when you stand upright with the
detector in your hand, the search
coil is about 2.5-5 cm above the
ground with your arm relaxed at
your side.
6. Turn the stem's lock nut counter-
clockwise to lock it in place.
CAUTION: DO NOT OVERTIGHTEN THE SEARCH COIL OR USE TOOLS
SUCH AS PLIERS TO TIGHTEN IT.
search coil adjustment
nut.
stem locking nut
7
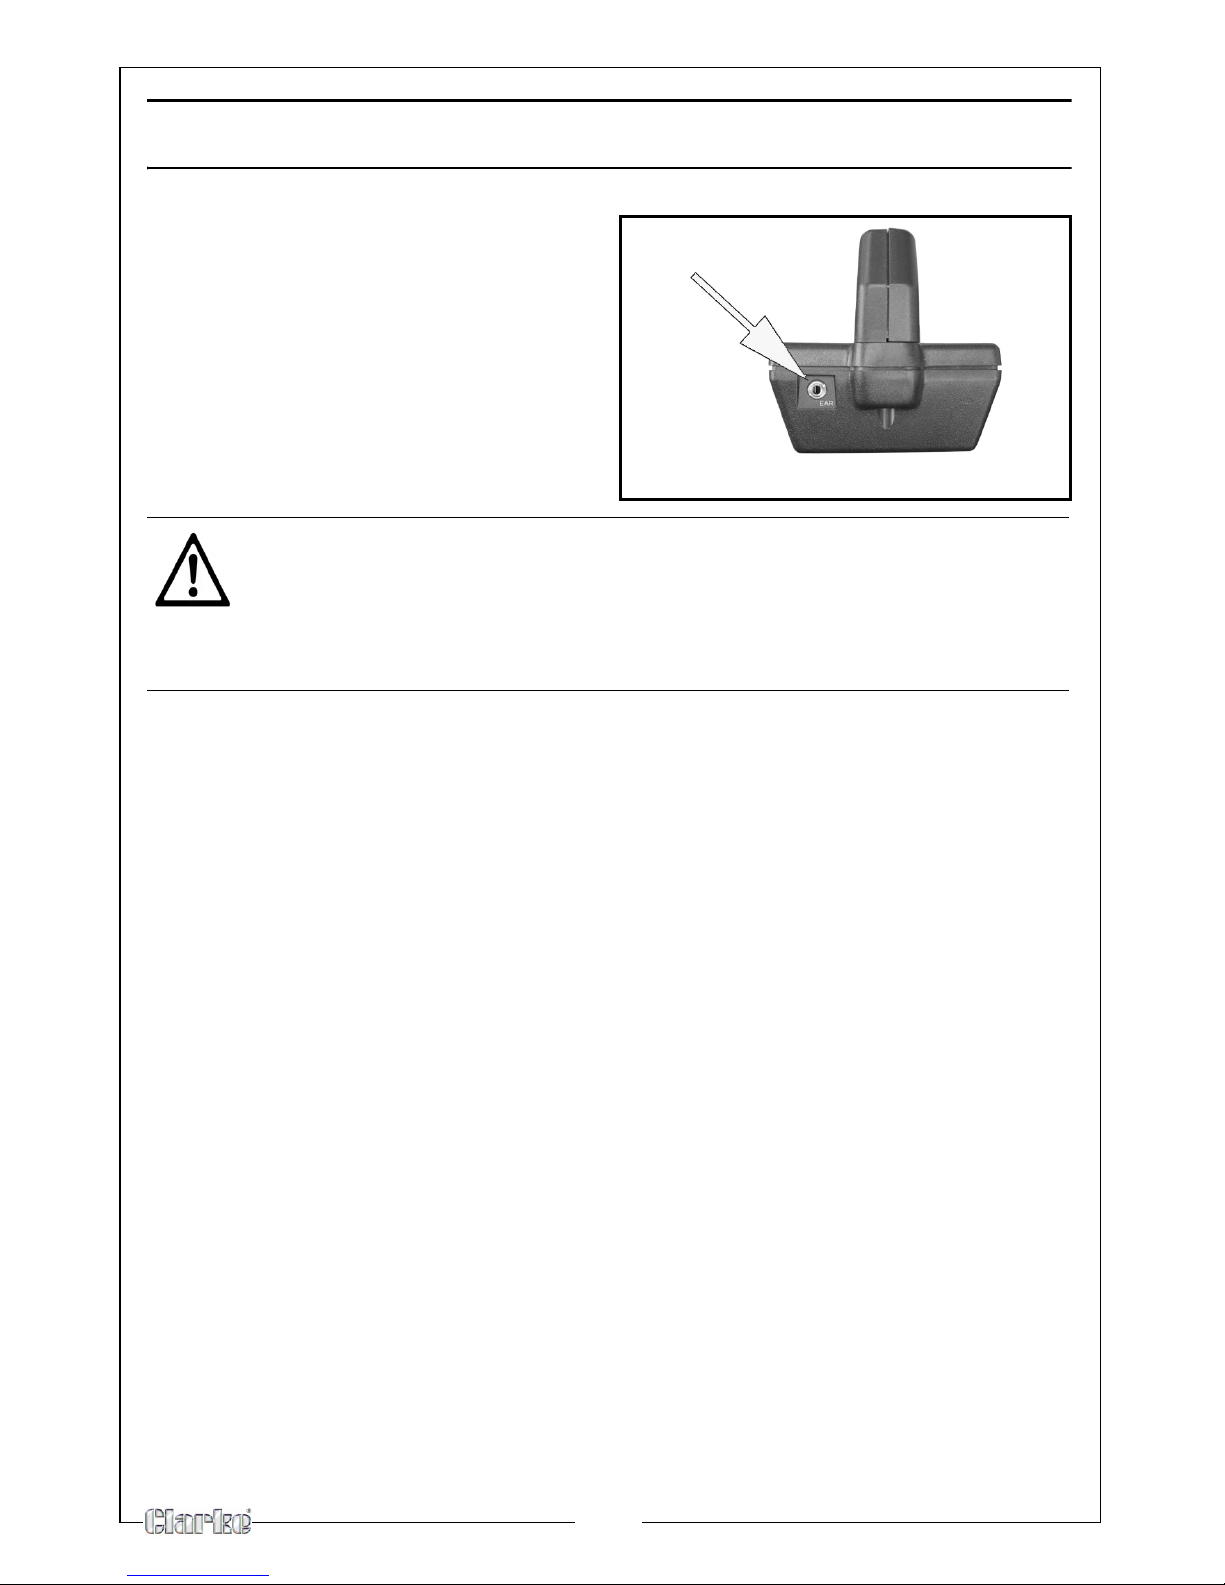
USING HEADPHONES
1. Insert your headphones into the
headphone socket on the control
housing.
Connecting headphones
automatically disconnects the
loudspeaker. Headphones also give
slightly more sensitivity as they reduce
external noise.
CAUTION: SET THE VOLUME TO THE LOWEST LEVEL BEFORE PUTTING ON
THE HEADPHONES. THEN ADJUST THE VOLUME TO A COMFORTABLE
LEVEL.
CAUTION: DO NOT WEAR HEADPHONES WHEN OPERATING NEAR
ROADS OR TRAFFIC.
8
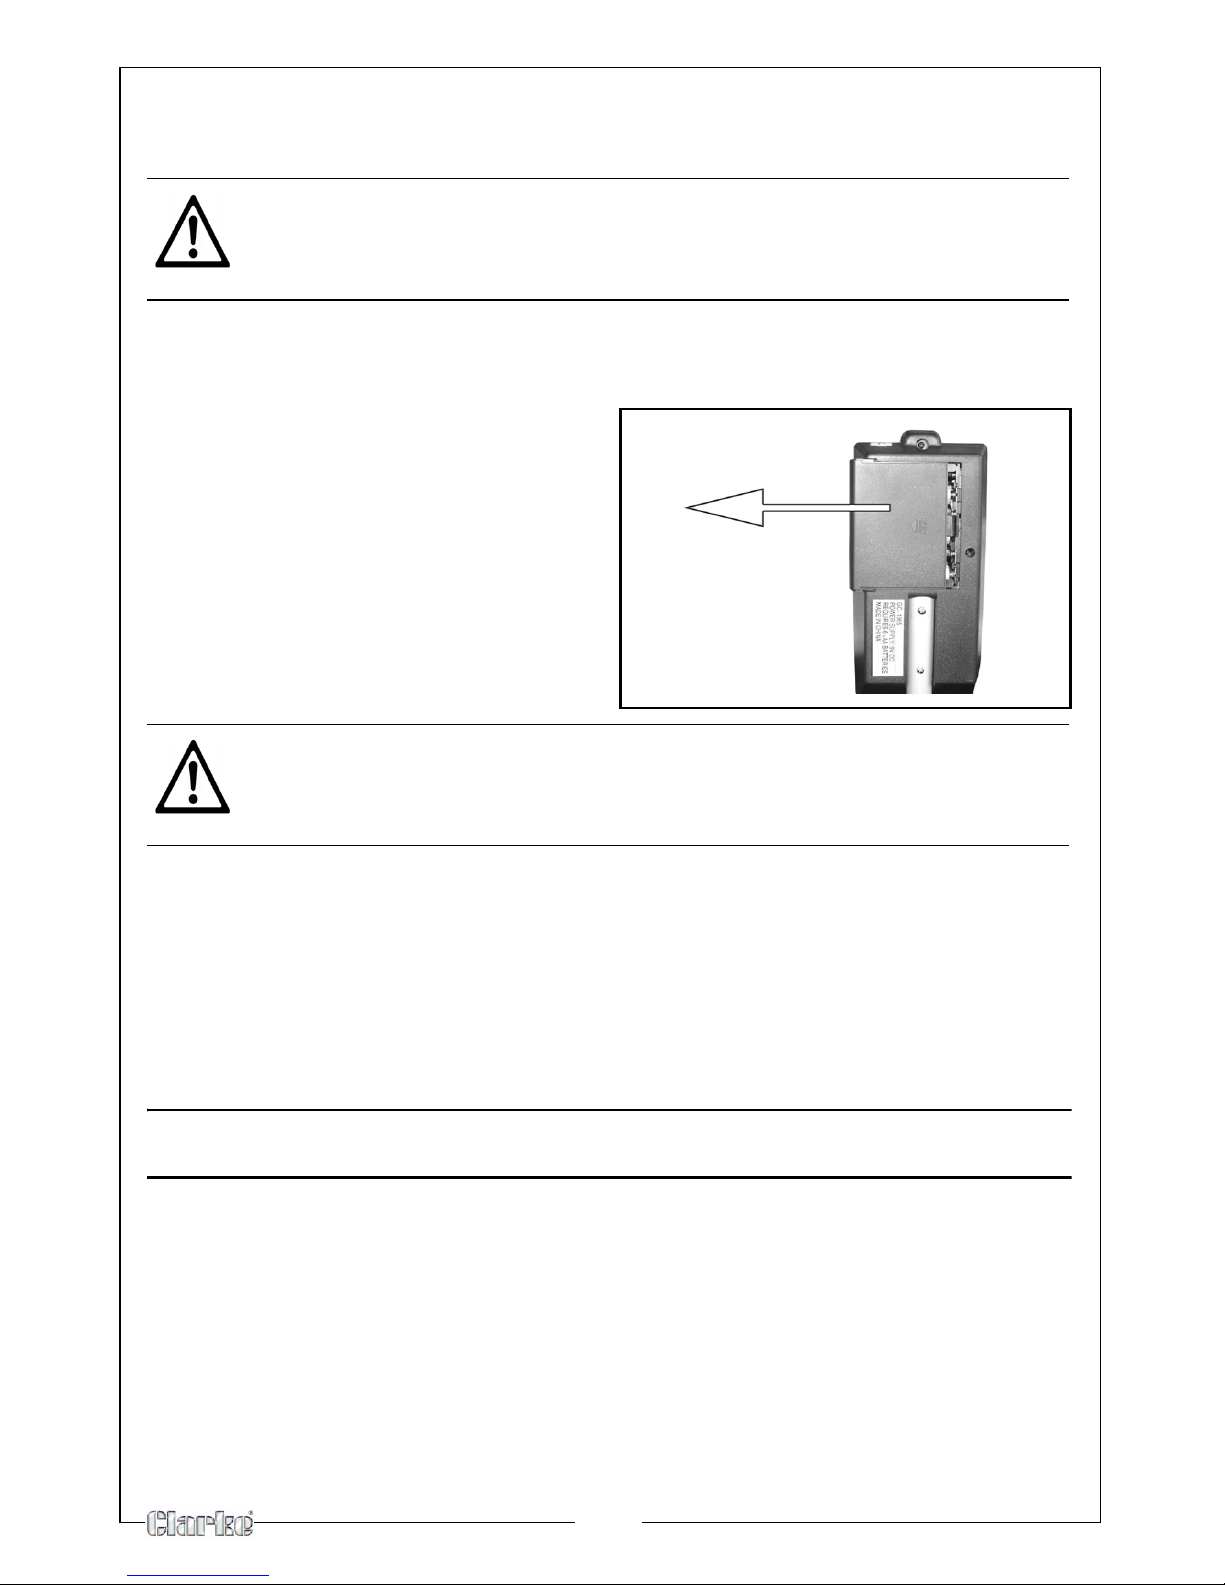
INSTALLING BATTERIES
Your detector requires 6 x AA alkaline batteries (not supplied).
1. If the detector is on, turn MODE to OFF.
• When you turn the volume switch to OFF
2. Slide the battery compartment
cover off in the direction of the
arrow.
3. Place 6 x AA batteries into the
battery compartment, matching
the polarity symbols (+ and -)
marked inside.
4. Replace the compartment cover.
• Change all batteries at the same time.
• You can extend battery life by using headphones, which require less
power than the built-in speaker. See “Using Headphones.”
• If the LOW BATT indicator lights during normal use or the detector
does not function properly, replace the batteries. If it still does not
function properly, you might need to reset the detector.
TESTING THE BATTERIES
1. Set the control switch to BATT TEST.
2. Press the Red button on the handle
• If the pointer stops in the green area on the meter the batteries are
OK to use.
• If not, replace all 6 AA batteries as shown above.
CAUTION: USE ONLY FRESH BATTERIES .
CAUTION: DO NOT MIX OLD AND NEW BATTERIES OR DIFFERENT TYPES OF
BATTERIES.
CAUTION: IF YOU DO NOT PLAN TO USE THE DETECTOR FOR A WEEK OR
MORE, REMOVE THE BATTERIES. BATTERIES CAN LEAK CHEMICALS THAT
CAN DESTROY ELECTRONIC PARTS.
9
OPERATION
Your metal detector distinguishes between ferrous and non-ferrous metals.
Ferrous metals contain iron, while non-ferrous metals such as gold, silver,
copper, platinum, aluminum, lead, and zinc do not.
When the detector senses a metallic object, the meter reading changes.
HOW TO TURN THE DETECTOR ON OR OFF
1. Hold the detector in a comfortable position, and set the control switch to
the OPERATE position.
2. Rotate the volume dial away from the OFF position.
TUNING THE DETECTOR
Follow these steps to tune the detector.
1. Rotate VOLUME to the 11 o'clock position.
2. Set DISCRIMINATION to its mid-point.
3. Hold the search coil at least 30 cm away from the ground
and any metal object, hold down the red button on the
handle and slowly rotate TUNE until the meter pointer resets
at or near 0.
NOTE: Press the red button on the handle at any time during operation
to automatically return the pointer to 0.
10
TESTING AND USING THE DETECTOR
To learn how the detector reacts to different metals, you should test it before
you use it for the first time. You can test the detector indoors or outdoors.
INDOOR TESTING
1. Remove any watches, rings, or other metal jewellery you are wearing, then
place the detector on a wooden or plastic table.
2. Adjust the search coil's angle so the flat part faces the ceiling.
NOTE: Never test the detector on a floor inside a building. Most buildings
have metal of some kind in the floor, which might interfere with
the objects you are testing or mask the signal completely.
3. Rotate VOLUME to the 11 o'clock position.
4. Set DISCRIMINATION to its mid-point.
5. Move a sample of the material you want the detector to
find (such as a gold ring or a coin) about 5cm above the
search coil.
NOTE:
• The search coil will not detect anything without motion. You must
move the object since you are not sweeping with the detector at
this time.
• If you are using a coin, the detector detects it more easily if you hold
it so a flat side (not the edge) is parallel with the flat side of the
search coil.
• If the detector detects the material, the pointer moves to FERROUS
or NON-FERROUS while the detector determines the type of metal it
is detecting. If it detects non-ferrous metal, it also sounds a tone.
• If the detector does not detect the material, check the battery
level. You might need to fine-tune the detector See “FINE-TUNING
THE DETECTOR” on page 12.
Indice
Altri manuali Clarke Rilevatore di metalli


Manuali Rilevatore di metalli popolari di altre marche


Steinberg Systems
Steinberg Systems SBS-MD-12 Manuale utente

GOLDEN MASK
GOLDEN MASK 5 Manuale utente

Grizzly
Grizzly YM 203 Manuale utente

Fisher Research Labs
Fisher Research Labs 1280-X Aquanaut Manuale utente

Treasure Cove
Treasure Cove Vibra-Probe 560 Manuale utente

Accurate Locators
Accurate Locators XL16 IMAGER Manuale utente