Cleco LiveWire 937240PT Manuale utente


Copyright © Apex Tool Group, 2019
No part of this document may be reproduced in any way or in any form, in whole or in part, or in a natural or
machine-readable language, or transmitted on electronic, mechanical, optical, or other media, without the
express permission of the Apex Tool Group.
Disclaimer
Apex Tool Group reserves the right to modify, supplement, or improve this document or the product without
prior notice.
Trademark
Cleco is a registered trademark of Apex Brands, Inc.
Apex Tool Group GmbH
Industriestraße 1
73463 Westhausen
Germany
01
1. 2.
02

Contents
EN
1 Product Description............................................................................... 5
2 Requirements........................................................................................ 5
3 Installation............................................................................................. 5
4 Activating Scanner ................................................................................ 5
5 Technical Data ...................................................................................... 6
6 Ambient conditions................................................................................ 6
7 Troubleshooting .................................................................................... 7
8 Cleaning Instruction .............................................................................. 7
DE
1 Produktbeschreibung ............................................................................ 8
2 Voraussetzung ...................................................................................... 8
3 Installation............................................................................................. 8
4 Scanner aktivieren ................................................................................ 8
5 Technische Daten ................................................................................. 9
6 Umgebungsbedingungen...................................................................... 9
7 Fehlersuche ........................................................................................ 10
8 Reinigungshinweise ............................................................................ 10
ES
1 Descripción del producto .................................................................... 11
2 Requisito ............................................................................................. 11
3 Instalación........................................................................................... 11
4 Activar escáner ................................................................................... 11
5 Datos técnicos .................................................................................... 12
6 Condiciones ambientales.................................................................... 12
7 Localización de fallas.......................................................................... 13
8 Instrucciones de limpieza.................................................................... 13

1 Product Description
The scanner allows you to scan the following barcodes:
2 Requirements
3 Installation
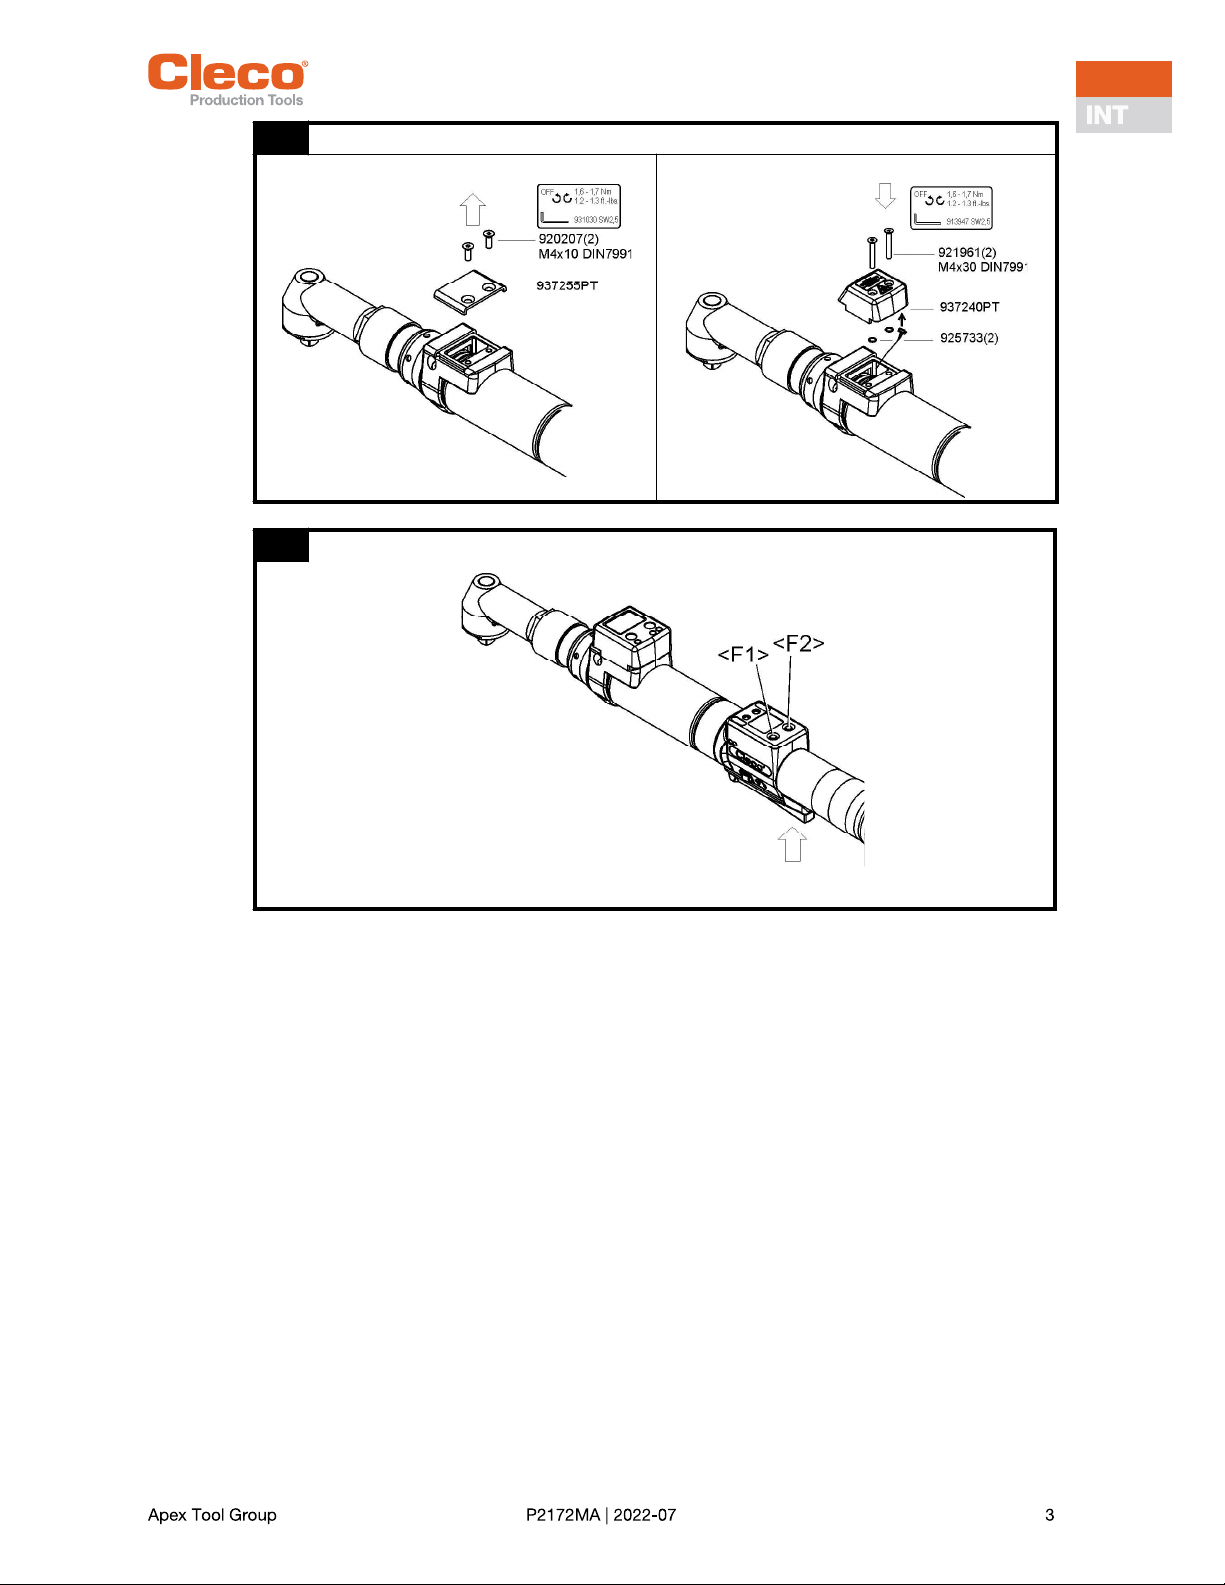
Installation see figure 01, page 3.
4 Activating Scanner
Position of the <F2> and <Start> buttons is shown in figure 02, page 3.
1. Activate LCD-display by pushing <Start>.
2. Use <F2> to select menu items and confirm with <Start>.
3. Type in Pin 254:
Press <F2> until 2. Confirm with <Start>.
Press <F2> until 5. Confirm with <Start>.
Press <F2> until 4. Confirm with <Start>.
Chinese 2of5 CODE-93 ISBT-128 Trioptic CODE-39
Codabar Discrete 2of5 MSI UCC/EAN-128
CODE-11 EAN-13 RSS-14 UPC-A
CODE-128 EAN-8 RSS-Expanded UPC-E
CODE-39 Interleaved 2of5 RSS-Limited UPC-E1
Danger from laser beams.
Eye injury from class 2 laser beam.
Do not look into the laser beam window when the laser is on.
Repair any damage immediately.
Damage of the optical components can cause laser radiation.
Modifications to the barcode scanner and procedures not outlined in this instruction manual are strictly
prohibited.
Take defective devices out of operation immediately.
937240PT 961621PT
Tool LiveWireTM Serie 17BPYPB/47BAYPB
Exception 47BAYPB70a
Firmware tool 937240PT: from S169251-131.3
onwards
961621PT: from S169251-149
onwards
Before installation of Module, switch off the tool or the control unit.
>Main
Admin
strati
Platfo
None
Pin
000

4. Select the desired accessory depending on the software version.
5. Confirm with <Start>.
The Scanner is now activated. No further settings are necessary.
5 Technical Data
6 Ambient conditions
EMC limit class A (immunity for industrial areas)
Use only indoors
Recommendation: ESD workplace during installation
Plattf
937240
Barcod
Plattf
961621
Barcod
Features 937240PT 961621PT
Scan rate 104 scans/sec. ±12 (bidirectional)
Scan angle 47° ±3 standard / 35° ±3 reduced
Crash resistance 2000 G
Ambient light 107.640 lux
Decode zone
(typical)
4 mil
5 mil
7,5 mil
10 mil
100%
15 mil
20 mil
40 mil
55 mil
2,54 13,97 cm
3,18 20,32 cm
3,81 33,66 cm
3,81 44,45 cm
3,81 59,69 cm
3,81 74,93 cm
4,45 90,17 cm
a 101,60 cm
1) 139,70 cm
a depending on the width of the barcode
Laser safety Laser class 2, IEC 60825 Laser class 1, IEC 60825
EMI/RFI FCC Part 15 Class B, EN 55024/CISPR 22, AS 3548, VCCI
Barcode types UPC-A, UPC-E, UPC-E1, Trioptic Code39, Interleaved 2of5, Discrete 2of5,
Chinese 2of5, Codabar, MSI barcode types, EAN8, EAN13, EAN128,
ISBT128, Code11, Code39, Code93, Code128, RSS14, RSS Limited, RSS
Expanded barcode types.
Standards 21CFR1040.10 and 1040.11
Except for discrepancies as for laser note no. 50, July 26, 2001.
EN60825-1:1994+ A1:2002 +A2:2001
IEC60825-1:1993+A1:1997+A2:2001

7 Troubleshooting
8 Cleaning Instruction
The window must be free of dirt. The barcode is not read if the window is dirty.
Clean it regularlyor immediately, if it becomes dirtyusing a damp cloth and a conventional window
cleaner.
Do not use acidic cleaners or acetone. These could dissolve the plastic.
Problem Possible cause Action
Scanner doesnt work Scanner not activated by software See Activating Scanner
Power outlet not active Press start button
Check the system
Cable is not plugged into the carrier
board
Check plug connection
Scanner defect Change Scanner
Cable defect Change cable

1 Produktbeschreibung
Der Scanner ermöglicht das Scannen folgender Barcodes:
2 Voraussetzung
3 Installation
Installation siehe Abbildung 01, Seite 3.
4 Scanner aktivieren
Position der Tasten <F2> und <Start> ist in Abbildung 02, Seite 3 dargestellt.
1. LCD-Anzeige mit <Start> aktivieren.
2. Mit <F2> folgende Menüpunkte auswählen und mit <Start> bestätigen:
3. Pin 254 eingeben:
<F2> drücken bis 2, mit <Start> bestätigen.
<F2> drücken bis 5, mit <Start> bestätigen.
<F2> drücken bis 4, mit <Start> bestätigen.
Chinese 2of5 CODE-93 ISBT-128 Trioptic CODE-39
Codabar Discrete 2of5 MSI UCC/EAN-128
CODE-11 EAN-13 RSS-14 UPC-A
CODE-128 EAN-8 RSS-Expanded UPC-E
CODE-39 Interleaved 2of5 RSS-Limited UPC-E1
Gefahr durch Laserstrahlen.
Schädigung der Augen durch Laserstrahl Klasse 2.
Bei aktiviertem Laserstrahl nicht in das Fenster des Laserstrahls blicken.
Schäden umgehend beheben.
Beschädigungen der optischen Bauteile können Laserstrahlung verursachen.
Änderungen am Barcode-Scanner, sowie Vorgehensweisen, die nicht in dieser Bedienungsanleitung
beschrieben werden, sind strengstens untersagt.
Defekte Geräte sofort außer Betrieb nehmen.
937240PT 961621PT
Werkzeug LiveWireTM Serie 17BPYPB/47BAYPB
Ausnahme von 47BAYPB70a
Firmware Werkzeug S169251-131.3 S169251-149
Vor Installation Modul, Werkzeug außer Betrieb nehmen bzw. die Steuerung ausschalten.
>Haupt
Verwal
tung
Plattf
Kein
Pin
000

4. Gewünschtes Zubehör je nach Software Version anwählen:
5. Mit <Start> bestätigen.
Der Scanner ist jetzt aktiviert. Es sind keine weiteren Einstellungen notwendig.
5 Technische Daten
6 Umgebungsbedingungen
EMV-Grenzwertklasse A (Störfestigkeit für Industriebereiche)
Nur im Innenbereich verwenden
Empfehlung: ESD Arbeitsplatz bei Installation
Plattf
937240
Barcod
Plattf
961621
Barcod
Merkmale 937240PT 961621PT
Scanrate 104 Scans/Sek. ±12 (bidirektional)
Scanwinkel 47° ±3 Standard / 35° ±3 reduziert
Sturzfestigkeit 2000 G
Umgebungslicht 107.640 Lux
Decodierzone
(typisch)
4 mil
5 mil
7,5 mil
10 mil
100%
15 mil
20 mil
40 mil
55 mil
2,54 13,97 cm
3,18 20,32 cm
3,81 33,66 cm
3,81 44,45 cm
3,81 59,69 cm
3,81 74,93 cm
4,45 90,17 cm
a 101,60 cm
1) 139,70 cm
a abhängig von Breite des Barcodes
Lasersicherheit Laserklasse 2, IEC 60825 Laserklasse 1, IEC 60825
EMI/RFI FCC Teil 15 Klasse B, EN 55024/CISPR 22, AS 3548, VCCI
Barcode-Typen UPC-A, UPC-E, UPC-E1, Trioptic Code39, Interleaved 2of5, Discrete 2of5,
Chinese 2of5, Codabar, MSI barcode types, EAN8, EAN13, EAN128,
ISBT128, Code11, Code39, Code93, Code128, RSS14, RSS Limited, RSS
Expanded barcode types.
Normen 21CFR1040.10 und 1040.11
außer für Abweichungen entsprechend Laser Hinweis Nr. 50, Juli 26, 2001.
EN60825-1:1994+ A1:2002 +A2:2001
IEC60825-1:1993+A1:1997+A2:2001
7 Fehlersuche
8 Reinigungshinweise
Das Fenster muss sauber sein. Bei verschmutztem Fenster wird der Barcode nicht gelesen.
Regelmäßig, oder bei Verschmutzung sofort, mit einem feuchten Tuch und einem handelsüblichen
Scheibenreinigungsmittel reinigen.
Keine säurehaltigen Reiniger oder Aceton verwenden. Diese können den Kunststoff lösen
Problem Mögliche Ursache Maßnahme
Scanner funktioniert nicht Scanner durch Software nicht akti-
viert
Siehe Scanner aktivieren
Spannungsversorgung nicht aktiv Startschalter am Werkzeug
betätigen
Kabel nicht richtig an Trägerplatine
eingesteckt
Steckverbindung prüfen
Scanner defekt Scanner tauschen
Kabel defekt Kabel tauschen
Questo manuale è adatto per i seguenti modelli
1
Indice
Lingue:


