CO/Tech DB5013-UK Manuale utente
ENGLISH
SVENSKA
NORSKSUOMI
Important!
Read the entire instruction manual carefully
and make sure that you fully understand
it before you use the equipment. Keep the
manual for future reference.
Viktig information:
Läs hela bruksanvisningen noggrant och
försäkra dig om att du har förstått den innan
du använder utrustningen. Spara manualen
för framtida bruk.
Viktig informasjon:
Les disse anvisningene nøye og forsikre deg
om at du forstår dem før du tar produktet i bruk.
Ta vare på anvisningene for seinere bruk.
Tärkeää tietoa:
Lue nämä ohjeet huolellisesti ja varmista
että olet ymmärtänyt ne, ennen kuin alat
käyttää laitetta. Säilytä ohjeet myöhempää
tarvetta varten.
Art.no Model
18-4456 DB5013-UK
31-5053 DB5013
Snow blower
Snöslunga
Snøfreser
Lumilinko
Ver. 20140428
Original instructions
Bruksanvisning i original
Original bruksanvisning
Alkuperäinen käyttöohje

2

3
ENGLISH
Snow blower
Art.no 18-4456 Model DB5013-UK
31-5053 DB5013
Please read theentire instruction manual before using theproduct and save it for future reference.
We reserve theright for any errors in text or images and any necessary changes made to technical data.
If you have any questions regarding technical problems please contact our Customer Services.
Safety
Double insulated for additional protection
Conforms to relevant safety standards.
Read the entire instruction manual before use.
General hazard warning symbol. Specific safety precautions are required by the user.
Keep children and pets a safe distance away from the machine.
Beware of flying objects. Make sure onlookers are kept at a safe distance.
This product should be disposed of in accordance with local regulations. If you are unsure how to
proceed, contact your local authority.
Never insert your hands into the discharge chute.
Danger – rotating feed screw.
Danger – risk of electric shock (machines with electric start). Never start the machine from
themains (230V) under rainy conditions.

4
ENGLISH
General safety precautions
• The snow blower must not be used by anyone (including children) suffering from physical or mental
impairment. Thisproduct should not be used by anyone that has not read theinstruction manual unless they
have been instructed in its use by someone who will take responsibility for their safety.
• Read carefully through theinstructions and inform yourself about all controls and functions and how to
correctly use thesnow blower.
• Never let children or others who do not have theadequate knowledge of these instructions use
thesnowblower. Localordinances can have restrictions regarding theuser’sage.
• Remember that theuser/driver is always ultimately responsible for accidents caused by use of thesnow blower.
• Be careful not to fall or slip, especially when thesnow blower is in reverse.
• Never use thesnow blower whilst under theinfluence of drugs, alcohol or medicine. Donot use theproduct
if you are tired orsick.
• The snow blower must only be repaired by qualified staff and only using original parts.
• Never use accessories not approved for use by themanufacturer or theretailer where thesnow blower
waspurchased.
Preparations
• Make sure that thearea being cleared is free from loose and foreign objects.
• Remove all service tools/keys before switching thesnow blower on. Aspanner or other tool which has been
left on arotating part of theblower could result in aninjury.
• Make sure that thecontrols are easily manoeuvrable and that they return to their original position when released.
• Pre-plan thearea to be cleared in order to avoid personal or property damage by flying objects.
• Never use thesnow blower without proper clothing. Useappropriate footwear with solid traction especially
in slippery conditions.
• Under no circumstances may maintenance and service be performed when theengine is on
(unlessotherwise instructed in theinstruction manual).
• Always use safety glasses or avisor when operating or carrying out maintenance on thesnow blower.
• Let thesnow blower adjust to outdoor temperatures before use.
Electrical safety
• If using anextension lead, make sure that it is designed for outdoor use.
• Never modify anextension lead or its plug in any way. Unmodified plugs and suitable wall sockets minimize
therisk of electric shocks.
• Do not abuse themains lead. Neveruse themains lead or extension lead to pull or jerk theplug from
thewall socket. Keepelectrical leads away from heat, oil, sharp edges and moving parts. Neveruse
adamaged mains or extension lead.
• Never use thesnow blower if its on/off switch is damaged or malfunctioning. Makesure that it is repaired by
aqualified electrician before usingit.
Safety precautions during use
• Make sure to keep hands and feet away from rotating parts. Avoidthedischarge chute.
• The snow blower cannot be used for any other purpose than for removing snow.
• Be careful when using on gravel paths, pavement and roads. Beattentive for possible hazards and
nearbytraffic. Avoidsteep inclines.
• Never point thedischarge chute towards public roads or traffic.
• Stop theengine immediately if you have struck aforeign object. Inspect themachine carefully after such
anincident. Donot reuse thesnow blower until any possible damage has been repaired.
• If thesnow blower begins to vibrate abnormally, turn off theengine immediately and find thecause.
Vibrations are normally asign of problems.

5
ENGLISH
• Existing safety features may not be disconnected or made inoperative.
• Never use thesnow blower in thevicinity of fences, cars, windows, inclines, etc. without properly
adjustingthedischarge chute.
• Always keep children and pets away from theareas to be cleared ofsnow.
• Never overload theblower by driving it toofast.
• Be very careful when reversing. Alwayslook behind you for possible obstacles.
• Never point thechute towards onlookers. Neverlet anyone stand in front of thesnow blower.
• Never use thesnow blower in conditions of inadequate visibility or improper lighting.
• Make sure you are well-balanced and have afirm grip on thehandles while using thesnow blower.
• Never use thesnow blower on roofs.
Safety instructions specific to snow blowers
• Read theinstruction manual thoroughly. Familiarize yourself with all thecontrols and functions of thesnow
blower before attempting to use it. Itis very important that you know how to switch thesnow blower on and
off and how to disengage thedrive.
• Make sure that thedischarge chute is fitted correctly and undamaged and that all thecontrols move
smoothly and return to their original positions when released. Ifany part of thesnow blower is missing or
damaged, it must be repaired/replaced before use.
• Pre-plan thearea to be cleared in order to avoid personal or property damage by flying objects.
• Always unplug themains lead before clearing snow blockages from thefeed screw, impeller housing or
discharge chute. Note:Use asuitable tool such as aplastic or wooden stick - never yourhands.
• Never leave thesnow blower unsupervised when it is connected to anelectrical socket. Unplugthemains
lead and remove theignition key before leaving thesnow blower.
• All safety devices and guards must be in place and working properly before thesnow blower isused.
• If themains and/or extension lead is damaged in any way during use, stop work immediately and unplug it.
Havethelead replaced or repaired before continuing work.
• If any part of thesnow blower has been replaced, all thefunctions of thesnow blower should be tested
before snow clearing is commenced.
• Always unplug themains lead and remove theignition key before relocating the snow blower.
• Always respect local regulations regarding noise and exhaust emissions. Showconsideration for your
neighbours and choose areasonable time to beginwork.
Contents
The snow blower comes with thefollowing accessories:
• 3 cableclips
• Chute crank, upper and lowerpart
• Key

6
ENGLISH
3
4
9
8
7
6
5
2
1
Buttons and functions
1. [On/off] switch
2. Key
3. Chute
4. Rubber bladed feedscrew
5. Feed screw starting handle
6. Handle
7. Chute direction crank
8. Carrying handle
9. Drive beltcover
7
ENGLISH
Assembly
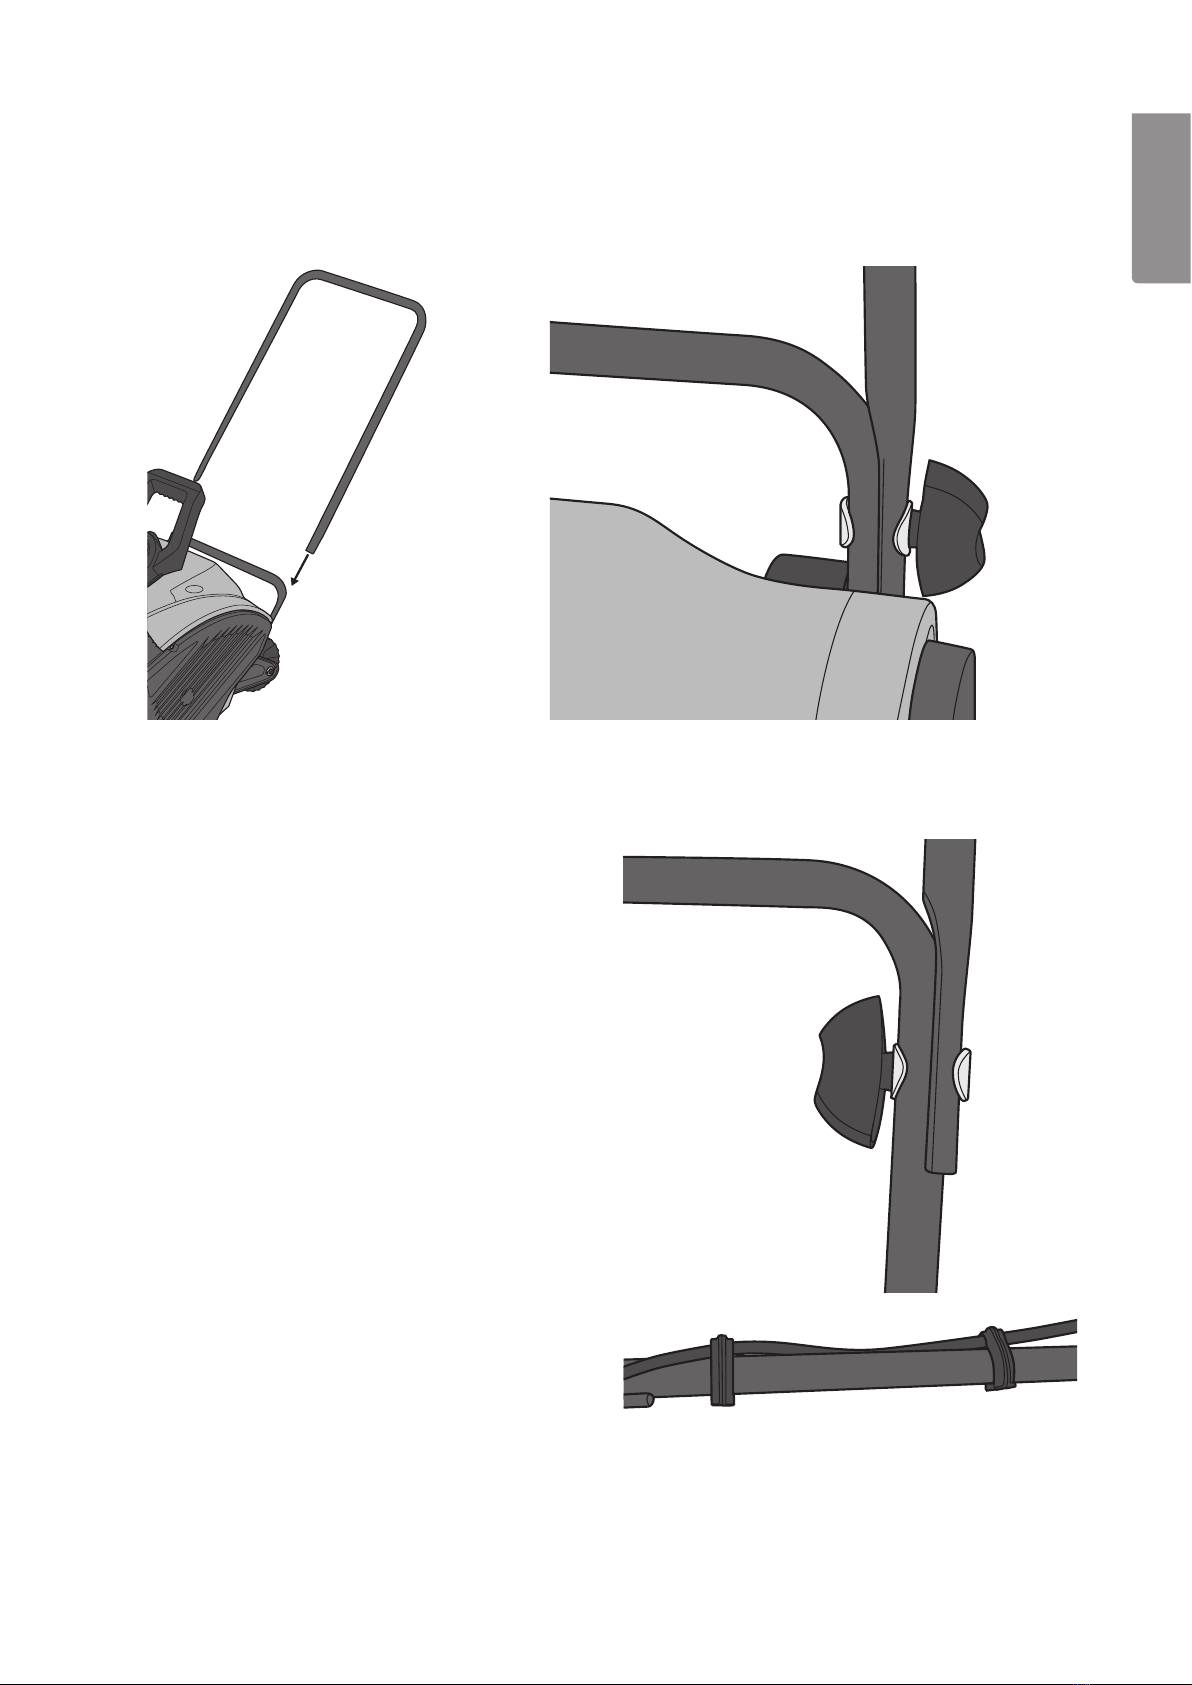
Handle
Join theparts of thehandle together using the4 bolts, wing nuts and washers. Ifthenuts and bolts were
fastened to thehandles upon delivery, they will need to be removed first.
2. Hold theupper part of thehandle so that its
holes line up with theholes in themiddle part.
Fastenthem together using bolts, washers and
wing nuts. Thewing nuts should be on theinside
of thehandle.
3. Fasten thecable to thehandle using two of the
included cableclips.
1. Hold themiddle part of thehandle so that theholes line up with theholes in thelower part. Fastenthem
together using bolts, washers and wing nuts. Thewing nuts should be on theoutside of thehandle.
8
ENGLISH
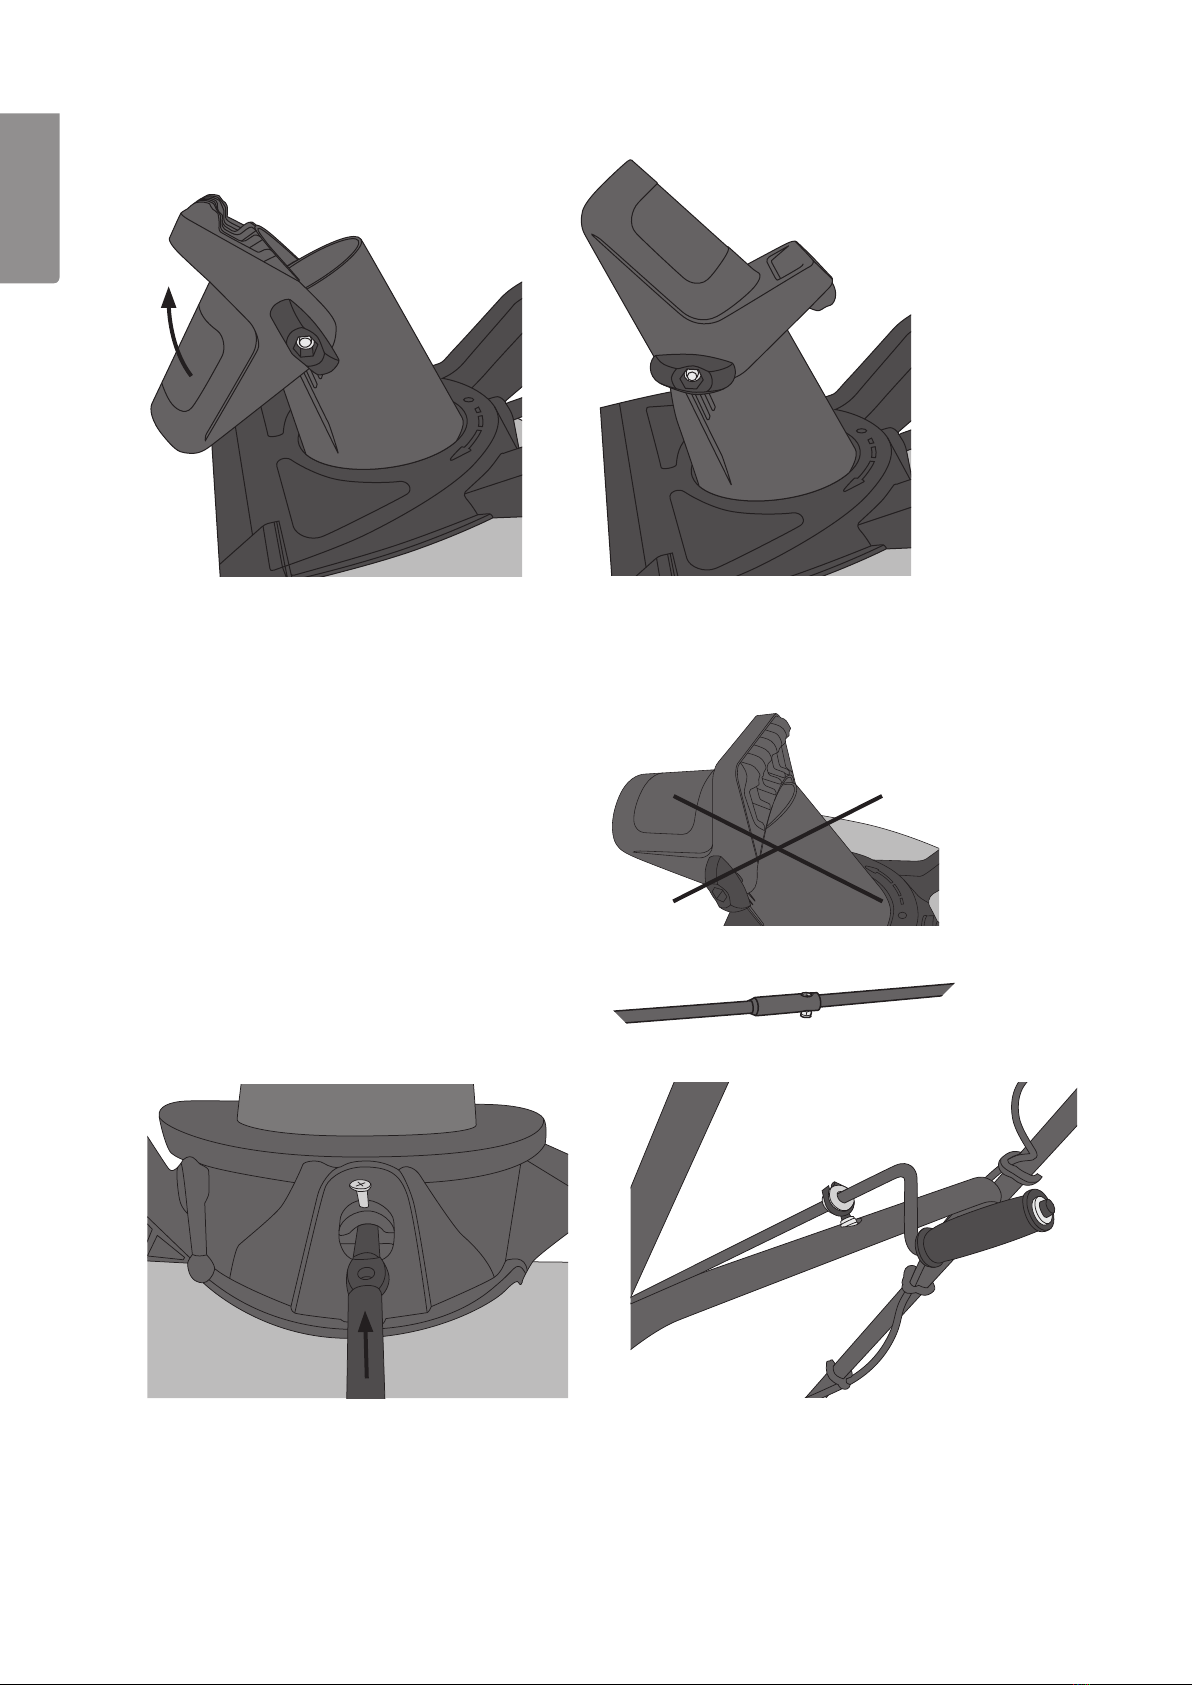
Chute
Note: Makesure that there is no gap between
theupper part and lower parts of thechute.
1. Undo thewing nuts holding theupper part
of thechute in place just enough to enable
you to lift thetop of thechute.
2. Set thetop of thechute in thedesired
position and lock it in place using
thewingnuts.
Chute direction crank
1. Slot thetwo parts of thecrank together and
fasten using theincluded nuts andbolts.
2. Slot thecrank into its hole at
thebase of thechute and fasten it.
3. Mount the crank’seyelet through
thehole in themiddle handle and
tighten its retaining nut to secure it.

9
ENGLISH
Operation
Note: Knottheextension lead loosely around themiddle of thehandle
to prevent it from accidentally disconnecting during operation.
Starting
1. Make sure that thesafety lever for thefeed screw drive is released so theblower is in neutral.
2. Insert theignition key. Makesure that it is pushed all thewayin.
3. Connect anextension lead approved for outdoor use to themains lead of thesnow blower and to
anearthed wall socket.
4. Press and hold the[on/off] switch.
5. Pull thesafety lever in towards thehandle to start thefeedscrew. Release the[on/off] switch.
6. Release thesafety lever to stop thefeedscrew.
Care and maintenance
• Always disconnect themains lead from thepower before servicing or adjusting thesnow blower.
• Regularly check that all thenuts and bolts are tight and that thesnow blower is undamaged and working properly.
• Ensure that any safety/warning labels are visible and legible. Replace any damaged or illegible labels.
• Always unplug themains lead after use and before cleaning snow off thefeed screw, impeller housing or
discharge chute.
• Store thesnow blower in adry, sheltered place out of thereach of children.
• Never store thesnow blower with the mains lead plugged into awall socket.
Changing the feed screw blades
1. Unplug themains lead from thewall socket.
2. Undo thenuts and bolts and remove therubber blades.
3. Replace theblades with new ones, refit thenuts and
bolts and tighten them.
Replacing the scraper blade
1. Unplug themains lead from thewall socket.
2. Lay thesnow blower handle down on theground.
3. Detach theworn scraper by removing the3 screws
holding it inplace.
4. Screw thenew scraper intoplace.
10
ENGLISH
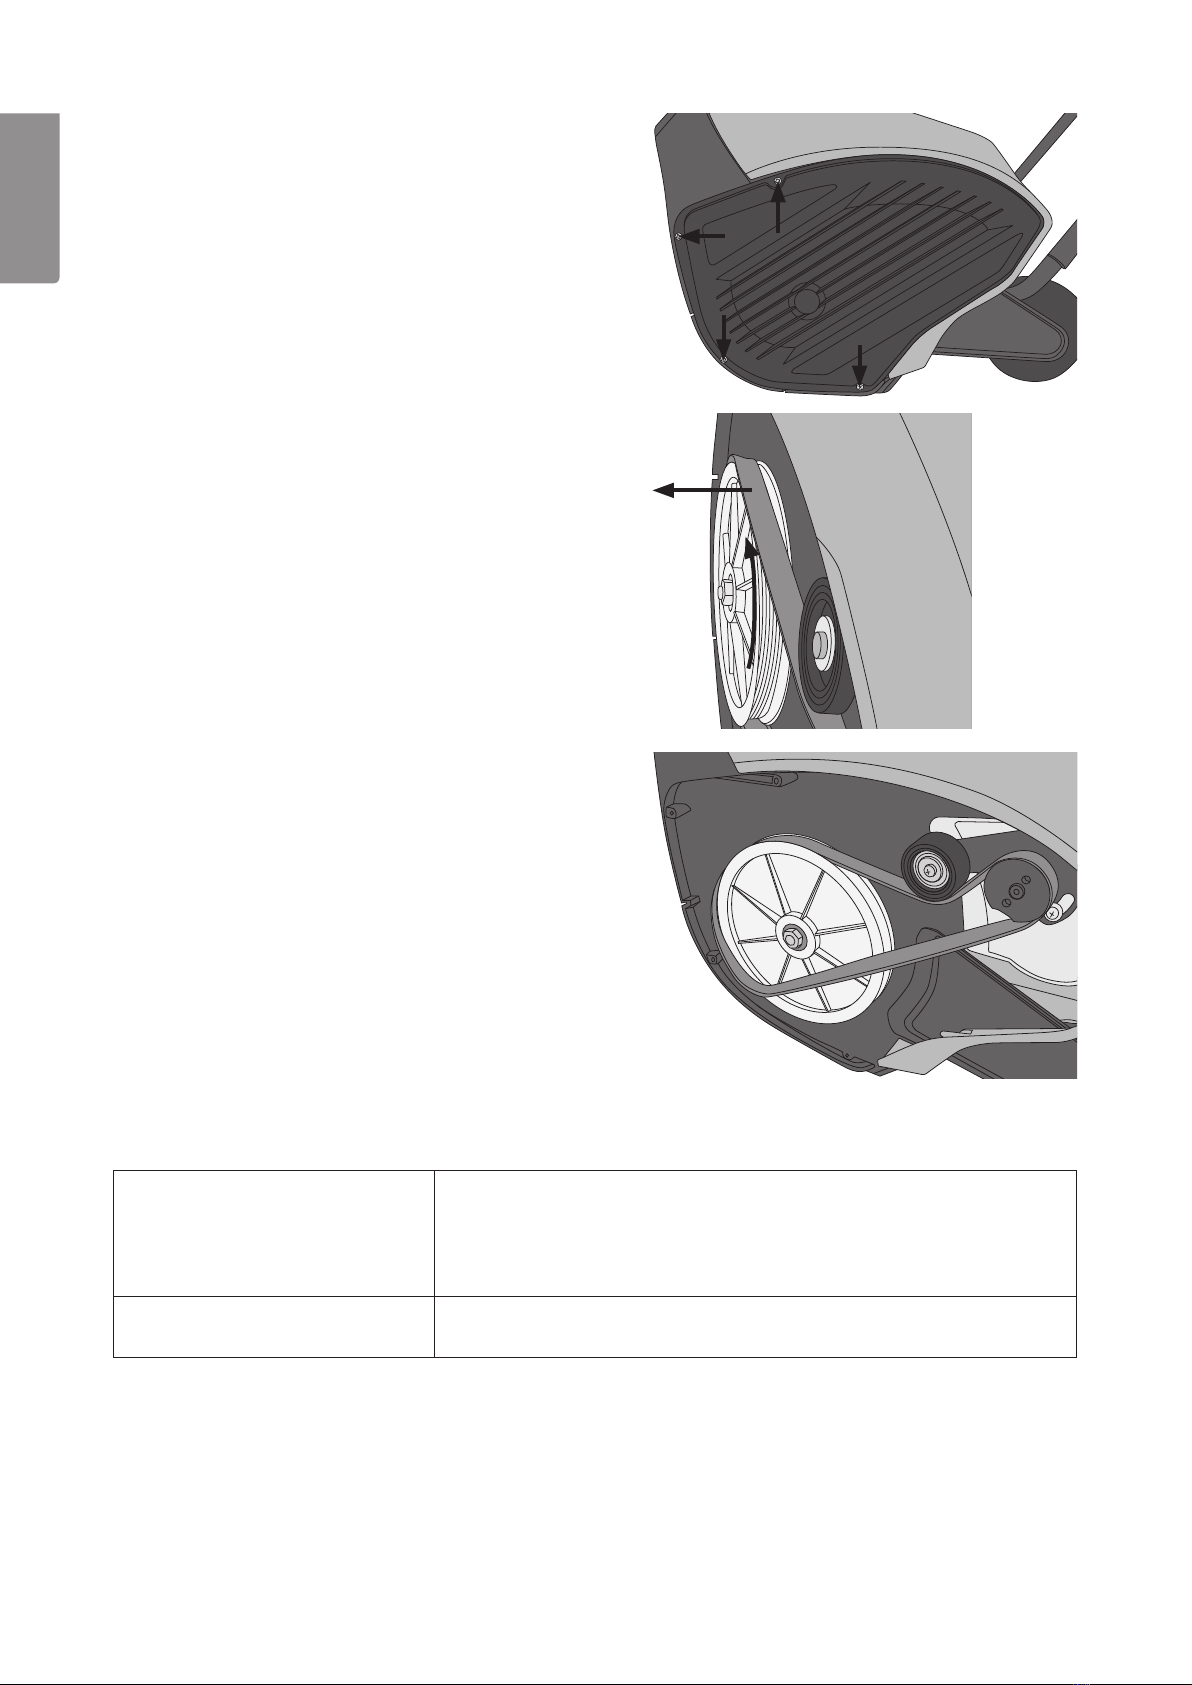
Changing the Drive Belt
1. Unplug themains lead from thewall socket.
2. Remove the4 screws from theleft side of thebelt
cover and remove thecover.
3. Lift thebelt tensioner and remove thedrive belt from
thelarge pulley.
4. Install anew belt as shown in thepicture,
turningthepulley until thebelt sits into itsgroove.
5. Refit thebelt cover and the4 screws.
Troubleshooting guide
The snow blower does notstart. • Make sure that theextension lead is connected correctly.
• Check to see if there is power at thewall socket
• Is theon/off button pushed in?
• Is thesafety lever pulled in against thehandle?
Snow does not exit the chute. • Unplug theextension lead and make sure that thechute is not
clogged withsnow.
Questo manuale è adatto per i seguenti modelli
1
Indice
Lingue:
Altri manuali CO/Tech Spazzaneve


