Coban TK06B Manuale utente

1
GPS GSM GPRS GPS Tracking System
User Manual
Model: TK06B
Thank you for purchasing the tracker. This manual shows how to operate the device smoothly
and correctly. Make sure to read this manual carefully before using this product. Please note
that specification and information are subject to changes without prior notice in this manual.
Any change will be integrated in the latest release.

2
Contents
◆Installation attentions........................................................................................3
◆Attentions..........................................................................................................3
1.Summary ............................................................................................................4
2.Specs...................................................................................................................4
3. Installation instructions.....................................................................................5
4. Wires connection ............................................................................................6
5. Function setting...............................................................................................7
5.1 Initialization ....................................................................................................7
5.2 Change Password............................................................................................8
5.3Authorization....................................................................................................8
5.4 Set up monitor central number.....................................................................8
5.5 Single Tracking............................................................................................9
5.6 Continuous Tracking Automatically............................................................9
5.7 Cell ID Tracking ..........................................................................................9
5.8 Modes switch between “track” & “monitor” ...............................................9
5.9 Data logging...............................................................................................10
5.10 Alarms.....................................................................................................10
5.11 Low battery alarm...................................................................................10
5.12 Power off alarm.......................................................................................10
5.13 Geo-fence alarm......................................................................................11
5.14 Movement alarm .....................................................................................11
5.15 Overspeed alarm......................................................................................12
5.16 ACC working alarm................................................................................12
5.17 Vibration alarm .......................................................................................12
5.18 Set all alarm mode...................................................................................13
5.19 Cut off the Oil and Power System ..........................................................13
5.20 Resume the Oil and Power System.........................................................13
5.21 Check the Vehicle State..........................................................................13
5.22 Device Resetting .....................................................................................14
5.23 IMEI Checking........................................................................................14
5.24 Time Setting............................................................................................14
5.25 GPRS Setting ..........................................................................................14
5.25.1 Set APN.................................................................................................15
5.25.4 Set IP and Port.......................................................................................15
6.Cautions .......................................................................................................15
7. Faults & the Solutions.................................................................................16
3
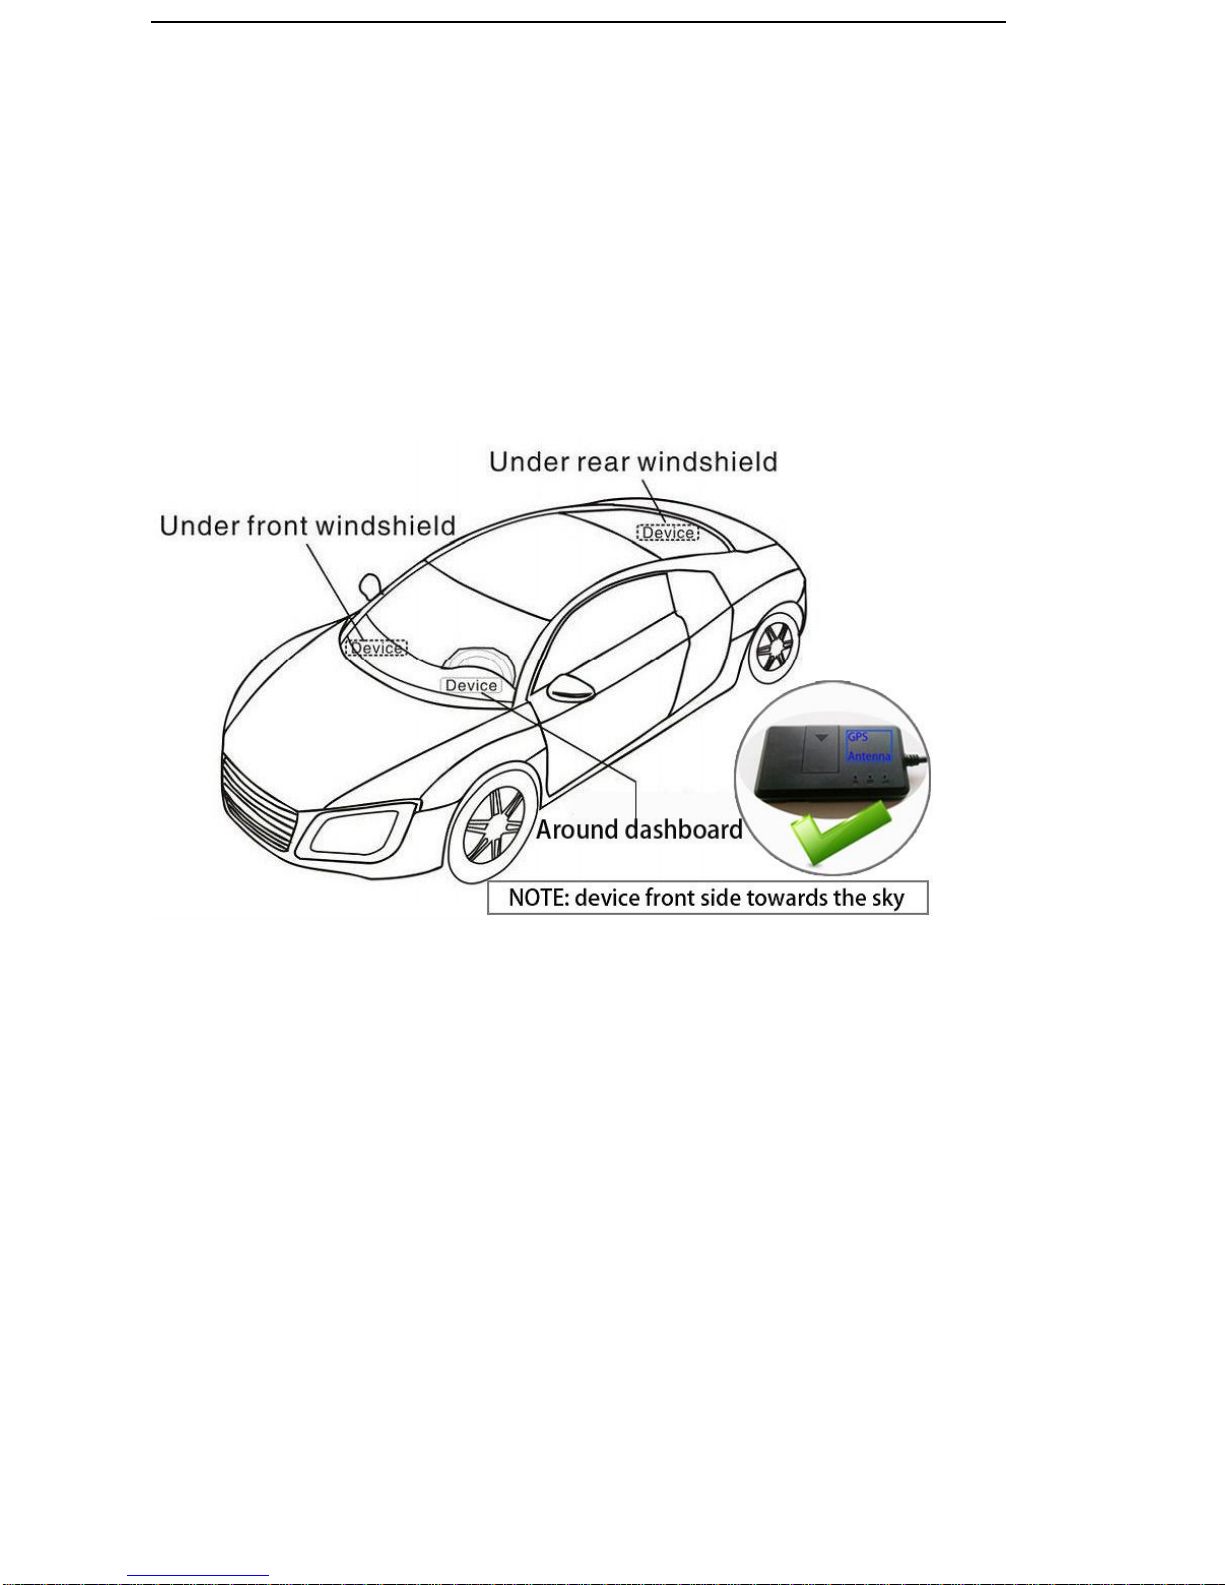
◆Installation attentions
NOTE: device front side towards the sky.
When install in car, if the windscreen glued by metal thermal insulation layer or
heating layer, it will reduce the GPS receive signal and lead to GPS work
disorder.
◆Attentions
◆Device light
1)No yellow light: failed to read SIM card, need reinstall SIM card.
2)Blue light flash: no GPS signal, make sure device started outside.
3)Three lights off: lights entered sleep mode, make a call can wake up.
◆Device failed located
1)Failed located: message replied with all 0, make sure device started outside
not in room.
2)Can’t reach the call: make sure SIM card has balance and installed properly.

4
◆Device can’t track on platform
1)Check three lights are stable lighting on. Make sure device can
communicate by sending SMS and make a call.
2)Check the Vehicle State
Send SMS command “check+password” to the tracker device to check the IP
port etc info.
1.Summary
Working Based on existing GSM/GPRS network and GPS satellites, this
product can locate and monitor any remote targets by SMS or GPRS.
NOTE: Please turn on small switch inside SIM card hole after install SIM card
2.Specs.
Content
Specs.
Dim.
84 mm x47.5 mm x 15 mm
Weight
50g
Network
GSM/GPRS/GPS
Band
850/900/1800/1900 Mhz
GPS chip
UBLOX 7020
GSM module
MT6260A
GPS sensitivity
-159dBm
GPS accuracy
5m
Time To First Fix
Cold status 45s
Warm status 35s
Hot status 1s
Work voltage
9V-36V
Storage Temp.
-40°C to +85°C
Operation Temp.
-20°C to +45°C
Humidity
5%--95%

5
3. Installation instructions
3.1 Preparation
4.1.1 Open the package to check the device model number is correct, be with
full accessories, or else please contact your supplier;
4.1.2 Choose SIM card, need insert a GSM SIM card into the device, please
refer to the suggestion of your supplier for SIM card choice.
Notice:
Please insert SIM card before turning the device power switch to on;
The SIM card need open the GPRS function;Please make sure SIM card
with full balance.
3.2 Installation
The device is hidden type installation, we suggest the device installing by
professional institution. Please pay attention to the following points:
3.2.1 To avoid the thieves destruction, the device installation place should be as
far as hidden.
3.2.2 Avoid putting the device with reversing radar, car burglar alarm and any
other vehicle communication devices;
3.2.3 Can fix the device by ribbon or wide sponge powerful two-side glue stick;
3.2.4 The device has built-in GSM and GPS antenna, make sure the receive side
upward and there is no metal shielding.
3.2.5 Recommended installation place: ①The hidden place in the board below
the front windscreen; ②The hidden place around former dashboard (nonmetal

6
material for skin); ③The hidden place in the board below the back windscreen.
Notice:
If the windscreen glued by metal thermal insulation layer or heating layer,
it will reduce the GPS receive signal and lead to GPS work disorder, then please
change the installation place.
3.3 Device light description
Light
Signal
Red light
Power
Yellow light
GSM signal
Blue
GPS signal
4. Wires connection
1. Red wire connects to vehicle power anode
2. Black wire connects to vehicle power cathode
3. Yellow wire connects to oil or circuit control wires
4. Green wire connects to ACC wire

7
5. Function setting
5.1 Initialization
Send SMS “begin+password” to the unit, it will reply “BEGIN,CONFIG OK ”
and initialize all the settings to default factory settings.(default password:
123456)
For example: send SMS “begin123456”, it will reply “BEGIN,CONFIG OK ”.
The “+” in the command, please don’t type “+”, space means press the
space keyboard on your cell phone.

8
5.2 Change Password
5.2.1 Send SMS “password+old password+space+new password” to the unit
to change the password.
For example: send SMS “password123456 888888” to the unit. If succeeded,
“PASSWORD,CONFIG OK” will reply to your cell phone from the device
tracker.
5.2.2 Make sure the new password is in 6 digits, or else the tracker cannot
recognize the password.
5.3Authorization
There are 5 numbers to be allowed to authorize in the tracker at most.
5.3.1 Authorization: Send SMS“admin+password+space+cell phone number”
to set up an authorized number, the other central number should be set by the
first authorized number, if the number is successfully authorized, the unit will
reply” ADMIN,CONFIG OK” by SMS.
5.3.2 Delete authorization: Send SMS“noadmin+password+space+authorized
number” to delete the authorized number.
5.4 Set up monitor central number
All alarms will be received by central number.
5.4.1 Setup: send command “centernum+password+space+number” to
tracker, it will reply “centernum ok”. After setup monitor center number, the
messages of auto track by SMS will be set to this center number, if all alarms
need to be sent to this number too, then this center number must be setup as

9
authorized number.
5.4.2 Cancel: Send “centernum+password” to tracker, it will reply
“CENTERNUM,CONFIG OK”.
5.5 Single Tracking
Make a missed call to device number or Send SMS “smslink123456”to device
number, it will reply a real time tracking message include Long & Lat info.
5.6 Continuous Tracking Automatically
5.6.1Send SMS command “ITV+password+space+moving time
interval+space+static time interval”to the tracker device.
5.6.2 For example: send SMS “ITV123456 10 500”it will report data to server
at 10s time interval when vehicle is moving; 500s time interval when
vehicle is static.
5.7 Cell ID Tracking
5.7.1 You must set up the APN of your local GSM network for the SIM card in
tracker first before using this function, if there is user name and password for
GPRS login, Please refer to following to configure the APN, user name and
password for GPRS login.
5.7.2 After configure the APN, send SMS “cell+password”to device, it will
reply cell ID info. (This function need platform support )
5.8 Modes switch between “track” & “monitor”
5.8.1 The default mode is “track” (track mode).
5.8.2 Send SMS command "monitor+password" to tracker device of vehicle

10
terminal, it will reply "MONITOR,CONFIG OK" and switch to “monitor”
mode. In this mode, the user can dial up the tracker device to monitor the voice.
5.8.3 Send SMS command "tracker+password" to tracker device of vehicle
terminal, It will return "TRACKER,CONFIG OK" and restore to “track” mode.
5.9 Data logging
This function must insert TF card.
Auto logging:When the tracker device lost GSM signals or fall offline from
GPRS, tracker will log the tracking position and alerts automatically in the SD
card on the basis of the pre-set condition, when GSM signals get back, all the
event alerts will be auto-sent to the authorized numbers or monitoring platform
(server), but the logged tracking data should be loaded to the monitoring
platform via SMS command.
5.10 Alarms
Note: All Alarms will be sent to Central Number
5.11 Low battery alarm
5.11.1 Send SMS “lowbat+password+space+1”to activate the function, it will
send SMS“low battery+latitude/longitude” to central number when voltage of
battery is below about 3.6V.
5.11.2 This function disactivates as default, send SMS “lowbat+
password+space+0” to deactivate.
5.12 Power off alarm
5.12.1 Send “extpower+password+space+1” to activate, it will send SMS
Indice
Altri manuali Coban GPS

Coban
Coban GPS102B Manuale utente

Coban
Coban GPS103-A Manuale utente

Coban
Coban GPS107 Manuale utente

Coban
Coban GPS103-A Manuale utente

Coban
Coban VT105 Manuale utente

Coban
Coban BN-311 Manuale utente

Coban
Coban GPS-303 Manuale utente

Coban
Coban GPS106A Manuale utente

Coban
Coban GPS302 Manuale utente

Coban
Coban gps104 TK104 Manuale utente


