Comfort Bilt HP21 Manuale utente
H P 2 1 P E L L E T S T O V E
O W N E R ' S M A N U A L
Please read this entire manual before installation and use of this fuel-burning pellet room heater, and save for future reference.
Failure to follow these instructions could result in property damage, bodily injury, or even death.
Contact local building or fire officials about restrictions and installation inspection requirements in your area.
WARNING!
Building Quality
Building Quality
Building Quality
Comforts
Comforts
Comforts

On behalf of the entire ComfortBilt team, I'd like to take
this opportunity to personally welcome you as a customer.
You, our customer, are the most important part of our
business, and we will work tirelessly to ensure your complete
satisfaction, now and for as long as you own your pellet
stove.
In an effort to provide the best possible service, we have
posted educational and informative articles, videos, and
guides to our website, www.comfortbilt.net, to help you
understand and get the best possible performance from your
pellet stove.
Thank you for choosing ComfortBilt!
Sincerely,
Dear New Comfortbilt Customer,
Glenn Turley
CEO
Welcome,
to the ComfortBilt Family!
DANGER! HOT SURFACES
Glass and other surfaces are hot during operation and cool down.
Hot glass will cause burns.
DANGER! Indicates a hazardous situation which, if not avoided, will result in death or serious injury.
WARNING! Indicates a hazardous situation which, if not avoided, could result in death or serious injury.
CAUTION! Indicates a hazardous situation which, if not avoided, could result in minor or moderate injury.
NOTICE: Indicates practices which may cause damage to the stove or to property.
Pro Tip: Indicates additional information to help you better understand your stove and optimize its
performance.
Safety Alert Key: It is important to pay attention to alerts you will see throughout this manual to ensure your
safety.
Install or operate damaged stove.
Modify Stove.
Install other than as instructed by the manufacturer.
Operate the stove without fully assembling all components.
Over Fire (burning at higher temperatures than recommended, causing permanent
damage to the stove.)
Install any components not approved by the manufacturer.
Install parts or components not listed or approved.
Disable safety switches.
Do not touch glass until it is cooled.
NEVER allow children to touch glass or door.
Keep children away; if you expect that children may come into contact with the stove, we
recommend a barrier such as a decorative screen.
CAREFULLY SUPERVISE children in the same room as the stove.
Alert children and adults to hazards of high temperatures.
NOTICE: FIRE RISK
SMG Hearth and Home / ComfortBilt disclaims any responsibilty, and the warranty and agency listing
will be voided by the below actions.
This wood heater needs periodic inspection and repair for proper operation.
It is against federal regulations to operate this wood heater in a manner inconsistent with operating
instructions in this manual.
Keep clothing, furniture, draperies, and other flammable materials away.
High temperatures may ignite clothing or other flammable materials.
This product, and the fuels used to operate is (wood), and the products of combustion
of such fuels, can expose you to chemicals including carbon black, which is known to
the State of California to cause cancer, and carbon monoxide, which is known to the
State of California to cause birth defects and other reproductive harm.
For more information go to www.P65warnings.ca.gov
3
DO NOT:
WARNING!
comfortbilt.net
Stay Safe!
This stove should NOT be used as the only source of heat in the home. Power outages and periodic
maintenance will result in a total loss of heat.
Contact local building or fire officials regarding restrictions and installation inspection requirements for
your area.
Contact your local authority (Municipal building department, Fire department, Fire prevention bureau,
etc...) to determine the need for a permit.
Keep combustible materials (such as grass, leaves, etc...) at least 3 feet away from the flue outlet on the
outside of the building.
Installation and repair of this pellet stove should be done by a qualified service person. The appliance
should be inspected before use, and at least annually by a qualified service person. It is imperative that
the control compartments, fire box, and circulating air passageways of the stove be kept clean.
CAUTION!
During a power outage, the stove will shut down safely. Do not open the main door or ash pan door.
During a power failure, the exhaust fan will not run. Keeping the doors sealed will allow the exhaust
vent to draft out naturally. When the power is restored, the stove will not restart. If the exhaust
temperature is still 126° F (52° C) when power is restored, the exhaust and convection fans will
continue to run until the stove cools.
Over Fire Protection: If the stove is being over fired or burning too hot, the high limit switches will
automatically shut down the stove to avoid damage to other components. If the temperature on the
hopper reaches 197° F (92° C), the auger will automatically stop and the stove will shut down. The
exhaust fan will continue to run until the proof of fire switch cools. Allow the stove to cool before
attempting to re-ignite.
NOTICE!
Install at least one smoke detector on each floor of your home to ensure your safety. They
should be located away from the stove, and close to the sleeping areas.
You should have separate CO monitors for areas near the stove
4comfortbilt.net
CAUTION!
If the electrical power fails at any time when the stove is hot, keep all stove doors closed.
This will limit the amount of smoke in the space.
Never shut the stove down (while running) by unplugging it from the power source.
Never shut the stove down (while running) by switching off the main power switch on the
rear of the stove.
WARNING!
This stove has a manufacturer set minimum low burn rate that must not be altered. It is against federal
regulations to alter this setting or otherwise operate this stove in a manner inconsistent with the
operating instructions within this manual. If the unit is modified, it will no longer be compliant with the
EPA regulations.
Stay Safe!

5comfortbilt.net
Table of Contents
Fuel Guide
Getting Ready
Control Panel Operation
Control Panel Display
Pre-Ignition Checklist
Operational Modes
Remote Control
Starting Your Stove
Settings
Pre-Installation
Floor Protection
Clearances to Combustibles
Vent Termination Clearances
Venting
Installation Examples
Safety Key
Additional Warnings
Getting Familiar with Your Stove
What's Included
Getting Started.........................................................................6
Installation...............................................................................8
Operation...................................................................................16
Troubleshooting Video
Total Power Loss
Low Temperature Alert
High Temperature Alert
Failure to Ignite
Lazy Burn / Pellet Buildup
Maintenance & Cleaning Video
Side Panel Access
BTU & Efficiency Specifications
Electrical Rating
Glass Specifications
Warranty Coverage and Limitations
Maintenance.............................................................................28
Troubleshooting.....................................................................31
Certifications..........................................................................34
Wiring Diagram..........................................................................36
stay safe.....................................................................................3
Replacement Parts...................................................................37
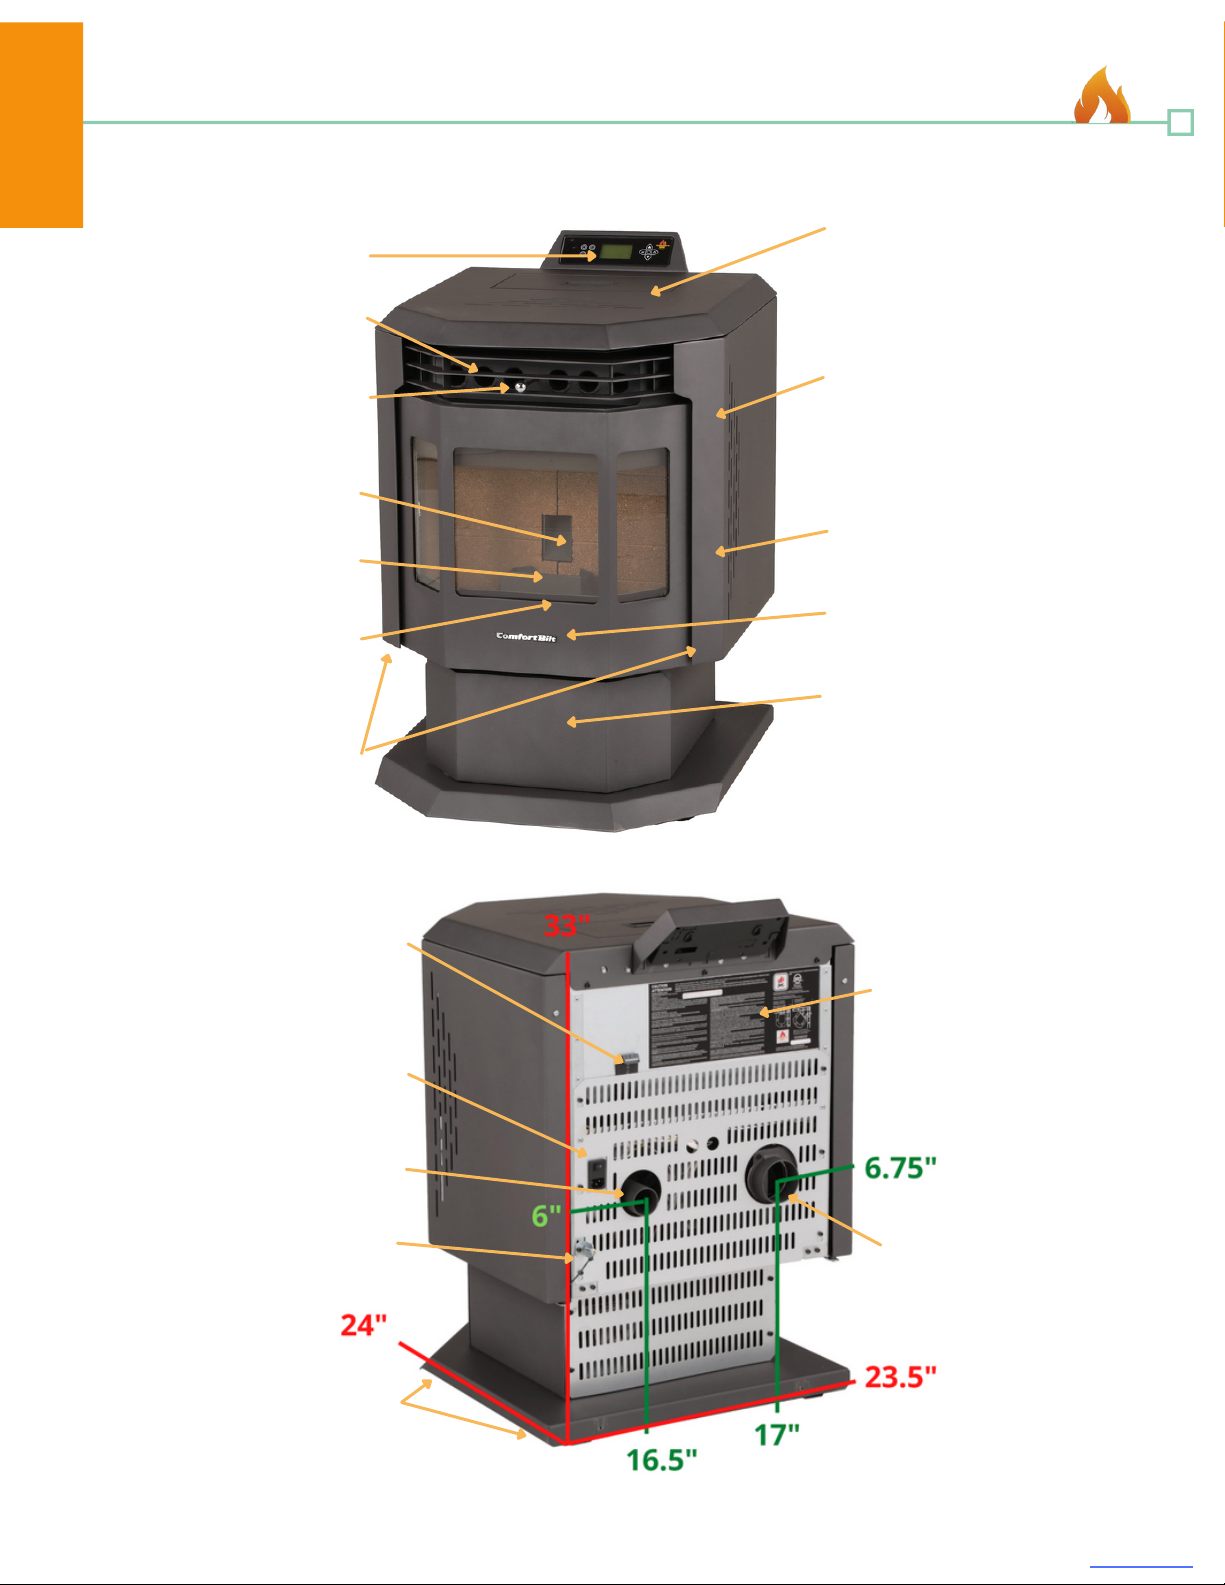
Room Temperature
Sensor
Igniter
(Behind Burn Pot)
Hopper Lid Switch
(Beneath Hopper Fill Lid)
Magnetic Side Panels
Serial # and
Safety Placard
Main Power Switch
(Backup Fuse Included)
Front Door Latch/Handle
(Behind Side Panel)
6comfortbilt.net
Getting Started
Getting Familiar with your Stove
Removable Ash Pan
Drawer
(Behind Magnetic Flip-down
Door)
Control Panel
Pellet Feed Chute
Burn Pot
Heat Exchange Tubes
Heat Tube
Cleaner/Scraper
Inside the Stove Body:
-Auger System
-Circuit Board
-Combustion Blower
-Convection Blower
-Vacuum Switch
-POF Sensors
-Air Intake Damper
Exhaust Port
Air Intake Port
Data Cable
Glass Airwash Damper
(Behind Front Door)
Adjustable Leveling
Feet
Getting Started
7comfortbilt.net
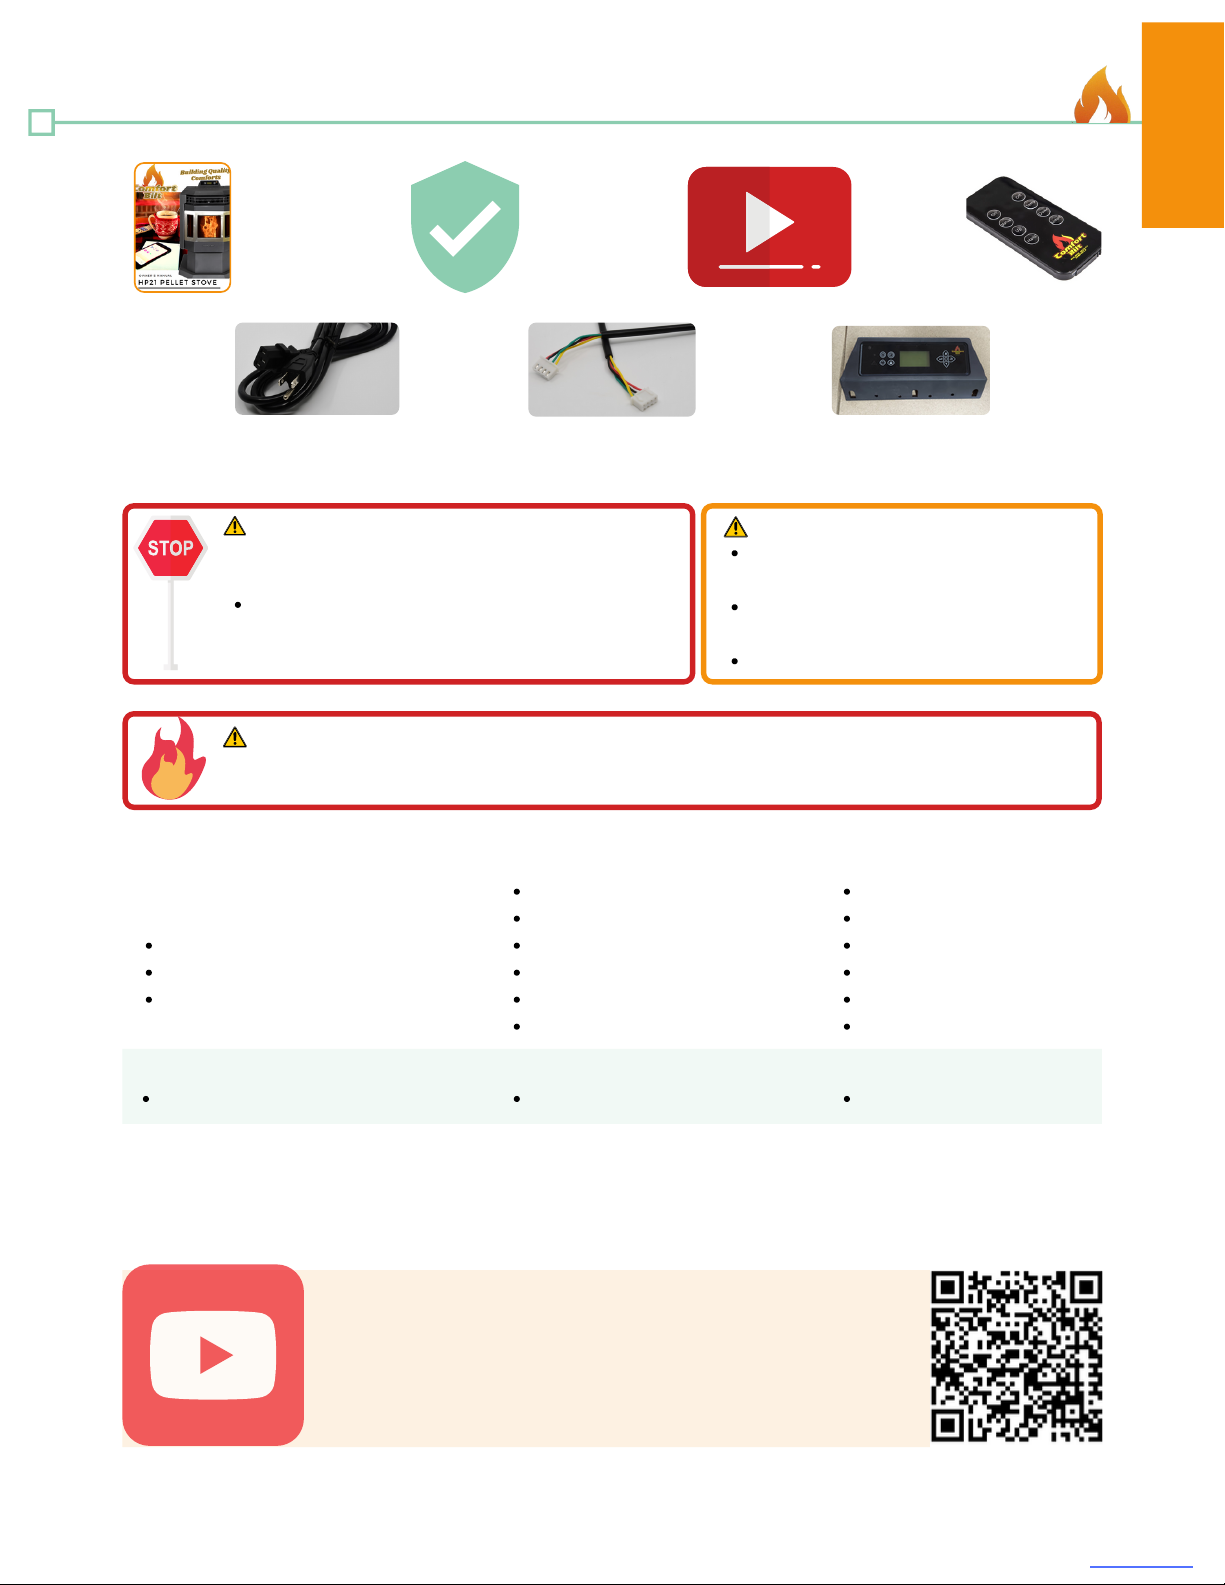
What's Included
Owner's Manual
Power Cord Control Panel & Bracket
Remote Control
1 Year Warranty
Data Cable
Online Guides and
Videos
Getting Started
Getting Started
Do NOT install damaged, incomplete, or
substitute components.
Inspect stove and components for damage.
Damaged parts may impair safe operation.
Report damaged parts to dealer or manufacturer.
Safety Equipment (Recommended for all installation and maintenance steps)
Pellet Vent Pipe
Must be an approved 3" or 4" diameter Type "L" or "PL" vent. Use 4" diameter vent if flue height is over 12 ft.
or if installation is over 5,000ft above sea level. (See Equivalent Vent Length chart on Pg. 13)
WARNING! CAUTION!
Risk of cuts, abrasions, or flying
debris.
Wear protective gloves and safety
glasses during installation.
Metal edges may be sharp.
What You May Need
High temperature silicone (500°F+)
Screwdriver
Allen wrench set
Tools & Supplies
Tape measure
Framing square
Reciprocating saw
Electric drill & bits
Caulking gun
Level
Plumb Line
Stud Finder
Utility knife
Pliers
Flashlight
Hammer
WARNING!
NO OTHER vent component may be used.
Substitute or damaged vent components may impair safe operation.
Fire Risk:
Safety glasses Close-toed shoesGloves
See our New Stove Tutorial Series on YouTube.
Or scan the code.
New Stove Tutorial Playlist
8comfortbilt.net
Installation
Pre-Installation
Installation
Remove cardboard lid, outer box sleeve, and packing foam.
Inspect for any shipping damage. (Preferably before delivery team
leaves)
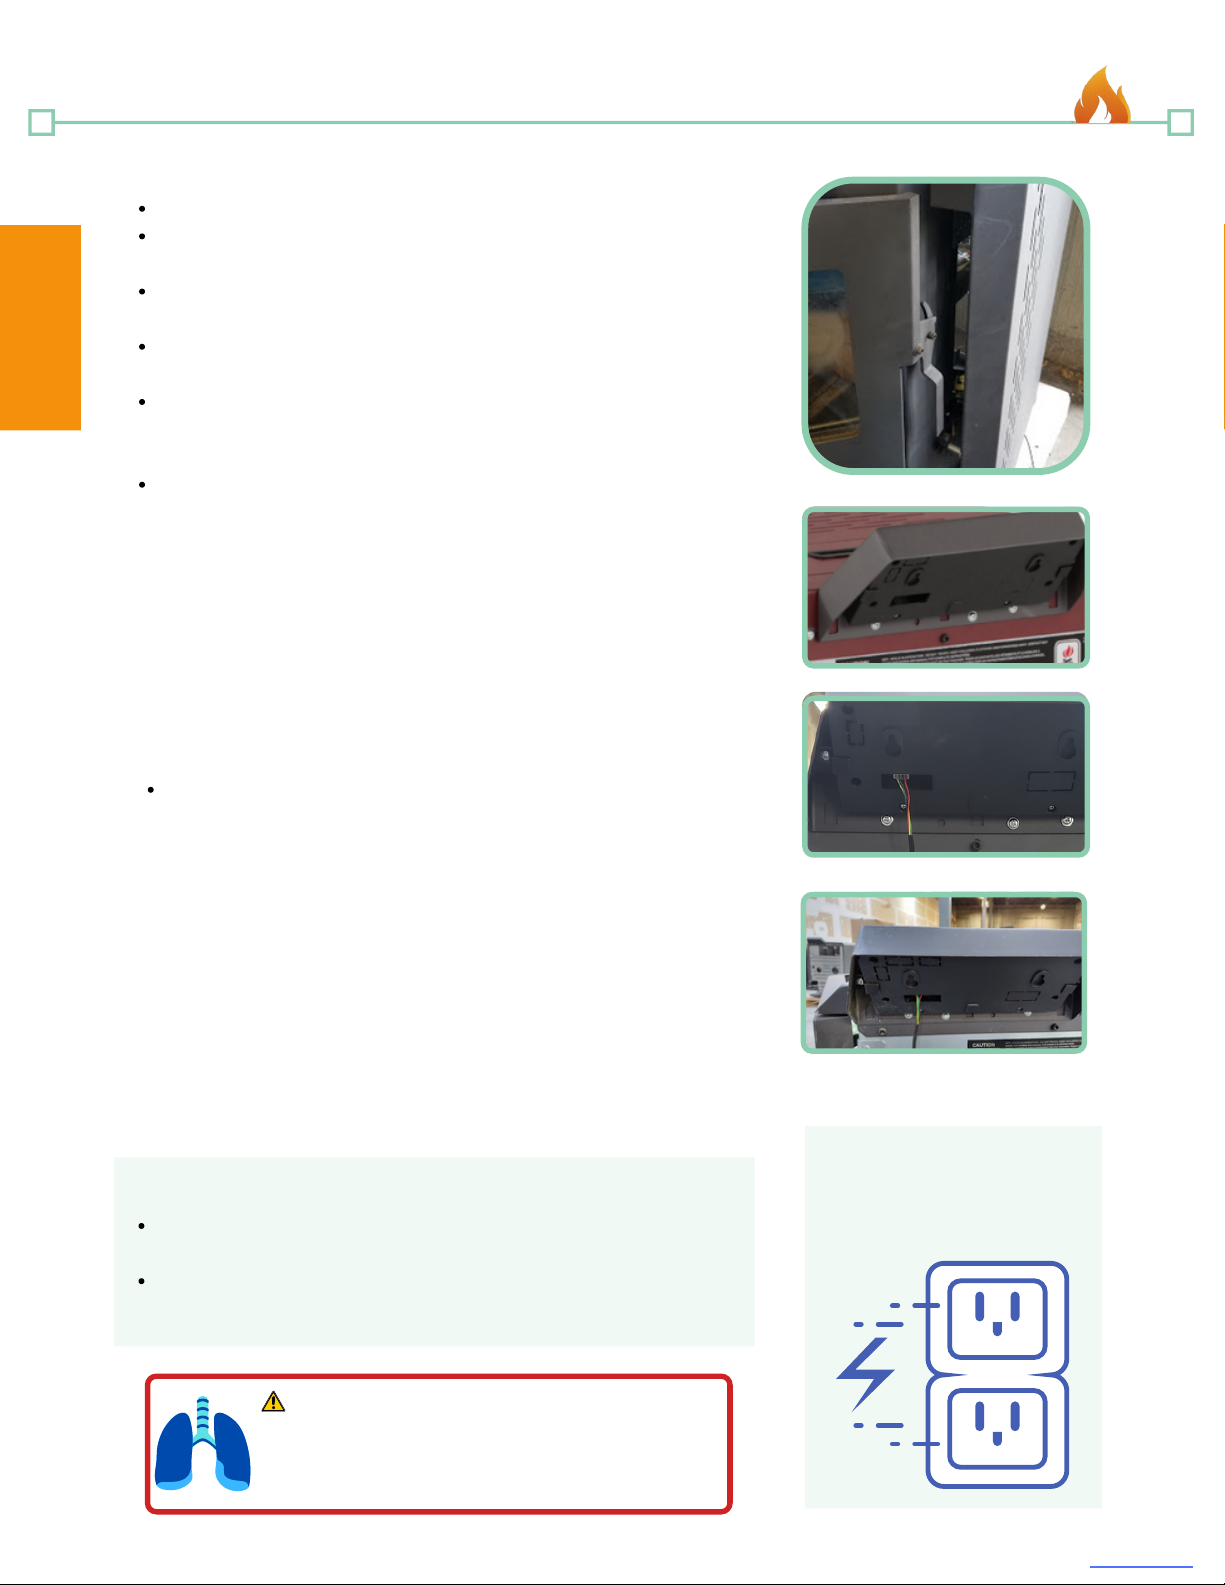
Unscrew the mounting L brackets that secure the rear of the stove
to the pallet. (4mm Allen)
Open hopper lid and remove control panel, power cord, remote
control, and all literature and packing material from the hopper.
Open the front door via the latch on the right side behind the
magnetic side panel (see picture) and remove cardboard packing
material from the firebox chamber.
Remove any tape or adhesive on the outside of the glass.
Unpacking:
Remove all four Phillips mounting screws along the top rear of the
stove where you wish to mount the controller bracket.
Line up the holes in the back to the mounting bracket and secure in
place. (Note: Universal mounting brackets are used, so only the far
left and two right screws align. This is normal, and will still secure
the panel to the stove)
Find the data cable line at the rear of the stove, and plug it snugly
into the back of the control panel.
Mounting the Control Panel:
1.
2.
3.
The universal mounting bracket will also allow for the control panel
to be mounted to the side farthest from the exhaust port for
specific vertical venting scenarios. (The two left and the far right
screws are used in this case).
Installation MUST comply with local, regional, state and national
codes and regulations.
Consult insurance carrier, local building inspector, fire officials, or
authorities having jurisdiction over restrictions, installation
inspection and permits.
Pro Tip: It is recommended that your pellet vent pipe be installed and
serviced by a professional installer.
Placement:
Where you place your stove can significantly affect its performance
and safety.
Sketch out a plan for installing the stove, including dimensions, before
permanent placement. When
determining the location for the stove, wall stud location is critical. You
may need to adjust the location of the stove to avoid encountering a
wall stud. Before placing the pellet stove, connect the vent to allow for
minimum clearances to combustible walls.
WARNING!
Asphyxiation Risk:
DO NOT INSTALL IN A SLEEPING ROOM.
Stove consumes oxygen in the room.
Front Door Latch
Control Panel Mounting
Data Wire Connection
Side Mounting
Surge Protector
Protect the electrical
components of your stove by
using a surge protector.
Notice: Be careful to protect the bottom of the stove and floor surfaces when moving the stove. Bottom
edges of the stove may be sharp and can scratch surfaces.
9comfortbilt.net
Installation
Floor Protection
It is necessary to install Ember Protection: a type 1 floor protector for this stove.
The floor protector must be non-combustible material, extending beneath the stove with a minimum of 6
inches (152mm) in front of the glass, and 6 inches (152mm) to both sides of the stove.
The stove must be installed on a noncombustible floor, with proper floor protection, or on a masonry hearth.
When a clean out T-vent is installed on the inside of a home, the floor protector must extend 2 inches beyond
the rear of the T-vent.
When stove is vented straight through the wall and the clean out T-vent is on the exterior of the home, the
minimum clearance is 2 inches from the back of the stove to the wall.
6"
6"
6"6"6"
6"
2"
2"
Installation
Notice: Clearances may only be reduced by means approved by the regulatory authority having jurisdiction.
Non-combustible floor protection must extend 2 inches (51mm) beneath the flue pipe of installed horizontal
venting or under the top vent adapter with vertical installation. CANADA REQUIRED, USA
RECOMMENDED.
*This will satisfy safety standards for both USA and Canada
10 comfortbilt.net
Installation
5"
5"
5"
5"
2"
7"
7"
2"
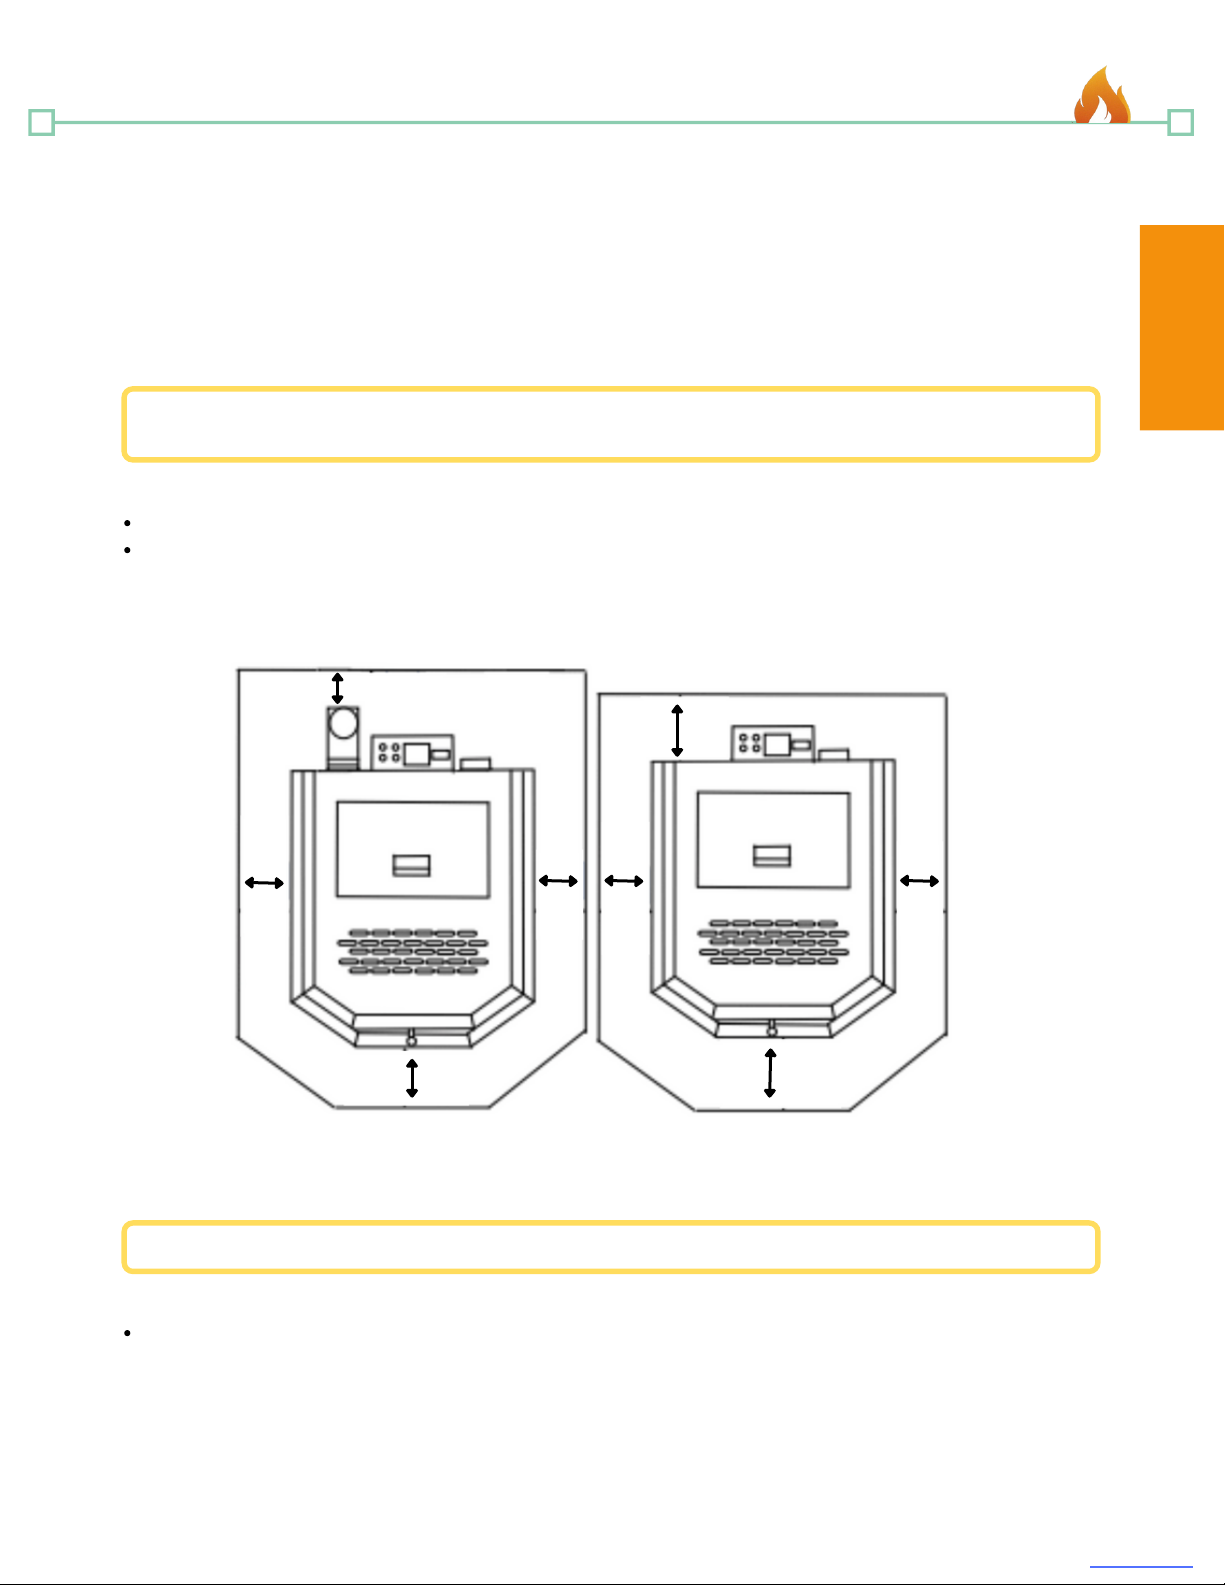
Clearances to Combustibles
Confirm required clearances to combustibles (Combustibles include wood, drywall, etc...)
2"
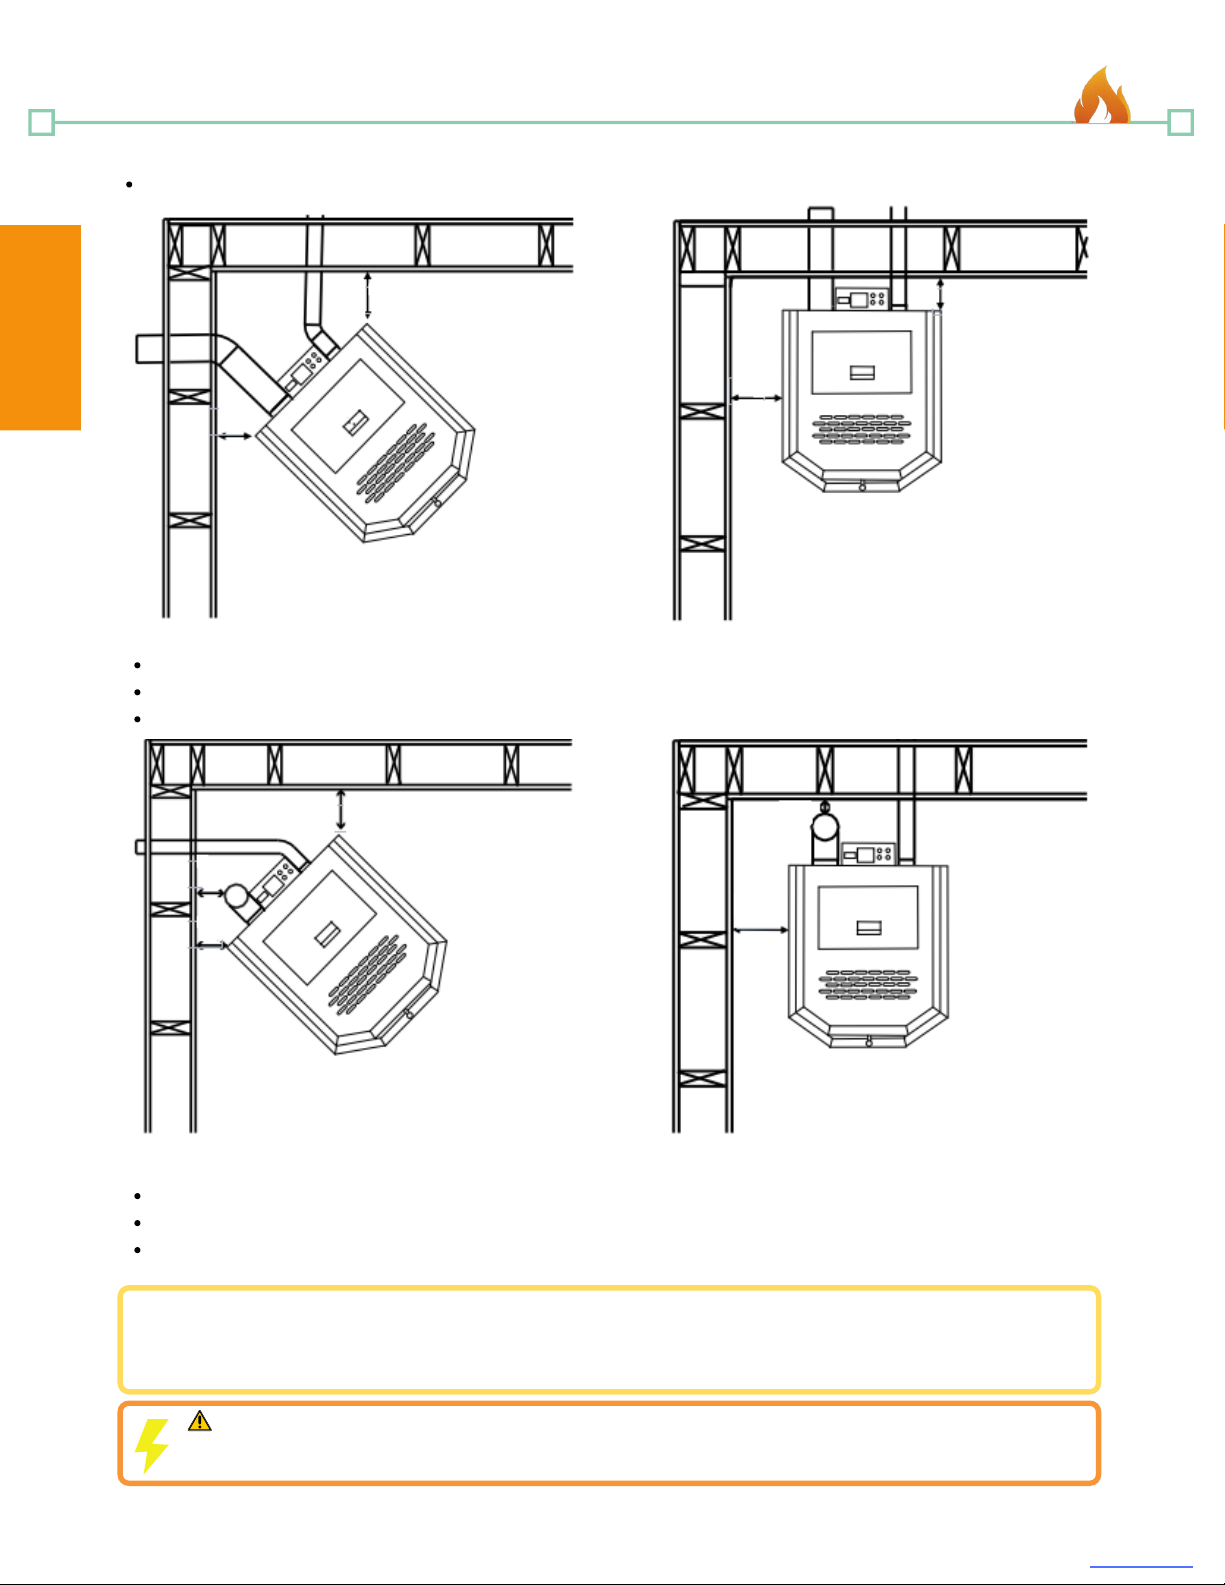
Notice: When interior vent is installed vertically, the clearance to the back wall is determined by the vent
size used. Install vent at clearance specified by the vent manufacturer. Take into consideration any upward
turning elbows or tees.
Back walls to Stove rear corners: 5" (13cm)
Back wall to Stove back: 2" (5cm)
Side wall to Stove: 7" (18cm)
Horizontal installation
Back walls to Stove rear corners: 5" (13cm)
Back wall to pellet pipe: 2" (5cm)
Side wall to Stove: 7" (18cm)
Vertical installation
Installation
Take appropriate precautions to locate utilities within the wall and avoid contact.
CAUTION!
Indice
Altri manuali Comfort Bilt Stufa

Comfort Bilt
Comfort Bilt HP54 Manuale utente

Comfort Bilt
Comfort Bilt HP22 Manuale utente

Comfort Bilt
Comfort Bilt HP50 Manuale utente

Comfort Bilt
Comfort Bilt Alpine HP40 Manuale utente

Comfort Bilt
Comfort Bilt HP55 Manuale utente

Comfort Bilt
Comfort Bilt HP22 Manuale utente

Comfort Bilt
Comfort Bilt HP21-SS Manuale utente

Comfort Bilt
Comfort Bilt HP22N Manuale utente

Comfort Bilt
Comfort Bilt HP50S Manuale utente

Comfort Bilt
Comfort Bilt HP61 Manuale utente


