Connex CX50A19 Manuale utente
FHD LED TV
Instruction Manual
Model:CX50A19

. . . . . . . . . . . . . . . . . . . . . . . . . . . . . . . . . . . . . . . . . . . . . . . . . . . . . . . . . . . . . . . . . . . . . . . .
. . . . . . . . . . . . . . . . . . . . . . . . . . . . . . . . . . . . . . . . . . . . . . . . . . . . . . . . . . . . . . . . . . . . . . . . . . . . . . . . . . . .
. . . . . . . . . . . . . . . . . . . . . . . . . . . . . . . . . . . . . . . . . . . . . . . . . . . . . . . . . . . . . . . . . . . . . . . . . . . . . . . . . . . . . . . . .
1
3
3
About Your TV
Important Safety Instructions
Specifications
Includes
Contents
. . . . . . . . . . . . . . . . . . . . . . . . . . . . . . . . . . . . . . . . . . . . . . . . . . . . . . . . . . . . . . . . . . . . . . . . . . . .
. . . . . . . . . . . . . . . . . . . . . . . . . . . . . . . . . . . . . . . . . . . . . . . . . . . . . . . . . . . . . . . . . . . . . . . . . . . . . . . .
. . . . . . . . . . . . . . . . . . . . . . . . . . . . . . . . . . . . . . . . . . . . . . . . . . . . . . . . . . . . . . . . . . . . . . . . . . . . . . . . . . . . .
. . . . . . . . . . . . . . . . . . . . . . . . . . . . . . . . . . . . . . . . . . . . . . . . . . . . . . . . . . . . . . . . . . . . . . . . . . . . . . . . . . . . .
. . . . . . . . . . . . . . . . . . . . . . . . . . . . . . . . . . . . . . . . . . . . . . . . . . . . . . . . . . . . . . . .. . . . . . . . . . . . . . . . . . . .
. . . . . . . . . . . . . . . . . . . . . . . . . . . . . . . . . . . . . . . . . . . . . . . . . . . . . . . . . . . . . . . . . . . . . . . . . . . . . . . . . . . .
. . . . . . . . . . . . . . . . . . . . . . . . . . . . . . . . . . . . . . . . . . . . . . . . . . . . . . . . . . . . . . . . . . . . . . . . . . . . . . . . . . . . .
. . . . . . . . . . . . . . . . . . . . . . . . . . . . . . . . . . . . . . . . . . . . . . . . . . . . . . . . . . . . . . . . . . . . . . . . . . . . . . . . . . . . .
. . . . . . . . . . . . . . . . . . . . . . . . . . . . . . . . . . . . . . . . . . . . . . . . . . . . . . . . . . . . . . . .. . . . . . . . . . . . . . . . . . .
. . . . . . . . . . . . . . . . . . . . . . . . . . . . . . . . . . . . . . . . . . . . . . . . . . . . . . . . . . . . . . . . . . . . . . . . . . . . . . . . . . . . .
. . . . . . . . . . . . . . . . . . . . . . . . . . . . . . . . . . . . . . . . . . . . . . . . . . . . . . . . . . . . . . . . . . . . . . . . . . . . . . . . . . . .
3
3
8
10
11
12
13
14
15
16
19
Setup
Connecting the Stand
. . . . . . . . . . . . . . . . . . . . . . . . . . . . . . . . . . . . . . . . . . . . . . . . . . . . . . . . . . . . . . . . . . . . . . . . 4
Mounting the TV on a wall
Remote Batteries
Main Menu Operation
Setup Wizard
. . . . . . . . . . . . . . . . . . . . . . . . . . . . . . . . . . . . . . . . . . . . . . . . . . . . . . . . . . . . . . . . . . . . . . . . . . . . . 5
Orientation
TV Controls & Inputs
. . . . . . . . . . . . . . . . . . . . . . . . . . . . . . . . . . . . . . . . . . . . . . . . . . . . . . . . . . . . . . . . . . . . . . . . . . . . . . . . . . . . . . . . 20
Customer Support
Warranty
. . . . . . . . . . . . . . . . . . . . . . . . . . . . . . . . . . . . . . . . . . . . . . . . . . . . . . . . . . . . . . . . . . . . . . . . . . . . . . . . . . . . . . . . . 7
Remote
Setup Menu
Picture Menu
Sound Menu
Time Menu
Lock Menu
Channel Menu
Media Menu
Trouble Shooting
1
Important Safety Instructions
Important Safety Instructions
gently
2
About Your TV
Specifications
•Model: CX50A19
•Screen Size: 50”
•Panel Resolution: 1920*1080
•Viewing Angle: 178(H)*178(V)
•Aspect Ratio: 16:9
•USB Port: Supports JPEG image/MP3 audio/ MPEG1,
2 & 4 video files
Includes
•Remote control and 2 AAA batteries
•Base stand
•Instruction Manual
Setup
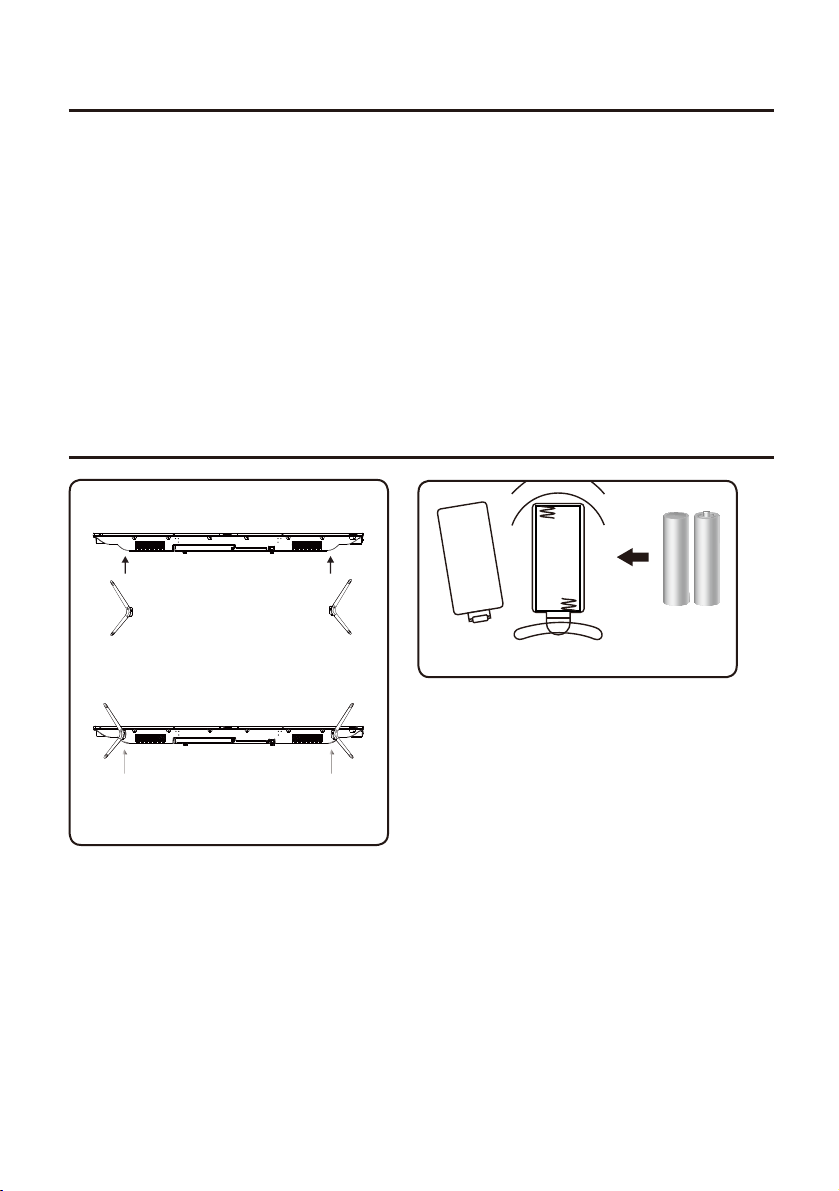
Remote Batteries
Requires 2, AAA-size batteries (included)
Connecting the Stand
When placing TV on flat surface, be careful not to push,
scratch, or otherwise damage the front of the TV and
LCD screen. Using a phillips-head screwdriver, tighten
the screws by hand. Using a power drill could damage
the TV stand.
BM4X20mm(3pcs) BM4X20mm(3pcs)
3
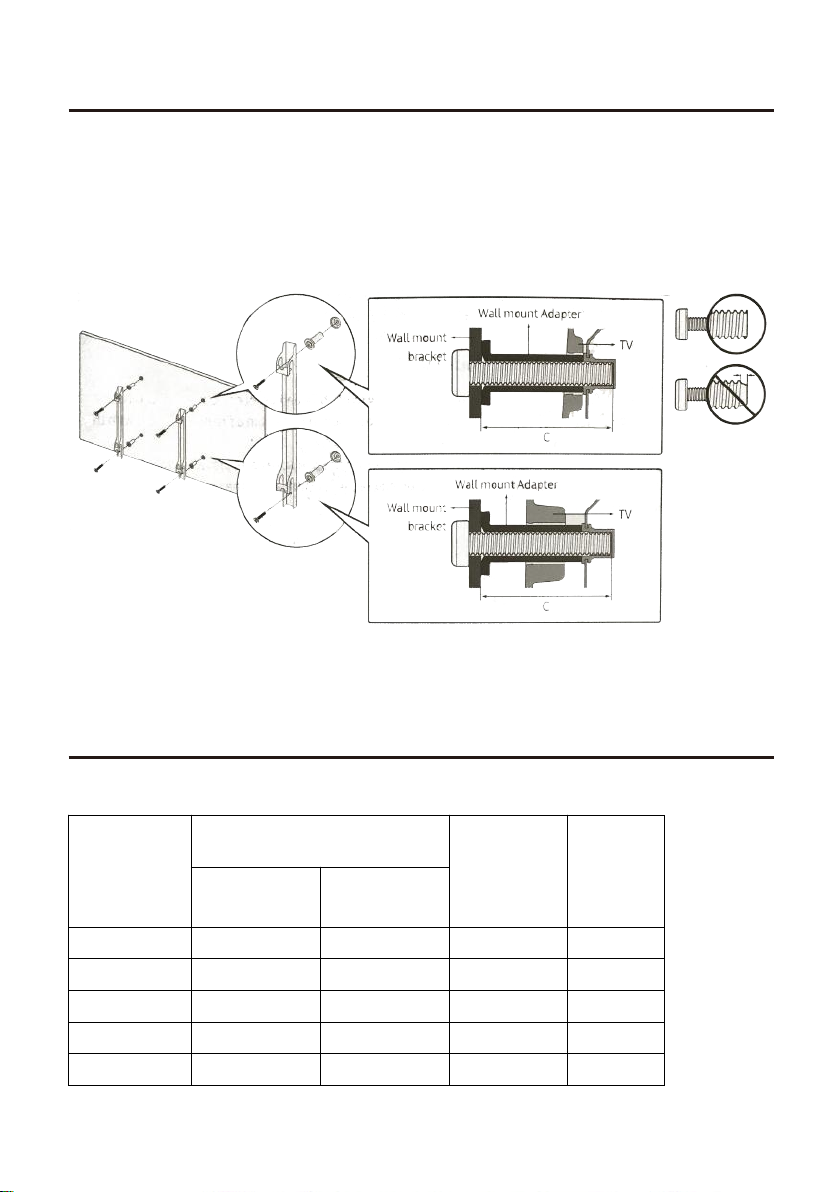
Mounting the TV on a wall
Install Steps
If you mount this TV on the wall, follow the instructions exactly as set out by the manufacturer.
Incomplete or improper installation may cause injury to you, and/or damage to the LED TV.
When you have appropriate wall mount brackets, please install them by using the VESA screws
included in TV PE bag.
1.Assemble the wall mount adapter.
2.Install the wall mount adapter on a wall with screws.
3.Install the wall mount brackets onto rear cabinet with the VESA screws.
4.Buckle the brackets with TV into the wall mount adapter.
Please refer to the table below to ensure the correct size VESA mount is used with the TV.
4
TV size in
inches
VESA screw hole specs
Screw Size Quantity
Width
mm
Height
mm
19-28 100 100 M4 4
3
65
75
2 200 100 M6 4
39-55 200 200 M6 4
400 400 M6 4
600 400 M8 4
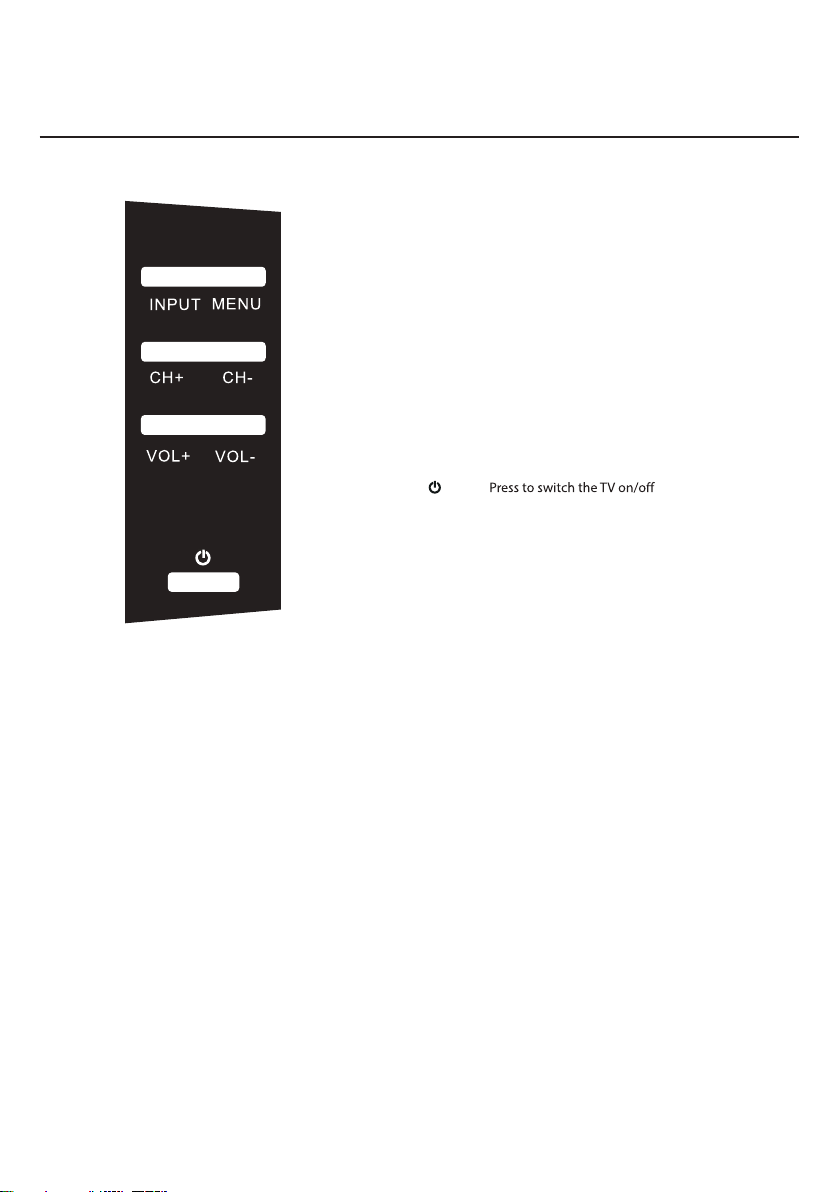
INPUT Press to select the input source
MENU Press to enter the main menu
VOL+ Press to increase the volume
VOL- Press to decrease the volume
CH+ Press to skip to the next channel
CH- Press to skip to the previous channel
TV Controls
Orientation
5
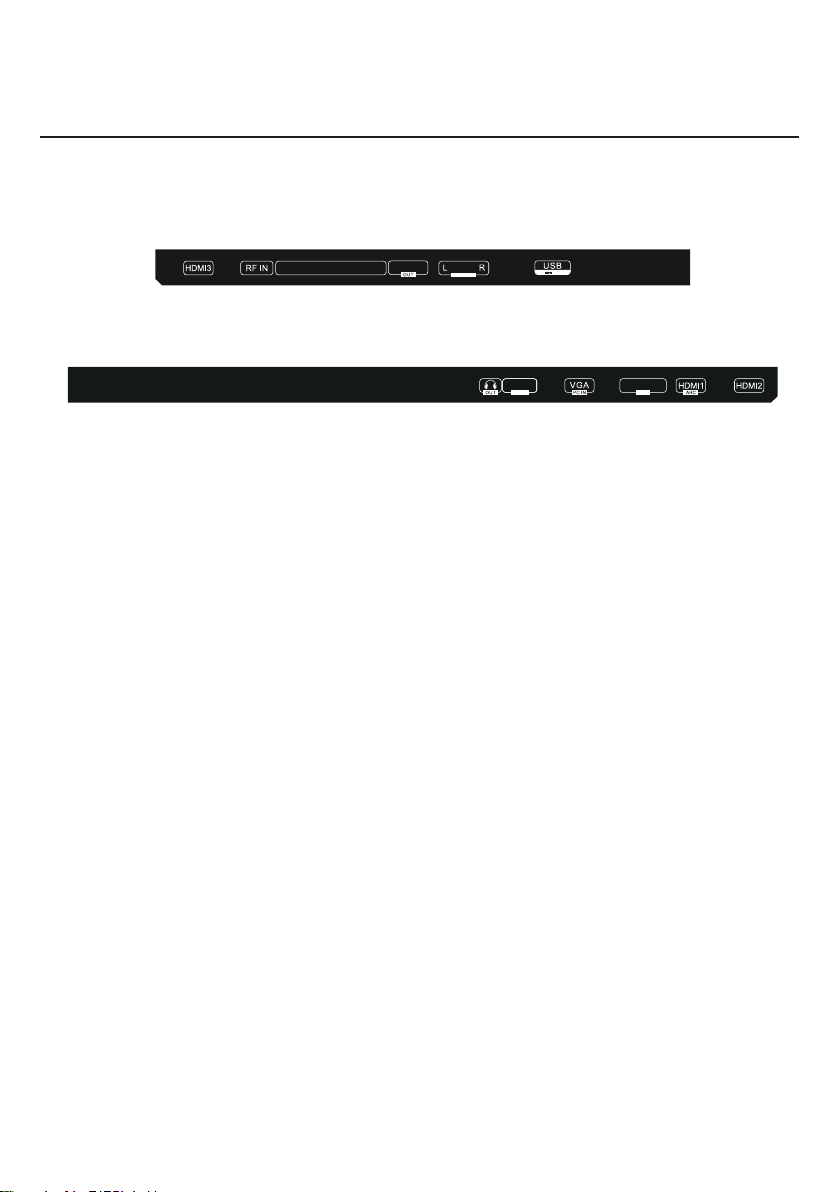
Headphone Jack:
PC Audio Input Jack:
VGA Input Jack:
Mini Line Out:
HDMI 1 Input Jack:
HDMI 2 Input Jack:
HDMI 3 Input Jack:
RF Input:
CVBS/Y/Pb/Pr:
Optical Out:
Audio Input Jack:
USB:
Headphone output jack.
Connects to the Audio out jack of a computer.
Connects to the VGA output jack on a personal computer.
Connects to the Audio in ports of an audio device.
HDMI in.
HDMI in.
HDMI in.
Connects to the ANTENNA, CABLE, or CABLE BOX.
Composite/Component Video & Audio in.
Connects to the Optical Audio in port of an audio device.
Connects to the Audio out ports of an audio device.
USB Port for media playback when Media is the TV’s selected source.
Inputs
Orientation
Y/CVBS Pb/Cb Pr/Cr
5V 500mA
AUDIO IN
OPTICAL
LINE OUT
MINI
AUDIO
PC IN
AUDIO
PC IN
6
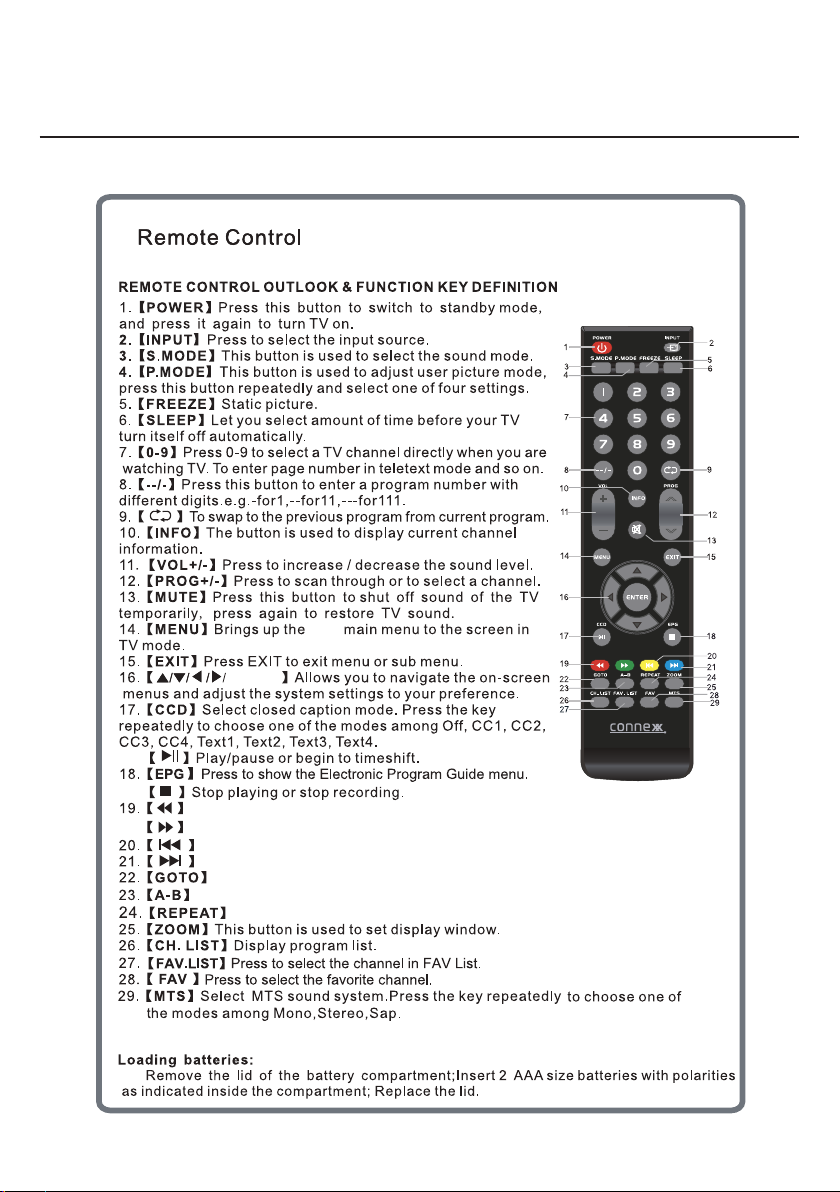
ENTER
LED
During playback, press to select the previous track/chapter.
During playback, press to select the next track/chapter.
Switch to the previous display.
Move to the next display.
Jump to a specific time on a DVD/ VCD/MP3/WMA or CD.
Press to start the A-B repeat function.
Press to select repeat playback modes.
Remote
Orientation
7
Connect RF cable to your TV Aerial socket.
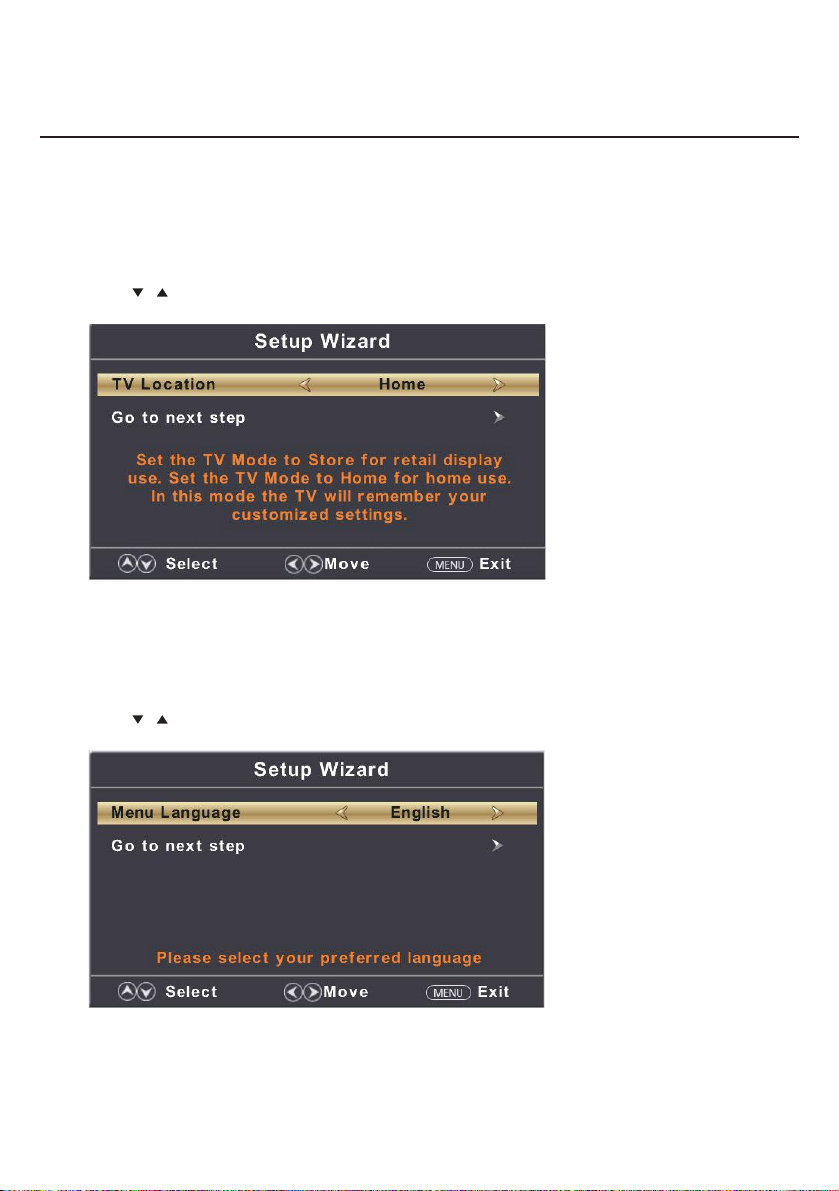
TV Location
Set the TV Mode to Home or Retail display use.
Press button to select(Home / Store).◄ / ►
Press / button to select and press ENTER/► button to enter the sub-menu.
Note:
This page is only enable when you have Energy Star request.
Select Language
Press ◄ / ► button to select the language to be used for menus and message.
Press / button to select and press ENTER/► button to enter the sub-menu.
Setup Wizard
Main Menu Operation
8
Indice
Altri manuali Connex TV LED


