ConServ FR430 Manuale utente

Model - FR430
Upright Freezer
1. Open Smart Phone
2. Open Camera
3. Scan QR Code
4. Click the Link
QR Code
Installation – e.g. Insufficient spacing around the appliance
Maintenance – e.g. Cleaning the appliance using solvents
Mishandling – e.g. Breakage of door or shelves
Do not puncture or damage refrigerant tubing.
Safe Disposal
Before discarding the appliance, remove the door but leave shelves in place in order to
prevent risk of child entrapment.
U
Use a dedicated power outlet and a three prong power socket, that is properly
grounded.
Do not use the power cord or plug if it is damaged.
When removing the power plug, do not pull on the cord. Grasp the plug firmly and pull
it out from the socket.
Unplug the unit first when doing maintenance or repair.
Do not touch the cold surfaces, particularly when hands are damp or wet.
Dispose off this appliance in accordance with local regulations.
Do not use extension cords or ungrounded two prong adapters.
This appliance is not intended for use by children or persons with reduced physical,
sensory or mental capabilities, or lack of experience and knowledge, unless they have
been given supervision or instruction concerning use of the appliance by a person
responsible for their safety. Children should be supervised to ensure that they do not
play with the appliance.
Customer Service.
Do not put acid or flammable or volatile materials inside the appliance.
Keep ventilation openings free of obstructions.
1
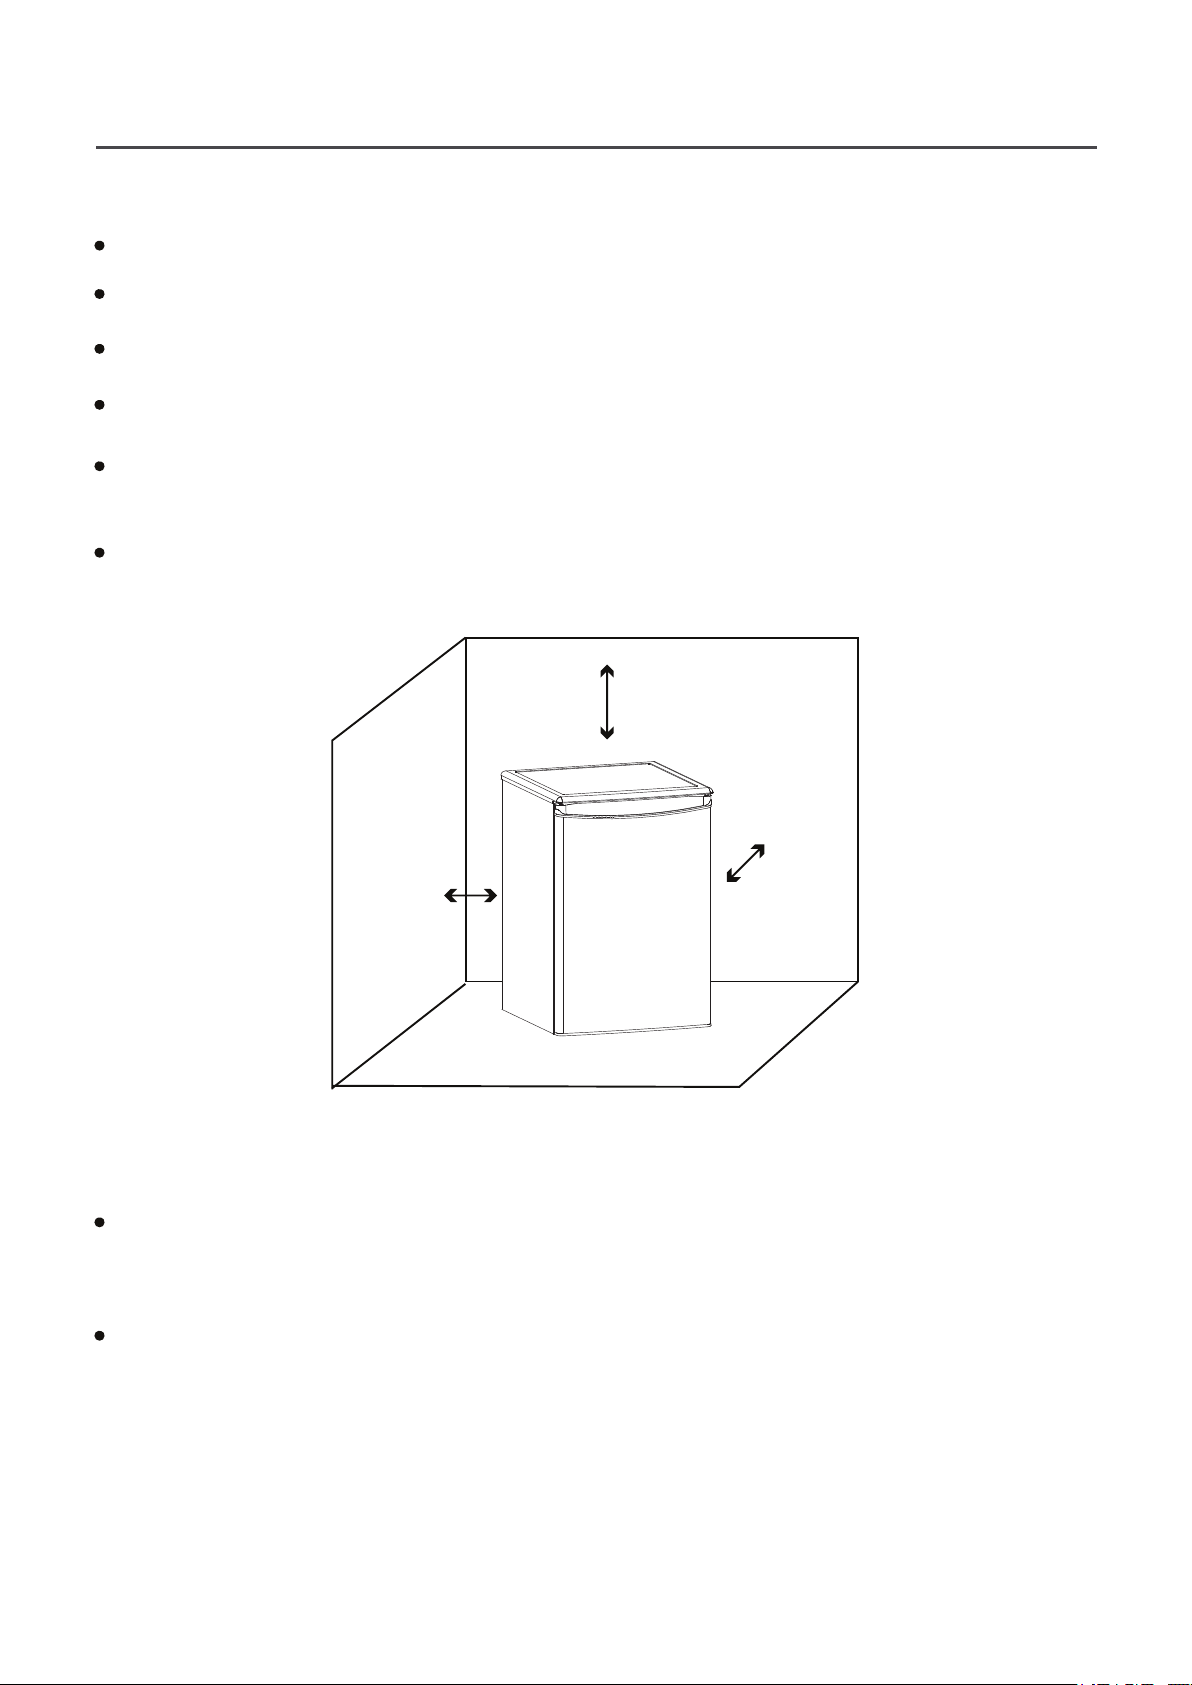
This unit is designed to be freestanding and not built-in.
When moving the appliance, ensure that it is not tilted more than 45 degrees.
Do not put the unit in direct sunlight, and keep it as far as possible from heat sources.
Don't put the unit in a cold area.
The unit should be placed on flat and stable ground. Keep the unit level by adjusting the
2 front leg levelers.
There should be 5" (12.7cm) space around the top, sides and back of the unit as shown,
to allow proper ventilation.
Turn the leveling leg counter-clockwise as far as it will go, until
Slowly turn the leveling leg clockwise until the appliance is level.
the top of the foot is touching the bottom of the chassis.
1.
2.
Before Use
Before initially plugging in the appliance, keep the unit standing upright and stable for
24 hours. The refrigerator should be on for up to 4 hours and adequately cold, before
putting food in it.
Clean the outside and inside of your appliance before placing food in it.
2
The unit should be placed in a ventilated and dry environment.
Placement
5" (12.7cm)
5" (12.7cm)
5" (12.7cm)
Operation
This appliance is intended for household use.
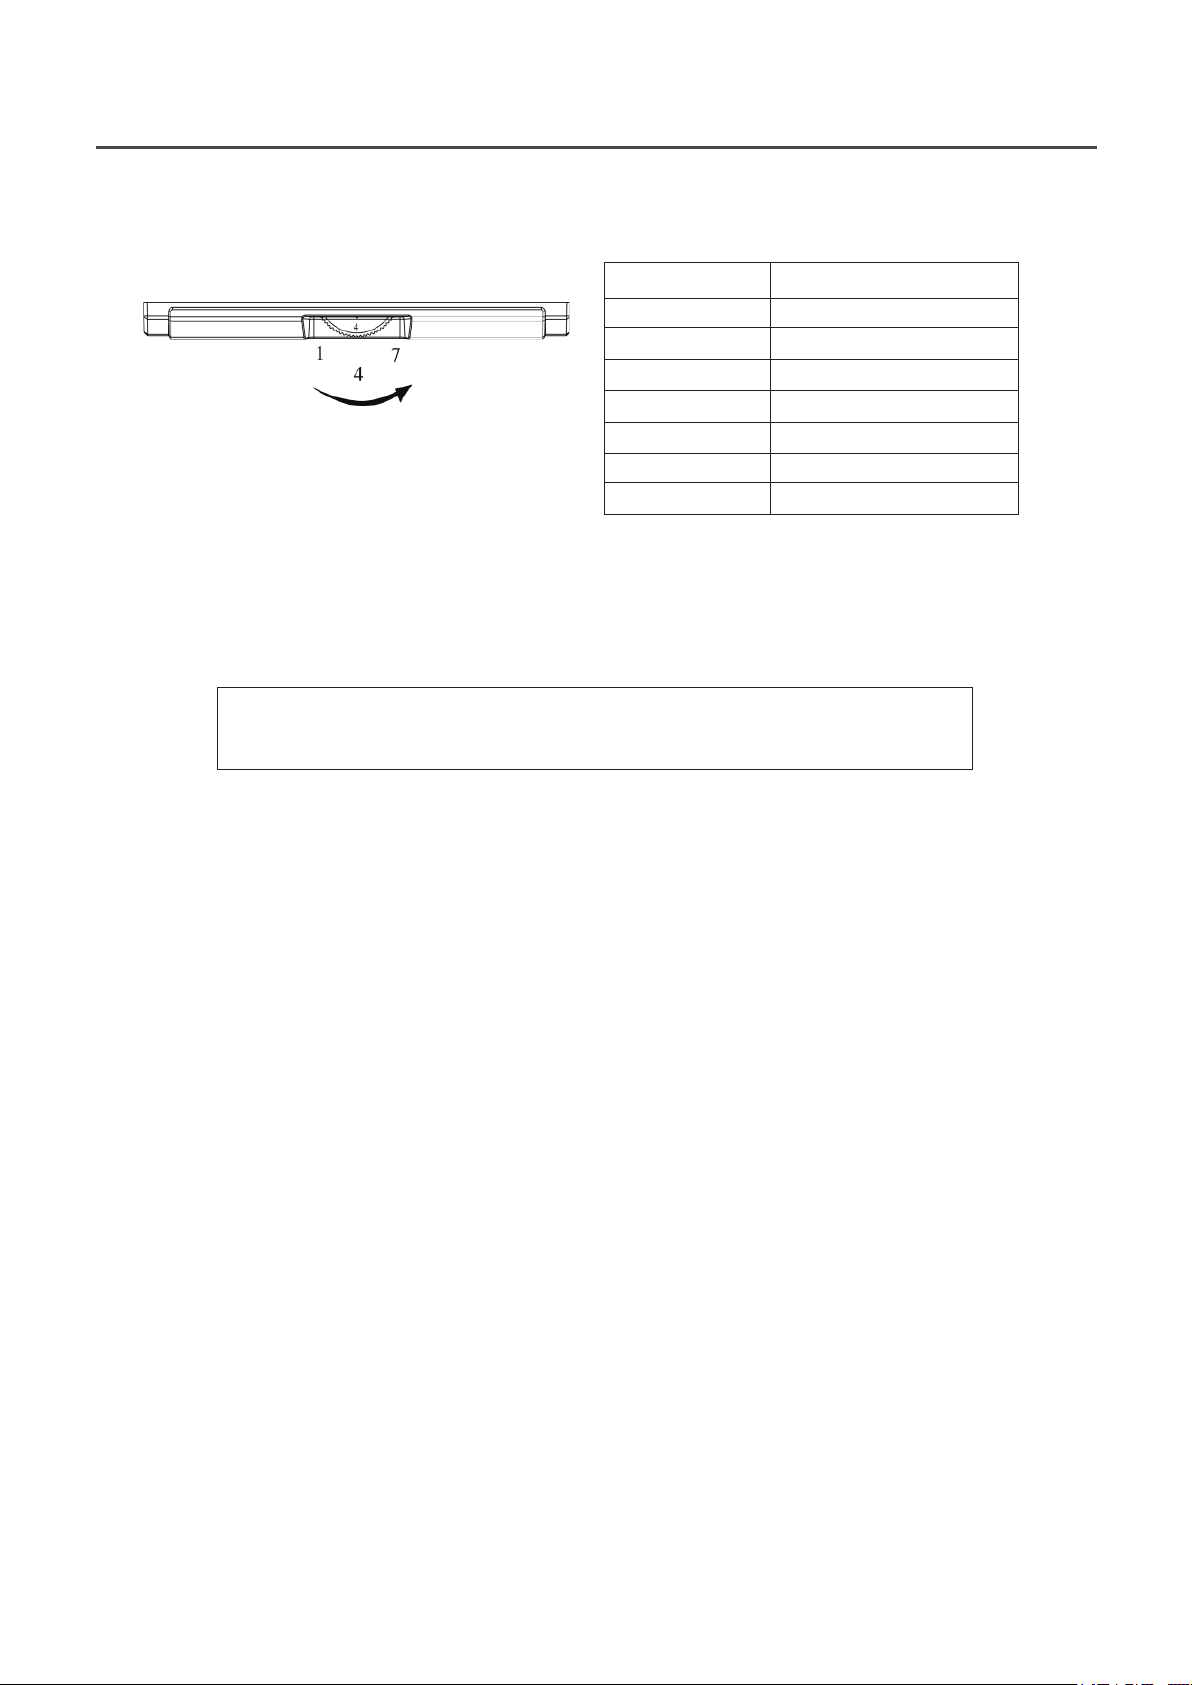
The temperature control dial is located inside and at the top of the appliance.
Set the temperature by turning the dial, which has numbers ranging from 0 -7. 0 is the off
position, where there is no cooling. 1 is the least cool and 7 is the coldest. The table above
indicates the number on the control dial and the corresponding temperature.
Note: In case you unplug your appliance or experience an electrical outage, allow 5 minutes
before plugging it back in or restarting the appliance.
3
Defrosting
• For most efficient operation and minimum energy consumption, defrost whenever the frost
becomes 1/4” thick. Never use a sharp or metallic instrument to remove the frost, as it may
damage the cooling coils. (A punctured coil will void the warranty). Use only a plastic scraper.
Do not use boiling water as it may damage the unit.
• Remove frozen food from the freezer and place it in a cooler to protect the food.
• Turn the temperature control dial to 0 and unplug the unit. Defrosting usually takes a
few hours. To defrost faster keep the freezer door open.
• Place a shallow defrost pan (not included) in front of the freezer and gently slide the defrost
drain outward. Water that has accumulated at the bottom of the freezer during defrosting will
drain into the pan.
• Monitor the defrost pan to avoid overflow.
• When defrosting is complete, wipe the interior of the freezer with a soft cloth. Plug power cord
back into the electrical outlet.
• Reset the temperature control to the desired setting.
• Return the food into the freezer.
C on t ro l
D ia l
T e m p e ra tu re
In s id e F r e e z e r C
1
-1 4 +-2
2
-1 6 +-2
3
-1 8 +-2
4
-2 0 +-2
5
-2 2 +-2
6
-2 4 +-2
7
-2 6 +-2
Control Dial Temperature
1
2
3
4
5
6
7
6.8F (-14C)
3.2F (-16C)
-0.4F (-18C)
-4F (-20C)
-7.6F (-22C)
-11.2F (-24C)
-14.8F (-26C)
Temperature Range 10.4 F to -11.2 F
The temperature range is + and - 2 degrees.
The ideal temperature for freezing is 0˚F (-18˚C). It is recommended
to set the control dial at 3 for optimal performance.
4
Maintenance
Remove all items and unplug the unit before cleaning.
Clean inside, behind and around the appliance regularly, using water and mild detergent,
and a damp cloth (not wet).
Never use boiling water, harsh cleaning chemicals or abrasive materials.
Dry all surfaces throughly.
Cleaning
If the unit will be switched off for a long time, remove all items, turn off the appliance and
clean the unit throughly.
Leave the door open and place the unit in a well ventilated area to avoid build up of odor.
Extended Absence
A sound like water running is caused by refrigerant flowing inside the system.
While the unit runs, heat is emitted from both sides of the cabinet.
When the environment is too humid, the edges around door may have a little moisture.
Simply wipe it with a dry cloth.
The following phenomenon is normal
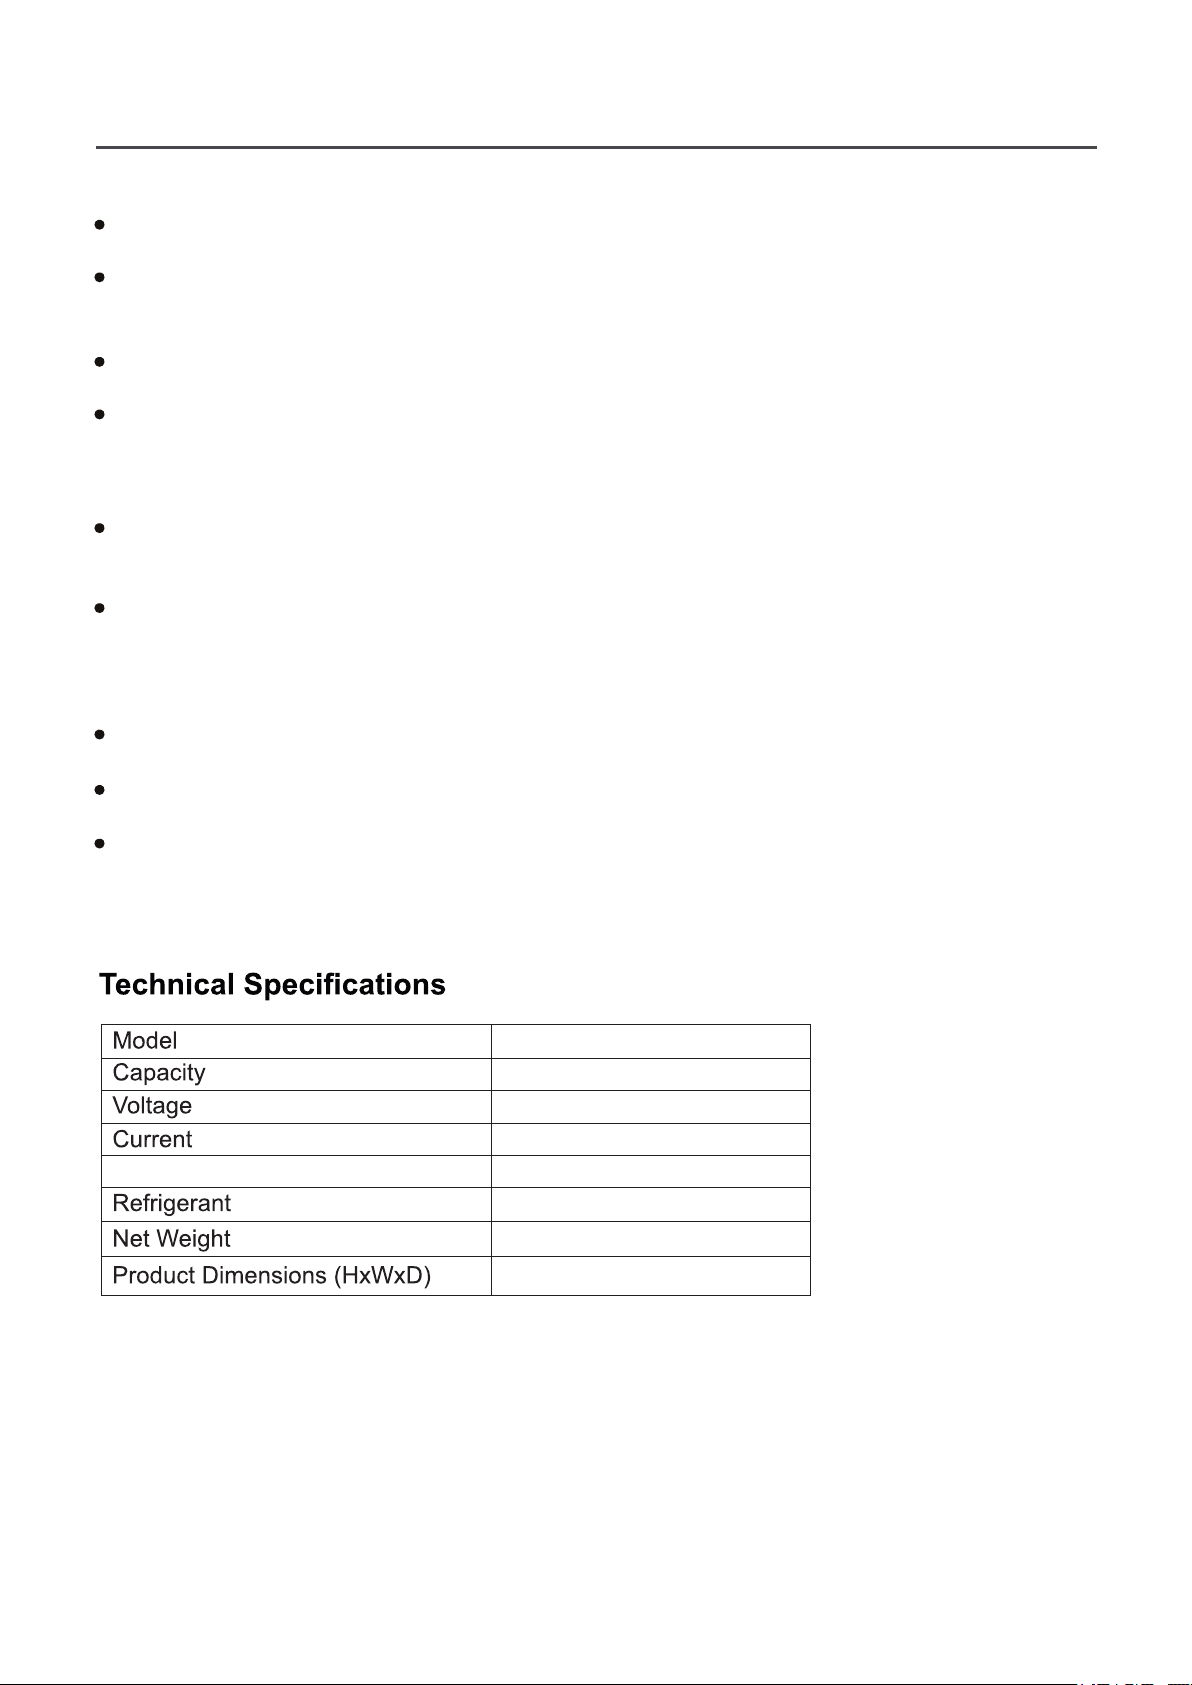
FR 430
4.3 cu.ft.
R600a / 1.41oz
83.4 lbs
115 V / 60 Hz
1.1A
36.14” x 23.94” x 24.88”
O
Temperature Range 10.4 F to -11.2 F
O
5
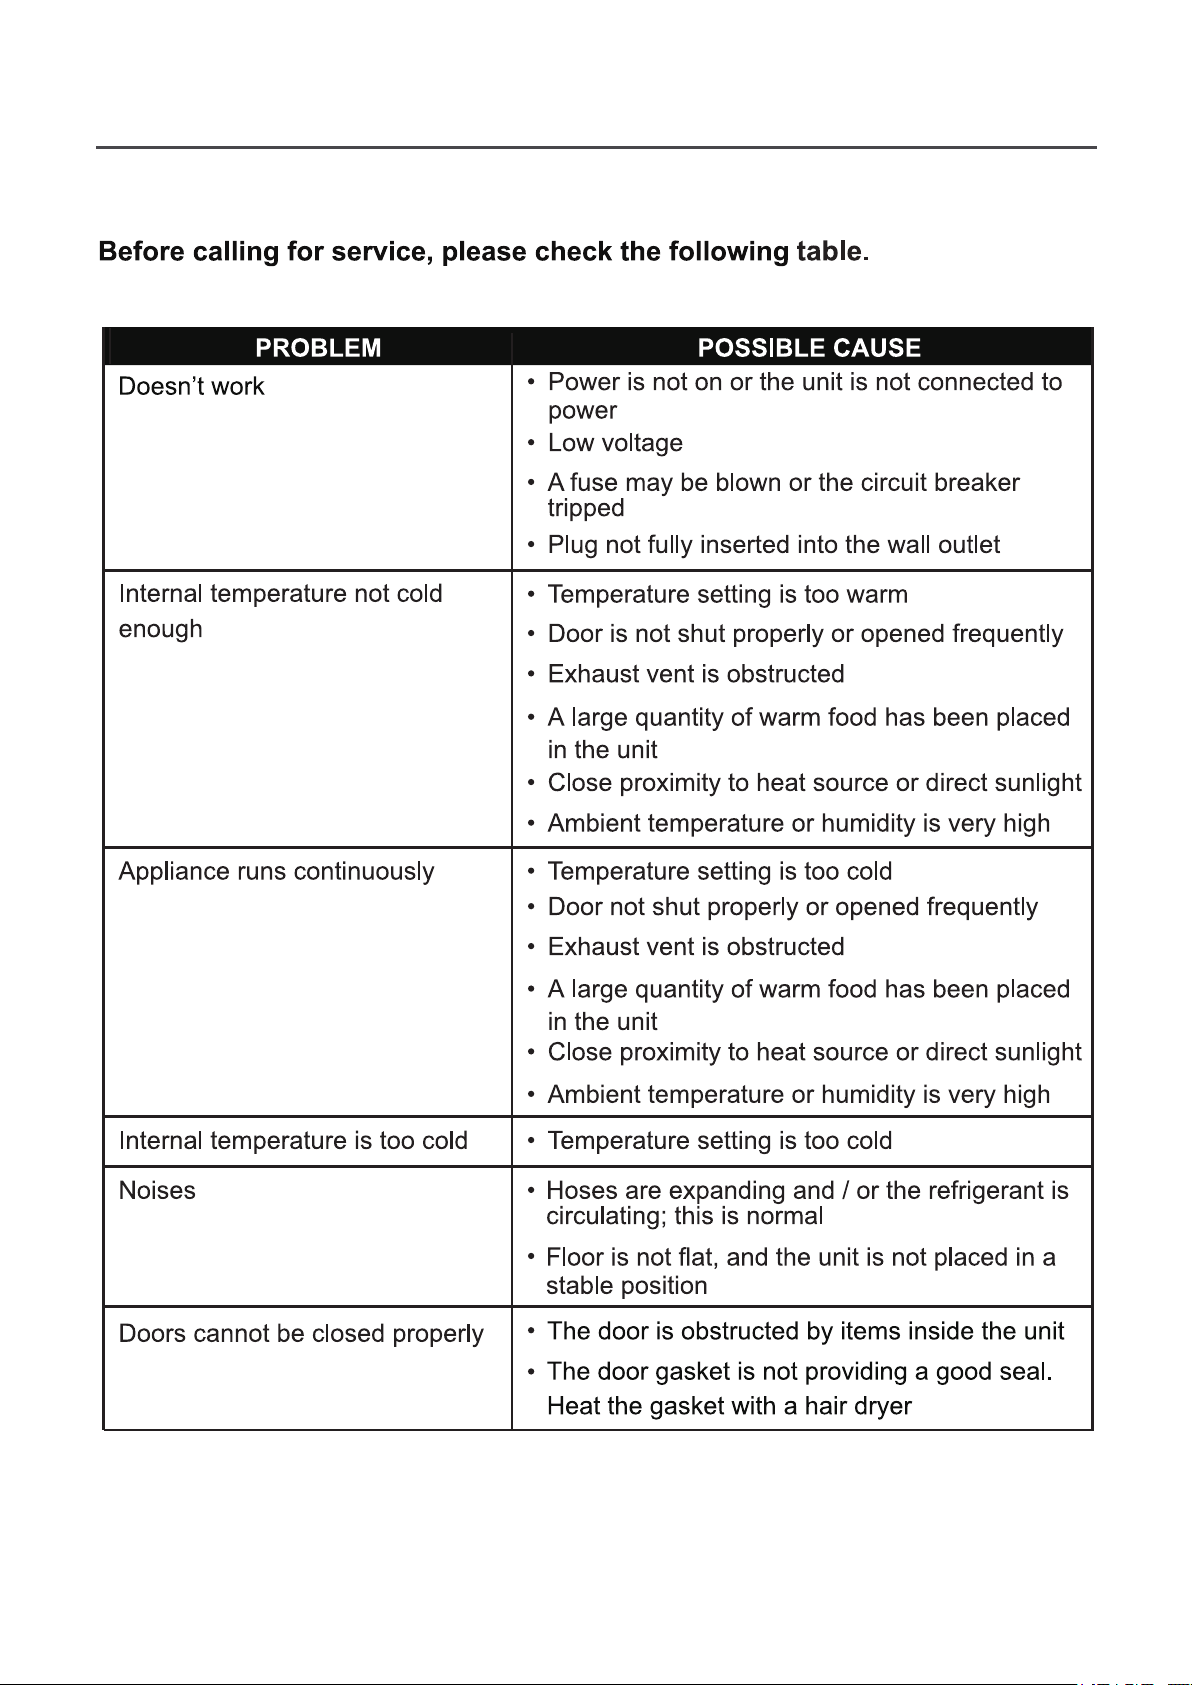
Troubleshooting
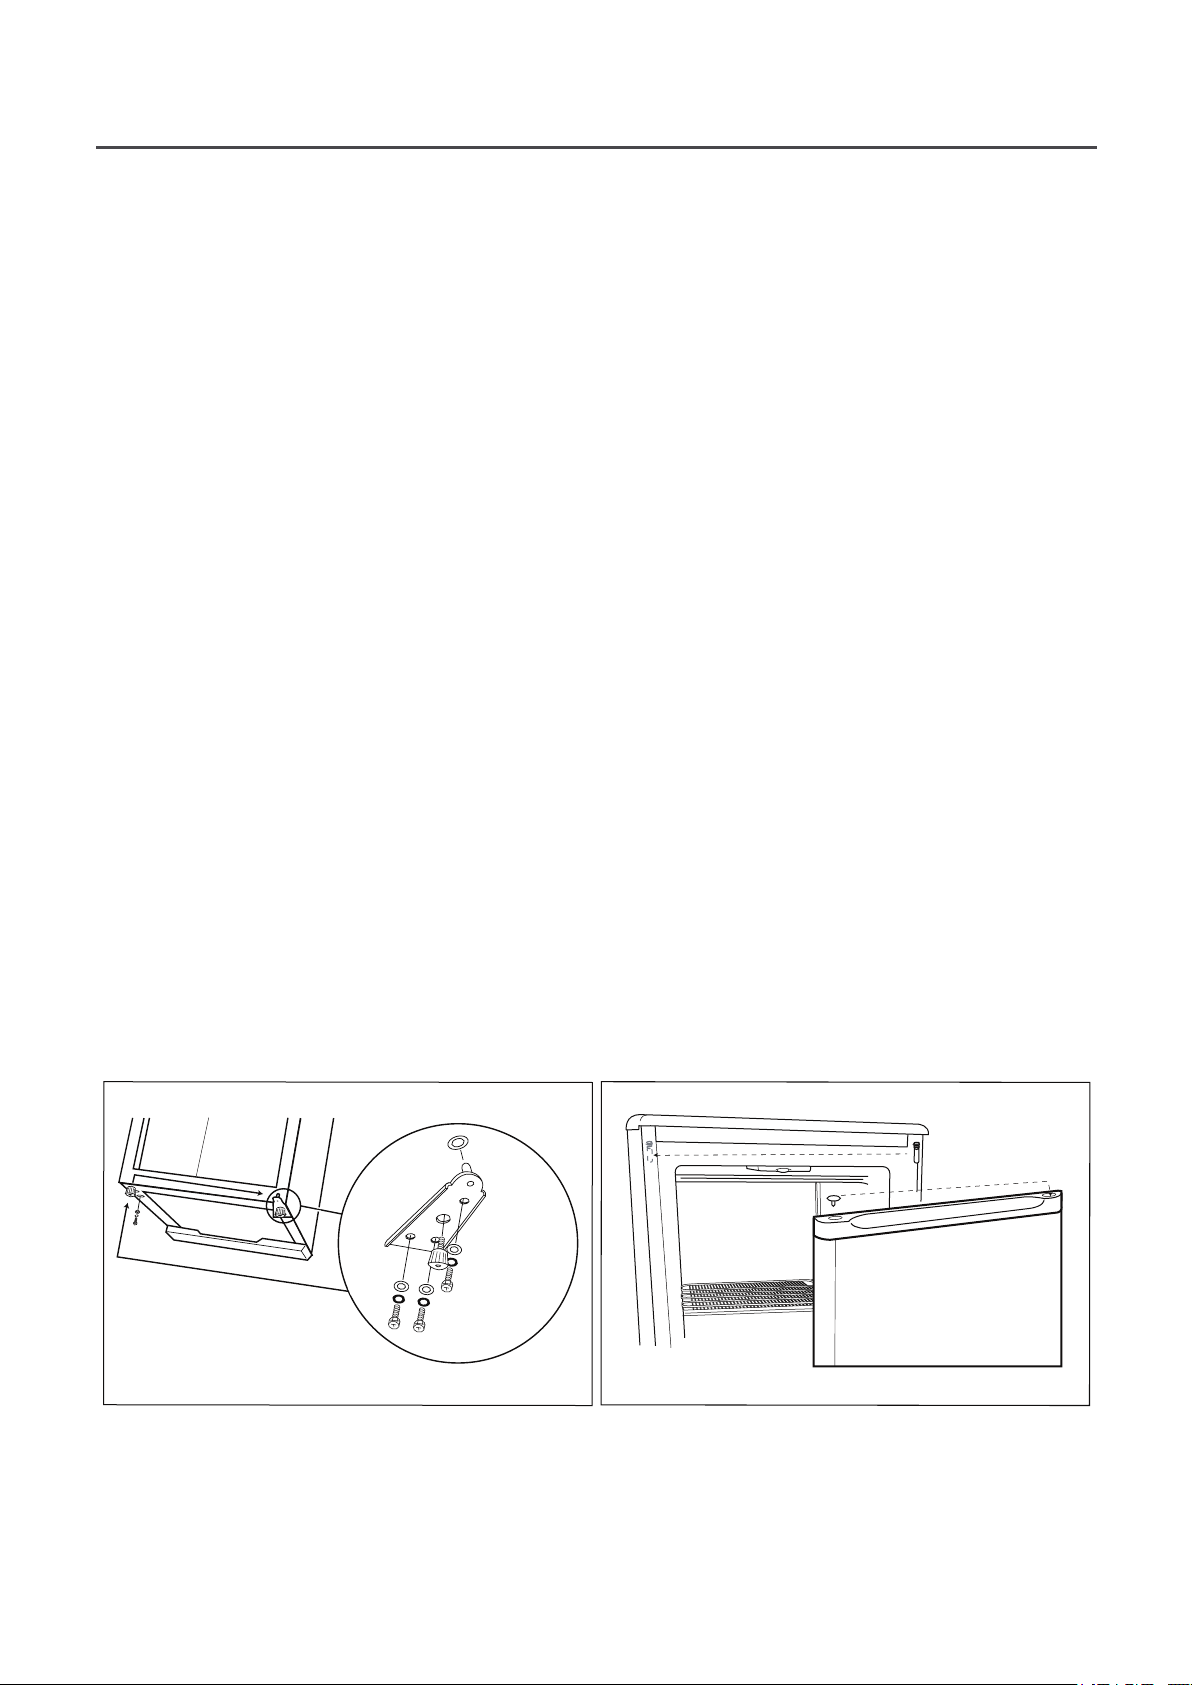
Door Reversal Instructions (Optional)
CAUTION: To avoid personal injury to yourself and/or property, we recommend someone assist
you during the door reversal process.
1. To access the lower hinge assembly, tilt back the freezer cabinet or lay the freezer on
its back. (Fig.1)
2. Remove both leveling legs located at the front of the cabinet.
3. Remove the screws holding the lower hinge assembly to the cabinet.
4. Remove door from cabinet by lifting it slightly and pulling down.
5. Using a flathead screwdriver, remove the main door top hinge pin. (Fig. 2)
6. Re-install the door top hinge pin on the opposite side of the cabinet.
7. Remove the door plug and door bushing located on the top of the door and reverse their
positions on the opposite sides.
8. Re-install door assembly on cabinet.
9. Remove door bushing (bottom door) and install on opposite side.
10. Re-install the lower hinge assembly on the opposite side.
11. Make sure the door assembly is properly aligned on the cabinet before tightening lower
hinge screws.
12. Re-install both leveling legs.
6
Fig. 1 Fig. 2
The door opening of the appliance can be reversed to open the door from the opposite side.
Follow instructions below for door reversal.
Indice
Altri manuali ConServ Congelatore


