Crosstour CT7000 Manuale utente

Action Camera
CT7000
User Manual

English
Deutsch
Francais
Espanol
Italiano
1 - 8
9-16
17 - 24
25 - 33
34 - 42
Contents

Thank you for purchasing product from Crosstour. Please read and follow this user manual carefully and
keep it in a safe place for future reference,
Crosstour consistently attaches great importance to product quality and high customer satisfaction. We
sincerely hope you can make a few suggestions during your use to help us improve our products. Your
precious suggestions will help us shape our business to perfectly fit your standards. We'll soon introduce
series of new products for our valued customers, please share this with your friends.
Just Let us know if you encounter any problem during your use. Our support team will provide you our best
solution without any delay. And all items purchased from Crasstour are covered by 1 year warranty.
You can find our contact information below:
supportOcrosstounco
Look forward to bringing you more great products in the future.
Kind regards,
Crasstour Support Team
Facebook
YouTube
1
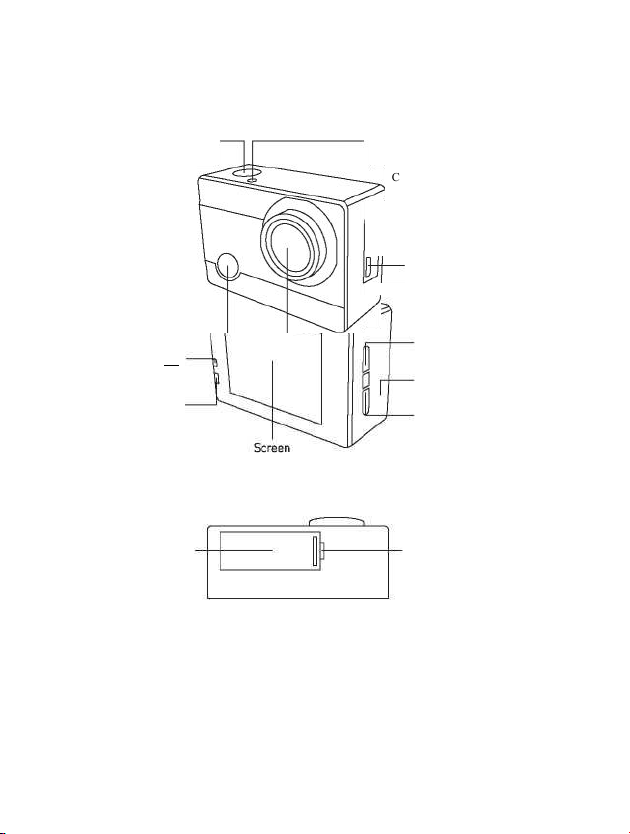
Product Diagram
OK Button / Video /
Photo/Wi-Fi
Power / Mode Button ——
Camera Lens
Back LED Status
Indicator
LED Charging
Indicator
Up Button
Speaker
Down Button /
Settings Mode
Battery
Compartment Door
Battery Compartment
Door Catch
Top LED Status Indicator
Microphone
Micro-HDMI Port
Micro SD Card Slot
Micro-USB Port

1
Specifications
Model
CT7000
Video Resolution
1080p [30fps], 720p (60fps)
720p (30fps)
Image Resolution
12MP, 8MP,5MP,4MP
Lens
170° HD wide-angle fisheye lens
Video Compression Format
H.264
Video/Image Format
MOV/JPG
Wi-Fi Connection
Android / iOS supported
Storage
32GB micro SD card support (Max), Class 10+ recommended (not
included)
USB Interface
USB 2.0
Charging Time
2 hours
Continuous Recording Time
Up to 90 minutes [or continuously if powered through the cable)
Battery
Removable 3.7V 1O50mAh Li-ion battery
Waterproof Case Depth Rating
30m/ 98.4ft
Language Options
English / German / French / Spanish / Italian / Portuguese /
Chinese Traditional / Chinese Simplified / Japanese / Russian /
Korean
Weight
64g / 2.24oz [with battery]
Dimensions
59x41 x 25mm / 2.33” x 1.61” x 0.97"
Getting Started
Charging
To charge, connect one end of the included micro-USB cable to a power adapter or a USB charging port and
the other end to the micro-USB port on the camera. When you connect the camera to the power, the camera
will automatically turn on. To more effectively charge the camera, turn it off. The red charging indicator will
stay on when the camera is charging and turn off when the camera is fully charged. Charging with the power
adapter takes around 2 hours.

1
Turning the Camera On/Off
Press and hold the power button for 2 seconds to turn the camera on/off. When the camera is turned on, the
two LED status indicators will Light up and the display will turn on.
Using aMicro SD Card
The camera does not include internal storage and requires a micro SD card (Classi 0 + recommended and
32GB Max supported) to function. Use a high-quality, branded card for maximum reliability. Insert a micro
SD card into the micro SD card slot and format it ( "Format' in camera system settings) to prepare the card for
use. Formatting will permanently erase any data on the micro SD card.
Camera Modes
Press the mode button to cycle through video, dashcam, photo, and playback modes. Press down button to go
to setting mode.
I八k Video Mode:Press the OK button to start or end recording. When the camera is recording, the LED
status indicators flash once every 2 seconds. When it stops recording, the LED status indicators
stay on.
Photo Mode:Press OK button once to take photos.
Dashcam Mode:Press OK button to start or end recording.
Playback Mode:Press down button to switch between CAR, video or JPG files and then press OK
button to confirm. Press up / down button to choose desired picture or video. For videos, press OK
button to play / pause, mode button to stop, and up / down to rewind / fast-forward. Press mode
button to exit playback mode.

1
Settings Mode:
• Press down button under video / dashcam / photo / playback mode to enter settings mode.
• Use up / down to highlight individual setting and press OK button to enter those settings.
• Use up / down to choose an option. Press OK button again to confirm or press mode button to return
to settings menu without changing.
• To exit settings, press the mode button.
Connecting to a Computer
There are two options when you use the included micro-USB cable to connect to a computer:USB and PC
Camera. Press OK button to switch between the two modes. Charging works in either mode but is more
effective if you turn off the camera [press and hold camera power button). Charging may be slower than
when using a power adapter due to lower power output of computer USB ports.
USB Mode :Access files on the camera's micro SD card to copy them or view them on a computer.
Alternatively, take the micro SD card out of the camera and insert it into a micro SD card slot or reader.
PC Camera:Use as a web cam for video chats and video recording on your computer. You may need to
allow Adobe Flash Player to run in your video chat software before video will display.
Connecting to a TV or Monitor
If your TV or monitor has a USB port or SD card slot (requires a micro-SD card adapter], you can access and
view files in a similar way as 'Connecting to a Computer' (see above). You can also use a micra-HDMI cable
[not included] to connect and view directly.
Operating Camera via Mobile Phone
Download the app to view and control the camera on your mobile device.
Download the App
Option 1:Download the "iSmart DV app from the App Store (iOS 7.1 or Later] or Google
Play (Android 4.3 or Later).
Option 2:Scan the QR code below that corresponds with your device OS to download
and install the "iSmart DV app.
Wi-Fi Connection
Connect your phone to the camera wirelessly. You can see the camera picture, control the camera, and
download recordings from the camera to your phone.
, Turn on the camera;then long press OK button.

1
, Switch on Wi-Fi on your phone and scan for Wi-Fi connections.
, Find and connect with "ActionCam' Wi-Fi using the password:1234567890
, Open the "iSmart DV app on your phone.
, To turn off Wi-Fi [and disconnect], Long press OK again.
Note:
• When you use your mobile phone to operate the camera, the camera screen will stay off.
• The camera can only connect to one device at a time.
• Using the Wi-Fi connection is more energy-intensive;avoid using it when the camera is Low on battery.

1
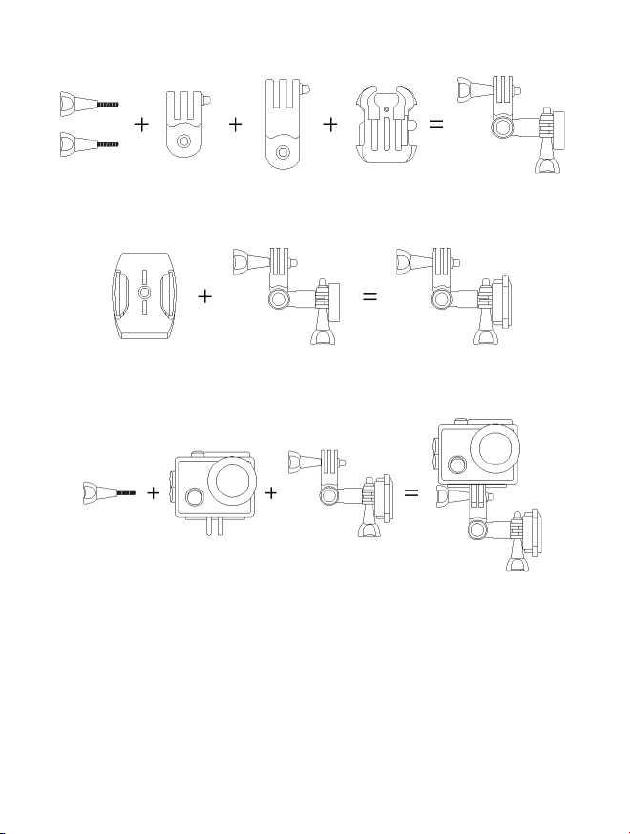
Camera Mount Assembly and Application
This Action Camera comes with a large selection of mount parts and other practical accessories for a wide
variety of configuration options and applications. The camera can be mounted on bicycles and other vehicles,
helmets, clothing, and much more. Below are a few common configuration and application options but you
can arrange and use the parts according to your situation and desired use.
1
Product Care & Use
•Keep away from Liquids (unless using the waterproof case), extreme heat, and strong magnetic fields.
• Ensure the camera is mounted safely and fixed securely to avoid causing an accident or damage to the
camera.
• Always pay attention to your surroundings and safety when using the camera.
•Wipe any dust and water off the camera after each use.
• Gently clean the camera lens with the included lens-cleaning cloth when necessary.
• Keep the camera out of the waterproof case when storing.
• Keep your videos and photos backed up elsewhere to protect against file corruption or loss caused by
Altri manuali per CT7000
1
Indice
Lingue:
Altri manuali Crosstour Fotocamera d'azione


