Cuisinart 85-3112-4 Istruzioni per l'installazione

EXACT FIT FOR CUISINART®MODELS:
CERAMIC:
85-3112-4 (G35801), 85-3113-2 (G35802), 85-3126-2 (G53507),
85-3127-0 (G53508), 85-3086-6 (G61803), 85-3087-4 (G61804)
GOURMET:
85-3056-8 /85-3057-6 (G52501/G52502/G52505/G52506);
85-3058-4 /85-3059-2 (G52503/G52504/G52507/G52508/G52509/G52510);
85-3108-6 /85-3109-4 (G53501/G53502); 85-3110-8 /85-3111-6 (G53503/G53504);
85-3122-0 /85-3123-8 (G53505/G53506/G53509/G53510);
85-3123-8 (G53506/G53510); 85-3060-6 / 85-3061-4 (G61801/G61802)
Manual Revision #: 2021.07.12-WZ
CARE & SAFETY
INSTRUCTIONS
READ AND SAVE MANUAL FOR FUTURE REFERENCE.
These Cuisinart®Stainless Steel Double Burners are designed and intended
for use with Cuisinart®CERAMIC and GOURMET Barbecues ONLY.
This product will replace the original stainless steel double burners sold with your
Cuisinart®CERAMIC and GOURMET Barbecue.
Stainless Steel Double Burner Kit
Includes: 1 ×Main burner, 2 × Hitch pin, 1 ×Connector,
1 × NO.10-24UNC x13 Screw, 1 × φ5 Lock Washer, 1 × φ5 Washer,1 × NO.10-24UNC Nut
085-0025-0 (G525-3800-03)
2
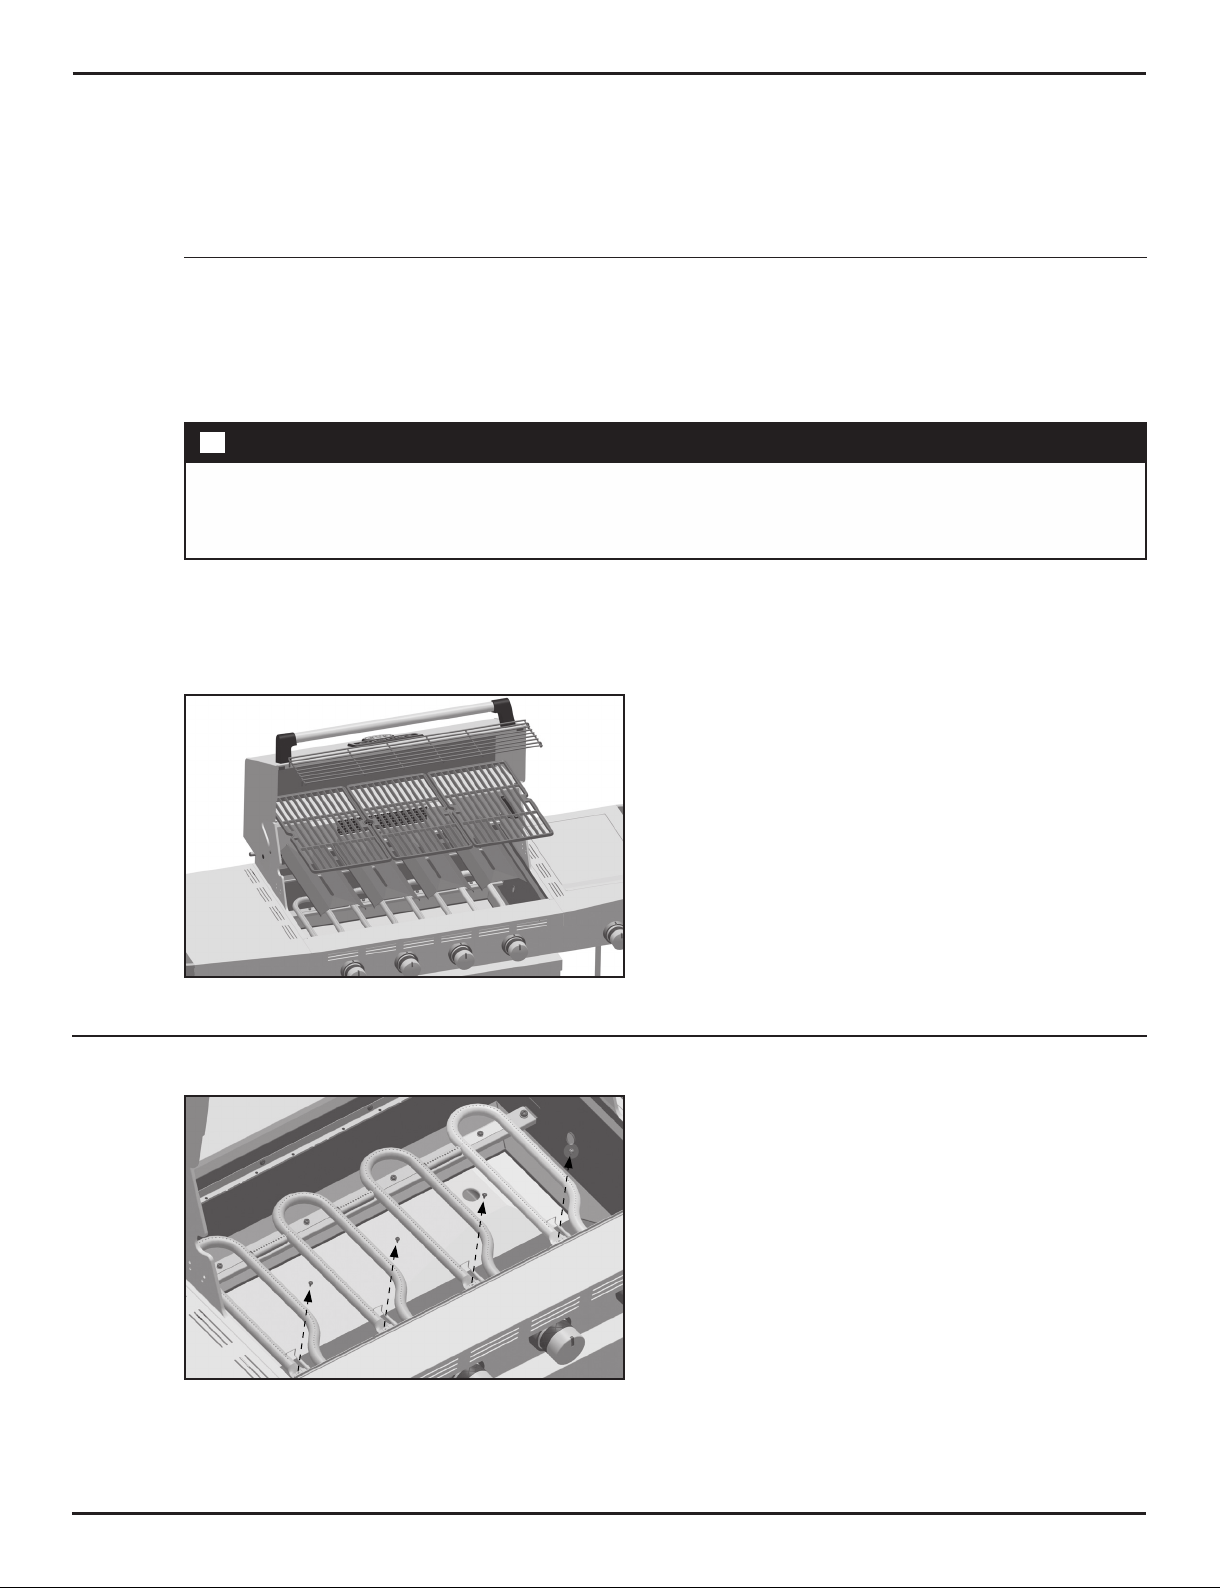
Lift the top lid. Remove the cooking grates and
flame tamers to reveal the double burners.
Remove the self-tapping screw from each
electrode as shown in Figure 2.
TIP: WD40 may be used on difficult to
remove hardware.
1.
2.
ASSEMBLY INSTRUCTIONS
If you have a model that starts with G525XX or G618XX, please use the
following instructions, otherwise proceed to page 5 for additional models.
G52501, G52502, G52503, G52504, G52505, G52506, G52507, G52508, G52509, G52510,
G61801, G61802, G61803, G61804
ATTENTION
Move grill to an open outdoor area prior to removing old Cuisinart®Double Burners and installing your
NEW replacement Double Burners.
Ensure grill is cool before proceeding. Turn grill control knob(s) off and gas supply off on the cylinder.
!

3
Remove the hardware used to attach the double
burner to the carryover bar as shown in Figure 3.
Replace the old burner with the new double
burner. Ensure that the venturi is seated
correctly over the valve Figure 4.
Use the new self-tapping screws to secure the
electrode to the new double burner as shown in
Figure 5.
3.
4.
5.
ASSEMBLY INSTRUCTIONS
TIP: WD40 may be used on difficult to
remove hardware.

4
Use the new hardware to secure the new double
burner to the carryover bar as shown in Figure 6.
Reposition the heat plates and cooking grates.
6.
7.
ASSEMBLY INSTRUCTIONS
CAUTION
Before attempting to ignite your barbecue, for your safety, please conduct a visual check to ensure that
the burners are aligned with the valves correctly, that all connections between the gas supply line and the
barbecue are tightened, and finally that a COMPLETE LEAK TEST of the hose and regulator, gas supply
connection and manifold connection, is successfully completed. Please visit www.cuisinartbbqs.com, or
refer to your Cuisinart®Safe Use and Care manual for additional information.
!

5
ASSEMBLY INSTRUCTIONS
Lift the top lid. Remove the cooking grates and
flame tamers to reveal the double burners.
Remove the hitch pins from the double burners
and carryover bar as shown in Figure 2.
1.
2.
If you have a model that starts with G358XX or G535XX, please use the
following instructions:
G35801, G35802, G53501, G53502, G53503, G53504, G53505, G53506, G53507, G53508,
G53509, G53510
ATTENTION
Move grill to an open outdoor area prior to removing old Cuisinart®Double Burners and installing your
NEW replacement Double Burners.
Ensure grill is cool before proceeding. Turn grill control knob(s) off and gas supply off on the cylinder.
!

6
Remove the self-tapping screw from each
electrode as shown in Figure 3.
Replace the old burner with the new double
burner. Ensure that the venturi is seated
correctly over the valve Figure 4.
Use the new hitch pin to secure the new double
burner to the carryover bar as shown in Figure 5.
3.
4.
5.
ASSEMBLY INSTRUCTIONS
TIP: WD40 may be used on difficult to
remove hardware.

7
Use the new self-tapping screws to secure the
electrode to the new double burner as shown in
Figure 6.
Reposition the heat plates and cooking grates.
6.
7.
ASSEMBLY INSTRUCTIONS
!CAUTION
Before attempting to ignite your barbecue, for your safety, please conduct a visual check to ensure that
the burners are aligned with the valves correctly, that all connections between the gas supply line and the
barbecue are tightened, and finally that a COMPLETE LEAK TEST of the hose and regulator, gas supply
connection and manifold connection, is successfully completed. Please visit www.cuisinartbbqs.com, or
refer to your Cuisinart®Safe Use and Care manual for additional information.

8
CARE AND MAINTENANCE
Storage
Avoid burner decay. If your barbecue is being stored outdoors remove, clean, and store your
Cuisinart® Double Burners indoors to protect from moisture and corrosive agents that can settle on
the surface and cause rusting.
Cuisinart® Double Burner Maintenance
The Cuisinart® double burner is the heart of your barbecue. It is subject to a number of conditions
that can cause damage and lead to potential safety issues. Because of the extreme temperature
of your barbecue and exposure to harsh climates, salts, fats, and basting solutions, used during
cooking, frequent maintenance and safety checks are necessary.
Avoid pre-mature aging of your Cuisinart® Double Burners by performing the following maintenance
and safety checks:
Regular Burner Maintenance and Safety Checks must be performed at least once every 5
barbecue sessions.
Seasonal Burner Maintenance and Safety Checks must be performed at least twice a season.
Inspect Cuisinart® Double Burners for the following:
1. Plugged port holes.
2. Split Seams.
3. Holes.
4. Excessive rusting.
5. Damage to venturi tube and orifice.
6. Irregular burner flames.
7. Excessive yellow or orange flames.
8. Clogged or damaged cross lighting tube.

9
1. Remove your Cuisinart®cooking grates and heat distribution plates to reveal the burners.
2. Remove hardware attaching double burner to carryover assembly.
3. Remove your double burners.
4. Brush the outer parts of the burner using a wire or brass bristled brush, paying particular attention to the burner
port holes.
5. Using a flexible wire, open paper clip, or a drill bit, probe each port hole to clear it of grime and rust.
6. Lightly tap the burner to remove any residue that has been dislodged from the ports and tubes in the previous step.
7. Using a Venturi tube brush, clean the interior of the burner. Special care should be taken to make sure the brush passes
through the entire burner interior.
8. Visually check the gas jets at the end of each of the valves, for dirt, dust and spider webs. Clean them if necessary.
9. Re-install burners using hardware removed. Ensure that the Double Burners are installed correctly with venturi seated
correctly over valve, gas jet.
10. Re-install heat plates and cooking grates.
ASSEMBLY INSTRUCTIONS
Cuisinart® Double Burner Maintenance steps:
CAUTION
Do not use anything larger in diameter than the port hole itself as this may cause damage to the burner
operation of your barbecue.
!

For more information
please visit us online at www.cuisinartbbqs.com
Join the conversation
facebook.com/cuisinartbbqs twitter.com/cuisinartbbqs
Cuisinart®is a registered
trademark used under license
© 2022 Trileaf Distributions Trifeuil
Questo manuale è adatto per i seguenti modelli
43
Indice
Altri manuali Cuisinart Bruciatore


